복잡한 객체들을 단계별로 생성할 수 있도록 하는 생성 디자인 패턴
같은 생성 코드를 사용해 한 객체의 여러 유형과 표현을 생성할 수 있게 해줌
문제
많은 필드와 중첩된 객체들을 힘들게 단계별로 초기화해야 하는 복잡한 객체 → 초기화 코드가 종종 많은 파라미터들로 이루어진 무시무시한 생성자 안에 파묻혀 있거나, 클라이언트 코드 전반에 흩어져 있음
House 객체 가정
기본적으로 4개의 벽, 바닥, 문, 창문, 지붕 필요
추가로 정원, 난방, 배관, 전기 배선 등등이 필요하다면?
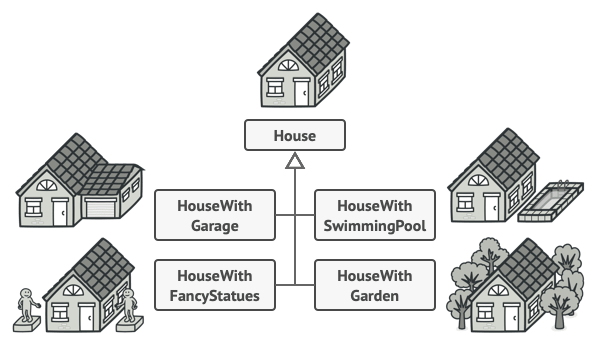
- 가장 간단한 해결책은 기초
House클래스를 확장해 서브클래스들의 집합을 만들어 모든 파라미터들의 조합을 커버하는 것 - 서브클래스들이 너무 많아지고 새로운 파라미터가 생기면 구조가 더 복잡해짐
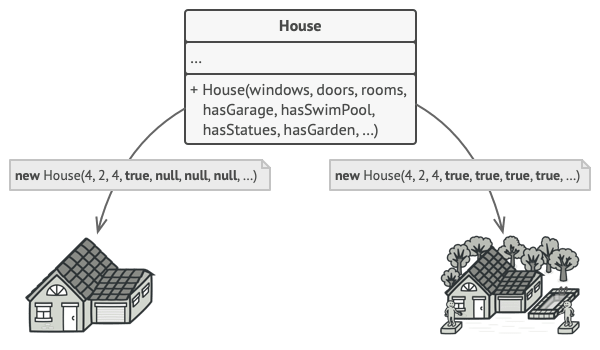
서브클래스를 만들지 않는 접근법 → 기초 House 클래스에 House 객체를 제어하는 모든 파라미터를 포함한 생성자를 만드는 것
- 대부분 많은 생성자들이 사용되지 않음 → 생성자 호출 코드가 못생겨짐
해결책
빌더 패턴 - 클래스에서 객체 생성 코드를 추출해 빌더라는 별도의 객체들로 이동시킴
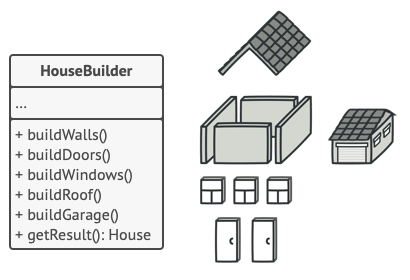
- 객체 생성을 일련의 단계들(`buildWalls`, `buildDoor`등)로 정리
- 객체를 생성하려면 빌더 객체에 각 단계들을 실행
- 모든 단계를 호출할 필요 없이, 특정 구성의 객체에게 필요한 단계들만 호출하면 됨
- 같은 단계에 각기 다른 방식의 빌더 클래스들을 생성해서 사용하면 다양한 유형의 객체 생성 가능
디렉터
일련의 빌드 단계 호출을 디렉터라는 별도의 클래스로 추출해 사용 가능
- 디렉터 → 빌드 단계 순서 정의
- 빌더 → 빌드 단계 구현 제공
항상 디렉터가 있어야 하는 건 아님
- 직접 클라이언트 코드에서 특정 순서로 빌더 단계 호출 가능
- 하지만 디렉터가 있으면 코드 재사용성 좋아짐
디렉터 → 클라이언트 코드로부터 product 생성의 세부 사항을 완전히 숨김, 클라이언트는 빌더를 디렉터와 매핑 후, 디렉터를 통해 객체 생성을 실행해서 빌더로부터 결과를 받아오기만 하면 됨
구조
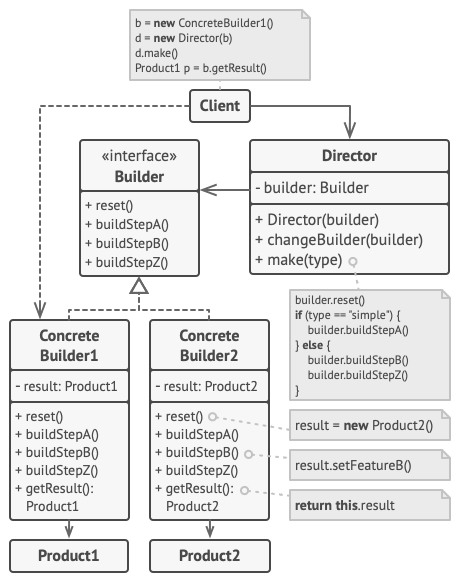
1. 빌더 인터페이스 - 모든 유형의 빌더들에게 공통된 product 생성 단계 선언

2. concrete 빌더 - 다양한 빌드 단계들의 구현 제공,
   concrete 빌더들은 공통 인터페이스를 따르지 않는 product를 생성할 수도 있음

3. product - 결과 객체, 다른 빌더로부터 생성된 객체들끼리는
             꼭 같은 클래스 계층구조나 인터페이스를 따르지 않아도 됨

4. 디렉터 클래스 - 빌드 단계 순서를 정의해 특정 객체의 configuration을 생성/재사용

5. 클라이언트 - 빌더를 디렉터에 매핑해줘야 함 (대개 디렉터 생성자의 파라미터를 통해 한 번만 함)
                → 디렉터는 그 빌더 객체를 추후 모든 생성에 사용
             - 클라이언트가 디렉터의 생성 메서드에 빌더 객체를 전달해주는 접근법도 있음
                → 매번 디렉터와 무언가를 생성할 때마다 다른 빌더 사용 가능
적용
“점층적 생성자” 제거
class Pizza {
    Pizza(int size) { ... }
    Pizza(int size, boolean cheese) { ... }
    Pizza(int size, boolean cheese, boolean pepperoni) { ... }
    // ...
- 10개의 optional 파라미터가 있다고 가정
→ 호출이 매우 불편하기 때문에 생성자를 오버로드해서 여러 개의 짧은 버전의 생성자를 만듦
- 빌더 패턴은 객체를 정말 필요한 단계만 거쳐가며 만들 수 있게 해줌
→ 여러 개의 파라미터를 생성자에 쑤셔넣을 필요 없음특정 product의 다양한 유형들을 생성할 수 있게 하려는 경우
- 빌더 패턴 - 디테일만 조금씩 다른 비슷한 단계들을 거쳐 생성되는 다양한 종류를 가진 product에 적용 가능
- 기초 빌더 인터페이스가 가능한 모든 빌드 단계를 정의하고,
  concrete 빌더가 이 단계들을 구현해 특정 유형의 product를 생성하고,
  디렉터 클래스가 빌드 단계의 순서를 정의
컴포지트 패턴의 트리나 다른 복잡한 객체를 생성하는 경우
빌더 패턴 - 객체를 단계별로 생성할 수 있게 해줌
         → 최종 product를 훼손하지 않고 일부 단계들을 미룰 수 있음,
           단계들을 재귀적으로 호출할 수도 있어서 객체 트리를 생성하기 편함

- 빌더는 빌드 단계에서 완성되지 않은 product를 노출시키지 않기 때문에
  클라이언트 코드가 미완성 product를 가져오는 것을 방지함
컴포지트 패턴 - 객체들의 관계를 트리 구조로 구성하여 부분-전체 계층을 표현
구현방법
1. 모든 product 유형을 생성하는 공통된 생성 단계들을 확실하게 정의할 수 있는지 확인

2. 그 단계들을 기본 빌더 인터페이스에 선언

3. 각 product 유형에 대해 concrete 빌더 클래스를 생성하고 해당 유형을 생성하는 단계를 구현
    - 생성 결과를 가져오는 메서드를 구현하는 것을 잊지 말 것
    - 이 메서드가 빌더 인터페이스 내부에 선언될 수 없는 이유:
      다양한 빌더들이 공통 인터페이스가 없는 product들을 생성할 수도 있기 때문에 해당 메서드의 반환 타입을 모름
    - 하나의 계층 구조를 가진 product를 다루는 경우에는 기본 인터페이스에 추가해도 괜찮음

4. 디렉터 클래스를 만들지 고려해보기 - 같은 빌더 객체를 사용해 product를 생성하는 다양한 방법을 캡슐화할 수 있음

5. 클라이언트 코드가 빌더와 디렉터 객체 생성
    - 클라이언트는 product 생성 시작 전에 빌더 객체를 디렉터에게 전달해야 함
      (대개 디렉터 생성자의 파라미터를 통해 한 번만 함)
      → 디렉터는 그 빌더 객체를 추후 모든 생성에 사용
    - 클라이언트가 디렉터의 생성 메서드에 빌더 객체를 전달해주는 접근법도 있음

6. 모든 product가 같은 인터페이스를 따르는 경우에만 생성 결과를 디렉터로부터 직접 얻을 수 있고,
   나머지 경우에는 빌더로부터 생성 결과를 얻어야 함
장단점
장점
- 객체를 단계별로 만들고, 특정 단계를 미룰 수 있고, 단계를 재귀적으로 실행할 수 있음
- 다양한 유형의 product에 대해 같은 생성 코드를 재사용할 수 있음
- SRP - 복잡한 생성 코드를 product의 비즈니스 로직으로부터 고립 가능
단점
- 여러 개의 새로운 클래스를 생성해야 하기 때문에 복잡도 증가다른 패턴과의 관계
- 많은 디자인은 팩토리 메서드(덜 복잡 & 자식 클래스들을 통해 더 많은 커스터마이징 가능)로 시작해
  추상 팩토리, 프로토타입 또는 빌더(더 유연 & 더 복잡) 패턴으로 발전

- 빌더 패턴 - 복잡한 객체를 단계를 거쳐 생성하는 것에 중점,
  추상 팩토리 - 연관된 객체들의 family를 생성하는 것에 중점을 둠
  - 추상 팩토리 - product 즉시 반환
  - 빌더 - product를 얻기 전 추가 단계를 거칠 수 있게 해 줌

- 복잡한 컴포지트 패턴의 트리를 생성하는 데 사용 가능

- 빌더 + 브리지 - 디렉터가 추상화 역할 수행, 빌더들이 구현 역할 수행

- 추상 팩토리, 빌더, 프로토타입 패턴 모두 싱글턴 패턴으로 구현 가능
TypeScript 예제
/**
 * The Builder interface specifies methods for creating the different parts of
 * the Product objects.
 */
interface Builder {
    producePartA(): void;
    producePartB(): void;
    producePartC(): void;
}

/**
 * The Concrete Builder classes follow the Builder interface and provide
 * specific implementations of the building steps. Your program may have several
 * variations of Builders, implemented differently.
 */
class ConcreteBuilder1 implements Builder {
    private product: Product1;

    /**
     * A fresh builder instance should contain a blank product object, which is
     * used in further assembly.
     */
    constructor() {
        this.reset();
    }

    public reset(): void {
        this.product = new Product1();
    }

    /**
     * All production steps work with the same product instance.
     */
    public producePartA(): void {
        this.product.parts.push('PartA1');
    }

    public producePartB(): void {
        this.product.parts.push('PartB1');
    }

    public producePartC(): void {
        this.product.parts.push('PartC1');
    }

    /**
     * Concrete Builders are supposed to provide their own methods for
     * retrieving results. That's because various types of builders may create
     * entirely different products that don't follow the same interface.
     * Therefore, such methods cannot be declared in the base Builder interface
     * (at least in a statically typed programming language).
     *
     * Usually, after returning the end result to the client, a builder instance
     * is expected to be ready to start producing another product. That's why
     * it's a usual practice to call the reset method at the end of the
     * `getProduct` method body. However, this behavior is not mandatory, and
     * you can make your builders wait for an explicit reset call from the
     * client code before disposing of the previous result.
     */
    public getProduct(): Product1 {
        const result = this.product;
        this.reset();
        return result;
    }
}

/**
 * It makes sense to use the Builder pattern only when your products are quite
 * complex and require extensive configuration.
 *
 * Unlike in other creational patterns, different concrete builders can produce
 * unrelated products. In other words, results of various builders may not
 * always follow the same interface.
 */
class Product1 {
    public parts: string[] = [];

    public listParts(): void {
        console.log(`Product parts: ${this.parts.join(', ')}\n`);
    }
}

/**
 * The Director is only responsible for executing the building steps in a
 * particular sequence. It is helpful when producing products according to a
 * specific order or configuration. Strictly speaking, the Director class is
 * optional, since the client can control builders directly.
 */
class Director {
    private builder: Builder;

    /**
     * The Director works with any builder instance that the client code passes
     * to it. This way, the client code may alter the final type of the newly
     * assembled product.
     */
    public setBuilder(builder: Builder): void {
        this.builder = builder;
    }

    /**
     * The Director can construct several product variations using the same
     * building steps.
     */
    public buildMinimalViableProduct(): void {
        this.builder.producePartA();
    }

    public buildFullFeaturedProduct(): void {
        this.builder.producePartA();
        this.builder.producePartB();
        this.builder.producePartC();
    }
}

/**
 * The client code creates a builder object, passes it to the director and then
 * initiates the construction process. The end result is retrieved from the
 * builder object.
 */
function clientCode(director: Director) {
    const builder = new ConcreteBuilder1();
    director.setBuilder(builder);

    console.log('Standard basic product:');
    director.buildMinimalViableProduct();
    builder.getProduct().listParts();

    console.log('Standard full featured product:');
    director.buildFullFeaturedProduct();
    builder.getProduct().listParts();

    // Remember, the Builder pattern can be used without a Director class.
    console.log('Custom product:');
    builder.producePartA();
    builder.producePartC();
    builder.getProduct().listParts();
}

const director = new Director();
clientCode(director);
# Output.txt
Standard basic product:
Product parts: PartA1
Standard full featured product:
Product parts: PartA1, PartB1, PartC1
Custom product:
Product parts: PartA1, PartC1참고 자료: Refactoring.guru