Vue.js 공식 튜토리얼을 따라가며 Vue.js의 가장 기본적인 것들을 간단하게 훑어본다.
Composition API, SFC 기준 튜토리얼을 따라간다.
React 위주로 프론트엔드 개발을 쭉 해 왔는데, Vue.js를 쓸 일이 생겨 빠르게 학습을 했다.
React에 익숙하고 Vue.js를 처음 접하는 사람이라면, 비슷한 기능들끼리 대응시키는 방식으로 더 효율적인 학습이 가능할 것이라 생각해 글을 썼다.
각 기능마다 공식 문서를 더 자세히 읽어보는 편이 물론 더 좋겠지만, 얕고 빠르게 훑어보고 싶은 사람들에겐 유용햔 글이었으면 하는 마음이다.
1. Declarative Rendering
SFC
튜토리얼 페이지 우측에 보이는 코드는 SFC (Single-File Component) 이다.
SFC는 HTML, CSS, JS를 감싸는, 재사용이 가능한 코드 블록이다.
Vue.js에서는 <script> 태그에 JS(로직), <template> 태그에 HTML(마크업), <style> 태그에 CSS(디자인)를 작성해 한 파일로 묶는다.
공식 Example 코드를 보면 무슨 느낌인지 단번에 이해가 될 것이다.
Declarative rendering
Vue.js의 핵심 개념은 Declarative rendering 선언적 렌더링이다.
선언적이라 함은 어떻게 할 지가 아니라 무엇을 할 지를 명시하는 것이다.
Vue.js는 HTML을 확장한 template syntax를 사용해, JavaScript state에 따라 HTML이 어떤 모습을 띄어야 하는지 설명할 수 있게 해준다.
state가 바뀌면 HTML이 저절로 업데이트된다.
React의 useState를 생각하면 되는데, Vue.js에서는 setState와 같은 별도의 함수를 통해 상태를 변경하는 대신 값을 직접 변경할 수 있다.
Vue.js에서 state를 생성하는 방법은 두 가지가 있다.
ref()
.value 프로퍼티를 통해 값을 얻거나 변경할 수 있다.
import { ref } from 'vue';

const message = ref('Hello World!');

console.log(message.value); // "Hello World!"
message.value = 'Changed';
reactive()
JavaScript의 Proxy 객체이다.
객체만 저장 가능하다.
import { reactive } from 'vue';

const counter = reactive({
  count: 0
});

console.log(counter.count); // 0
counter.count++;
컴포넌트의 <script setup> 블록에 선언된 state는 <template>에서 아래와 같이 사용할 수 있다.
<h1>{{ message }}</h1>
<p>count is: {{ counter.count }}</p>
{{}} 괄호는 React의 {}와 같다고 보면 된다.
state 뿐만 아니라 JavaScript의 표현식도 들어갈 수 있다.
<h1>{{ message.split('').reverse().join('') }}</h1>2. Attribute Bindings
directive
directive - v- 접두사로 시작하는 특별한 속성을 지칭한다.
v-bind
<div v-bind:id="dynamicId"></div>
<!-- is the same as -->
<div :id="dynamicId"></div> <script>에서 dynamicId라는 값을 <div>의 id attribute로 선언하는 것이다.
v-bind는 자주 쓰이기 때문에 편의를 위해 통째로 생략할 수 있다.
3. Event Listeners
v-on
DOM 이벤트를 listen한다.
v-on 역시 자주 쓰이기 때문에 @로 줄여 쓸 수 있다.
<script setup>
import { ref } from 'vue';

const count = ref(0);

function increment() {
  // update component state
  count.value++;
}
</script>

<button v-on:click="increment">{{ count }}</button>
<!-- is the same as -->
<button @click="increment">{{ count }}</button>
4. Form Bindings
v-model
v-bind + v-on - form input element들에 양방향 바인딩을 할 수 있다.
v-model - v-bind와 v-on을 합친 효과를 내는 syntactic sugar이다.
function onInput(e) {
  // a v-on handler receives the native DOM event
  // as the argument.
  text.value = e.target.value;
}

<input :value="text" @input="onInput">
<!-- is the same as -->
<input v-model="text">
<input>의 값을 바인딩된 state와 자동으로 싱크해준다.
React에서 value에 state를 넣고 onChange에 setState를 넣는 것과 같다.
5. Conditional Rendering
v-if
React의 conditional rendering을 태그 안으로 집어넣었다고 생각하면 된다.
<h1 v-if="awesome">Vue is awesome!</h1>위 코드에선 awesome이 truthy인 경우에 <h1>이 렌더링된다.
v-else, v-else-if 또한 존재한다.
<h1 v-if="awesome">Vue is awesome!</h1>
<h1 v-else>Oh no 😢</h1>
6. List Rendering
v-for
React에서 map으로 리스트를 나열하는 것과 비슷하다.
<ul>
  <li v-for="todo in todos" :key="todo.id">
    {{ todo.text }}
  </li>
</ul>
todo 는 v-for 요소 안의 지역 변수라고 생각하면 된다.
map과 마찬가지로 렌더링 효율을 위해 유니크한 id 를 <li>의 key로 사용한다.
리스트는 변경과 재할당이 모두 가능하다.
todos.value.push(newTodo); // oktodos.value = todos.value.filter(/* ... */); // ok7. Computed Property
computed()
다른 state의 값에 근거해 .value 가 바뀌고, 캐싱이 된다.
React의 useMemo와 비슷하다.
import { ref, computed } from 'vue'

const hideCompleted = ref(false);
const todos = ref([
  /* ... */
]);

const filteredTodos = computed(() => {
  return hideCompleted.value
  ? todos.value.filter((t) => !t.done)
  : todos.value
});

<li v-for="todo in filteredTodos">
8. Lifecycle and Template Refs
ref
React의 useRef와 같다.
const p = ref(null);
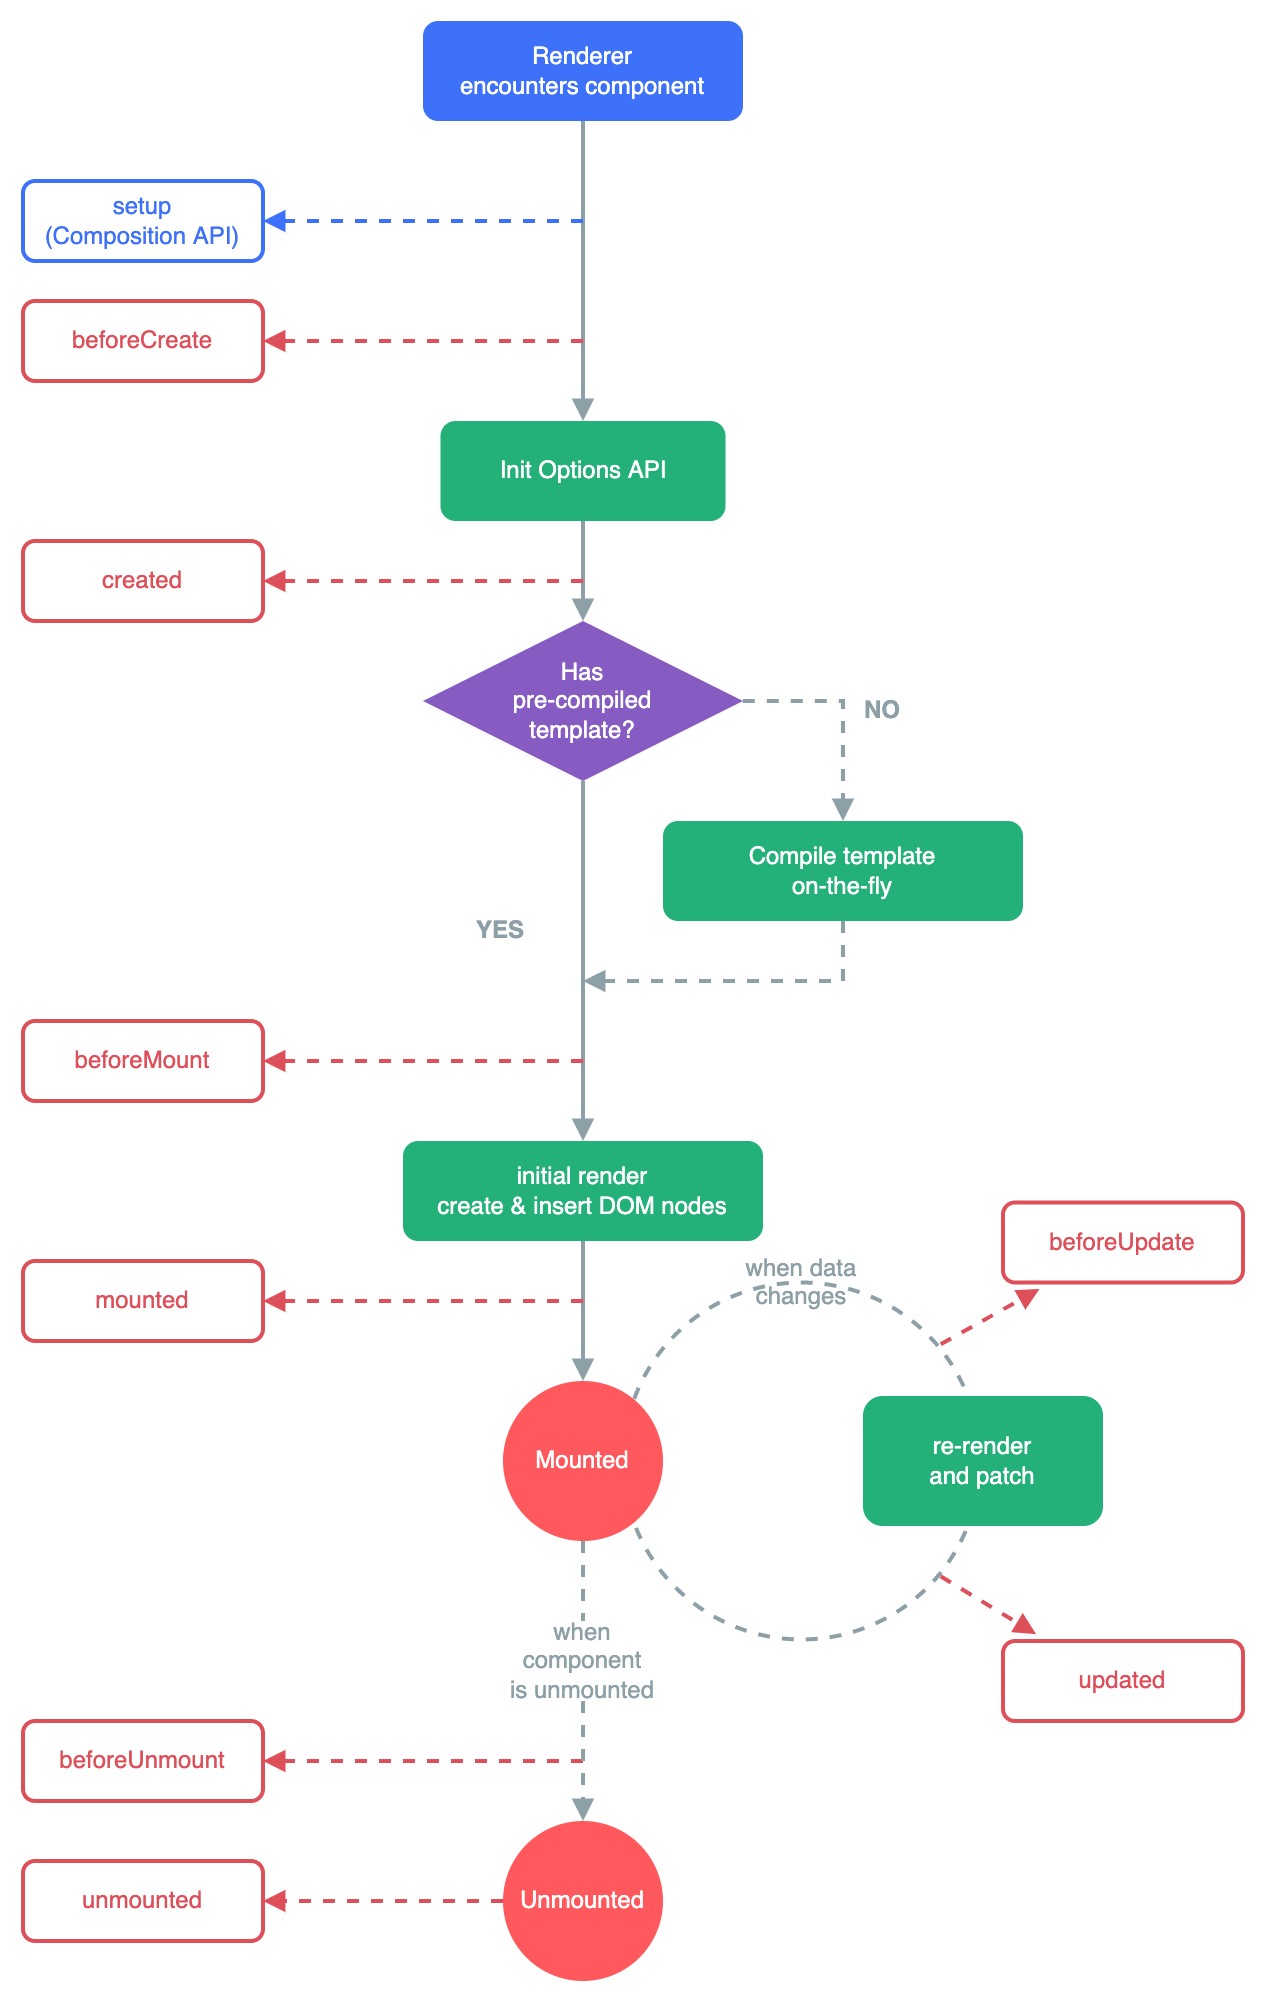
<p ref="p">hello</p>onMounted
React의 componentDidMount와 같다.
import { onMounted } from 'vue'

onMounted(() => {
  // component is now mounted.
});
Vue.js의 lifecycle diagram
9. Watchers
watch
React의 useEffect와 같이 side effect를 관리한다.
인자는 첫 번째가 dependency, 두 번째가 콜백이다.
import { ref, watch } from 'vue'

const count = ref(0);

watch(count, (newCount) => {
  // yes, console.log() is a side effect
  console.log(`new count is: ${newCount}`);
})
10. Components
React와 마찬가지로 자식 컴포넌트를 import해 사용할 수 있다.
import ChildComp from './ChildComp.vue';

<ChildComp />
11. Props
React와 마찬가지로 props를 통해 부모 컴포넌트가 자식 컴포넌트로 값을 전달할 수 있다.
Vue.js에서는 자식 컴포넌트에서 defineProps()를 통해 사용할 수 있다.
defineProps()는 컴파일 타임 매크로이기 때문에 import할 필요 없다.
<!-- ChildComp.vue -->
<script setup>
const props = defineProps({
  msg: String
});
</script>msg는 자식 컴포넌트의 <template>에서 사용될 수도 있고, props 변수를 통해 <script>에서 사용될 수도 있다.
부모 컴포넌트에서는 v-bind로 넘겨주면 된다.
<ChildComp :msg="greeting" />12. Emits
React와 다르게 자식 컴포넌트가 부모 컴포넌트에 직접 이벤트를 보낼 수 있다.
먼저 자식 컴포넌트에서 defineEmits를 하고 emit 으로 이벤트를 보낸다.
첫 번째 인수는 이벤트 이름, 두 번째부터는 이벤트 리스너에 보내지는 인수들이다.
<script setup>
// declare emitted events
const emit = defineEmits(['response']);

// emit with argument
emit('response', 'hello from child');
</script>
부모는 v-on으로 이벤트를 listen한다.
<ChildComp @response="(msg) => childMsg = msg" />13. Slots
React에서는 흔히 부모 컴포넌트가 자식 컴포넌트에게 props로 텍스트 등을 넘겨주고 자식 컴포넌트 안에서 직접 렌더링을 해주지만, Vue.js에서는 slot이라는 걸 통해 <template> 코드 조각들을 넘겨줄 수 있다.
부모 컴포넌트의 <template> 안에서 자식 컴포넌트 안에 아래와 같이 컨텐츠를 넣는다.
<ChildComp>
  This is some slot content!
</ChildComp>
자식 컴포넌트에서는 아래와 같이 <slot>을 통해 부모로부터 전달된 컨텐츠를 렌더링할 수 있다.
<slot />부모가 아무 컨텐츠도 전달하지 않았을 경우 보여질 fallback을 넣을 수도 있다.
<slot>Fallback content</slot>