Spring Controller 완전정복 - 1. DispatcherServlet 소스코드 까보기
Servlet과 전체적인 스프링 구조에 대한 이해를 가정하고 글을 작성합니다.
Dispatcher Servlet
개요
Dispatcher Servlet은 Spring MVC에서 Front Controller 역할을 하는 Servlet이다.

Servlet의 필터를 통과한 요청은 DispatcherServlet으로 전달된다.
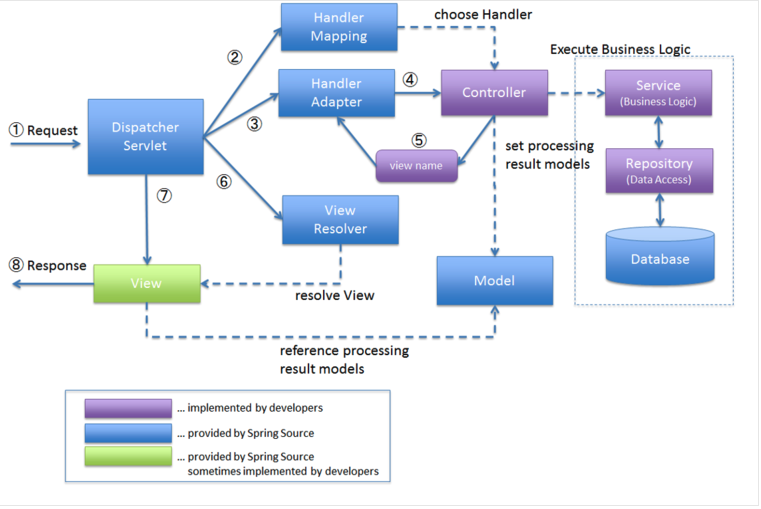
위 그림은 이러한 과정을 더 자세히 나타내고 있는데, DispatcherServlet에 요청이 전달되면, 핸들러를 찾아서 호출하고, 이 결과를 가지고 View를 만들어 응답한다.
코드 살펴보기
상속 구조
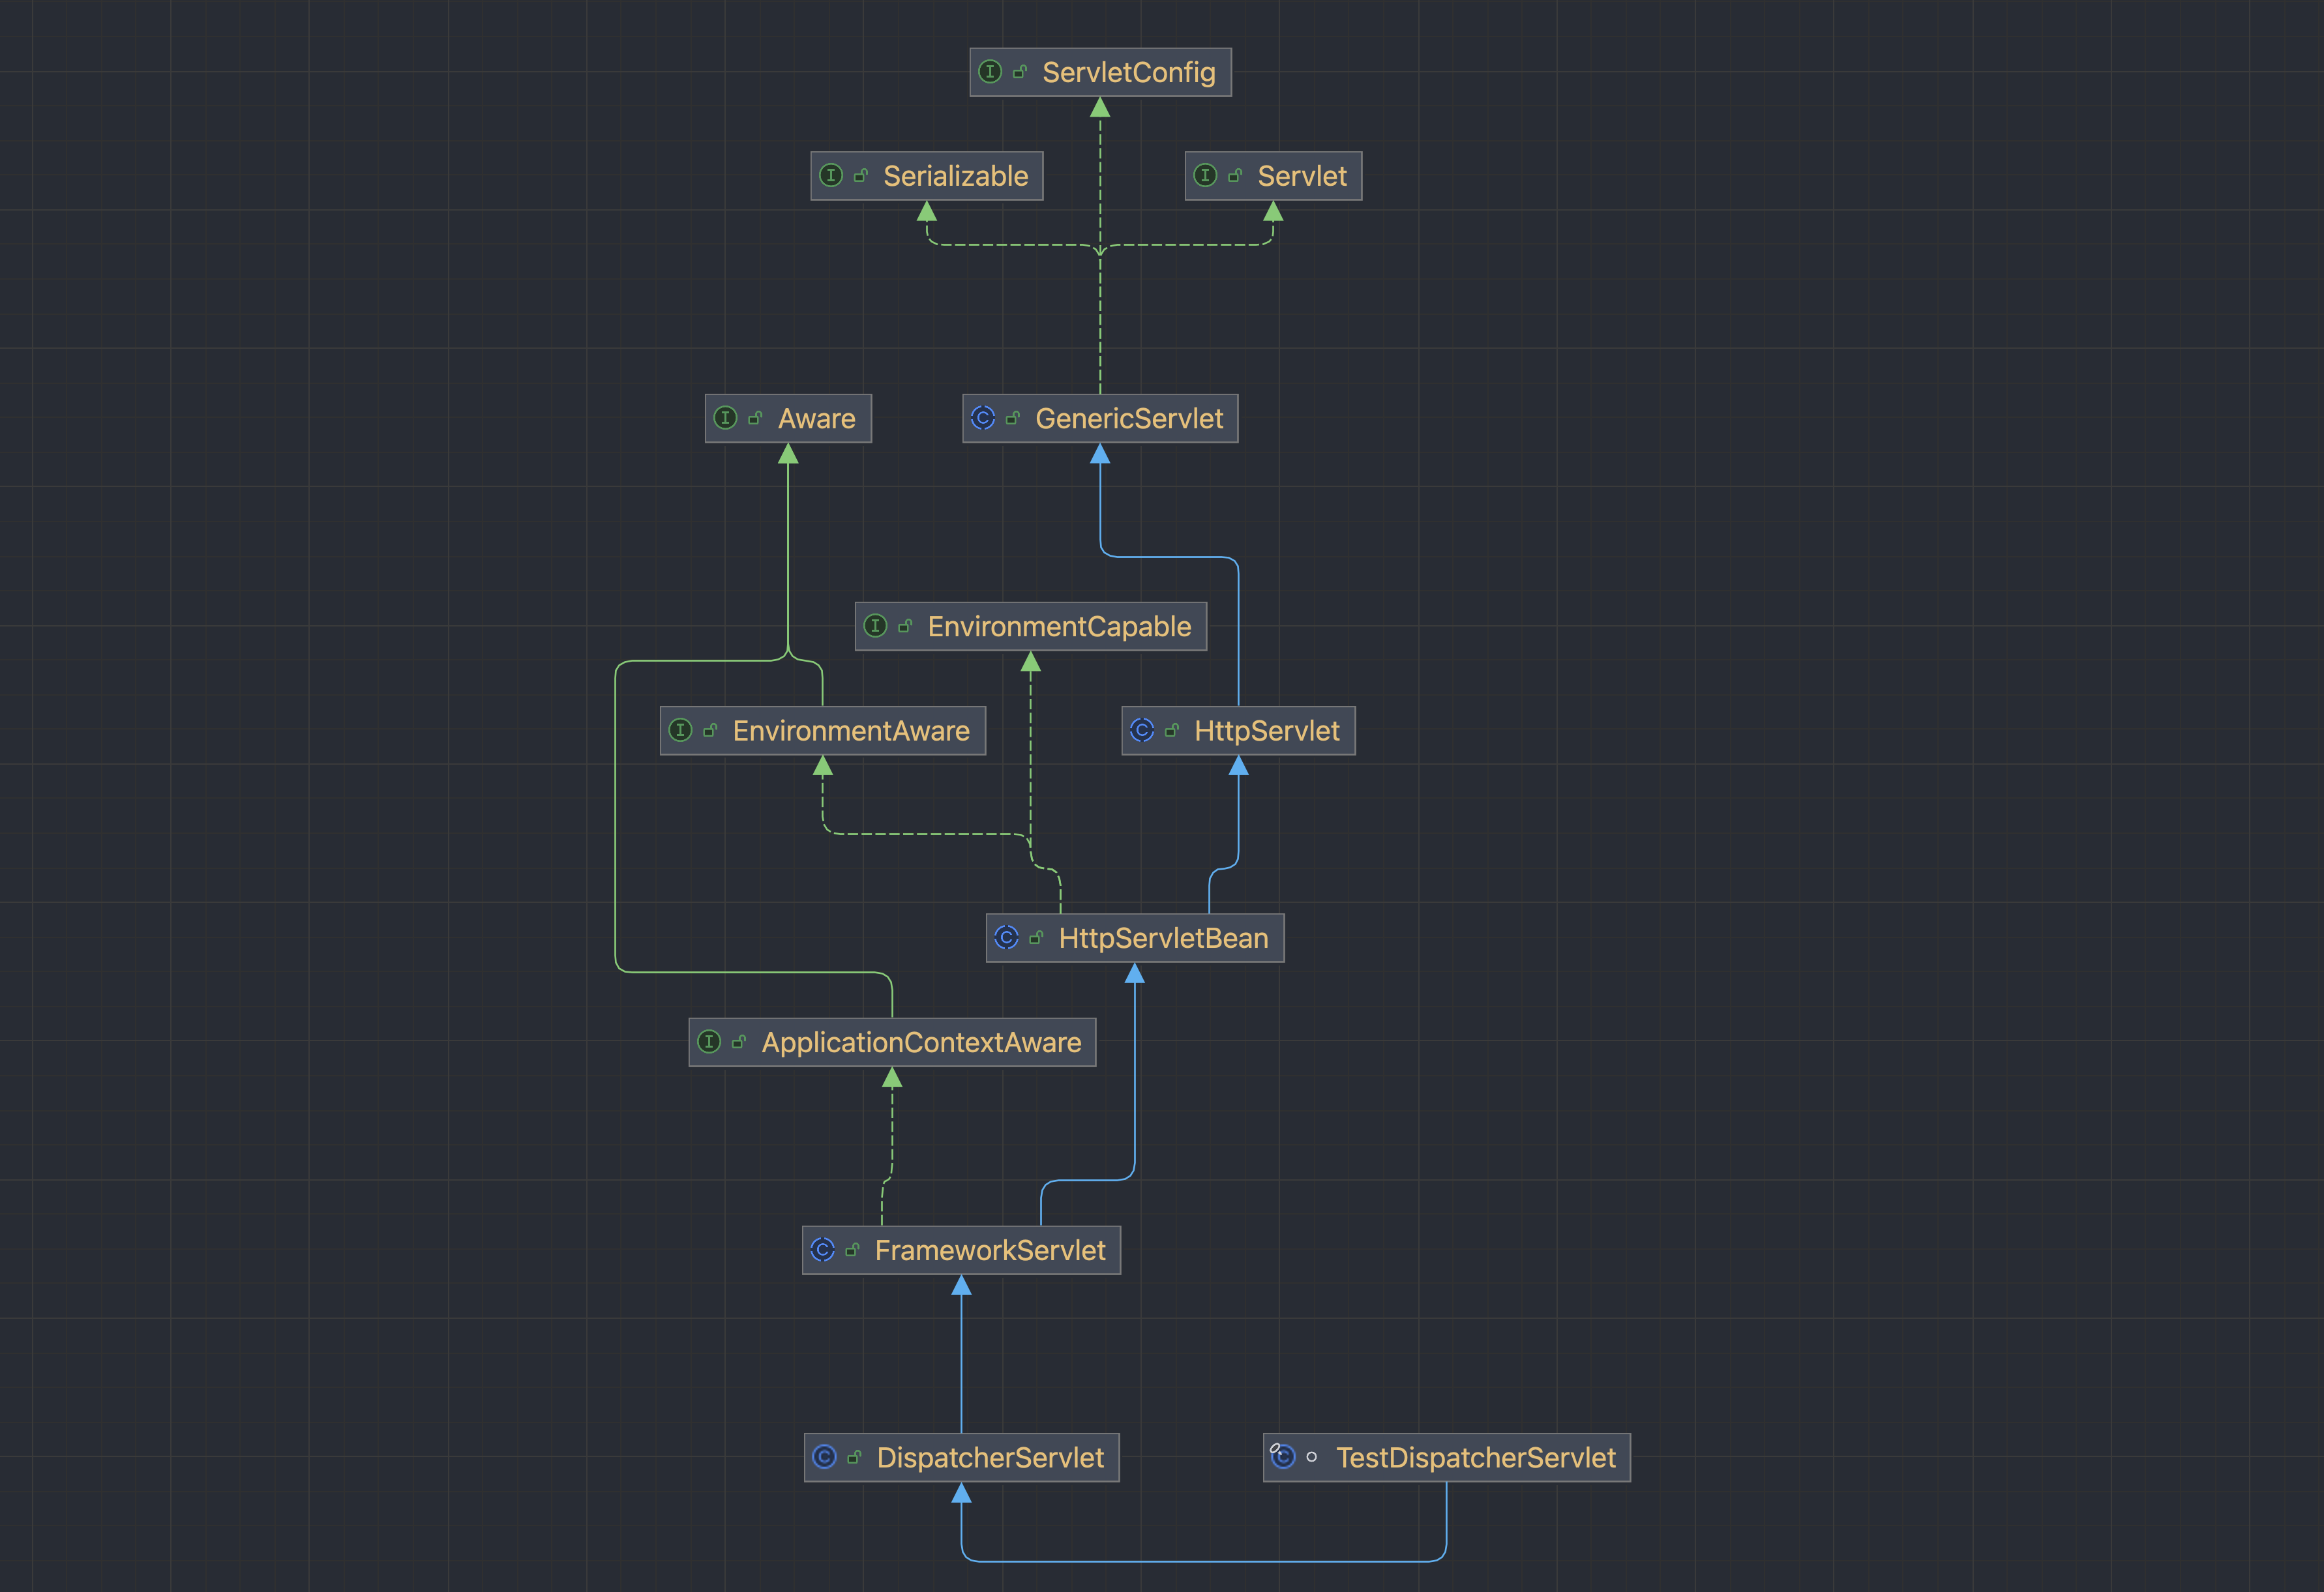
상속 구조를 살펴보면 DispatcherServlet은 jakarta(javax)의 Http Servlet에
property getter/setter를 더해 HttpServletBean을 만들고(spring 객체)
스프링의 핵심 객체인 ApplicationContext를 더해 만들어진 것이라는 것을 알 수 있다.
생성자
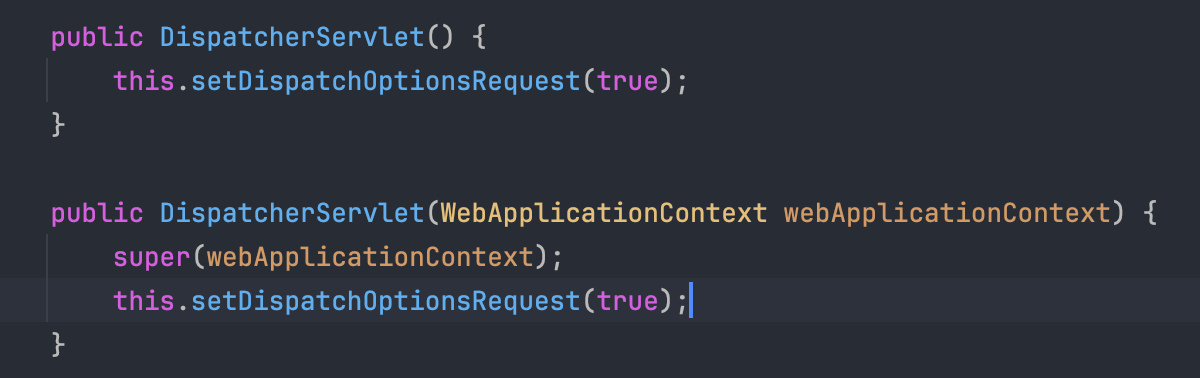
생성자는 볼 수 있듯이 WebApplicationContext를 받고 있는데, 이는 ApplicationContext를 상속한 객체이다.
HttpServlet에 빈 컨테이너와, 설정정보를 더한 것이 DispatcherServlet이다.
더 자세히 살펴보자.
초기화 (init)
계층적 컨텍스트 구성
초기화의 경우, Servlet#init 메서드가 여러번 감싸진다. 자세한 내용은 코드를 살펴보길 바란다. 주요 내용만 요약하자면,
아래 코드는 FrameworkServlet의 메서드로, 초기화 과정에서 WebApplicationContext가 존재하지 않으면 생성한다.
맨 위의 contextClass의 경우, 설정할 수 있지만, 기본적으로는 XmlWebApplicationContext가 박혀있다.
	protected WebApplicationContext createWebApplicationContext(@Nullable ApplicationContext parent) {
		Class<?> contextClass = getContextClass();
		if (!ConfigurableWebApplicationContext.class.isAssignableFrom(contextClass)) {
			throw new ApplicationContextException(
					"Fatal initialization error in servlet with name '" + getServletName() +
					"': custom WebApplicationContext class [" + contextClass.getName() +
					"] is not of type ConfigurableWebApplicationContext");
		}
		ConfigurableWebApplicationContext wac =
				(ConfigurableWebApplicationContext) BeanUtils.instantiateClass(contextClass);

		wac.setEnvironment(getEnvironment());
		wac.setParent(parent);
		String configLocation = getContextConfigLocation();
		if (configLocation != null) {
			wac.setConfigLocation(configLocation);
		}
		configureAndRefreshWebApplicationContext(wac);

		return wac;
	}
보면 알겠지만, 주어진 ApplicationContext를 WebApplicationContext의 부모로 둔다는 점이다.
스프링을 깊게 공부한 사람은 알겠지만, context는 계층적으로 구성되어 있다.
공식문서를 보면 알 수 있지만,
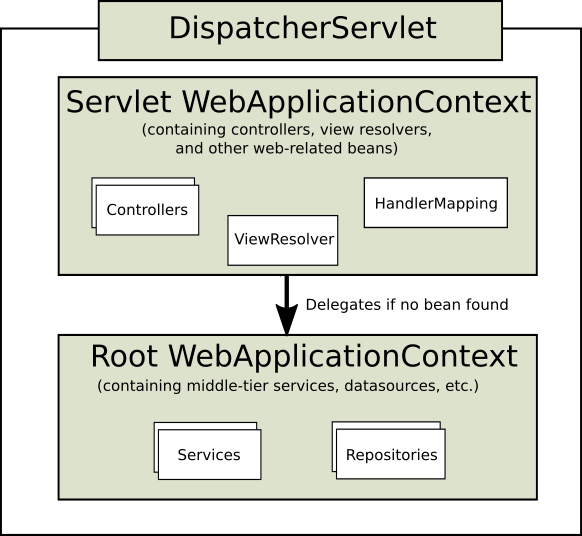
이와 같이 계층적으로 만들어져 있으며, 이렇게 설계한 이유는 Servlet에 종속적이지 않기 위해서 이다.(예를 들어 webflux라던지, 서블릿보다 더 좋은 기술이 나온다 해도)
초기화 과정
// FrameworkServlet.java
	protected WebApplicationContext initWebApplicationContext() {
위 메서드가 Servlet#init 메서드의 역할을 대리하고 있는데 코드는 대부분 초기화 하고, WebApplicationContext를 만드는 내용을 담고 있다.
핵심은 만들던, 가져오던 간에 configureAndRefreshWebApplicationContext메서드를 호출한다는 것이다.
// FrameworkServlet.java
	protected void configureAndRefreshWebApplicationContext(ConfigurableWebApplicationContext wac) {
		// ...
		wac.refresh();
	}
이 메서드는 refresh()를 호출하고, 여기서는 많은 초기화 작업이 일어난다.
// AbstractApplicationContext.java
    public void refresh() throws BeansException, IllegalStateException {
    		// ...

            try {
                this.postProcessBeanFactory(beanFactory);
                StartupStep beanPostProcess = this.applicationStartup.start("spring.context.beans.post-process");
                this.invokeBeanFactoryPostProcessors(beanFactory);
                this.registerBeanPostProcessors(beanFactory);
                beanPostProcess.end();
                this.initMessageSource();
                this.initApplicationEventMulticaster();
                this.onRefresh();
                this.registerListeners();
                this.finishBeanFactoryInitialization(beanFactory);
                this.finishRefresh();
            } catch (Error | RuntimeException var12) {
            // ...
    }
그리고 맨 마지막의 this.finishRefresh()는
// AbstractApplicationContext.java
    protected void finishRefresh() {
    	//...
        this.publishEvent((ApplicationEvent)(new ContextRefreshedEvent(this)));
    }
ContextRefreshedEvent 이벤트를 발생시킨다. 이것을 말하는 이유는 이것이 Servlet의 초기화 과정을 실행시키기 때문이다.
// FrameworkServlet.java
	public void onApplicationEvent(ContextRefreshedEvent event) {
		this.refreshEventReceived = true;
		synchronized (this.onRefreshMonitor) {
			onRefresh(event.getApplicationContext());
		}
	}
저 onRefresh 메서드는 서블릿의 초기화를 담당하는 메서드로, DispatcherServlet에서 override되어 있다.
// DispatcherServlet.java
	@Override
	protected void onRefresh(ApplicationContext context) {
		initStrategies(context);
	}

	protected void initStrategies(ApplicationContext context) {
		initMultipartResolver(context);
		initLocaleResolver(context);
		initThemeResolver(context);
		initHandlerMappings(context);
		initHandlerAdapters(context);
		initHandlerExceptionResolvers(context);
		initRequestToViewNameTranslator(context);
		initViewResolvers(context);
		initFlashMapManager(context);
	}
이 이벤트에 반응해서 많은 Web 관련 기능들을 초기화하는 것을 볼 수 있다.
핵심만 정의한다면,
- 초기화 과정에서 어떻게든
WebApplicationContext을 리턴한다.(만들던 가져오던) - 계층적으로 Context를 만든다.
- Context를 초기화하고(PostBeanProcessor등)
- ContextRefreshedEvent를 Publish 한다.
- 이거에 반응해서 Servlet이 초기화 된다.
Service
서블릿에 대해 아는 사람이라면, 다음 궁금할 것은 당연히 service이다. 핵심 메서드는 어떻게 작성되어 있을까?
상속구조는 항상 머리속에 그리고 가야한다.(이 글을 이해하기 위해서는)
HttpServlet에서 service메서드를 통해 doGet, doPost.... 이렇게 메서드 별로 응답을 나눠준다.
// HttpServlet.java
    protected void service(HttpServletRequest req, HttpServletResponse resp) throws ServletException, IOException {
	    //...
        if (method.equals("GET")) {
        //...
        } else if (method.equals("HEAD")) {
        //...
        } else if (method.equals("POST")) {
            this.doPost(req, resp);
        } else if (method.equals("PUT")) {
하지만, FrameworkServlet에서는 이 메서드를 하나로 다시 통합한다.
// FrameworkServlet.java
	@Override
	protected final void doGet(HttpServletRequest request, HttpServletResponse response)
			throws ServletException, IOException {
		processRequest(request, response);
	}

	@Override
	protected final void doPost(HttpServletRequest request, HttpServletResponse response)
			throws ServletException, IOException {
		processRequest(request, response);
	}

	@Override
	protected final void doPut(HttpServletRequest request, HttpServletResponse response)
			throws ServletException, IOException {
		processRequest(request, response);
	}

	@Override
	protected final void doDelete(HttpServletRequest request, HttpServletResponse response)
			throws ServletException, IOException {
		processRequest(request, response);
	}
따라서 우리가 봐야할 메서드는? 그렇다 FrameworkServlet#processRequest다.
이 메서드에서는 간추리면 다음과 같은 일을 한다.
- LocaleContext 초기화
- doService메서드 호출 (핵심 메서드)
- ServletRequestHandledEvent 발행
doService의 경우, 추상 클래스로 DispatcherServlet에 구현되어 있다. 만약 나만의 어떤 http 프레임워크를 만들고 싶으면 이 메서드를 구현하면 되겠다.
DispatcherServlet::doService 는 주요 attribute를 request에 등록한 뒤, doDispatch를 호출한다.
DispatcherServlet::doDispatch의 경우, 정말 핵심적인 로직이 들어 있는데, 간추리면 다음과 같다.
- 멀티파트 요청이면
MultipartHttpServletRequest로 재해석한다.
processedRequest = checkMultipart(request);
multipartRequestParsed = (processedRequest != request);- Handler 와 HandlerAdapter 를 결정한다.(핵심, 우리가 아는 컨트롤러가 여기서 선택된다.)
// Determine handler for the current request.
mappedHandler = getHandler(processedRequest);
if (mappedHandler == null) {
	noHandlerFound(processedRequest, response);
	return;
}

// Determine handler adapter for the current request.
HandlerAdapter ha = getHandlerAdapter(mappedHandler.getHandler());- pre 인터셉터를 적용한다.
if (!mappedHandler.applyPreHandle(processedRequest, response)) {
	return;
}
boolean applyPreHandle(HttpServletRequest request, HttpServletResponse response) throws Exception {
for (int i = 0; i < this.interceptorList.size(); i++) {
HandlerInterceptor interceptor = this.interceptorList.get(i);
if (!interceptor.preHandle(request, response, this.handler)) {
triggerAfterCompletion(request, response, null);
return false;
}
this.interceptorIndex = i;
}
}이 인터셉터 적용 중, 더 이상 진행될 필요가 없으면 false를 리턴하고, 이렇게 되면 컨트롤러(정확히는 handler가 호출되지 않게 된다.)
- 핸들러(컨트롤러)를 호출한다.
// Actually invoke the handler.
// ModelAndView mv;
mv = ha.handle(processedRequest, response, mappedHandler.getHandler());
정확히 말하면, HandlerAdapter가 호출되고, 이 어댑터가 적절한 처리(변환 등)를 하여 Handler를 실행한다.
미리 스포를 좀 한다면, 우리가 컨트롤러 메서드에 인자로 다양한 타입을 받을 수 있는거도 바로 이 어댑터가 이를 매핑해주기 때문이다.
- post 인터셉터를 적용한다.
- View를 렌더링 한다.
processDispatchResult > render 메서드를 통해 렌더링이 되는데
여기서 View를 통해 응답을 작성하게 된다.
	protected void render(ModelAndView mv, HttpServletRequest request, HttpServletResponse response) throws Exception {
		//...
		View view;
		//...
			view.render(mv.getModelInternal(), request, response);
		}
그러면 html이 아닌 json은 어떻게 되는건가요?
아닌 분들도 있겠지만, restApi만 작성했던 나와 같은 사람은 이와 같은 의문점을 가질 수도 있겠다.
View의 구현체를 한번 살펴보자.
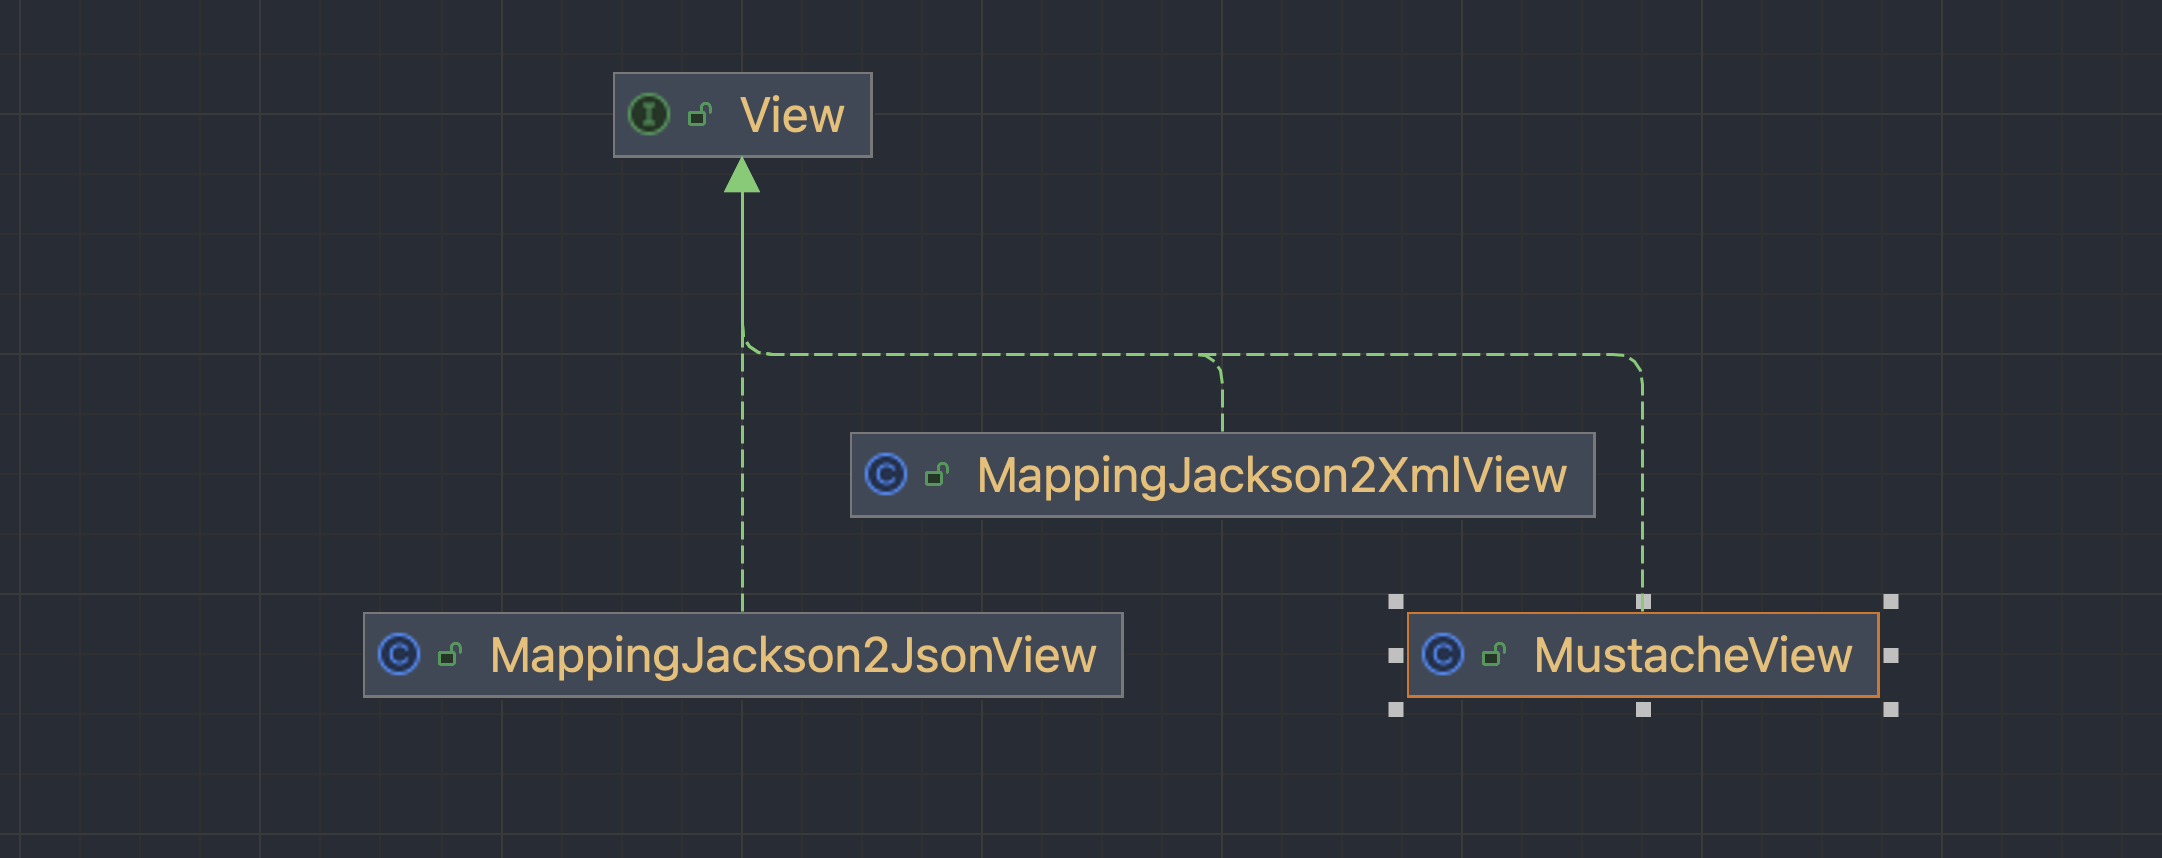
물론 이 외에도 수많은 구현체가 있으며, 우리가 직접 구현 할 수도 있다.
그러니까 우리가 ResponseEntity나 객체로 생으로 리턴한 경우는 Jackson을 활용한 JsonView로 연결되어 Json응답을 쓰는 방식으로 구현이 되어 있는 것이다.
(나만의 View도 만들 수 있다.)
마무리
오늘은 Controller 부분 중에서도 뼈대가 되는 DispatcherServlet에 대해 소스코드 레벨로 자세히 알아보았다.
이제 이 그림을 보면, 단순히 추상적인 그림이 아니라, 정말 코드 조각으로 볼 수 있게 되었다.
다음 글에서는 Handler, View 부분의 조금 더 상세한 동작을 알아보겠다.
