글의 개요
항상 만날 때마다 걸리적 거리는 이 CORS에 대해 정리하려고 한다.
항상 대충 훑고 넘어가니, 볼 때마다 당황스럽고 주먹구구식으로 땜빵을 하기 일수다.
이번 글의 목적은 핵심만, 그리고 명확하게 이다.
CORS, 넌 누구냐
CORS는 CORS는 Cross-Origin Resource Sharing의 줄임말입니다.
그동안 만악의 근원인줄 알았던 CORS는 우리한테 오히려 편리한 아이입니다.
왜냐하면, 브라우저가 제한하는 동일 출처 정책을 우회할 수 있게 도와주는 녀석이기 때문이죠.
자 아래에서 자세히 알아봅시다.
😈 진짜 배후는 - SOP(Same-Origin Policy)
자 우리가 그동안 CORS 라는 녀석이 우리를 불편하게 만드는 줄 알았다면, 이는 상당한 오해입니다.
우리를 진짜 괴롭혔던 녀석은 바로 이 SOP(Same-Origin-Policy)입니다.
SOP는 지난 2011년, RFC 6454에서 처음 등장한 보안 정책으로, 말 그대로 “같은 출처에서만 리소스를 공유할 수 있다”라는 규칙을 가진 정책 입니다.
3.4.2.  Network Access

   Access to network resources varies depending on whether the resources
   are in the same origin as the content attempting to access them.

   Generally, reading information from another origin is forbidden.
   However, an origin is permitted to use some kinds of resources
   retrieved from other origins.  For example, an origin is permitted to
   execute script, render images, and apply style sheets from any
   origin.  Likewise, an origin can display content from another origin,
   such as an HTML document in an HTML frame.  Network resources can
   also opt into letting other origins read their information, for
   example, using Cross-Origin Resource Sharing [CORS].  In these cases,
   access is typically granted on a per-origin basis.

   Sending information to another origin is permitted.  However, sending
   information over the network in arbitrary formats is dangerous.  For
   this reason, user agents restrict documents to sending information
   using particular protocols, such as in an HTTP request without custom
   headers.  Expanding the set of allowed protocols, for example, by
   adding support for WebSockets, must be done carefully to avoid
   introducing vulnerabilities [RFC6455].
아주 간단하게 요약하면 다음과 같습니다.
- RFC 6454에 등장한 SOP에 의해, 다른 Origin의 정보를 읽는 것은 금지되었다(forbidden)
- 네트워크 리소스(정보를 제공하는 쪽)는 CORS를 사용해 다른 Origin이 자신의 정보를 읽을 수 있도록 할 수 있다.
- 이 접근 허용은 오리진 별로 허용된다.
그러니까, SOP라는 정책은 매우 엄격해서, 같은 Origin에서만 정보를 가져올 수 있게 되어 있는데, CORS가 이를 일부 허용할 수 있게 도와준다는 것이다.
왜 SOP를 적용하는가?
- 웹에서 클라이언트 애플리케이션 들은, 소스가 그대로 노출된다.
- 악의를 가진 사용자가
CSRF(Cross-Site Request Forgery)나XSS(Cross-Site Scripting)와 같은 방법을 사용하여 여러분의 어플리케이션에서 코드가 실행된 것처럼 꾸며서 사용자의 정보를 탈취하기가 너무나도 쉬워진다. - 출처를 제한하므로써 이를 막는다.
동일 출처는 무엇인가?
- Scheme, Host, Port, 이 3가지만 동일하면 된다.
- Comparing Origins 문서를 참조하면, 아래와 같은 부분이 있다.
      If the two origins are scheme/host/port triples, the two origins
      are the same if, and only if, they have identical schemes, hosts,
      and ports.
if, and only if는 우리가 흔히 아는 필요충분 조건이다. (A ↔ B)
따라서 아래 명제가 참이된다.
- Scheme, Host, Port 가 동일하면 same origin이다
- same origin 이면 Scheme, Host, Port 가 동일하다.
그렇다면 만약 포트가 명시되어 있지 않다면? -> 이는 각 브라우저의 정책에 따른다.
참고로 IE의 경우 출처 비교시 포트를 완전히 무시한다. IE는 잘 퇴출된거 같다.
SOP는 어디서 체크하나?
- 브라우저에서 체크한다.
- 즉 SOP를 지키지 않으면서 CORS같은 우회 사항에 만족하지 않으면 브라우저에서 차단한다.
- 따라서 서버간 통신에서는 CORS가 필요없다.
- 서버에서는 CORS 위반 여부를 알 수 없다. 그냥 브라우저에서 자체적으로 폐기하기 때문
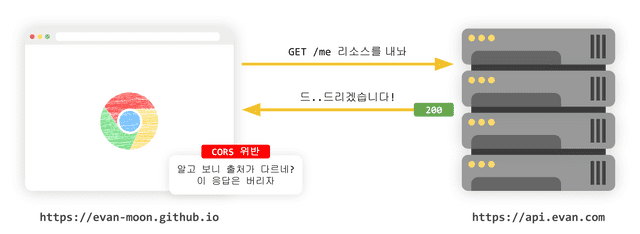
출처 : https://evan-moon.github.io/
CORS가 정확히 어떻게 동작하나
자 위에서 SOP에 대해 읽었으면, SOP와 CORS가 서로 어떤 역할인지 알게 되었을 것이다.
CORS는 리소스를 주는 서버에서 응답에 특정한 헤더를 포함시키므로서 작동하게 된다.
그러면 브라우저는 이 헤더를 체크하여 이 다른 Origin의 리소스를 받을지 말지를 결정하게 된다.
즉 응답이 이루어 지고 난 후, 브라우저가 검사를 하는 것이다.
따라서 우리 백엔드 개발자들은, 브라우저가 실시하는 이 검사에 성실히 임하도록 설정을 하면 된다.
브라우저가 이 검사를 수행하는데는 크게 3가지 방법이 있다.
- Preflight Request
- Simple Request
- Credentialed Request
이 각각을 알아보자.
1. Preflight Request
이름에서 유추할 수 있듯이 비행 전 요청을 하는 것이다.
마치 비행기가 이륙하기 전, 관제탑에게 먼저 허용되는 활주로나 이런 정보들을 물어보는 것과 같은 방식이다.
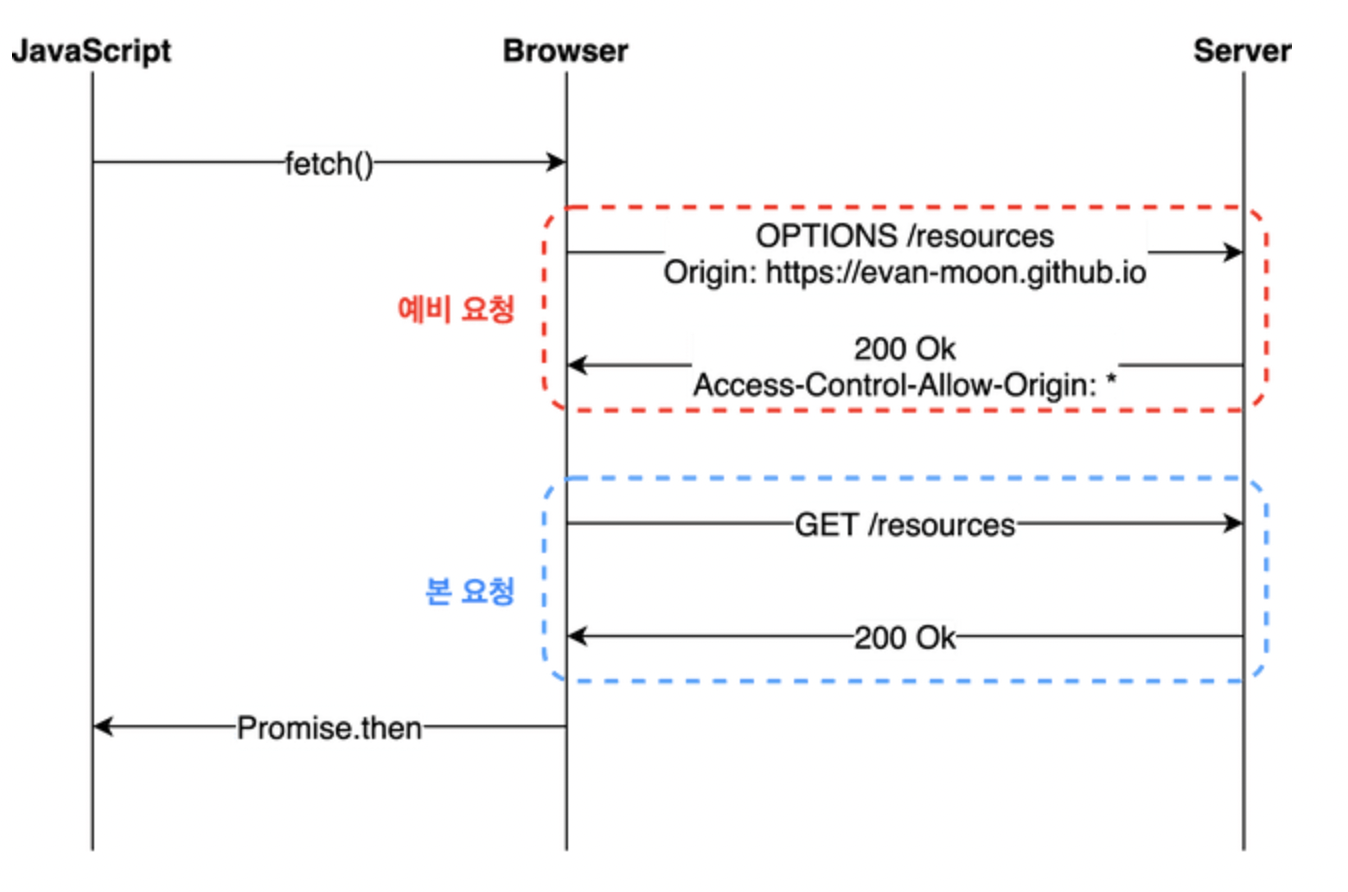
Preflight Request은 다음과 같은 모습이다.
- 메서드
- OPTIONS - 헤더
- Origin : 본 요청에 Origin을 여기로 보낼 예정이야
- Access-Control-Request-Method : 본 요청에 메서드 이거 쓰려고 하는데
- Access-Control-Request-Headers : 본 요청에 헤더 이거 보낼 예정이야
우리는 개발자니까, 코드를 보는 것이 훨신 직관적일 것이다.
		//spring security -cors filter 중 코드 한줄
		boolean preFlightRequest = CorsUtils.isPreFlightRequest(request);

        //CorsUtils::isPreFlightRequest
        public static boolean isPreFlightRequest(HttpServletRequest request) {
			return (HttpMethod.OPTIONS.matches(request.getMethod()) &&
				request.getHeader(HttpHeaders.ORIGIN) != null &&
				request.getHeader(HttpHeaders.ACCESS_CONTROL_REQUEST_METHOD) != null);
		}
바로 와닿지 않는가? 이것이 preFlightRequest의 조건이다. (개발자는 역시 백마디 주석보다 한줄의 코드가 편한법...)
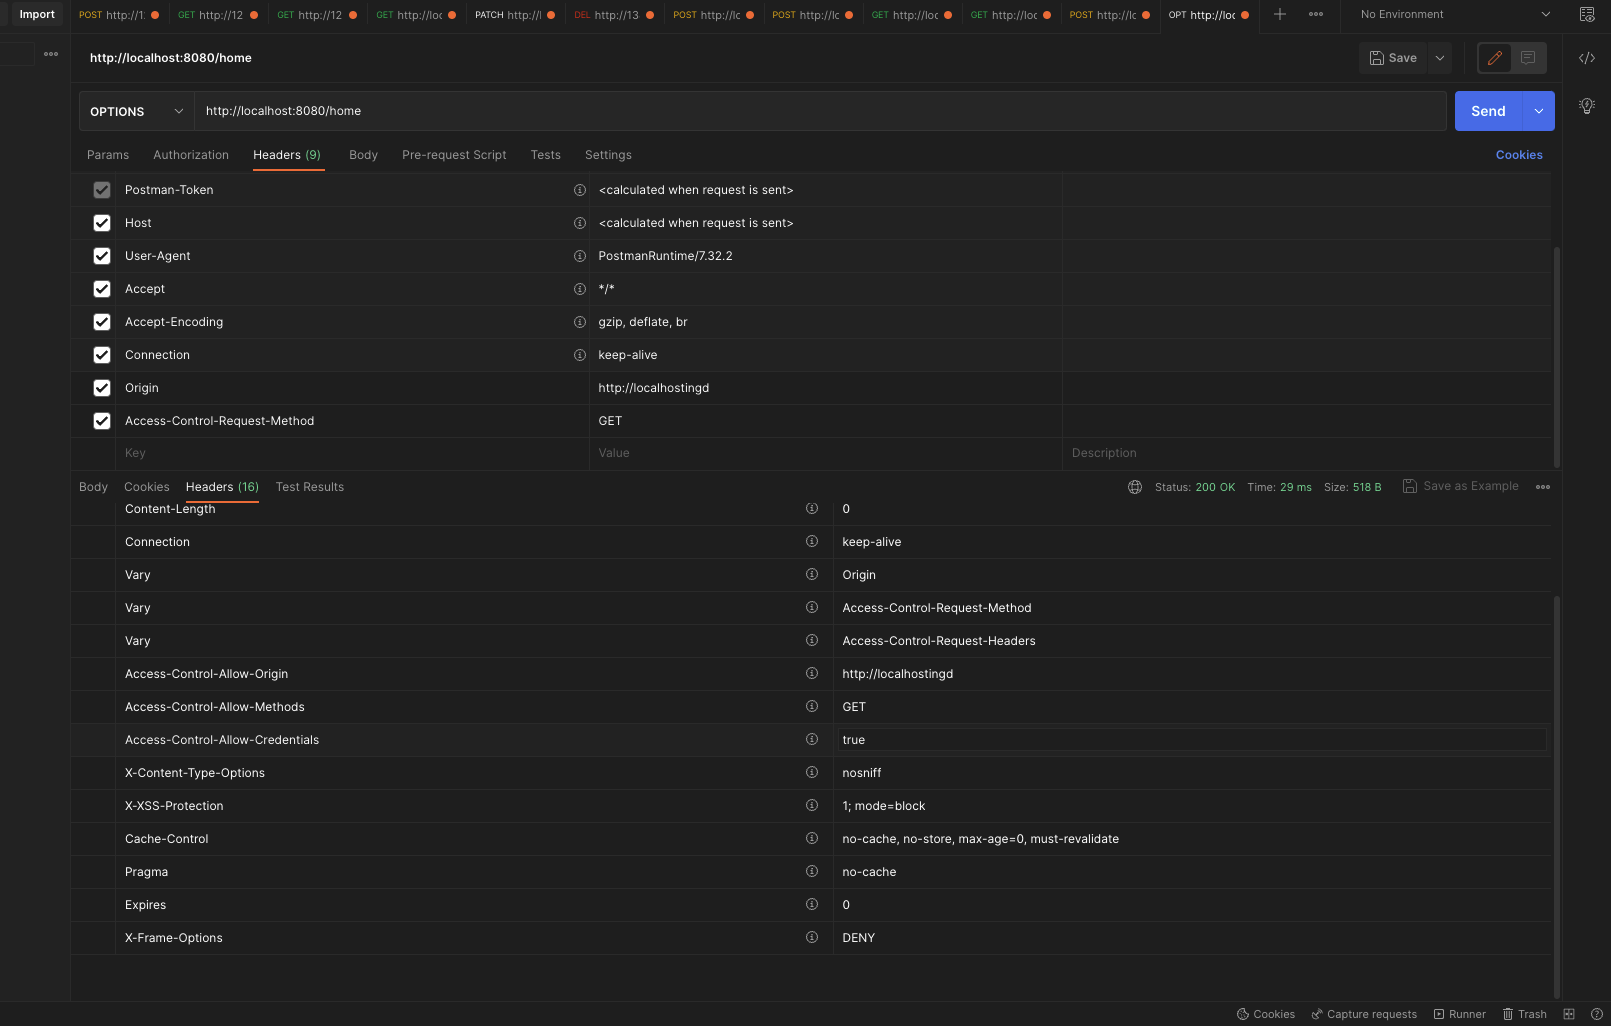
자 직접 preflight 요청을 보내보자
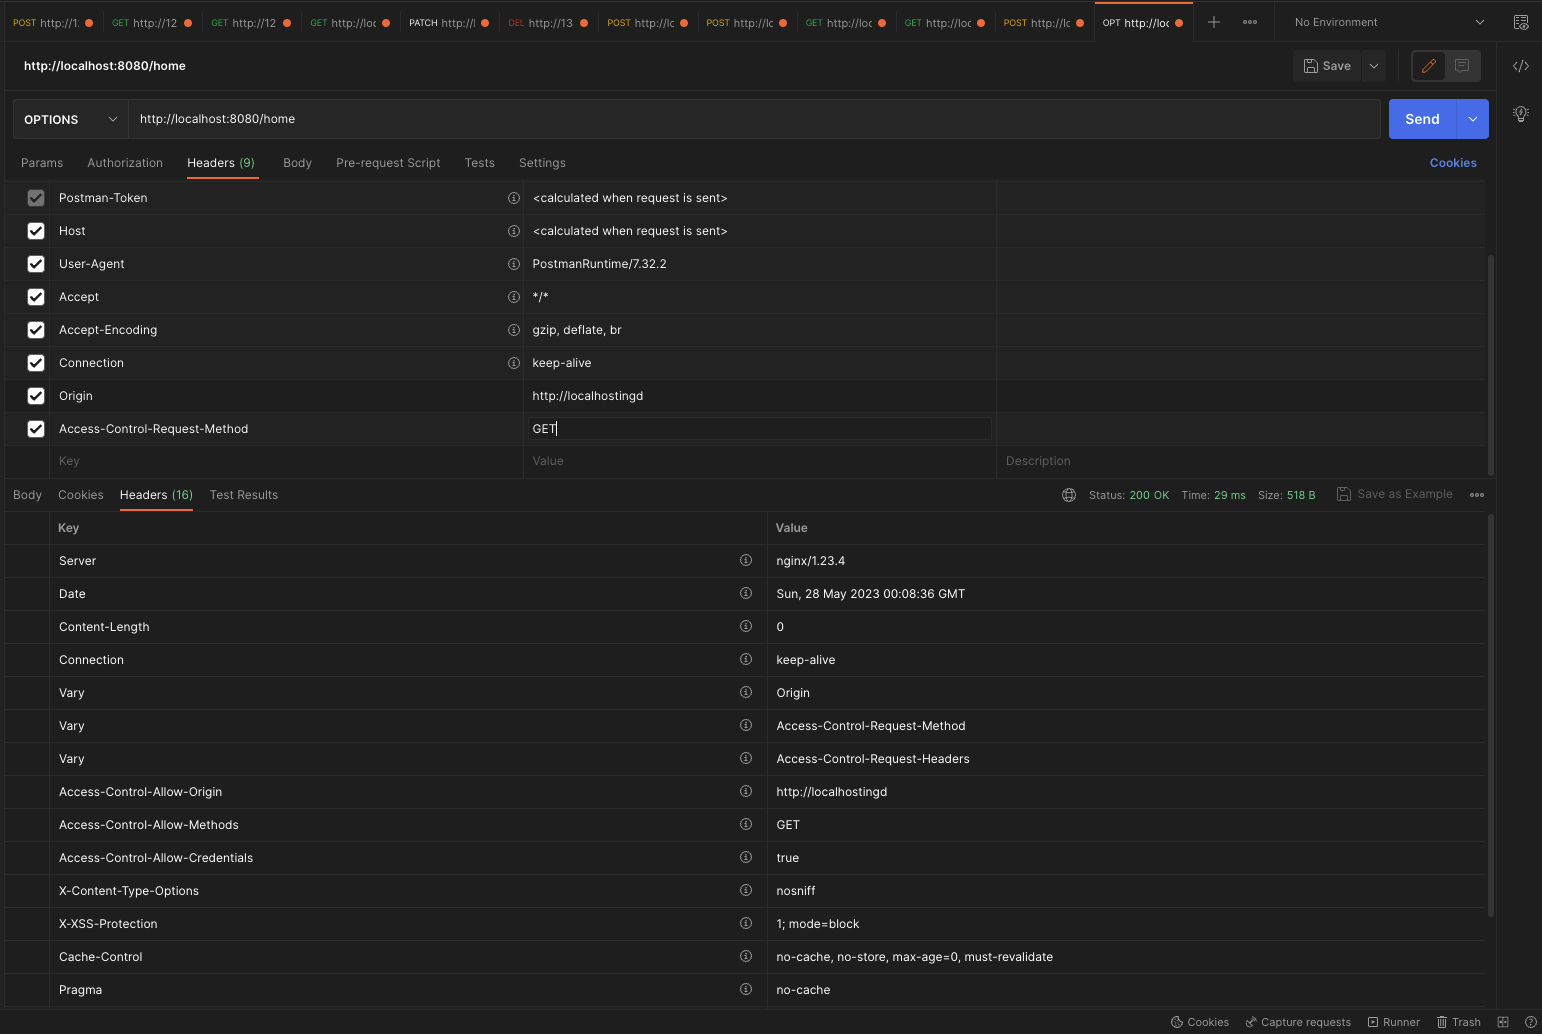
자 이렇게 보면, 바로 알 수 있다. 내가 임시로 CORS설정을 마친 서버에 예비요청을 보내보았다. (임시라서 모든 것 허용하는 설정으로)
- 요청시 OPTION으로 Origin, Access-Control-Request-Method 를 보냈다.
- 응답으로, 다음과 같은 헤더가 왔다.
- Access-Control-Allow-Origin
- Access-Control-Allow-Methods
- Access-Control-Allow-Credentials
이렇게 응답이 오면, 브라우저는 CORS 설정을 확인하여, SOP 정책을 우회할지 말지를 결정한다.
2. Simple Request
정식 명칭은 아닌데, MDN의 CORS문서에는 이렇게 명칭되어 있다.
말 그대로 preflight 요청없이 하나의 요청으로 처리하겠다는 것이다. 요청을 보내면 응답의 헤더에 Access-Control-Allow-Origin 을 포함해서 던져주기 때문에, 브라우저는 응답을 보고 CORS 설정을 검사한다.
GET /resources/public-data/ HTTP/1.1
Host: bar.other
User-Agent: Mozilla/5.0 (Macintosh; Intel Mac OS X 10.14; rv:71.0) Gecko/20100101 Firefox/71.0
Accept: text/html,application/xhtml+xml,application/xml;q=0.9,*/*;q=0.8
Accept-Language: en-us,en;q=0.5
Accept-Encoding: gzip,deflate
Connection: keep-alive
Origin: https://foo.example
HTTP/1.1 200 OK
Date: Mon, 01 Dec 2008 00:23:53 GMT
Server: Apache/2
Access-Control-Allow-Origin: *
Keep-Alive: timeout=2, max=100
Connection: Keep-Alive
Transfer-Encoding: chunked
Content-Type: application/xml
[…XML Data…]그러면 다 Simple Request만 쓰지 왜 번거롭게 예비요청을 사용하는가?
그 이유는 Simple Request는 제약사항이 많기 때문이다.
아래는 MDN에서 긁어온 것이므로, 원본을 보려면 MDN의 SimpleRequest에서 참조하라
- 다음 중 하나의 메서드
- GET
- HEAD
- POST- 유저 에이전트가 자동으로 설정 한 헤더 (예를들어, Connection, User-Agent (en-US), Fetch 명세에서 “forbidden header name”으로 정의한 헤더)외에, 수동으로 설정할 수 있는 헤더는 오직 Fetch 명세에서 “CORS-safelisted request-header”로 정의한 헤더 뿐입니다.
- Accept
- Accept-Language
- Content-Language
- Content-Type (아래의 추가 요구 사항에 유의하세요.)
- Content-Type 헤더는 다음의 값들만 허용됩니다.
- application/x-www-form-urlencoded
- multipart/form-data
- text/plain
어쨌든 제약사항이 참 많다. 다른건 몰라도 메서드가 PATCH나 DELETE같은 것도 못 쓰는 데다가, 헤더가 너무 기본적이 것들밖에 허용이 안된다. content-type도 뭐,, 거의 쓰지 말라는 수준
3. 인증을 포함한 요청 - Credentialed Request
이것도 최대한 요점만 간단하게 말을 하자면,
- 기본적으로 브라우저가 제공하는 비동기 리소스 요청 API인 XMLHttpRequest 객체나 fetch API는 별도의 옵션 없이 브라우저의 쿠키 정보나 인증과 관련된 헤더요청에 담지 않는다.
- credentialed requests는 HTTP cookies 와 HTTP Authentication 정보를 포함할 수 있다.
- 브라우저는 Access-Control-Allow-Credentials: true 가 없는 응답을 거부합니다.
- Access-Control-Allow-Origin 응답 헤더의 와일드 카드 (*)를 허용하지 않습니다.
맨 마지막이 두개가 가장중요하다.
그러니까 원래는 쿠키나 인증을 보내지 않는데, Credentialed Request는 이를 포함할 수 있다. 대신 몇가지 조건이 더 붙는다. 정도로 이해하면 된다.
나의 경우 credential을 대응하기 위해, Access-Control-Allow-Origin 도 와일드 카드를 사용하지 않았고, Access-Control-Allow-Credentials: true 도 포함하도록 하였다.
Spring Security 코드로 이해하는 CORS
이런 경험이 있지 않은가? 개발과 관련해서 장황한 설명을 들을 때는 두루뭉실 했던 개념들이 코드를 보는 순간 매우 직관적으로 변한 경험 말이다.
나는 자주 그러고 이번 CORS도 코드를 보고 비로소 직관적으로 이해가 가능했다.
여기서 Spring Security에 메커니즘은 이해했다고 가정하고 설명을 진행한다. (그건 이 글의 논점을 벗어난다.)
CORS Configuration Overview
우선 설정부터 간단하게 보고 들어가자.
@Bean
public SecurityFilterChain securityFilterChain(HttpSecurity security, AccessToken.TokenBuilder tokenBuilder) throws Exception {
return security
//앞 생략
.cors()
.and()
//뒤 생략
.build();
}
@Bean
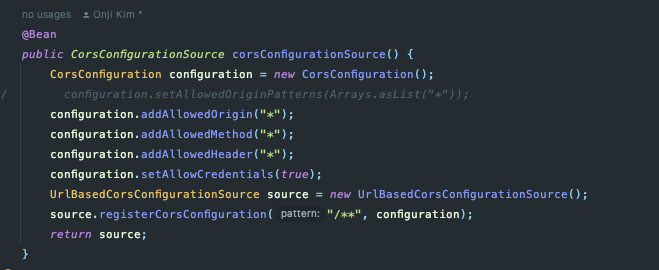
public CorsConfigurationSource corsConfigurationSource() {
CorsConfiguration configuration = new CorsConfiguration();
configuration.setAllowedOriginPatterns(Arrays.asList("*"));
configuration.addAllowedMethod("*");
configuration.addAllowedHeader("*");
configuration.setAllowCredentials(true);
UrlBasedCorsConfigurationSource source = new UrlBasedCorsConfigurationSource();
source.registerCorsConfiguration("/**", configuration);
return source;
}자 이렇게 CORS를 필터체인에 설정하게 되면, CorsFilter 가 활성화 하게 된다.
이 필터는 CorsConfigurationSource 빈을 참조하기 때문에, 저것을 빈으로 등록해주면 된다.
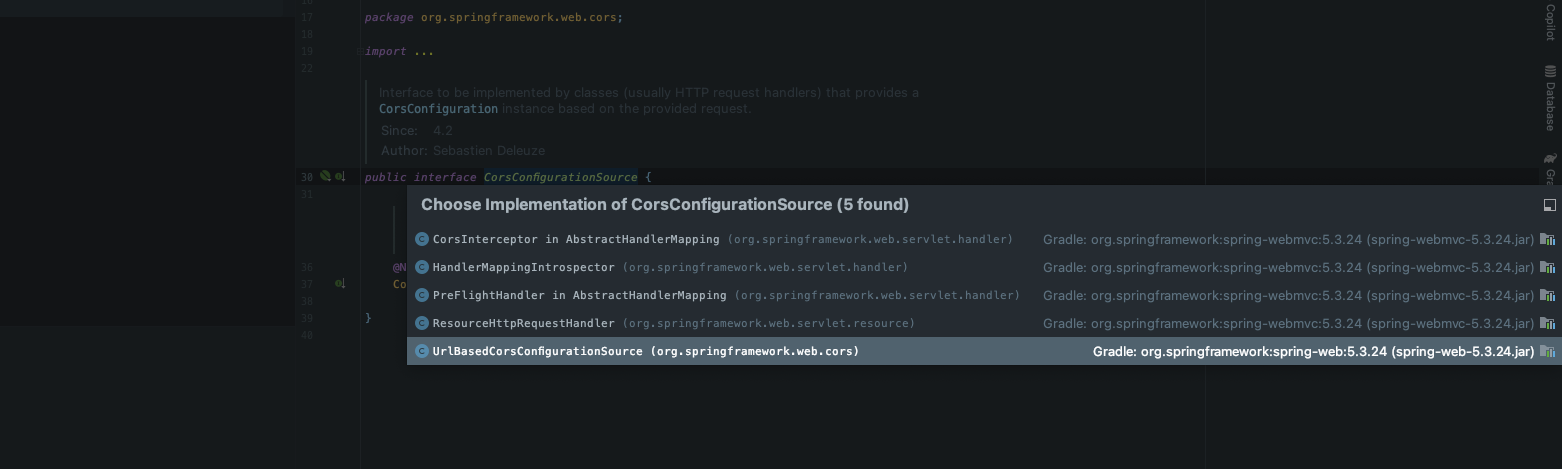
다양한 구현체가 있지만, 범용적으로 사용할 만한 것은 UrlBasedCorsConfigurationSource 이 되겠다.
CorsFilter
public class CorsFilter extends OncePerRequestFilter {

	private final CorsConfigurationSource configSource;

	private CorsProcessor processor = new DefaultCorsProcessor();


	/**
	 * Constructor accepting a {@link CorsConfigurationSource} used by the filter
	 * to find the {@link CorsConfiguration} to use for each incoming request.
	 * @see UrlBasedCorsConfigurationSource
	 */
	public CorsFilter(CorsConfigurationSource configSource) {
		Assert.notNull(configSource, "CorsConfigurationSource must not be null");
		this.configSource = configSource;
	}


	/**
	 * Configure a custom {@link CorsProcessor} to use to apply the matched
	 * {@link CorsConfiguration} for a request.
	 * <p>By default {@link DefaultCorsProcessor} is used.
	 */
	public void setCorsProcessor(CorsProcessor processor) {
		Assert.notNull(processor, "CorsProcessor must not be null");
		this.processor = processor;
	}


	@Override
	protected void doFilterInternal(HttpServletRequest request, HttpServletResponse response,
			FilterChain filterChain) throws ServletException, IOException {

		CorsConfiguration corsConfiguration = this.configSource.getCorsConfiguration(request);
		boolean isValid = this.processor.processRequest(corsConfiguration, request, response);
		if (!isValid || CorsUtils.isPreFlightRequest(request)) {
			return;
		}
		filterChain.doFilter(request, response);
	}

}
너무 직관적이지 않는가?
OncePerRequestFilter를 상속했다. (전형적으로)- 우리가 등록한
CorsConfigurationSource를 주입받는다. CorsProcessor는 기본값이 있고, setter로 교체할 수 있다.CorsConfigurationSource에서 우리가 아까 등록했던,CorsConfiguration를 꺼낸다.
메인 동작은 저 processor에서 이루어진다. 이 코드는 아래에서 보기로 하고, 간단한 CorsUtils::isPreFlightRequest() 부터 보자
	public static boolean isPreFlightRequest(HttpServletRequest request) {
		return (HttpMethod.OPTIONS.matches(request.getMethod()) &&
				request.getHeader(HttpHeaders.ORIGIN) != null &&
				request.getHeader(HttpHeaders.ACCESS_CONTROL_REQUEST_METHOD) != null);
	}
이 또한 직관적이다. 이걸 보면 우리가 postman으로 preflightRequest를 보내려면, 어떻게 보낼지 알 수 있다.
앞에서 본 PerFlight의 정의이다.
processRequest
위에서
boolean isValid = this.processor.processRequest(corsConfiguration, request, response);
여기서 이어지는 코드이다.
	@Override
	@SuppressWarnings("resource")
	public boolean processRequest(@Nullable CorsConfiguration config, HttpServletRequest request,
			HttpServletResponse response) throws IOException {

		Collection<String> varyHeaders = response.getHeaders(HttpHeaders.VARY);
		if (!varyHeaders.contains(HttpHeaders.ORIGIN)) {
			response.addHeader(HttpHeaders.VARY, HttpHeaders.ORIGIN);
		}
		if (!varyHeaders.contains(HttpHeaders.ACCESS_CONTROL_REQUEST_METHOD)) {
			response.addHeader(HttpHeaders.VARY, HttpHeaders.ACCESS_CONTROL_REQUEST_METHOD);
		}
		if (!varyHeaders.contains(HttpHeaders.ACCESS_CONTROL_REQUEST_HEADERS)) {
			response.addHeader(HttpHeaders.VARY, HttpHeaders.ACCESS_CONTROL_REQUEST_HEADERS);
		}

		if (!CorsUtils.isCorsRequest(request)) {
			return true;
		}

		if (response.getHeader(HttpHeaders.ACCESS_CONTROL_ALLOW_ORIGIN) != null) {
			logger.trace("Skip: response already contains \"Access-Control-Allow-Origin\"");
			return true;
		}

		boolean preFlightRequest = CorsUtils.isPreFlightRequest(request);
		if (config == null) {
			if (preFlightRequest) {
				rejectRequest(new ServletServerHttpResponse(response));
				return false;
			}
			else {
				return true;
			}
		}

		return handleInternal(new ServletServerHttpRequest(request), new ServletServerHttpResponse(response), config, preFlightRequest);
	}
중간에 빠르게 리턴 하는 부분을 통과했다면,handleInternal 메서드로 넘어간다.
handleInternal()
	protected boolean handleInternal(ServerHttpRequest request, ServerHttpResponse response,
			CorsConfiguration config, boolean preFlightRequest) throws IOException {

		String requestOrigin = request.getHeaders().getOrigin();
		String allowOrigin = checkOrigin(config, requestOrigin);
		HttpHeaders responseHeaders = response.getHeaders();

		if (allowOrigin == null) {
			logger.debug("Reject: '" + requestOrigin + "' origin is not allowed");
			rejectRequest(response);
			return false;
		}

		HttpMethod requestMethod = getMethodToUse(request, preFlightRequest);
		List<HttpMethod> allowMethods = checkMethods(config, requestMethod);
		if (allowMethods == null) {
			logger.debug("Reject: HTTP '" + requestMethod + "' is not allowed");
			rejectRequest(response);
			return false;
		}

		List<String> requestHeaders = getHeadersToUse(request, preFlightRequest);
		List<String> allowHeaders = checkHeaders(config, requestHeaders);
		if (preFlightRequest && allowHeaders == null) {
			logger.debug("Reject: headers '" + requestHeaders + "' are not allowed");
			rejectRequest(response);
			return false;
		}

		responseHeaders.setAccessControlAllowOrigin(allowOrigin);

		if (preFlightRequest) {
			responseHeaders.setAccessControlAllowMethods(allowMethods);
		}

		if (preFlightRequest && !allowHeaders.isEmpty()) {
			responseHeaders.setAccessControlAllowHeaders(allowHeaders);
		}

		if (!CollectionUtils.isEmpty(config.getExposedHeaders())) {
			responseHeaders.setAccessControlExposeHeaders(config.getExposedHeaders());
		}

		if (Boolean.TRUE.equals(config.getAllowCredentials())) {
			responseHeaders.setAccessControlAllowCredentials(true);
		}

		if (preFlightRequest && config.getMaxAge() != null) {
			responseHeaders.setAccessControlMaxAge(config.getMaxAge());
		}

		response.flush();
		return true;
	}
전체적이 코드가 다음과 같다.
- 주어진 헤더와 허용하는 헤더를 비교한다.
- 헤더에 적절한 헤더들을 추가한다.
- 응답을 보낸다.
너무 빠르게 보려고 하지말고, 코드를 한줄씩 읽으면 로직 자체가 그리 어렵지 않다는 것을 알게 될 것이다.
CORS요청인지, preflight요청인지 확인하고, 우리의 설정을 확인해 적절한 헤더를 추가해서 리턴한다.
Credential Request관련 코드
자 이 글을 열심히 읽었다면 다음 문제를 풀어보자
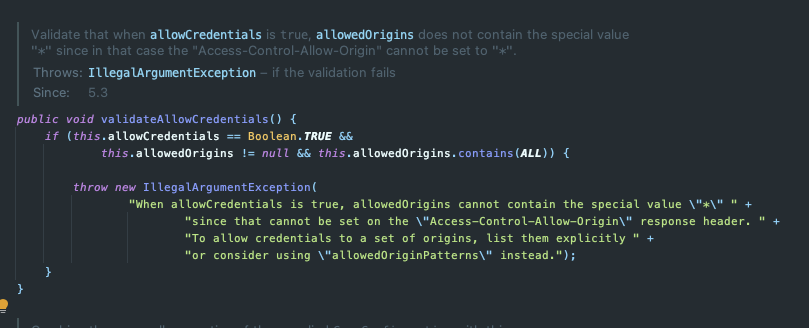
이 코드는 필터 내의 checkOrigin이라는 메서드 안에 박혀 있는 메서드 이다.
저 예외의 의미를 알겠는가?
바로 앞에서 설명했던, Credential Request에는, 와일드 카드를 사용할 수 없다는 것을 체크하는 로직이다.
즉 configuration에서 아래와 같은 설정을 사용할 수 없다.
만약 저 credential을 true로 주려면, 패턴에 기반한 허용 오리진을 설정해야만 한다.
정리
즉 글 전체 정리 하자면, 다음과 같다.
- SOP는 동일 출처의 리소스만 접근하게 막는 정책이다
- 이것은 브라우저가 검사를 시행하여 막는다.
- 예외 사항이 있는데 그것은 CORS이다.
- 서버측에서, 클라이언트의 Preflight 요청이나 CORS요청을 감지하여, 서버에서 허용하는 적절한 CORS 응답을 응답 헤더에 추가해줘야 한다.
- Preflight 요청은 몇가지 조건이 있고, SpringSecurity는 이 조건을 체크하여, Preflight인지 확인한다.
- Simple Request는 간단하지만, 제약사항이 많다
- Credential Request는 보안 관련 사항을 요청에 포함할 수 있지만, 여러가지 제약이 추가된다.
