이 문서에 대한 설명은 현재기준 SpringSecurity 최신버전인 6.0.1을 기준으로 작성되었습니다.
과거 문서에서 많은 deprecate된 부분은 반영하지 않습니다.
사전 지식
debug 사용법
아래 주석을 추가하여 구성된 모든 security filter들을 print 할 수 있습니다.
@EnableWebSecurity(debug = true)이 설정을 추가하면 spring 시작시 아래 로그가 찍힌다.
********************************************************************
**********        Security debugging is enabled.       *************
**********    This may include sensitive information.  *************
**********      Do not use in a production system!     *************
********************************************************************
그리고 애플리케이션이 돌아가면서 아래와 같이 로그가 찍힌다.
이는 개발을 진행하면서 로그를 확인하기에 좋다.
2023-01-03T23:11:09.691+09:00  INFO 1911 --- [nio-8080-exec-1] Spring Security Debugger                 :

************************************************************

Request received for GET '/':

org.apache.catalina.connector.RequestFacade@2af88ac8

servletPath:/
pathInfo:null
headers:
host: localhost:8080
connection: keep-alive
sec-ch-ua: "Not?A_Brand";v="8", "Chromium";v="108", "Google Chrome";v="108"
sec-ch-ua-mobile: ?0
sec-ch-ua-platform: "macOS"
upgrade-insecure-requests: 1
user-agent: Mozilla/5.0 (Macintosh; Intel Mac OS X 10_15_7) AppleWebKit/537.36 (KHTML, like Gecko) Chrome/108.0.0.0 Safari/537.36
accept: text/html,application/xhtml+xml,application/xml;q=0.9,image/avif,image/webp,image/apng,*/*;q=0.8,application/signed-exchange;v=b3;q=0.9
purpose: prefetch
sec-fetch-site: none
sec-fetch-mode: navigate
sec-fetch-user: ?1
sec-fetch-dest: document
accept-encoding: gzip, deflate, br
accept-language: ko-KR,ko;q=0.9,en-US;q=0.8,en;q=0.7


Security filter chain: [
  DisableEncodeUrlFilter
  WebAsyncManagerIntegrationFilter
  SecurityContextHolderFilter
  HeaderWriterFilter
  CorsFilter
  LogoutFilter
  JwtAuthenticationFilter
  JwtAuthorizationFilter
  RequestCacheAwareFilter
  SecurityContextHolderAwareRequestFilter
  AnonymousAuthenticationFilter
  SessionManagementFilter
  ExceptionTranslationFilter
  AuthorizationFilter
]


************************************************************
기본 동작 구조
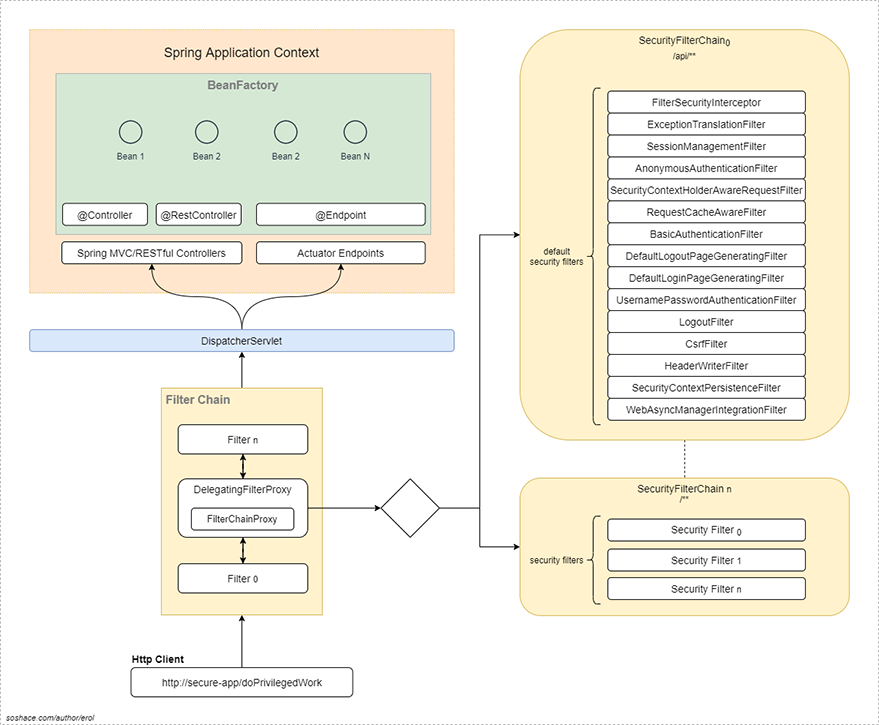
위의 그림은 타 사이트에서 가져온 그림이며, 현재는 바뀐 필터의 내용이 포함되어 있으므로 구성만 참고하자
위는 SpringSecurity의 동작을 표현한 것이다.
다른 부분은 이 문서의 범위를 벗어나므로 서술하지 않겠다.
DelegatingFilterProxy는 포함된 특수 필터 FilterChainProxy에게 권한을 위임한다.
이렇게 설계된 이유는 DelegatingFilterProxy는 표준 Servlet Container 에 연결되있는 반면, Spring Security가 제공하는 필터들은 SpringFramework에 의해 lazily하게 로딩되기 때문이다.
FilterChainProxy가 요청을 받으면 요청을 평가해서 Spring Security가 설정한 SecurityFilterChain중 적절한 SecurityFilterChain으로 연결시켜준다.
Servlet Container에서는 URL이 필터를 선택하는 유일한 파라미터인데 반해서,
SecurityFilterChain은 RequestMatcher라는 HttpServletRequest에 특정한 매칭 알고리즘을 제공하는 매처를 사용한다.
이 RequestMatcher은 위에서 말한 FilterChainProxy를 통해 검사되어 적절한 SecurityFilterChain을 찾게 도와준다.
SecurityFilterChain이 호출되면 그 안에 있는 Security Filter 들이 순차적으로 실행된다.
🌟Security Filters Orders
오늘의 핵심 주제이기도 하다.
Security Filter에는 어떤 것들이 있고 그 순서는 어떤 순서로 적용되는지 알아보자.
아래의 순서는 공식 문서에 나온 순서이고, 그에 따른 설명을 덧붙였다.
다시 말하지만 Spring Security 6.0.1 을 기준으로 쓰여졌다.
여기에 존재하는 필터들은 SpringSecurity에서 제공되는 기본 필터들이므로 HttpSecurity.addFilter 메서드를 통해 추가하면 자동으로 순서에 맞추어 관리된다.
여기에 포함되지 않은 (또는 extend 하지 않은) 커스텀 필터들은 addFilterAt이나 addFilterBefore ,addFilterAfter 같은 메서드를 따로 사용해야한다.
addFilter메서드는 SpringSecurity에서 제공되거나 그걸 상속한 필터만 사용할 수 있다.
자세한 설정들은 HttpSecurity의 메서드를 참고하면 된다.
1.ForceEagerSessionCreationFilter
Http 세션이 존재하지 않으면 세션을 생성합니다.
이는 아래와 같은 설정을 했을때 유효합니다.
@Bean
public SecurityFilterChain filterChain(HttpSecurity http) {
    http
        .sessionManagement(session -> session
            .sessionCreationPolicy(SessionCreationPolicy.ALWAYS)
        );
    return http.build();
}
2.ChannelProcessingFilter
web 요청이 required channel을 통해 전달되도록 합니다.
가장 흔한 용도는 요청이 HTTPS 를 통해 진행되는지 확인하는 것이다.
ChannelDecisionManager의 구현체에게 위임한다.
자세한 내용은 공식문서 참고: https://docs.spring.io/spring-security/site/docs/6.0.1/api/org/springframework/security/web/access/channel/ChannelProcessingFilter.html
3.WebAsyncManagerIntegrationFilter
<<이 부분은 저의 이해도가 부족합니다.>>
Reactive Application에서 사용됨
SecurityContext와 Spring Web의 WebAsyncManager간의 통합(Integration)을 제공합니다.
SecurityContextCallableProcessingInterceptor.beforeConcurrentHandling(org.springframework.web.context.request.NativeWebRequest, Callable)을 사용함으로써 Callable에 SecurityContext를 채우는데 사용됩니다.
4.SecurityContextHolderFilter
SecurityContextPersistenceFilter는 deprecated 되었다.
설정
public SecurityFilterChain filterChain(HttpSecurity http) {
	http
		// ...
		.securityContext((securityContext) -> securityContext
			.securityContextRepository(new RequestAttributeSecurityContextRepository())
		);
	return http.build();
}
적절한 SecurityContextRepository구현체를 설정해주면 된다.
기본 구현체는 DelegatingSecurityContextRepository로 이는 다음에 처리를 위임한다.
- HttpSessionSecurityContextRepository
- RequestAttributeSecurityContextRepository
동작
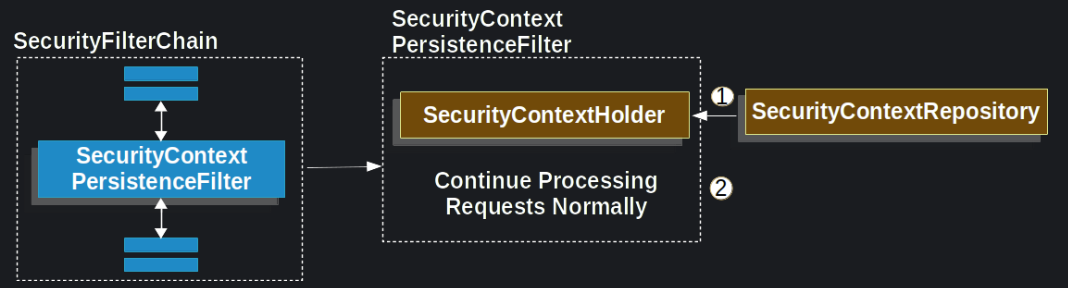
(그림에 오류가 있다 SecurityContextPersistenceFilter가 아니라 SecurityContextHolderFilter로 되어야 맞다.)
- 설정한
SecurityCurityRepository에서SecurityContext를 가져와SecurityContextHolder에 배치하고 - 나머지 과정을 진행시킵니다.
이전의 SecurityContextPersistenceFilter의 동작 구조를 보자
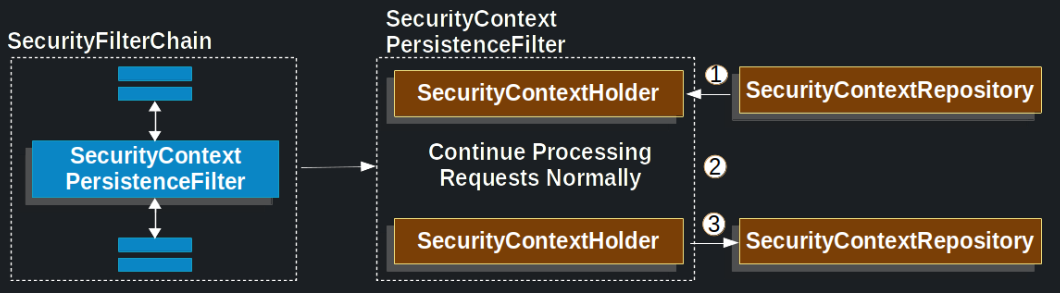
차이점이 보이는가? deprecated 된 SecurityContextPersistenceFilter에는 하나의 과정이 더 있다.
SecurityContext를 배치하고- 나머지 과정을 진행하고
- 돌아오면
SecurityContextRepository에 저장하는
과정을 맡았었다.
즉 중간의 과정에서는 SecurityContextHolder에 배치만해주고, 다 끝나면 이 필터가 저장을 해주는 방식이었다.
하지만 만약 실행중에 이미 Response가 commit되면 문제가 있다.
다음은 대표적이 예 이다.
- 만약 실행 중간에 redirect 같은 처리를 하게 된경우
- 실행중간에 이미 response가 결정된 경우
이렇게 되면, 이미 작성된 응답에 세션을 작성하는게 불가능해진다.
이걸 해결하기 위해 HttpServletRequest와 HttpServletResponse를 래핑해서 SecurityContext의 변화를 감지한다.
하지만 이제 3번의 과정이 빠졌기 때문에, SecurityContextRepository에 저장하는 일을 직접 해주어야 한다.
public SecurityFilterChain filterChain(HttpSecurity http) {
	http
		// ...
		.securityContext((securityContext) -> securityContext
			.requireExplicitSave(true)
		);
	return http.build();
}
위와 같이 설정하게 되면 아래와 같이 저장을 명시적으로 해주어야 한다.
SecurityContextHolder.setContext(securityContext);
//기존에는 위까지만 쓰면 됬지만, 이제는 아래처럼 명시적으로 저장을 해주어야함
securityContextRepository.saveContext(securityContext, httpServletRequest, httpServletResponse);
이 또한 공식 문서를 참고하면 자세히 나와있다.
SpringSecurity에서 Session을 유지하는 필터는
SecurityContextHolderFilter와RememberMeAuthenticationFilter가 있다.
이SecurityContextHolderFilter는 세션이 유지 되는 동안만 로그인을 유지시켜준다. 세션이 만료되면 다시 로그인 해야한다.
RememberMeAuthenticationFilter는 세션이 만료되어도 유지 되는 로그인 서비스를 만드는데 사용된다.
5.HeaderWriterFilter
역할
HeaderWriterFilter는 브라우저 보호를 활성화 하기 위해 일부 보안 헤더를 응답에 추가하는 일을 한다.
설정
public SecurityFilterChain filterChain(HttpSecurity http) {
	http
		// ...
		.header() //...
		//...
	return http.build();
}
스프링 부트에 의해 삽입되는 헤더들
자동 삽입
- X-Content-Type-Options: This header is used to prevent content sniffing by adding such a header:
X-Content-Type-Options: nosniff - X-XSS-Protection: With this header, XSS protection can be enforced and this makes browsers block rendering the page or sanitize it if an XSS reflection attack is detected. Spring Security defaults this header to block mode.
X-XSS-Protection: 1; mode=block - Cache-Control: The following headers are inserted to prevent caching if no cache control headers have been specified.
Cache-Control: no-cache, no-store, max-age=0, must-revalidate
Pragma: no-cache
Expires: 0 - Strict-Transport-Security: This header is inserted by Spring Security if the request is transported over HTTPS. The header forces secure connections and prevents session data stored in cookies to be lost.
Strict-Transport-Security: max-age=31536000 ; includeSubDomain
X-Frame-Options: This header is inserted to help avoiding clickjacking(UI redress attack). - X-Frame-Options: DENY
Content-Security-Policy: Content Security Policy (CSP) header helps a web application declare the trusted sources from which scripts can be loaded.
수동 삽입
- Content-Security-Policy: script-src https://myscripts.com
Spring Security does not insert this header into the response by default. So it can be configured as follows to be inserted into the response header:
//HttpSecurity http
http.headers()
.contentSecurityPolicy("script-src 'self' https://trustedscripts.example.com; object-src https://trustedplugins.example.com; report-uri /csp-report-endpoint/");- Referrer-Policy: This header is about the submission of the previous page information to the destination.
Referrer-Policy: same-origin
Spring Security does not insert this header into the response by default. So it can be configured as follows to be inserted into the response header:
//HttpSecurity http
http.headers()
.referrerPolicy(ReferrerPolicy.SAME_ORIGIN);- Feature-Policy: This header allows web site owners to enable or disable the features and APIs of the web browser. Feature-Policy will be replaced by Permissions-Policy header.
Feature-Policy: camera ‘none’; fullscreen ‘self’;
Spring Security does not insert this header into the response by default. So it can be configured as follows to be inserted into the response header:
//HttpSecurity http
http.headers()
    .featurePolicy("geolocation 'self'");
6.CorsFilter
역할
CorsFilter는 org.springframework.web.filter에 있다.
Cors 설정을 한다.
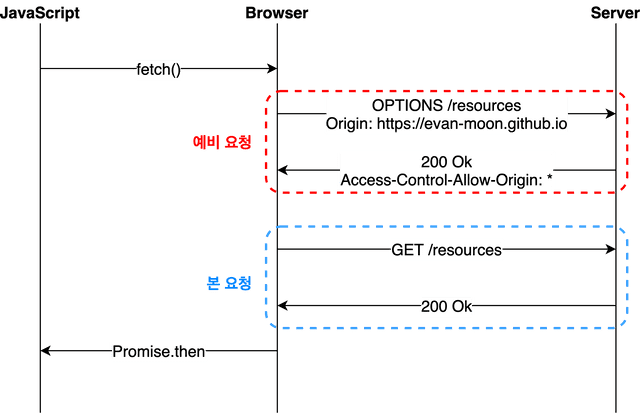
CorsFilter는 SpringSecurity 이전에 실행되어야한다.
왜냐면 그 이전의 Preflight 요청은 cookie를 포함하지 않기 때문이다.
그렇게 된다면 SpringSecurity는 인증이 되지 않았다고 판단하고 거절한다.
설정
CorsFilter가 먼저 실행되도록 하는 가장 쉬운 방법은 CorsWebFilter를 사용하는 것이다.
우리는 CorsConfigurationSource을 제공함으로써 CorsWebFilter와 SpringSecurity간의 통합을 제공할 수 있다.
@Bean
CorsConfigurationSource corsConfigurationSource() {
	CorsConfiguration configuration = new CorsConfiguration();
	configuration.setAllowedOrigins(Arrays.asList("https://example.com"));
	configuration.setAllowedMethods(Arrays.asList("GET","POST"));
	UrlBasedCorsConfigurationSource source = new UrlBasedCorsConfigurationSource();
	source.registerCorsConfiguration("/**", configuration);
	return source;
}
아래 코드는 Cors와의 통합을 비활성화 한다.
@Bean
SecurityWebFilterChain springSecurityFilterChain(ServerHttpSecurity http) {
	http
		// ...
		.cors(cors -> cors.disable());
	return http.build();
}
7.CsrfFilter
역할
이 필터는 Cross-Site Request Forgery attacks을 방지하는데 관한 것이다.
이 필터는 state를 변화 시킬 수 있는 요청에 대해 실행된다.
그러므로 API를 설계할 때 REST semantics를 엄격하게 지켜서 설계 해야한다.
특히 HTTP 메서드 GET, GEAD, TRACE, OPTIONS 같은 걸로 state를 변경하게 설계하면 안된다.
설정
@Bean
SecurityWebFilterChain springSecurityFilterChain(ServerHttpSecurity http) {
	http
		// ...
		.csrf()
        //...
	return http.build();
}
8.LogoutFilter
역할
로그아웃 필터는 RequestMatcher에 맞는 request가 오면 발동된다.(기본적으로는 /logout)이다.
LogoutHandler를 통해 로그아웃을 진행하며,
로그아웃 이후에는 어떤 생성자를 썻느냐에 따라 LogoutSuccessHandler나 logoutSuccessUrl에 의해 결정된 URL로 redirect 시킨다.
설정
@Bean
SecurityWebFilterChain springSecurityFilterChain(ServerHttpSecurity http) {
	http
		// ...
		.logout()
        //...
	return http.build();
}
SSO 관련 중간 필터들
9.OAuth2AuthorizationRequestRedirectFilter
이 Filter는 OAauth 2.0를 사용할 시 End-User의 user-agent를 인가 서버의 엔드포인트로 보냅니다.
이것은 OAuth 2.0 Authorization Request를 만듭니다. 이 Request는 Authorization Endpoint로 보내는 URI로 리다이렉트 시키는데 사용됩니다.
기본적으로는 아래와 같은 URI를 사용합니다
/oauth2/authorization/{registrationId}
10.Saml2WebSsoAuthenticationRequestFilter

위 그림은 Saml을 이용한 로그인과정을 표현한 것이다.
Saml2WebSsoAuthenticationRequestFilter은 Saml2AuthenticationRequestFactory을 이용해서 <saml2:AuthnRequest> 을 creates, signs, serializes, and encodes합니다.
Saml2WebSsoAuthenticationFilter은 15번에서 나온다.
공식 문서에서는 아래와 같이 설명한다
This Filter formulates a SAML 2.0 AuthnRequest (line 1968) and redirects to a configured asserting party.
It supports the HTTP-Redirect (line 520) and HTTP-POST (line 753) bindings.
Saml과 SAML에 관한 글 : https://jangsunjin.tistory.com/117
Pre-Authentication Filter들
11.X509AuthenticationFilter
12번의 AbstractPreAuthenticatedProcessingFilter의 자손
만약 SecurityContext가 비어있으면 Http요청에서 정보를 추출하려고 시도합니다.그리고 AuthenticationManager로 보냅니다.
12번의 구체적 구현이라고 생각하면 된다.
X509가 뭔지 모르겠다면, 이 링크를 참고하면 좋다. 너무 잘 설명해주셔서 감사할 따름이다.
내가 이해한 대로 간단하게 표현하면, 인터넷 상에서 보안을 위해 CA에서 인증서를 발급하는데, 여기서 사용되는 표준 같은 거라고 이해했다.
X.509는 암호학에서 공개키 인증서와 인증알고리즘의 표준 가운데에서 공개 키 기반(PKI)의 ITU-T 표준이다.
x.509 인증서 인증의 가장 일반적인 용도는 SSL을 사용할 때 서버의 ID를 확인하는 것입니다.
가장 일반적으로 브라우저에서 HTTPS를 사용할 때입니다.
브라우저는 서버에서 제시한 인증서가 신뢰할 수 있는 인증기관 목록중 하나에서 발급 되었는지 자동으로 확인 합니다.
12.AbstractPreAuthenticatedProcessingFilter
이 클래스는 Security Context를 검사하고 만약 비어있으면 HTTP 요청에서 유저 정보를 추출하려고 시도합니다. 그리고 AuthenticationManager로 보냅니다.
하위 클래스 들은 아래의 메서드 들을 오버라이드 해야됩니다.
protected abstract Object getPreAuthenticatedPrincipal(HttpServletRequest request);

protected abstract Object getPreAuthenticatedCredentials(HttpServletRequest request);
요청하는 사용자를 식별하고, 사용자에 대한 권한을 얻는 이 두 메서드가 주축이 되고 세부사항은 외부 인증 메커니즘에 따릅니다. 대표적인 예로 X.509의 경우 인증서 정보로, Siteminder의 경우 HTTP 요청 헤더로 사용자를 식별할 수 있습니다.
SSO Authentication관련 Filter들
AbstractAuthenticationProcessingFilter 구현체들
각각은 적절한 요청을 감지하여 진행되며, 정보를 뽑아 알맞은 Token(Authentication) 을 만들어 AuthenticationManager에게 인증을 요청한다.
SSO에 대한 자세한 설명은 아마존 문서를 참고하면 도움된다.
대표적인 예시로 Saml2의 인증과정을 예시로 들겠다.
이런 과정을 통해서 Saml2WebSsoAuthenticationFilter로 들어가게 되면,
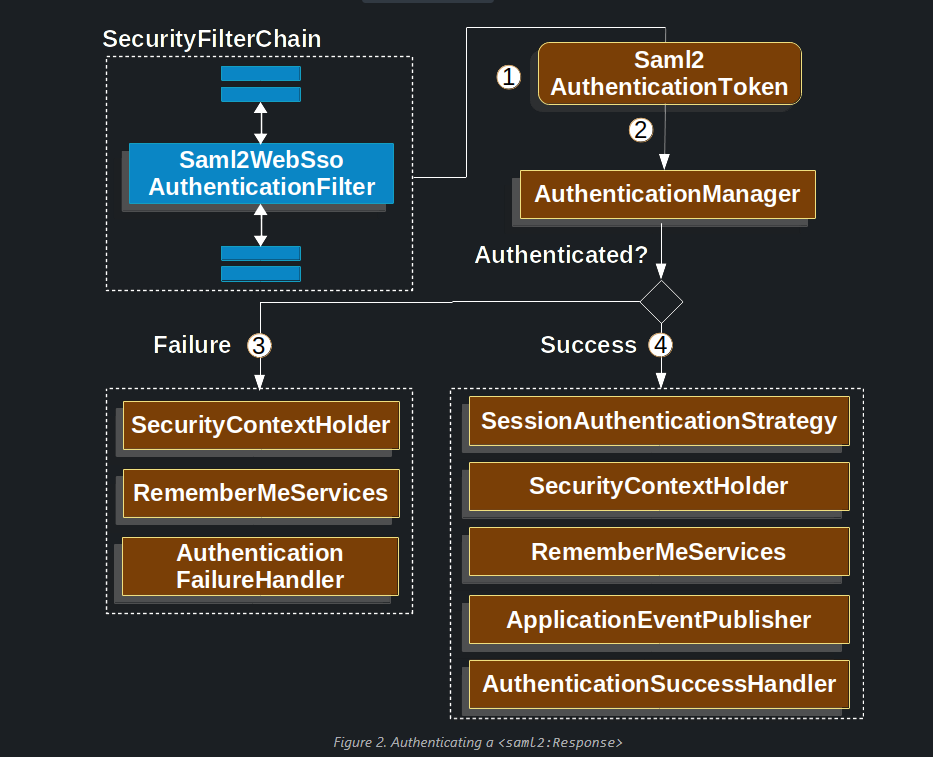
이런식으로 익숙한 과정이 펼쳐지게 된다.
타 과정과 똑같이 토큰을 만들고 AuthenticationManager에 넘겨서 적절한 AuthenticationProvier에 매칭시켜주고 인증을 진행한다.
대표적인 SSO 구현 방식은
- CAS
- OAuth
- SAML
- OIDC
- Kerberos
등이 있으며, 아래의 13,14,15는AbstractAuthenticationProcessingFilter의 구현체 이다.
자세한 구현 방법은 공식 레퍼런스 문서를 참고하면 된다.
https://docs.spring.io/spring-security/reference/index.html
13.CasAuthenticationFilter
14.OAuth2LoginAuthenticationFilter
15.Saml2WebSsoAuthenticationFilter
16.UsernamePasswordAuthenticationFilter
마찬가지로 AbstractAuthenticationProcessingFilter의 자손이다.
역할
UsernamePasswordAuthenticationFilter은 form login을 처리하는 필터이다.
form은 반드시 username과 password를 담고 있어야한다.
이 필터의 기본 RequestMatcher은 /login이다. 그리고 '/login' 요청이 만들어지면 필터는 username과 password를 request body에서 읽는다. 만약 존재한다면 유저를 authenticate 합니다.
아래는 상세 과정을 설명하고 있습니다.
사전과정
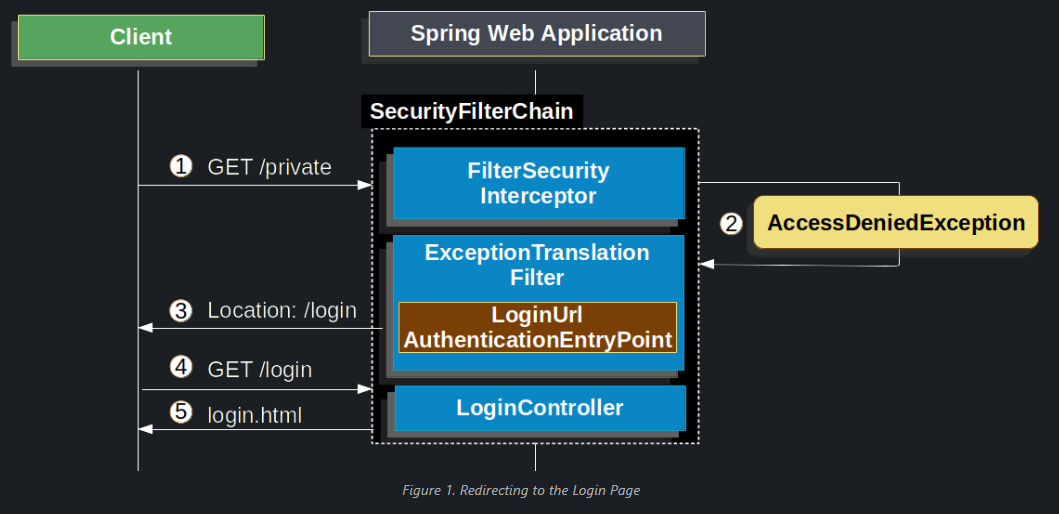
위 그림에서는 이 필터가 동작하기 전 사전 과정을 보여주고 있다.
AccessDeniedException이 발생해서 브라우저를 로그인 페이지로 redirect 시킨다.
그리고 컨트롤러가 로그인 페이지를 보내준다.
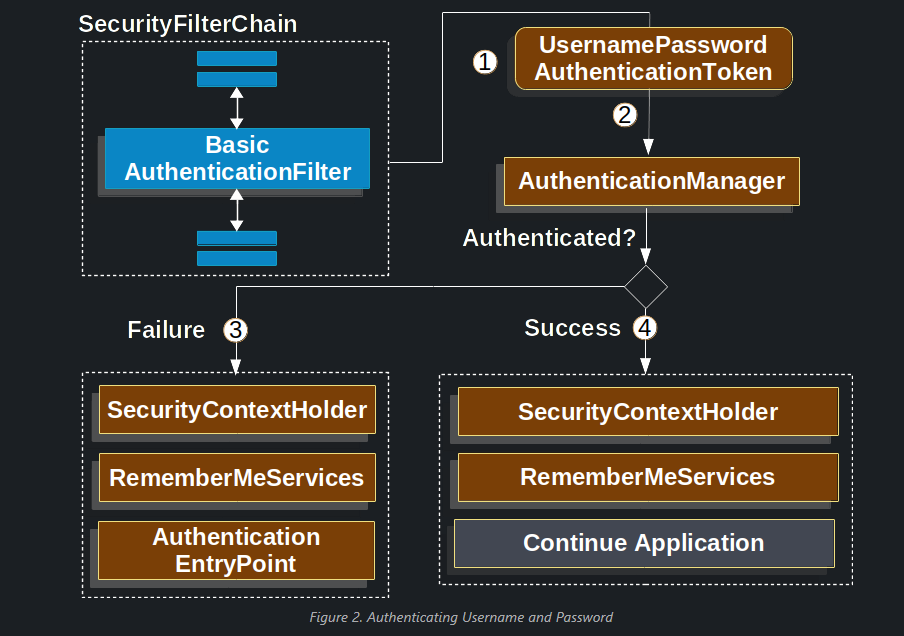
작동과정
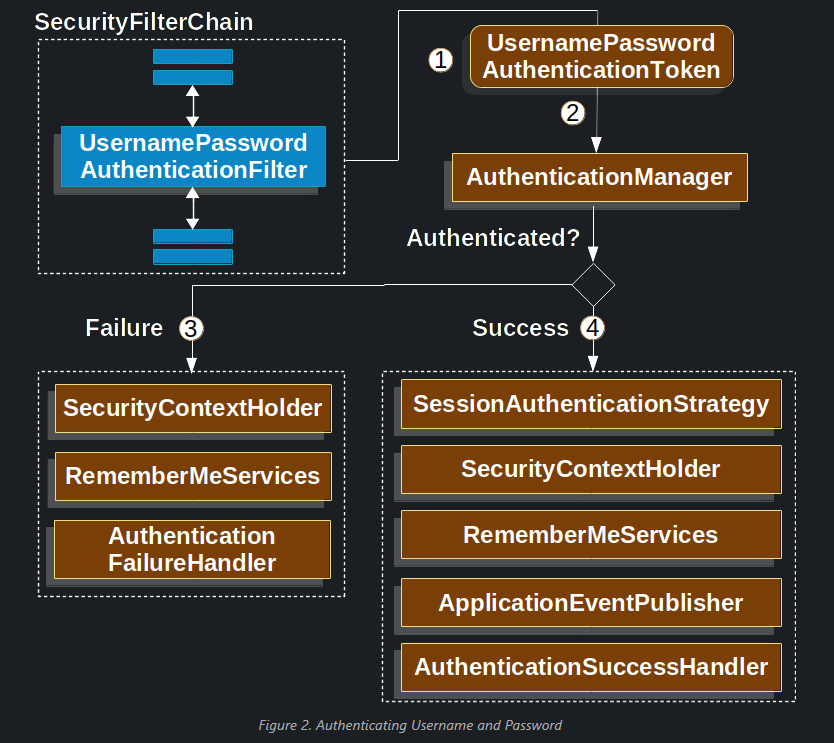
타 과정과 비슷하다. Authentication을 상속한 UsernamePasswordAuthenticationToken을 만들고 AuthenticationManager에게 전달해 Authentication을 진행한다.
설정
최소한의 설정
public SecurityFilterChain filterChain(HttpSecurity http) {
	http
		.formLogin(withDefaults());
	// ...
}
커스텀 설정
public SecurityFilterChain filterChain(HttpSecurity http) {
	http
		.formLogin(form -> form
			.loginPage("/login")
			.permitAll()
		);
	// ...
}
추가적으로 로그인 페이지를 전달해주는 컨트롤러와, 로그인 페이지를 구현해주면 된다.
기본 로그인 필터
이는 사용자가 로그인 페이지를 설정하지 않았을 경우 기본 페이지를 제공하기 위해 존재합니다.
설정을 할경우 실행되지 않습니다
17.DefaultLoginPageGeneratingFilter
이는 사용자가 로그인 페이지를 설정하지 않았을 경우 사용됩니다.
로그인 페이지로 리다이렉트 될 때만 사용합니다.
18.DefaultLogoutPageGeneratingFilter
기본 제공 로그아웃 페이지를 생성합니다.
19.ConcurrentSessionFilter
필터의 기능
세션의 업데이트와 만료 체크를 담당한다.
- request마다 매번
SessionRegistry.refreshLastRequest(String)을 호출해서 등록된 세션이 항상 올바른 "last update" date/time을 갖도록 한다. - 각 request마다
SessionRegistry에서SessionInformation을 불러와서 세션이 만료되었는지 체크한다.
만약 만료 되었으면(흔히 무효화된 세션이면), 설정된 logout handler를 호출한다.
만료된 세션을 처리하기 위해 만들어진SessionInformationExpiredStrategy를 호출한다.
web.xml에 등록된HttpSessionEventPublisher를 통해HttpSessionDestroyedEvent가 호출된다.
20.DigestAuthenticationFilter
Digest Authentication 을 지원하기 위해 제공되는 필터
이 인증 방식은 보안상 문제가 있어 사용이 권장되지 않는다.
You should not use Digest Authentication in modern applications, because it is not considered to be secure. The most obvious problem is that you must store your passwords in plaintext or an encrypted or MD5 format. All of these storage formats are considered insecure. Instead, you should store credentials by using a one way adaptive password hash (bCrypt, PBKDF2, SCrypt, and others), which is not supported by Digest Authentication.
21.BearerTokenAuthenticationFilter
OAuth 2.0 Baerer Token을 포함한 Authentication Request 를 Authenticate한다.
이 필터는 OncePerRequestFilter의 구현체이다. 이름 그대로 요청당 한번만 실행된다.
하지만 BearerTokenAuthenticationToken을 Authenticate 할 수 있는 AuthenticationManager가 주입되어야 한다.
23.BasicAuthenticationFilter
역할
HTTP request의 BASIC authorization 헤더를 처리한다.
Authorization: Basic QWxhZGRpbjpvcGVuIHNlc2FtZQ==
이런식으로 Authorization 헤더에 값을 넣는다.
Basic 다음 값은 Base64로 인코딩된 username:password 을 넣는다.
이를 변형해서 JWT 토큰을 Authorization 헤더에 넣어서 관련 처리를 해주도록 할 수도 있다.
결과를 SecurityContextHolder에 넣는다.
이 필터는 OncePerRequestFilter의 구현체이다. 이름 그대로 요청당 한번만 실행된다.
처리 과정
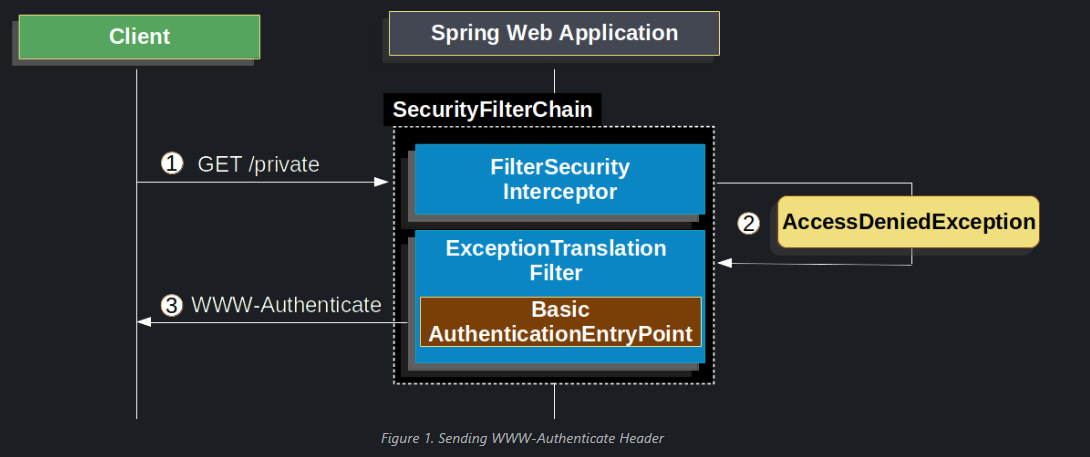
클라이언트가 WWW-Authenticate 헤더를 받으면, username과 password와 함께 다시 시도해야한다는 것을 알아 차립니다.
그리고 Authorization 헤더가 포함된 요청을 보내면 BasicAuthenticationFilter이 실행됩니다.
설정 방법
public SecurityFilterChain filterChain(HttpSecurity http) {
	http
		.httpBasic(basic -> basic
			//관련 설정
		);
	// ...
}
커스텀 BasicAuthentication 넣는법
일단 httpBasic을 disable 하고 BasicAuthenticationFilter를 상속한 필터를 삽입해주면 된다.
	@Bean
	public SecurityFilterChain filterChain(HttpSecurity http) {
		http
			.httpBasic().disable(); //비활성화
            .apply(new MyCustomDsl()) //커스텀 필터 등록
		// ...
	}

    public class MyCustomDsl extends AbstractHttpConfigurer<MyCustomDsl,HttpSecurity>{ //커스텀 필터 등록
        @Override
        public void configure(HttpSecurity http) throws Exception {
            AuthenticationManager authenticationManager = http.getSharedObject(AuthenticationManager.class);
            http
                    .addFilter(new JwtAuthorizationFilter(authenticationManager,userRepository));
                    //JwtAuthorizationFilter extend BasicAuthenticationFilter
        }
    }
24.RequestCacheAwareFilter
RequestCache는 HttpServletRequest를 저장한다. Authentication이 성공적으로 진행되면, 저장해놨던 Request를 리플레이한다.
RequestCacheAweareFilter은 RequestCache를 이용해서 HttpServletRequest저장하는 역할을 한다.
기본적으로는 HttpSessionRequestCache가 사용된다.
아래의 코드는 RequestCache의 구현체중 하나인 HttpSessionRequestCache를 설정해서 적용하는 방법이다. "continue" 파라미터가 존재하면, 요청을 저장하기 위해 체크하도록 설정하였다.
설정 방법
@Bean
DefaultSecurityFilterChain springSecurity(HttpSecurity http) throws Exception {
	HttpSessionRequestCache requestCache = new HttpSessionRequestCache();
	requestCache.setMatchingRequestParameterName("continue");
	http
		// ...
		.requestCache((cache) -> cache
			.requestCache(requestCache)
		);
	return http.build();
}
25.JaasApiIntegrationFilter
Java Authentication and Authorization Service (JAAS)
SpringSecurity에서는 JAAS 를 통한 인증을 제공한다.
SpringSecurity는 JAAS에게 요청을 위임한다.
이 필터는 JAAS Subject를 얻고 FilterChain을 계속하도록 시도합니다.
이 필터를 Spring의 JaasAuthenticationProvider와 함께 사용하면, Spring의 SecurityContext 와 Jaas Subject가 동시에 채워질 수 있다.
이것은 JAAS Subject가 채워지는 기능이 필요한 코드에서 통합을 제공하므로 유용하다.
26.RememberMeAuthenticationFilter
SpringSecurity에서 Session을 유지하는 필터는
SecurityContextHolderFilter와RememberMeAuthenticationFilter가 있다.
(정확한 표현은 아니다. SecurityContextRepository가 세션 방식으로 작동할때)
이SecurityContextHolderFilter는 세션이 유지 되는 동안만 로그인을 유지시켜준다. 세션이 만료되면 다시 로그인 해야한다.
RememberMeAuthenticationFilter는 세션이 만료되어도 유지 되는 로그인 서비스를 만드는데 사용된다.
기능
만약 SecurityContext에 Authentication 오브젝트가 없으면 실행됩니다.
그리고 RememberMeService의 구현체에서 요청하는 경우 remember-me authentication token 으로 context를 채웁니다.
RememeberMeService의 구현체들은 RememeberMeService.autoLogin(HttpServletRequest, HttpServletResponse) 메서드를 가지고 있다. 그리고 이 필터는 그 메서드를 호출한다.
만약 이 메서드가 null 이 아닌 Authentication 오브젝트를 리턴하면 그 오브젝트를 AuthenticationManager에 넘겨준다.
그리고 최종적으로 받아진 Authentication객체가 SecurityContext에 넣어지게 된다.
만약 인증이 성공적이라면 InteractiveAuthenticationSuccessEvent가 application context로 발행된다. 인증이 실패하면 아무 이벤트도 발행되지 않는다.
설정 예시
@Bean
SecurityFilterChain securityFilterChain(HttpSecurity http, RememberMeServices rememberMeServices) throws Exception {
	http
			.authorizeHttpRequests((authorize) -> authorize
					.anyRequest().authenticated()
			)
			.rememberMe((remember) -> remember
				.rememberMeServices(rememberMeServices)
			);
	return http.build();
}

@Bean
RememberMeServices rememberMeServices(UserDetailsService userDetailsService) {
	RememberMeTokenAlgorithm encodingAlgorithm = RememberMeTokenAlgorithm.SHA256;
	TokenBasedRememberMeServices rememberMe = new TokenBasedRememberMeServices(myKey, userDetailsService, encodingAlgorithm);
	rememberMe.setMatchingAlgorithm(RememberMeTokenAlgorithm.MD5);
	return rememberMe;
}
개인적으로 나중에 참고해보면 좋을 자료
https://velog.io/@kyukim/remember-me-%EA%B5%AC%ED%98%84-%EC%82%BD%EC%A7%88-%EA%B8%B0%EB%A1%9D
Remember-me 도는 영구 로그인 인증은
웹사이트가 세션 간에 Principal의 Id를 기억 할 수 있는 것을 말합니다.
일반적으로는 쿠키가 브라우저에 전송함으로써 수행되며, 미래에 쿠키가 감지됨으로써 자동으로 로그인이 시행됩니다.스프링 시큐리티는 이러한 작업을 수행하는데 필요한 두가지 구현체를 제공합니다.
하나는 쿠키 기반의 토큰에 보안을 유지하기 위해 해싱을 사용하고,
하나는 데이터베이스나 영구 저장장치 메커니즘을 이용하여 생성된 토큰을 저장한다.중요한건 둘다
UserDetailsService를 필요로 한다는 것이다.만약
UserDetailsService를 사용하지 않은AuthenticationProvider를 사용한다면,UserDetailsService가 application context에 빈으로 등록되어있는지 확인해야 한다. 만약 등록되어 있지 않다면 이는 작동하지 않는다.자세한 사항은 공식 문서를 참고해보자.
26.AnonymousAuthenticationFilter
만약 SecurityContextHolder에 Authentication 오브젝트가 없으면 AnonymousAuthenticationToken를 생성합니다. 그리고 이는 ProviderManager를 거쳐 AnonymousAuthenticationProvider 처리됩니다.
이 필터는 이 결과로 생성된 AnonymousAuthenticationToken 을 SecurityContextHolder를 채웁니다.
anonymous user는 spring security가 인증되지 않은 유저를 처리하는 방식이며, ROLE_ANONYMOUS 역할을 가진 익명 유저로 처리한다.
설정 방법
//HttpSecurity http
http.anonymous()
주의 : Spring MVC에서 anonymous Authentication
잘못된 예시
@GetMapping("/")
public String method(Authentication authentication) {
	if (authentication instanceof AnonymousAuthenticationToken) {
		return "anonymous";
	} else {
		return "not anonymous";
	}
}
이렇게 하면 anonymous 요청에도 항상 "not anonymous"를 리턴할 것이다.
왜 그렇냐면, Spring Mvc는 HttpServletRequest#getPrincipal를 사용하여 파라미터를 해결하기 때문이다. 그래서 anonymous 일때는 null 을 반환한다.
올바른 예시
그래서 anonymous 요청에 대해 Authentication을 얻고 싶다면, 다음과 같이 사용해야한다.
@GetMapping("/")
public String method(@CurrentSecurityContext SecurityContext context) {
	return context.getAuthentication().getName();
}
27.OAuth2AuthorizationCodeGrantFilter
OAuth 2.0에서 access token을 얻는 방법중 하나인 OAuth 2.0 Authorization Code Grant를 위한 필터이다.
이 필터는 OAuth 2.0 Authorization Response의 처리를 다룬다.
OAuth 2.0 Authorization Response의 과정은 이러하다.
- 유저가 클라이언트(우리 서버)에 대한 엑세스 권한을 부여했다면, 인증 서버(ex. google)는 redirect_uri(Authorization 요청에서 주어졌던)에 각종 code, state, parameters를 담아 유저를 이 필터로 redirect 시킵니다.
- 이 필터는
OAuth2AuthorizationCodeAuthenticationToken을 받은 code와 함께 만들어서AuthenticationManager에게 authenticate 과정을 위임합니다. - 성공적인 인증이 완료되면, 클라이언트를 access token과 Principal에 연결함으로
Authorized Client가 만들어지고,OAuth2AuthorizedClientRepository에 이것을 저장합니다.
28.SessionManagementFilter
SessionManagementFilter는 SecurityContextHolder에 대해 SecurityContextRepository를 확인하여 유저가 현재 요청 동안에 Authenticated 된 것인지 결정합니다.
non-interactive authentication 으로 분류되는 pre-authentication 이나 remember-me 같은 것이 현재 요청 중에 인증된 대표적인 예입니다.
주요 로직
만약 repository가 security context를 포함하고 있다면, 필터는 아무 동작도 하지 않습니다.
만약 그렇지 않으면서 thread-local의 SecurityContext가 non-anonymous Authentication object 를 가지고 있다면,
필터는 stack의 이전 필터에서 인증되었다고 추측합니다.
그리고 설정된 SessionAuthenticationStrategy를 실행합니다.
만약 유저가 아직 인증되지 않았다면, 필터는 유효하지 않은 session ID가 요청되었는지 체크합니다.(timeout 같은 것들에 의해)
그리고 설정된 InvalidSessionStrategy가 있다면 실행합니다.
가장 흔한 처리는 그냥 고정된 URL로 보내는 것이고 이것은 표준 구현체인 SimpleRedirectInvalidSessionStrategy에 담겨있습니다.
인증 후 리 다이렉트를 하는 메커니즘(form 로그인 같은)은
SessionManageMentFilter에 의해 감지 되지 않습니다. 이들은 인증 요청중에 이 필터가 실행되지 않습니다.
이들은 각각 세션 관리 기능을 각각 처리해야 합니다.
자세한 설정 종류는 공식 문서에 자세히 설명 되어있습니다.
설정 예시
한 계정에서 동시 접속을 컨트롤 하는 것 또한 매우 간단하게 구현이 가능하다.
먼저 Spring Security가 Session Lifecycle Event에 대해 지속적으로 업데이트하도록 하기 위해 아래 listener를 등록한다.
@Bean
public HttpSessionEventPublisher httpSessionEventPublisher() {
    return new HttpSessionEventPublisher();
}
그리고 아래 코드를 추가한다.
@Bean
public SecurityFilterChain filterChain(HttpSecurity http) {
    http
        .sessionManagement(session -> session
            .maximumSessions(1)
        );
    return http.build();
}
이 코드는 로그인이 된 상태로 두번째 로그인이 발생하면 첫번째 로그인이 무효화 된다.
때로는 두번째 로그인을 막아야 할 때도 있다. 그럴때는 다음 설정을 하면 된다.
@Bean
public SecurityFilterChain filterChain(HttpSecurity http) {
    http
        .sessionManagement(session -> session
            .maximumSessions(1)
            .maxSessionsPreventsLogin(true)
        );
    return http.build();
}
The second login is then rejected. By “rejected”, we mean that the user is sent to the authentication-failure-url if form-based login is being used. If the second authentication takes place through another non-interactive mechanism, such as “remember-me”, an “unauthorized” (401) error is sent to the client. If, instead, you want to use an error page, you can add the session-authentication-error-url attribute to the session-management element.
29.ExceptionTranslationFilter
이 또한 매우 중요한 필터이다.
이 필터는 AccessDeniedException과 AuthenticationException를 받아서 HTTP responses로 변환한다.
설정
@Bean
public SecurityFilterChain filterChain(HttpSecurity http) {
    http
        .exceptionHandling()
        //...
    return http.build();
}
동작 과정
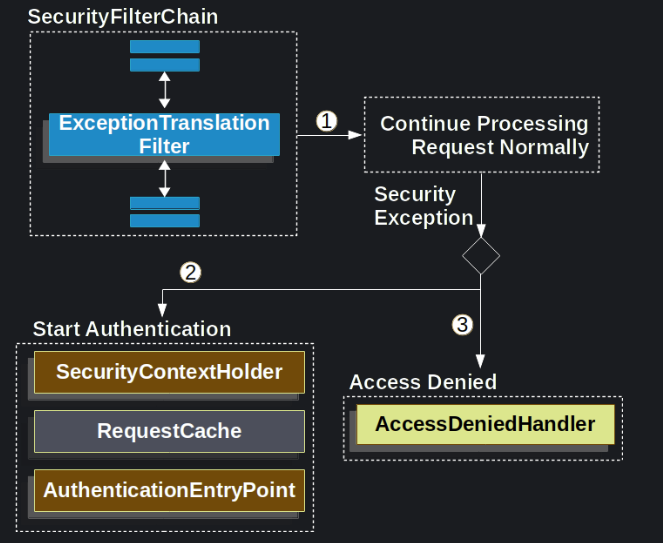
ExceptionTranslationFilter가 실행되면FilterChain.doFilter(request, response)를 통해 나머지 application을 실행한다.- 유저가 인증되지 않았으면,
AuthenticationException이 발생한다. 그리고 인증을 시작한다.- SecurityContextHolder 를 비운다
HttpServletRequest를 저장해서 인증이 성공하면 replay 할 수 있도록 한다.AuthenticationEntryPoint는 클라이언트한테 credentials 를 요청한다.
예를 들면 로그인 페이지로 리다이렉트 시킨다던가, 아니면WWW-Authenticate헤더를 보낸다던가 하는 것이 있다.
- 만약
AccessDeniedException이 발생하면AccessDeniedHandler가 실행되어 접근 거부를 처리한다.
만약 application이 AccessDeniedException이나 AuthenticationException이 발생하지 않는다면 ExceptionTranslationFilter는 아무 일도 하지 않는다.
30.AuthorizationFilter
FilterSecurityInterceptor가 AuthorizationFilter로 바뀌었다.
나의 글에서 매우 자세히 다루었다. (https://velog.io/@on5949/SpringSecurity-Authorization-%EC%95%84%ED%82%A4%ED%85%8D%EC%B3%90)
그리고 각종 매칭에 대해 공식 문서에서 자세히 다루고 있다 (https://docs.spring.io/spring-security/reference/servlet/authorization/authorize-http-requests.html)
이 필터는 HttpServletRequest에 대해 Authorization을 제공한다.
설정 예시
@Bean
SecurityFilterChain web(HttpSecurity http) throws Exception {
	http
		// ...
		.authorizeHttpRequests(authorize -> authorize
			.requestMatchers("/resources/**", "/signup", "/about").permitAll()
			.requestMatchers("/admin/**").hasRole("ADMIN")
			.requestMatchers("/db/**").access(new WebExpressionAuthorizationManager("hasRole('ADMIN') and hasRole('DBA')"))
			// .requestMatchers("/db/**").access(AuthorizationManagers.allOf(AuthorityAuthorizationManager.hasRole("ADMIN"), AuthorityAuthorizationManager.hasRole("DBA")))
			.anyRequest().denyAll()
		);

	return http.build();
}
31.SwitchUserFilter
이 필터는 유저 Context를 전환하는 특수한 역할을 맡는다. 아주 재밌는 역할이다.
대표적인 사용 예시로는 ROLE_ADMIN을 가진 높은 권한의 유저가 ROLE_USER의 일반 유저로 전환하는 기능을 구현할 때 사용된다.
이 필터는 이 유저 전환을 시도하는 것이 일반적인 로그인을 필요로 하다고 가정한다.(예를 들면 ROLE_ADMIN 유저로)
그리고 그 유저(아마 관리자)는 "자기가 되고싶은 유저로 전환할 수 있는 기능"을 제공하는 페이지나 컨트롤러에 접근해서 자기 자신을 바꿀 수 있다. (switchUserUrl)
아마 예상했듯이 이 Url은 적절한 사용자만 접근할 수 있도록 적절한 보안구성을 해야한다. (ROLE_ADMIN 처럼)
성공적인 전환이 일어나면 유저의 SecurityContext는 업데이트되며, SecurityContext는 원래의 유저를 담고있는 SwitchUserGrantedAuthority를 추가적으로 포함한다.
전환 전에 현재의 유저가 이미 전환된 유저인지 체크하는 과정을 통해 중복해서 전환된 유저가 생기지 않도록 방지한다.
이 전환된 유저 context에서 벗어나기 위해서는 유저는 다시 원래 유저로 돌아가기 위한 URL(exitUserUrl)을 사용한다.
이를 설정하기 위해서 SwitchUserFilter는 빈에 등록되면 된다.
중요한 점은 적절한 보안구속을 하기 위해서 SwitchUserFilter는 반드시 AuthorizationFilter의 후에 배치되어야 한다는 점이다.
