이번 글에서는 예외 처리 관련 동작 중, tomcat의 예외 처리에 대해 자세히 알아보겠다.
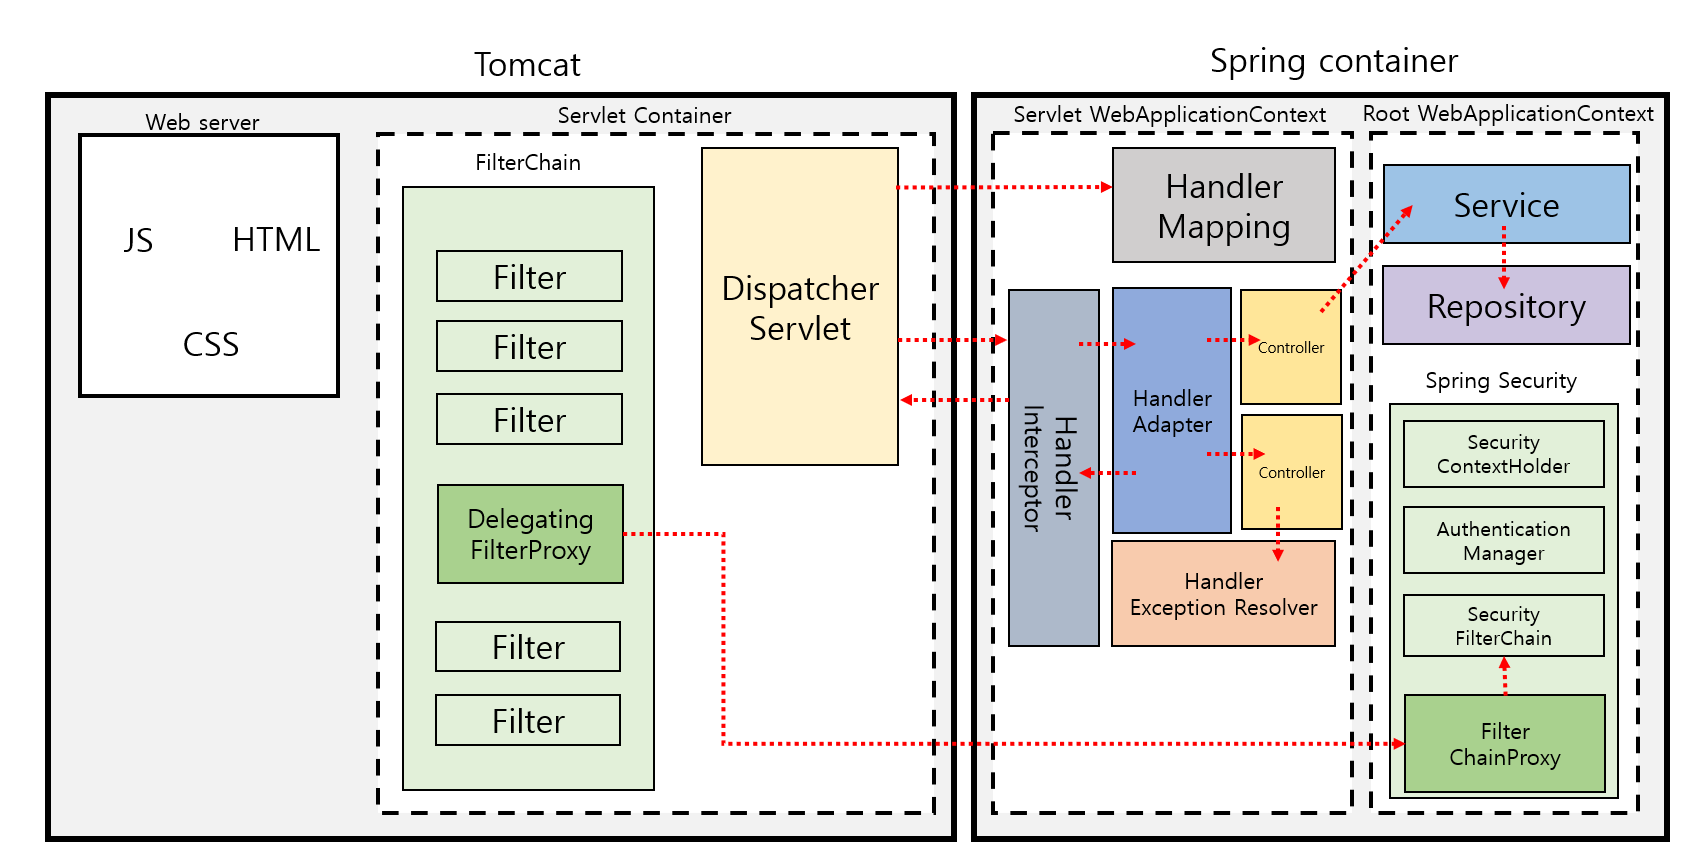
스프링의 기본 구조이다.(mvc servlet tomcat 기준)
스프링 에러처리에 관련된 글을 보면 다음과 같은 문구를 볼 수가 있다.
예외가 처리되지 않고 tomcat까지 가면, /error 가 발생한다.
아예 틀린 말은 아니지만, 여러 상황중 대표적인 한 상황에서만 맞는 표현이다.
오늘은 자세히 이 동작을 들여다 보겠다.
ex. 참고로 결론부터 말하자면,
- exception이 발생하는게 조건이 아니다. errorState가 조건이다.
- /error의 경우 기본 값이고 더 정확히는 등록된 ErrorPage 객체중 첫번째를 택한다.
사전지식
interface Valve
org.apache.catalina.Valve
public interface Valve {

    Valve getNext();

    void setNext(Valve valve);

    void backgroundProcess();

    void invoke(Request request, Response response)
        throws IOException, ServletException;

    boolean isAsyncSupported();
}
톰캣에서는 이 Valve라는 어노테이션의 구현체들이 서로가 Next가 되어 파이프라인을 구성한다.
Response, Request
우리가 흔히 스프링을 사용할 때 다루는 HttpServletResponse 인터페이스는, ServletResponse에서 Http에 한정적인 기능을 확장한 인터페이스다
이의 구현체로
package org.apache.catalina.connector;

/**
 * Wrapper object for the Coyote response.
 *
 * @author Remy Maucherat
 * @author Craig R. McClanahan
 */
public class Response implements HttpServletResponse {
톰캣에서는 이를 사용하는것 같다.(내가 디버깅 했을 때는 그러했다.)
설명을 보면 알겠지만 coyote response를 감싸고 있다. 이 coyote response가 바로 위에서 말한 valve에서 인자로 주고 받는 request, response이다. 즉 이 coyote response를 org.apache.catalina.connector 로 감싸서 우리한테 던져주는 것이다.
package org.apache.coyote;

public final class Response {
coyote response의 errorState
이 coyote response에는 특이한 필드가 하나 있는데,
private final AtomicInteger errorState = new AtomicInteger(0); The state machine is very simple:
0 - NONE
1 - NOT_REPORTED
2 - REPORTED
-->---->-- >NONE
| | |
| | | setError()
^ ^ |
| | \|/
| |-<-NOT_REPORTED
| |
^ | report()
| |
| \|/
|----<----REPORTED그림을 보면 바로 이해가 갈 것이다. setError()와 report()로 상태를 제어할 수 있다.
바로 이 플래그에 톰캣에서 반응한다.
사전지식은 이정도면 된것 같다. 이제 코드를 살펴보자.
매우 간단한 설명부터
이해를 쉽게 하기 위해 내가 처했던 상황을 예로 들어보자
- Spring Security를 사용하고 있고 AuthenticationEntryPoint와 같은 설정은 모두 기본값을 사용했다.
- /test 로 요청을 보내면 403 으로 거부한다.
- /error 페이지는 permitAll()로 설정되어 있다.
분명히 내부에서 예외가 톰캣으로 던져지지 않았는데, /error 페이지로 요청이 가는 상황이었다.
그 이유는 무엇일까?
결론부터 이야기 하자면, 바로 AuthenticationEntryPoint에서 response.sendError()를 호출했기 때문이다.
    @Override
    public void sendError(int status, String message) throws IOException {

        //...
        setError();

        getCoyoteResponse().setStatus(status);
        getCoyoteResponse().setMessage(message);

        // Clear any data content that has been buffered
        resetBuffer();

        // Cause the response to be finished (from the application perspective)
        setSuspended(true);
    }
이 코드를 보면,setError를 호출하는데, 내부에 wrapping하고 있는 coyote response에 errorState플레그를 에러 상태로 변화시킨다.
그래서 이게 무엇이 무슨 효과가 있냐?
StandardHostValue.java
// invoke 메서드 중
            response.setSuspended(false);

            Throwable t = (Throwable) request.getAttribute(RequestDispatcher.ERROR_EXCEPTION);

            // Protect against NPEs if the context was destroyed during a
            // long running request.
            if (!context.getState().isAvailable()) {
                return;
            }

            // Look for (and render if found) an application level error page
            if (response.isErrorReportRequired()) {
                // If an error has occurred that prevents further I/O, don't waste time
                // producing an error report that will never be read
                AtomicBoolean result = new AtomicBoolean(false);
                response.getCoyoteResponse().action(ActionCode.IS_IO_ALLOWED, result);
                if (result.get()) {
                    if (t != null) {
                        throwable(request, response, t);
                    } else {
                        status(request, response);
                    }
                }
            }
바로 여기서 isErrorReportRequired라는 메서드가 errorState 플레그를 확인한다.
그래서 errorFlag가 에러 상태라면 if문 안의 코드를 실행시킨다.
status와 throwable의 차이는 인자로 Throwable을 받느냐의 차이가 있는데 전체적인 실행과 동작은 비슷하다.
이후에는 status라는 이름으로 퉁쳐서 설명하겠다.
자세한 코드는 직접 코드를 열어보는 것을 추천하고, 주요 코드 동작만 간추리겠다.
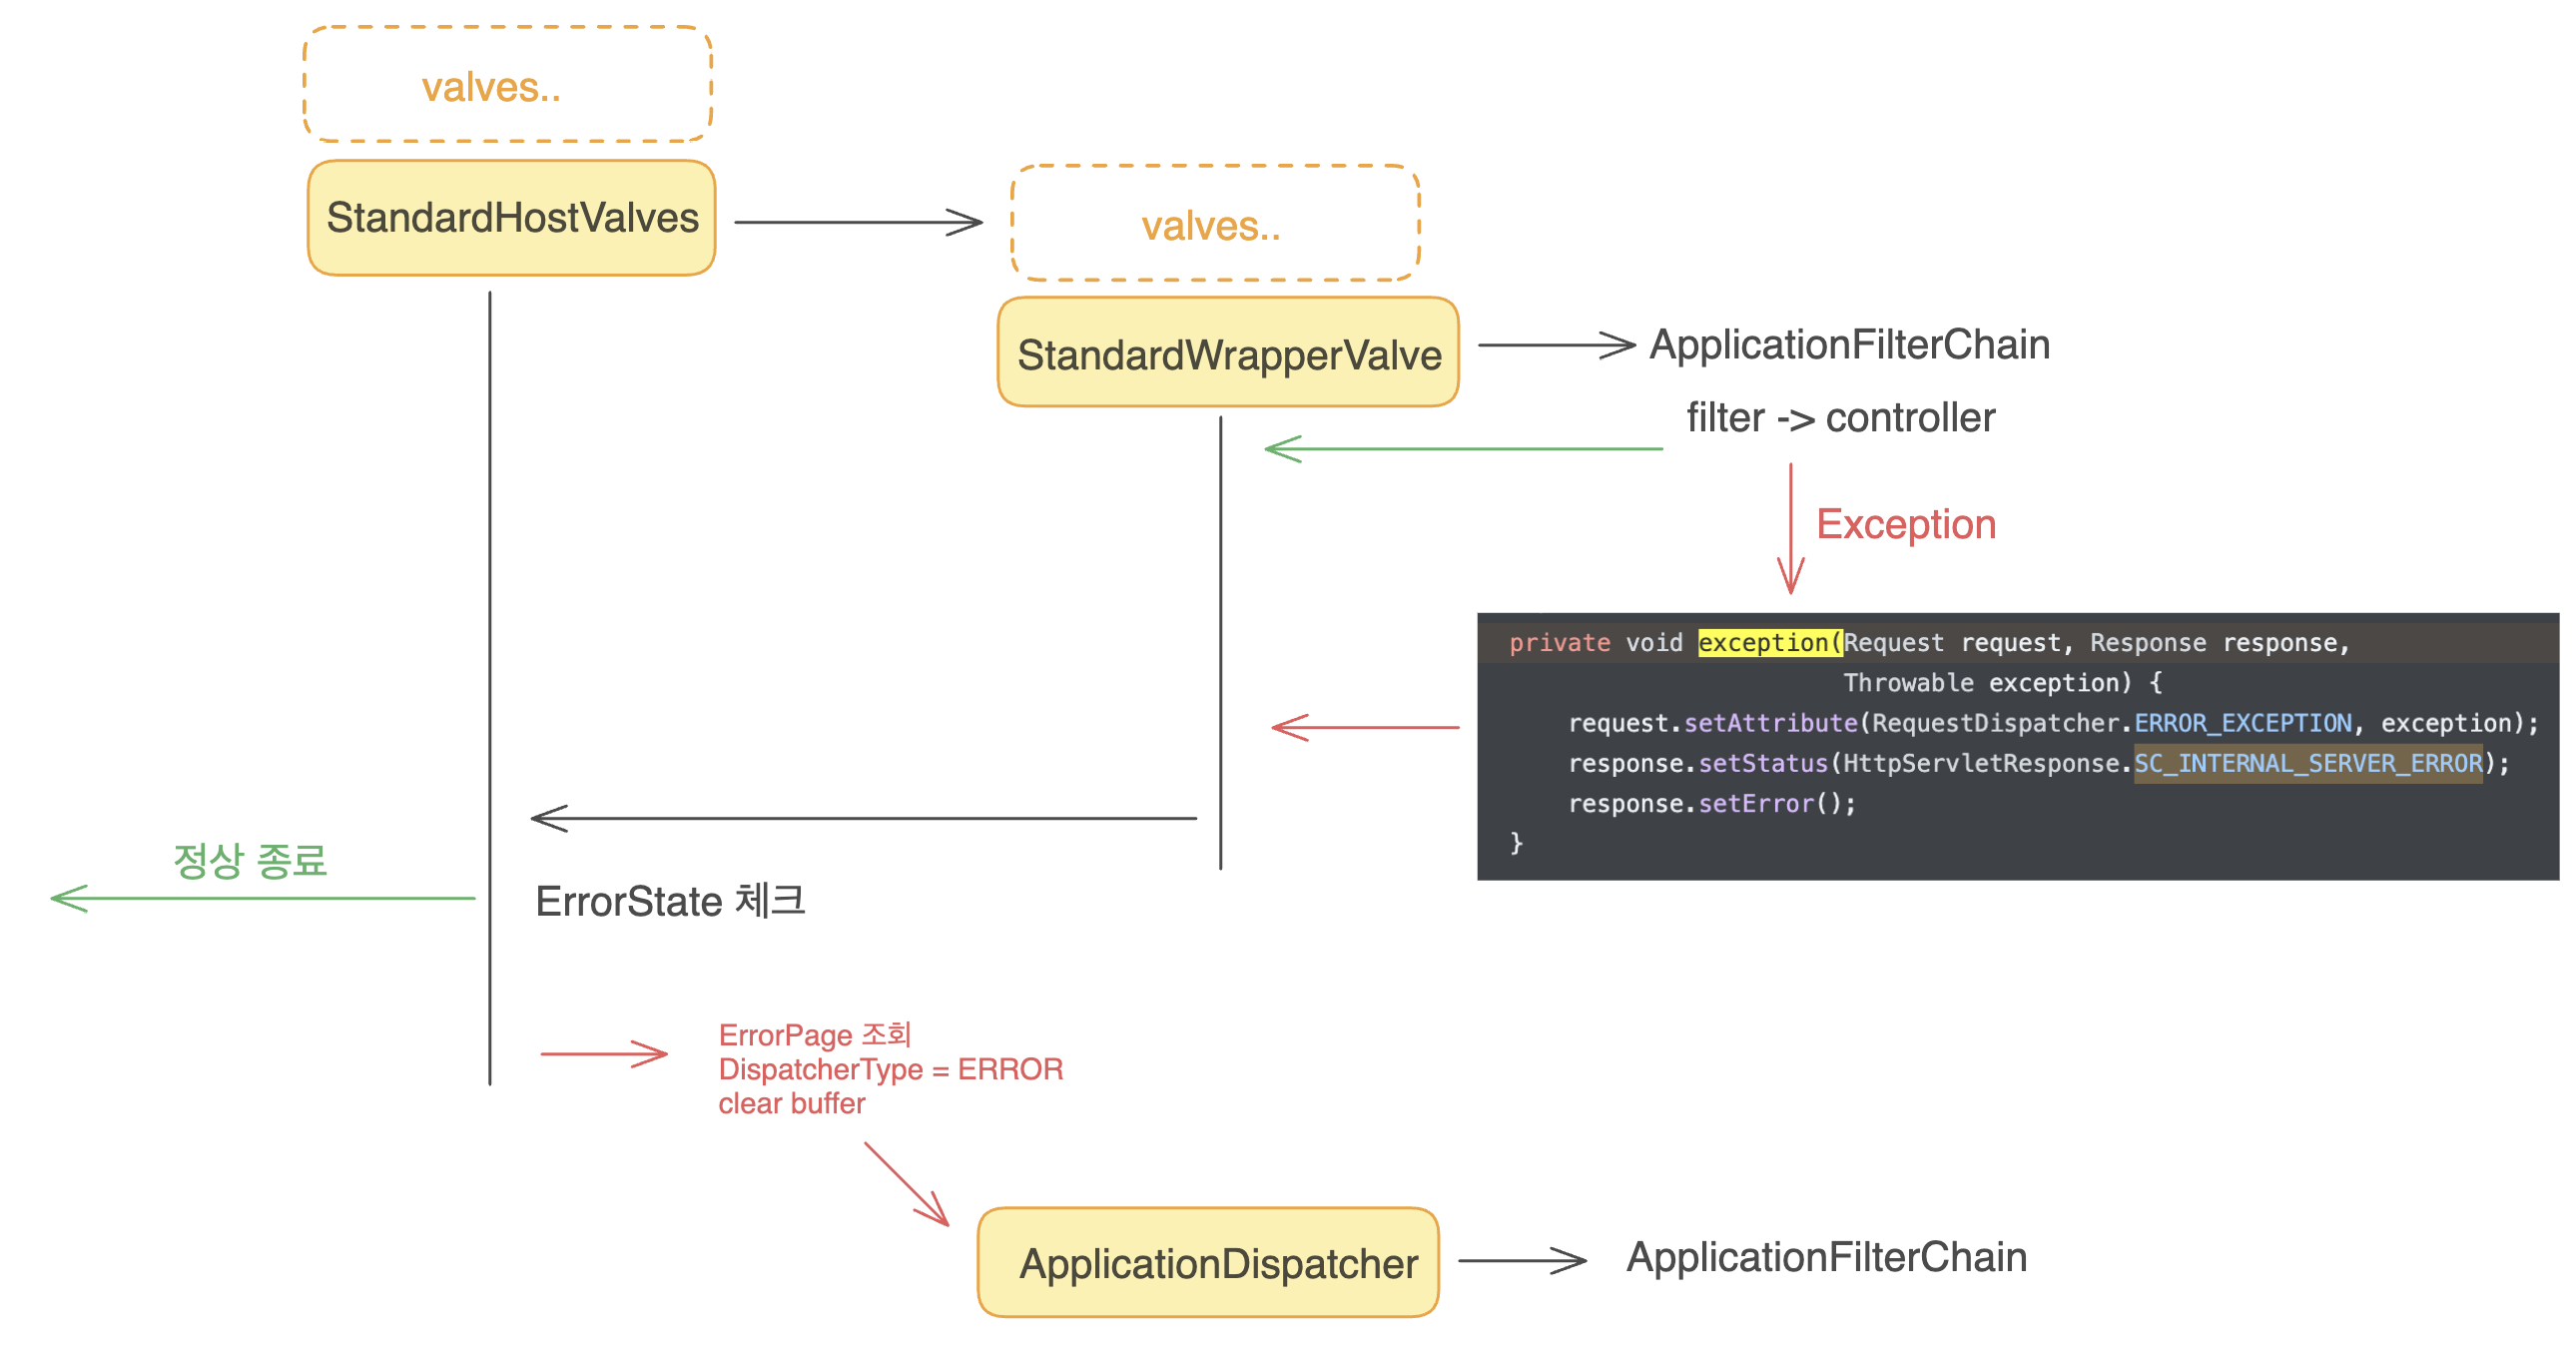
죄송합니다.. 최대한 그리려고 했는데 발 그림이 되었네요
StandardHostValve#invoke()
우선 요청이 들어오면 여러 valve를 거치다가, StandardHostValves가 호출이 된다. 아래 코드를 보면, context.getPipeline().getFirst().invoke(request, response); 가 호출되는 것을 볼 수가 있는데, 이 코드가 호출되면, 여러 밸브를 거치다가 StandardWrapperValve가 로 가게 된다.
            try {
                if (!response.isErrorReportRequired()) {
                    context.getPipeline().getFirst().invoke(request, response);
                }
            } catch (Throwable t) {
                ExceptionUtils.handleThrowable(t);
                container.getLogger().error(sm.getString("standardHostValve.exception", request.getRequestURI()), t);
                // If a new error occurred while trying to report a previous
                // error allow the original error to be reported.
                if (!response.isErrorReportRequired()) {
                    request.setAttribute(RequestDispatcher.ERROR_EXCEPTION, t);
                    throwable(request, response, t);
                }
            }
StandardWrapperValve
StandardWrapperValve에서는 우리가 흔히 아는 동작을 하는데, ApplicationFilterChain을 생성해서 호출한다. 이 ApplicationFilterchain의 코드가 우리가 흔히 아는 그 스프링의 동작이다. 내부 코드를 보면 필터를 순서대로 호출하고, 맨 마지막에 servlet의 service()메서드를 호출한다.
중요한 것은 그게 아니고, 만약 여기서 처리되지 않은 예외가 발생했을 때이다.
    private void exception(Request request, Response response,
                           Throwable exception) {
        request.setAttribute(RequestDispatcher.ERROR_EXCEPTION, exception);
        response.setStatus(HttpServletResponse.SC_INTERNAL_SERVER_ERROR);
        response.setError();
    }
catch 문에서 예외가 감지되면 바로 이 함수를 호출하는데, setError()를 호출하는 것을 볼 수 있다. 바로 이게 coyote response의 errorState를 error 상태로 바꾸는 역할을 한다.
이따 나오겠지만, 이 동작 때문에 "처리되지 않은 예외가 발생하면, /error로 요청이간다"라고 사람들이 생각하는거다.
중요한 것은 바로 errorStatus이다.
StandardHostValve
자 에러가 발생했다고 가정하고, 다시 StandardHostValve로 돌아왔다고 해보자.
그러면 다음 코드가 실행된다.
response.isErrorReportRequired() 는 바로 coyote response의 errorState를 체크하는 코드이다.
            // Look for (and render if found) an application level error page
            if (response.isErrorReportRequired()) {
                // If an error has occurred that prevents further I/O, don't waste time
                // producing an error report that will never be read
                AtomicBoolean result = new AtomicBoolean(false);
                response.getCoyoteResponse().action(ActionCode.IS_IO_ALLOWED, result);
                if (result.get()) {
                    if (t != null) {
                        throwable(request, response, t);
                    } else {
                        status(request, response);
                    }
                }
            }
만약 errorState가 에러 상태라면, throwable이나 status를 호출한다. 둘의 차이점은 크지 않고 인자에 Throwable이 잇냐 없냐의 차이다.
StandardHostValve#status
이 메서드에서는 여러가지 동작을 하는데,
- 에러페이지를 찾는다.(기본값은 /error)
        ErrorPage errorPage = context.findErrorPage(statusCode);
        if (errorPage == null) {
            // Look for a default error page
            errorPage = context.findErrorPage(0);
}- body를 비우고, contentLength 를 초기화 하고, Servlet으로 포워딩을 한다.
            // Forward control to the specified location
            ServletContext servletContext = request.getContext().getServletContext();
            RequestDispatcher rd = servletContext.getRequestDispatcher(errorPage.getLocation());
// Reset the response (keeping the real error code and message)
response.resetBuffer(true);
response.setContentLength(-1);
rd.forward(request.getRequest(), response.getResponse());
// If we forward, the response is suspended again
response.setSuspended(false);- dispatcherType을 REQUEST -> ERROR로 변경한다.
- 그러면 /error 엔드포인트를 매핑해서 실행한다.
결론
코드 흐름을 평문으로 설명하는 것은 상당히 힘들다...
직접 코드를 살펴보는 것을 추천하며, 디버그 시작 지점은 StandardHostValves#invoke()를 추천한다.
결론은 요약하자면, 다음과 같다.
- 우리가 쓰는
HttpServletRequest/Response는 내부적으로는 coyote request/response를 활용하고 있다. - 이 coyote 내부에는 errorState가 관리되고 있다.
- errorState가 에러 상태라면, 설정된 error 페이지로 포워딩한다.
그러면 나의 경우 왜 /error로 포워딩되었는가? 예외가 발생하지도 않았는데 말이다.
그 이유는 response.sendError가 내부적으로 errorState를 설정했기 때문이다.
그래서 단순하게 처리되지 않은 예외가 있으면, /error가 호출된다 라고 외우면 안된다.
추가 팁
SpringSecurity 설정
많이들 실수하는 것 중 하나가, authroization 설정을 할 때 /error(기본설정일 때) 에 대한 권한 설정을 하지 않는다는 것이다. 이 경우, /error로의 요청이 거부되어서 403이 반환된다.
만약 /error가 정상적으로 표시되길 원한다면(원.한.다.면) permitAll을 해주면 된다.
/error 엔드포인트 커스텀화
AbstractErrorController를 상속해서 구현하고 빈에 등록하면 된다. BasicErrorController의 autoconfiguration에 가보면 이 클래스에 대한 missing bean 조건이 걸려있다.
DispatcherType과 필터
DispatcherType은 요청이 무슨 타입인지 가리킨다. 기본은 REQUEST지만, 이렇게 /error 엔드포인트로 포워드할 때는 ERROR타입으로 바꿔서 포워드 한다.
중요한 것은 기본 방식대로 필터를 등록하면, REQUEST 타입의 요청에만 필터가 걸린다는 것이다.
만약 ERROR까지도 필터가 걸리길 원한다면,
@Configuration
public class DebugConfig {

    @Bean
    public FilterRegistrationBean<DebugFilter> debugFilter() {
        FilterRegistrationBean<DebugFilter> filterRegistrationBean = new FilterRegistrationBean<>();
        filterRegistrationBean.setFilter(new DebugFilter());
        filterRegistrationBean.setOrder(Ordered.HIGHEST_PRECEDENCE + 100);
        filterRegistrationBean.addUrlPatterns("/*");
        filterRegistrationBean.setDispatcherTypes(DispatcherType.REQUEST
                , DispatcherType.ERROR
        );
        return filterRegistrationBean;
    }
}
이런 식으로 ERROR까지 커버한다는 것을 명시해주어야 한다.
참고로 SpringSecurity의 기반이 되는 DelagatingProxyFilter(?스펠링 확실치 않음)이건 ERROR에도 동작하게 등록되어 있다.
