[한 입 크기로 잘라먹는 실전 프로젝트 SNS 편 - 이정환] 강의를 듣고 zustand에 대해 간략히 정리한 학습 내용입니다. 자세한 내용은 담고 있지 않음을 미리 알립니다.
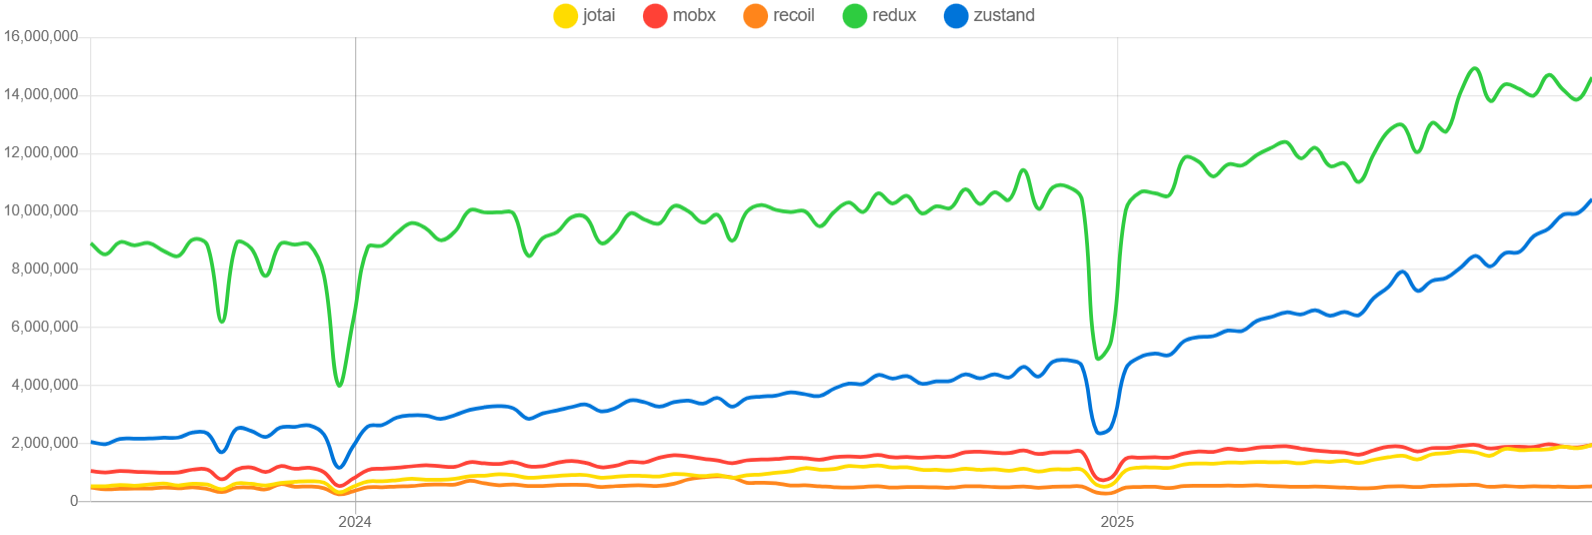
npm trends를 통해서도 확인할 수 있듯, zustand는 상태 관리 라이브러리계의 떠오르는 별이다. 많은 사람들로부터 관심을 받고 있는 만큼 기본적인 사용법에 대해 숙지해놓으면 좋겠다고 생각했고, 마침 이번 강의 수강을 통해 쉽게 개념을 익힐 수 있는 시간을 가졌다.
Zustand는 작고 빠르며 확장 가능한 상태 관리 라이브러리이다. store를 사용하여 여러 상태를 중앙에서 관리하며, 이를 통해 컴포넌트 간 데이터를 쉽게 공유하고 데이터 변경을 감지하여 자동으로 렌더링할 수도 있다.
- 스토어(Store): 애플리케이션의 여러 상태(State)를 중앙에서 관리하는 패턴
- 장점
- 가벼운 패키지 용량
- 간단한 훅과 함수 정의
- 상세한 공식 문서 설명
- 설치
# NPM npm install zustand # Or, use any package manager of your choice. - 사용 방법
- store 생성: 상태를 관리를 담당하는 훅을 생성한다. 초기값, 객체, 함수 모두 올 수 있다.
create의 콜백 함수를 전달하여 객체 형태의 스토어를 생성할 수 있다.import { create } from 'zustand' const useStore = create((set) => ({ bears: 0, increasePopulation: () => set((state) => ({ bears: state.bears + 1 })), removeAllBears: () => set({ bears: 0 }), updateBears: (newBears) => set({ bears: newBears }), })) - 컴포넌트 바인딩: provider 없이도 생성한 훅을 사용할 수 있다.
function BearCounter() {
  const bears = useStore((state) => state.bears)
  return <h1>{bears} around here...</h1>
}

function Controls() {
  const increasePopulation = useStore((state) => state.increasePopulation)
  return <button onClick={increasePopulation}>one up</button>
}
- store 생성: 상태를 관리를 담당하는 훅을 생성한다. 초기값, 객체, 함수 모두 올 수 있다.
🤔개념
Selector
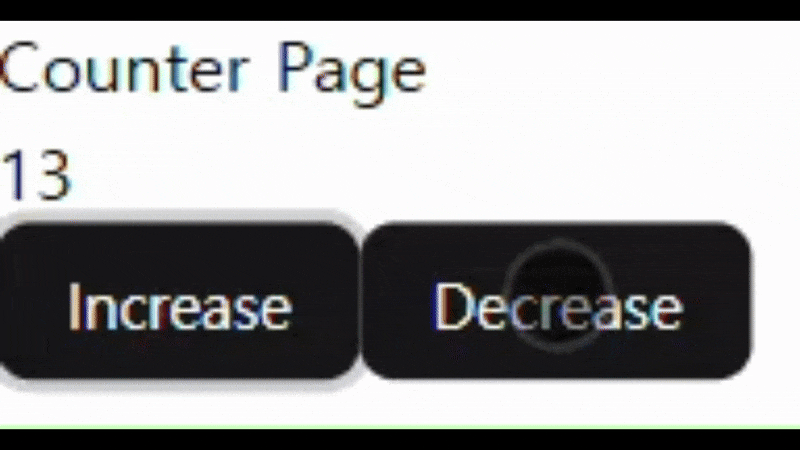
컴포넌트에서 불러온 store 값들 중 하나라도 업데이트가 되면, store를 참조하는 모든 컴포넌트를 자동으로 리렌더링 시킨다.
아래 카운터 예시를 보자. Increase, Decrease 버튼을 클릭하면 버튼까지 리렌더링되는 모습을 볼 수 있다.
import { useCounterStore } from "@/store/count";

export default function CounterViewer() {
  const { count } = useCounterStore();

  return <p>{count}</p>;
}
import { useCounterStore } from "@/store/count";
export default function CounterController() {
const { increase, decrease } = useCounterStore();
return (
<div>
<Button onClick={increase}>Increase</Button>
<Button onClick={decrease}>Decrease</Button>
</div>
);
}
const { increase, decrease } = useCounterStore(); 와 같이 선택적으로 값을 불러오긴 하지만, 사실 스토어가 반환하는 값은 모든 상태이다. 즉, 예시에서는 count 까지 포함한다.
따라서 아래와 같이 선택적으로 상태를 불러올 수 있는 selector 기능을 제공한다.
import { useCounterStore } from "@/store/count";

export default function CounterController() {
  const increase = useCounterStore((store) => store.increase);
  const decrease = useCounterStore((store) => store.decrease);

  return (
    <div>
      <Button onClick={increase}>Increase</Button>
      <Button onClick={decrease}>Decrease</Button>
    </div>
  );
}
액션 분리
여러 컴포넌트에서 단일 스토어의 액션을 많이 사용하거나 단일 컴포넌트에서 스토어의 여러 액션을 사용해야 하는 경우가 있을 수 있다. 이때 액션을 분리해 관리하는 패턴을 고려할 수 있다. actions 객체 안에서 모든 액션을 관리하는 것이다.
import { create } from "zustand";

type TCounterStore = {
  count: number;
  actions: {
    increase: () => void;
    decrease: () => void;
  };
};
export const useCounterStore = create<TCounterStore>((set, get) => ({
  count: 0,
  actions: {
    increase: () => {
      // const count = get().count;
      // set({ count: count + 1 });
      set((store) => ({
        count: store.count + 1,
      }));
    },
    decrease: () => {
      set((store) => ({
        count: store.count - 1,
      }));
    },
  },
}));
import { Button } from "../ui/button";
import { useCounterStore } from "@/store/count";
export default function CounterController() {
// 액션 함수 가져오기
const { increase, decrease } = useCounterStore((store) => store.actions);
return (
<div>
<Button onClick={increase}>Increase</Button>
<Button onClick={decrease}>Decrease</Button>
</div>
);
}커스텀 훅으로 유지보수성 향상하기
위와 같이 셀렉터와 액션 분리를 통해 리렌더링 문제와 코드 라인 절감의 효과는 누릴 수 있다. 하지만 만약 스토어의 상태 변수명이 바뀌는 등의 상황이 발생하면 어떨까? 스토어를 사용하는 모든 곳에서도 변경사항을 반영해주어야 할 것이다.
import { create } from "zustand";

type TCounterStore = {
  캌카운트: number;
  actions: {
    increase캌카운트: () => void;
    decrease캌카운트: () => void;
  };
};
export const useCounterStore = create<TCounterStore>((set, get) => ({
  캌카운트: 0,
  actions: {
    increase캌카운트: () => {
      // const count = get().count;
      // set({ count: count + 1 });
      set((store) => ({
        캌카운트: store.캌카운트 + 1,
      }));
    },
    decrease캌카운트: () => {
      set((store) => ({
        캌카운트: store.캌카운트 - 1,
      }));
    },
  },
}));
import { Button } from "../ui/button";
import { useCounterStore } from "@/store/count";
export default function CounterController() {
// Error!
const { increase, decrease } = useCounterStore((store) => store.actions);
return (
<div>
<Button onClick={increase}>Increase</Button>
<Button onClick={decrease}>Decrease</Button>
</div>
);
}따라서 아래와 같이 스토어 내부에서 커스텀 훅을 생성해보자. 커스텀 훅은 스토어 훅 자체를 한 번 더 감싼 형태가 된다.
import { create } from "zustand";

export const useCounterStore = create<TCounterStore>((set, get) => ({
  // ...
}));

export const useCounterCount = () => {
  return useCounterStore((store) => store.count);
};

export const useCounterActions = () => {
  return useCounterStore((store) => store.actions);
};
주요 미들웨어
combine
상태의 타입 추론을 용이하게 해준다. 첫 번째 인수로 추론할 상태를, 두 번째 인수로 set , get 매개변수를 포함하는 액션 함수를 받는다. 아래 예제에서 기존 create 로 감싼 객체를 combine 으로 한 번 더 감싼 형태를 볼 수 있다.
create(
  combine({ count: 0 }, (set, get) => ({
    actions: {
      increase: () => {
      },
      decrease: () => {
      },
    },
  })),
);
immer
더 편리하게 불변 상태를 사용할 수 있게 해주며, 이를 사용하여 zustand에서 불변 데이터 구조를 간편하게 처리할 수 있다.
// 미들웨어 immer + combine
const initialState = {
  count: 0,
};
export const useCounterStore = create(
  immer(
    combine(initialState, (set, get) => ({
      actions: {
        increase: () => {
          set((state) => ({
            count: state.count + 1, // 직접 객체 속성에 접근
          }));
        },
      },
    })),
  ),
);
subscribeWithSelector
현재 상태에 따라 특정 데이터를 구독할 수 있게 해주며, 특정 상태 변경에 따른 사이드 이펙트를 관리하는 데에 유용하게 사용될 수 있다. subscribeWithSelector 로 스토어를 감싼 후, 스토어 훅의 subscribe 메서드를 통해 특정 상태를 구독할 수 있다.
// 미들웨어: subscribeWithSelector + immer + combine
const initialState = {
  count: 0,
};
export const useCounterStore = create(
  subscribeWithSelector(
    immer(
      combine(initialState, (set, get) => ({
        actions: {
          increase: () => {},
        },
      })),
    ),
  ),
);

useCounterStore.subscribe(
  // 셀렉터
  (store) => store.count,
  // 리스너
  (count, prevCount) => {
    const store=useCounterStore.getState();
    useCounterStore.setState({
      count:count+1
    })
  },
);- 매개변수
- 첫 번째 매개변수: selector
- 두 번째 매개변수: listener
- 첫 번째 매개변수: 현재 state
- 두 번째 매개변수: 이전 state
- 단일 컴포넌트에서
useEffect훅을 통해 구독 시작/취소// 출처: HEROPY DEV 블로그 import { useEffect, useState } from 'react' import { useCountStore } from './store/count' export default function App() { const [double, setDouble] = useState(2) // 컴포넌트 언마운트 시 구독 해제 useEffect(() => { const unsubscribe = useCountStore.subscribe( state => state.count, count => { setDouble(count * 2) } ) return () => { unsubscribe() } }, []) // 컴포넌트 언마운트 시 구독 해제 (축약형) useEffect( () => useCountStore.subscribe( state => state.count, count => { setDouble(count * 2) } ), [] ) return <h2>{double}</h2> }
persist
스토어를 로컬 스토리지 또는 다른 스토리지에 보관할 수 있게 해준다. 즉, 새로고침이나 애플리케이션 재시작에도 데이터를 지속해야 하는 등 지속성이 중요한 상황에 유용하게 사용될 수 있다.
// 미들웨어: persist + subscribeWithSelector + immer + combine
const initialState = {
  count: 0,
};
export const useCounterStore = create(
  persist(
    subscribeWithSelector(
      immer(
        combine(initialState, (set, get) => ({
          actions: {
            increase: () => {
              set((state) => {
                state.count += 1;
              });
            },
          },
        })),
      ),
    ),
    {
      name: "counter",
      partialize: (state) => ({
        count: state.count,
      }),
      storage: createJSONStorage(() => sessionStorage),
    },
  ),
); - 주요 파라미터
- name: 스토리지 상의 키 역할을 하는 유일한 명칭
- storage(optional): default는 로컬스토리지이며, 다른 스토리지를 지정할 수도 있다.
- partialize(optional): persist하고자 하는 상태를 고를 수 있다.
devtools
Redux DevTools 확장 프로그램을 사용할 수 있게 한다.
// 미들웨어: devtools + persist + subscribeWithSelector + immer + combine
const initialState = {
  count: 0,
};
export const useCounterStore = create(
  devtools(
    persist(
      subscribeWithSelector(
        immer(
          combine(initialState, (set, get) => ({
            actions: {
              increase: () => {
                set((state) => {
                  state.count += 1;
                });
              },
            },
          })),
        ),
      ),
      {
        name: "counter",
        partialize: (state) => ({
          count: state.count,
        }),
        storage: createJSONStorage(() => sessionStorage),
      },
    ),
    { name: "counter" },
  ),
);- 주요 파라미터
- name: Redux DevTools 내에서의 식별자
😎실습
사용자의 로그인 정보 전역으로 관리하기
보통 인가와 관련한 로직을 구현할 때, 로그인한 사용자에 대한 정보가 필요하다. 따라서 프론트엔드 단에서는 이를 저장한다고 하면 스토리지, 쿠키와 같은 방법을 사용할 수 있을 것이다. wangnOOni(왕눈이) 프로젝트에서는 백엔드와의 협의를 통해 사용자 로그인 후 응답으로 받는 고유 식별 id를 전역 상태로 관리하게 되었다.
// STORE: 로그인한 사용자의 상태
import { create } from "zustand";

interface IUserState {
  userId: number | undefined;
  keepUserId: (userId: IUserState["userId"]) => void;
  clearUserId: () => void;
}
export const useUserStore = create<IUserState>((set) => ({
  userId: undefined,

  keepUserId: (userId) => {
    set(() => ({
      userId: userId,
    }));
  },

  clearUserId: () => {
    set(() => ({
      userId: undefined,
    }));
  },
}));
// Layout: 메인 레이아웃
export default function MainLayout() {
const [activeTab, setActiveTab] = useState(TAB.RECORD);
const { data: userData } = useGetPersonalInfo();
const { keepUserId } = useUserStore();
useEffect(() => {
keepUserId(userData?.pfp.user_id);
}, [keepUserId, userData]);
return (
<>
<TopNavBar title={activeTab} />
<main>{renderPage()}</main>
<BottomNavBar setActiveTab={setActiveTab} />
</>
);
}