어제에 이어서 오늘은 로또 번호 생성기 기능 구현을 해보겠습니다.
가장 먼저 버튼 3가지(번호 추가, 초기화, 자동 생성)와 넘버 피크를 정의해주었습니다.
private  val clearButton by lazy {findViewById<Button>(R.id.btn_clear)} //초기화
private val addButton by lazy {findViewById<Button>(R.id.btn_add)} //번호 추가
private val runButton by lazy {findViewById<Button>(R.id.btn_run)} //자동 생성
private val numPick by lazy {findViewById<NumberPicker>(R.id.np_num)} //넘버 피크
(여기서 by lazy는 당장 선언하지않고 나중에 선언한다는 뜻이라는 걸 배웠습니다.)
그리고 번호를 표시해주는 공 6개를 정의해 주었습니다.
private val numTextViewList : List<TextView> by lazy {
        listOf<TextView> (
            findViewById(R.id.tv_num1),
            findViewById(R.id.tv_num2),
            findViewById(R.id.tv_num3),
            findViewById(R.id.tv_num4),
            findViewById(R.id.tv_num5),
            findViewById(R.id.tv_num6)
        )
    }
그리고 실행중인지 확인해주는 변수와 사용자가 지정한 숫자를 잠깐 담아둘 공간을 생성해 주었습니다.
private var didRun = false
//run이 실행중인지 체크해주는 변수(처음에는 실행되지 않으므로 초기값은 false)
private val pickNumberSet = hashSetOf<Int>()
//사용자가 지정한 숫자를 잠깐 담아둘 공간(hashSet: 공간함수)
이렇게 사전 준비가 다 끝났습니다.
그리고 numberPicker의 최대, 최소 범위를 지정해 주었습니다.
번호가 1번부터 45번까지 있기때문에 범위를 지정해 줍니다!
numPick.minValue = 1 //최소 숫자는 1
numPick.maxValue = 45 //최대 숫자는 45
그 다음 함수 3개를 생성해 주고 각 함수를 부를때 호출되는 함수를 정해주었습니다.
initAddButton()
initRunButton()
initClearButton()
3가지 함수를 생성하여 주고
먼저 initAddButton() 을 부를때 호출되는 함수를 지정하여 주었습니다.
 private fun initAddButton() {
        addButton.setOnClickListener {
            when {
                didRun -> showToast("초기화 후에 시도해주세요.")
                pickNumberSet.size >= 5 -> showToast("숫자는 최대 5개까지 선택할 수 있습니다.")
                pickNumberSet.contains(numPick.value) -> showToast("이미 선택된 숫자입니다.")
                else -> {
                    val textView = numTextViewList[pickNumberSet.size]
                    textView.isVisible = true
                    textView.text = numPick.value.toString()
                    setNumBack(numPick.value, textView)
                    pickNumberSet.add(numPick.value)
                }
            }
        }
    }

//숫자마다의 색을 지정해주기 위한 함수값
private fun setNumBack(number: Int, textView: TextView) {
        val background = when (number) {
            in 1..10 -> R.drawable.circle_yellow
            in 11..20 -> R.drawable.circle_blue
            in 21..30 -> R.drawable.circle_red
            in 31..40 -> R.drawable.circle_gray
            else -> R.drawable.circle_green
        }

        textView.background = ContextCompat.getDrawable(this, background)

    }

//메세지를 출력하기 위한 함수값
private fun showToast(message: String) {
        Toast.makeText(this, message, Toast.LENGTH_SHORT).show()
    }
내용 살펴보기
-
addButton.setOnClickListener : addButton(번호 추가하기)를 눌렀을때 {}안의 내용이 실행된다.
-
didRun -> showToast("") : 숫자 6가지를 다 생성하였을때 출력되는 ("")안의 메세지
-
pickNumberSet.size >= 5 -> showToast("") : 사용자가 고른 숫자는 5개로 제한 해놨기때문에 5개보다 더 선택시 ("")안의 메세지를 출력합니다.
-
pickNumberSet.contains(numPick.value) -> showToast("") : 선택된 숫자가 중복될 경우 ("")메세지를 출력합니다.
-
val text View = numTextViewList[pickNumberSet.size] : 위에서 지정해준 textView list중 하나를 가져옵니다.
-
textView.isVisible = true : 기존에 false로 지정해 주었기 때문에 true로 바꿔줍니다.
-
numPick.value.toString() : 공이 하나 생성되고 그 공에 숫자가 써집니다.
-
setNumBack(numPick.value, textView) : 지정해준 setNumBack을 가져오며 textView도 함께 가져옵니다.
-
pickNumberSet.add(numPick.value) : 위에서 만든 공을 pickNumberSet에 잠시 보관해둡니다.
.
.
.
.
.
initAddButton은 이렇게 마무리 되었고(어렵습니다 ㅠㅠ 화이팅!)
이제 버튼 두개 남았습니다! clear(초기화) 버튼 먼저 해보겠습니다.
private fun initClearButton() {

        clearButton.setOnClickListener {
            pickNumberSet.clear()
            numTextViewList.forEach { it.isVisible = false }
            didRun = false
            numPick.value = 1
        }
    }
내용 살펴보기
-
clearButton.setOnClickListener {} : clearButton이 클릭되었을때 {}의 내용이 실행된다.
-
pickNumberSet.clear() : pickNumberSet을 초기화 해줍니다.
-
numTextViewList.forEach { it.isVisible = false } : 위에서 설정해준 textView.isVisible = true를 다시 false로 꺼줍니다.(List를 반복문으로 돌아야 하기에 forEach를 사용하였습니다.)
-
didRun = false
numPick.value = 1 : didRun과 numPick.value는 초기상태는 false와 1로 바꾸어줍니다.
.
.
.
.
.
clearButton은 마무리 되었고 마지막 run(자동 생성하기) 버튼을 마무리 해보겠습니다!
private  fun initRunButton() {
        runButton.setOnClickListener {
            val list = getRandom()

            didRun = true
            list.forEachIndexed { index, number ->
                val textView = numTextViewList[index]
                textView.text = number.toString()
                textView.isVisible = true
                setNumBack(number, textView)
            }
        }
    }

//랜덤한 값을 가져오기 위한 랜덤 함수
 private fun getRandom(): List<Int> {
        val numbers = (1..45).filter {it !in pickNumberSet} //1부터 45중 내가 이미 지정한 숫자 빼고
        return (pickNumberSet + numbers.shuffled().take(6-pickNumberSet.size)).sorted()
    }
내용 살펴보기
-
runButton.setOnClickListener {} : run 버튼을 누르면 {}의 내용을 실행합니다.
-
val list = getRandom() : 랜덤한 값을 가져옵니다.(랜덤 함수에서 지정해놓은)
-
didRun = true : 6개의 값을 만들었기에 true로 됩니다.
-
list.forEachIndexed { index, number ->
val textView = numTextViewList[index]
textView.text = number.toString()
textView.isVisible = true
setNumBack(number, textView)}
: 숫자에 대한 6개의 공을 만들어 줍니다. -
sorted() : 랜덤 함수 지정 함수에서 sort는 정렬 알고리즘이라고 합니다.
.
.
.
.
.
이렇게 기능 구현까지 마쳐보았습니다!(역시 코드들이 어렵습니다 ㅠㅠ)
구동해보니까 잘 작동해서 다행이네요 ㅎㅎ
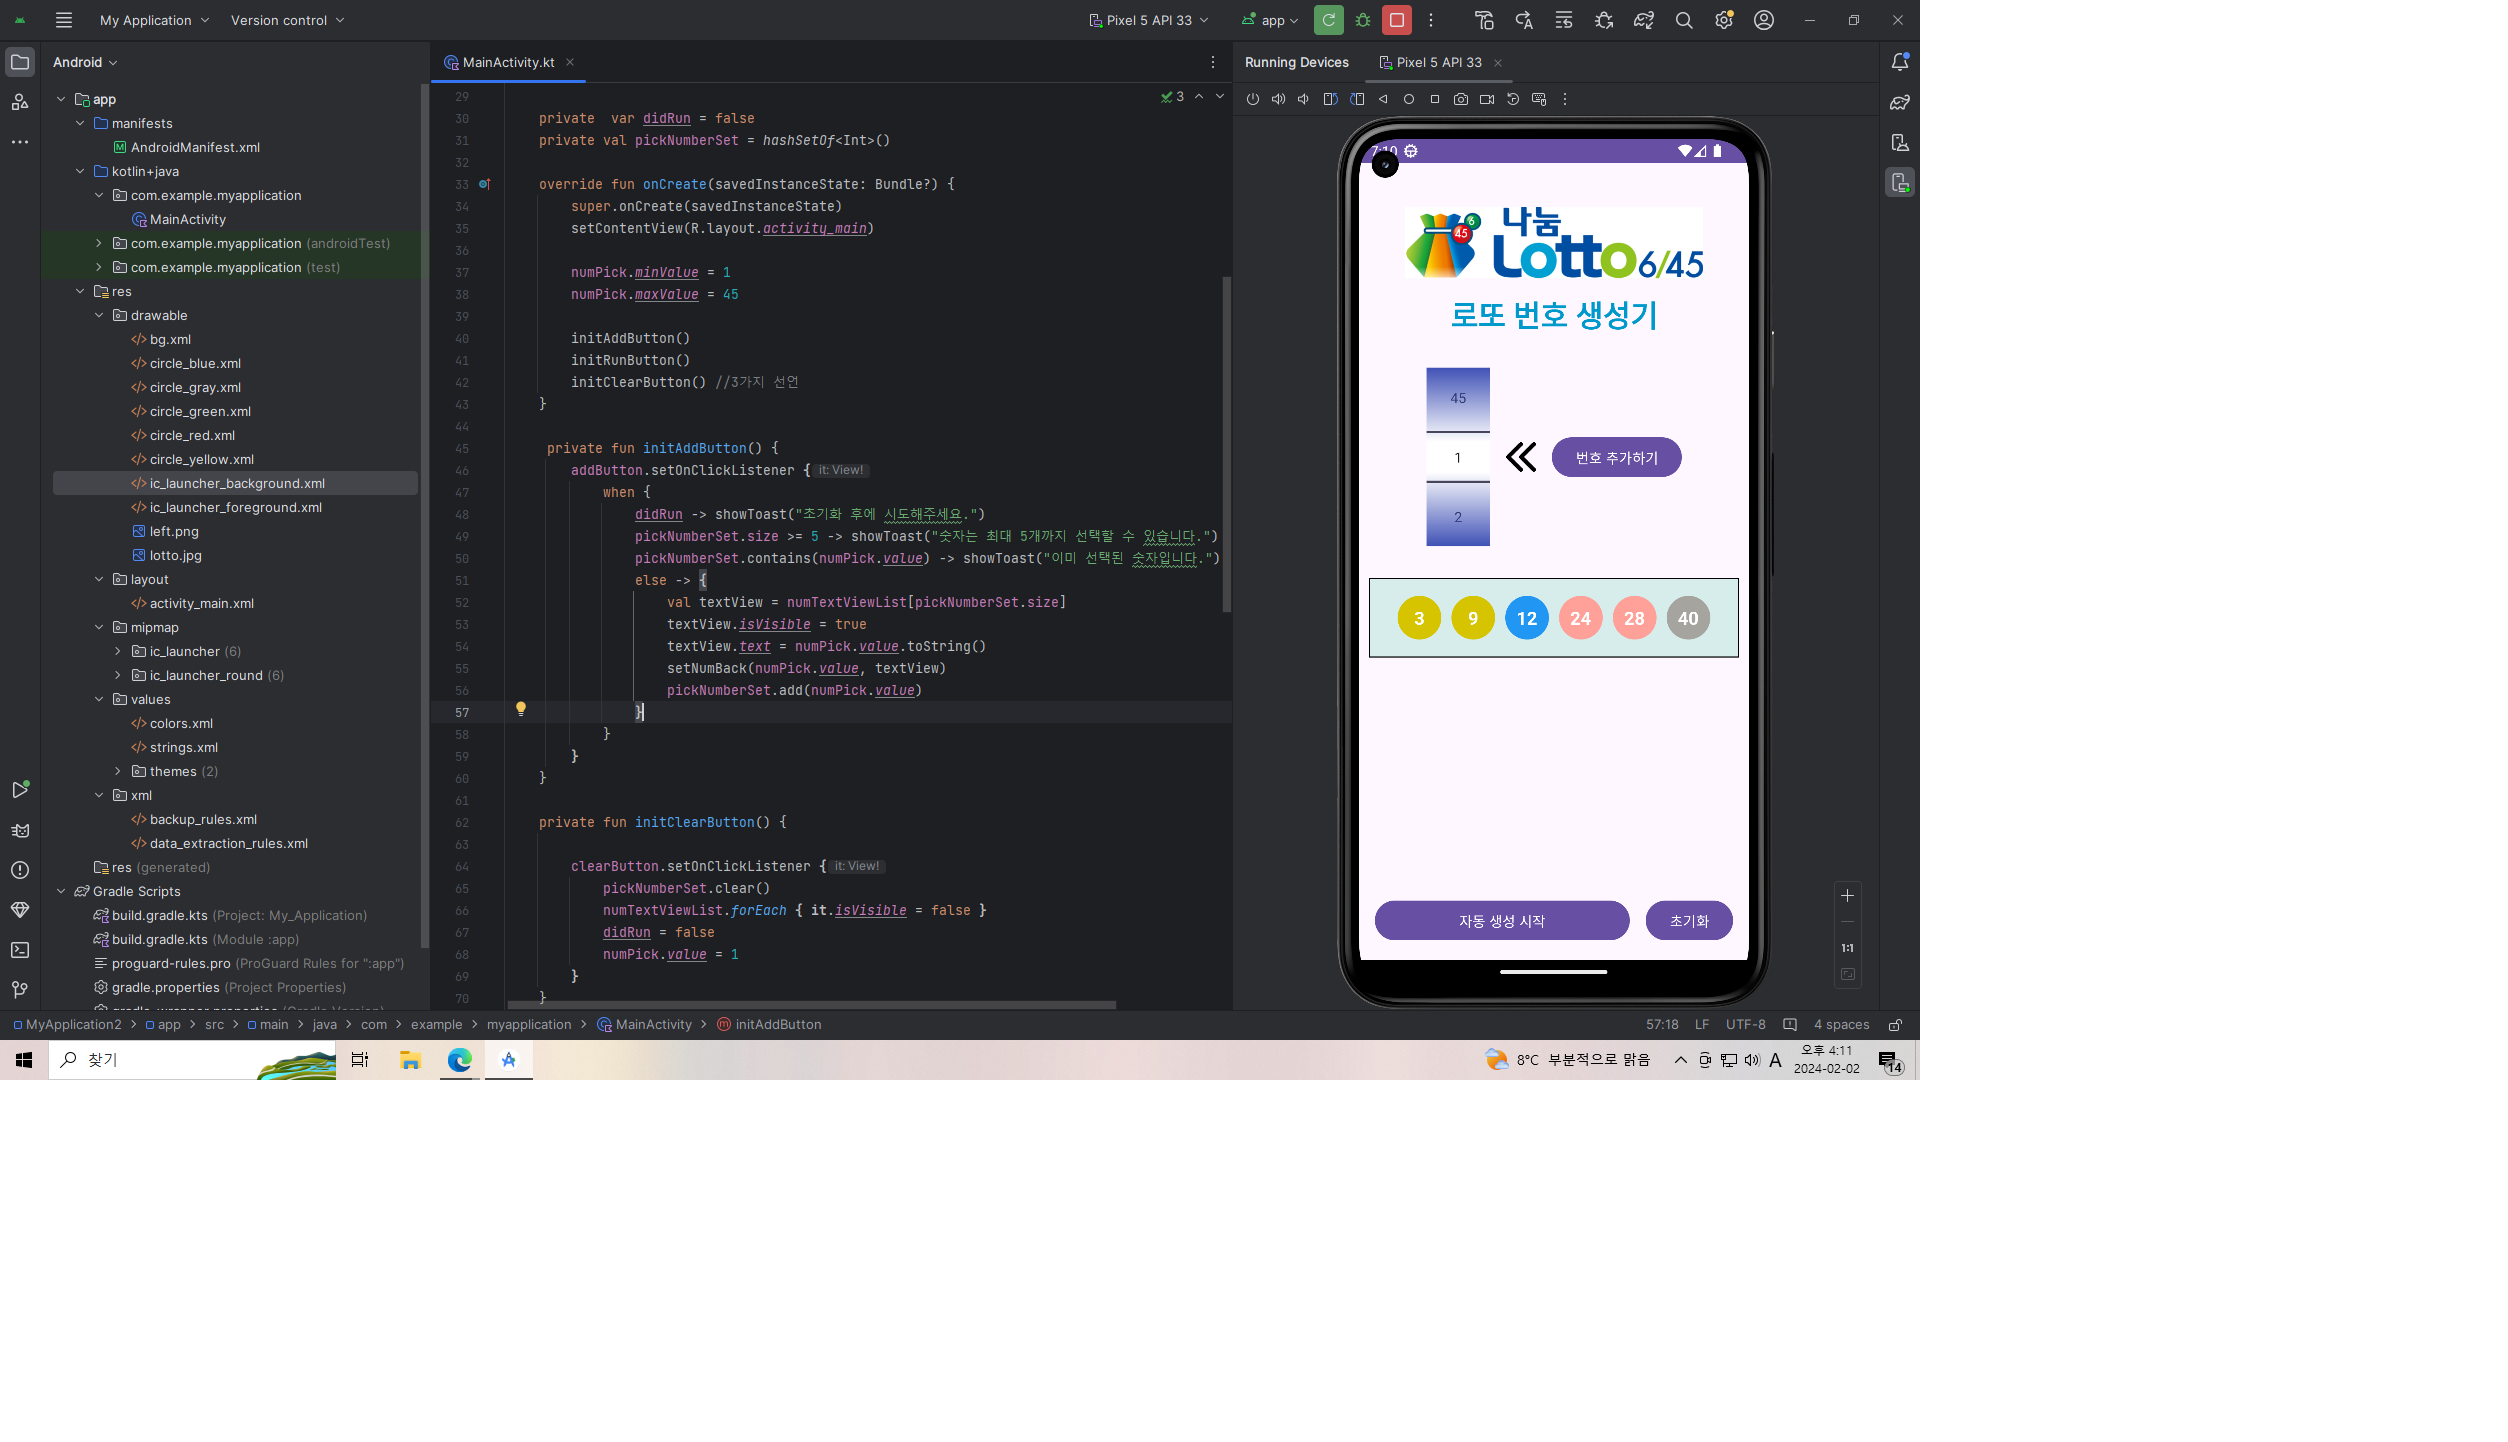
나온 번호로 로또 사러 가봐야겠습니다.