3. page와 레이아웃
pages
구상하는 사이트의 page파일을 폴더에 추가
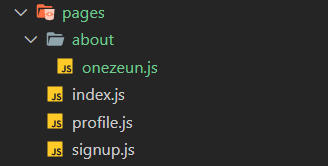
pages폴더 안에 새로운 폴더를 만들고 그 안에 파일을 추가하는 것도 가능
주소는 /about/onezeun
components
재사용되거나 불필요한 리렌더링을 막기 위해 컴포넌트 쪼개기
→ 폴더명 굳이 components일 필요는 없음
공통 Layout 만들기
components/AppLayout.js

import React from 'react';
import PropTypes from 'prop-types';

const AppLayout = ({ children }) => {
  return (
    <div>
      <div>공통메뉴</div>
      {children}
    </div>
  );
};
AppLayout.propTypes = {
  children: PropTypes.node.isRequired,
};
export default AppLayout;
{children} 안에는 사용되는 페이지나 다른 컴포넌트들이 들어갈 예정
PropTypes
React에서 타입 체크를 위해서 사용되는 라이브러리
설치 npm i prop-types
PropTypes.node.isRequired
.node: 렌더링 가능한 모든것(number, string, element, 또는 그것들이 포함된 array/fragment)
.isRequired: 필수 prop으로 인식하고, 값이 없거나 잘못되었을 경우 콘솔 창에서 오류를 확인할 수 있다.
pages/index.js

import React from "react";
import AppLayout from "../components/AppLayout";

const Home = () => {
  return (
    <AppLayout>
      <div>Hello, Next!</div>
    </AppLayout>
  );
};

export default Home;
4.Link와 eslint
next/link
Next는 자체적인 라우터가 있다
링크 태그 불러오기 : import Link from 'next/link';
components/AppLayout.js
import React from 'react';
import PropTypes from 'prop-types';
import Link from 'next/link';
const AppLayout = ({ children }) => {
return (
<div>
<div>
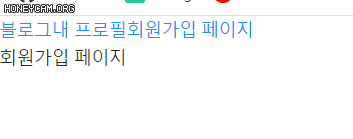
<Link href="/"><a>블로그</a></Link>
<Link href="/profile"><a>내 프로필</a></Link>
<Link href="/signup"><a>회원가입 페이지</a></Link>
</div>
{children}
</div>
);
};
...
eslint
코드를 분석해 문법적인 오류나 안티 패턴을 찾아주고 일관된 코드 스타일로 작성하도록 도와줌
설치
npm i eslint -D
npm i eslint-plugin-import -D
npm i eslint-plugin-react -D
npm i eslint-plugin-react-hooks -D
-D : 개발용으로만
.eslintrc 파일 생성
{
  "parserOptions": {
    "ecmaVersion": 2022,
    "sourceType": "module",
    "ecmaFeatures": {
      "jsx": true
    }
  },
  "env": {
    "browser": true,
    "node": true,
    "es6": true
  },
  "extends": [
    "eslint:recommended",
    "plugin:react/recommended"
  ],
  "plugins": [
    "import",
    "react-hooks"
  ],
  "rules": {
  }
}
엉망진창