1.Mybatis
MyBatis는 JdbcTemplate보다 더 많은 기능을 제공하는 SQL Mapper이다. 기본적으로 JdbcTemplate이 제공하는 대부분의 기능을 제공하고 Mybatis의 가장 큰 장점은 동적 쿼리를 매우 편리하게 작성할 수 있다는 점이다.
Mybatis - SQL
 <update id="update">
    update item
    set item_name=#{itemName},
        price=#{price},
        quantity=#{quantity}
    where id = #{id}
 </update>
Mybatis는 xml로 작성하기 때문에 직접 sql문 "+" 작성이 필요없고 개발자가 Jdbctemplate의 복잡한 동적 쿼리문을 Mybatis를 사용하면 편리하게 작성할수 있다.
1-1.Mybatis 설정
main과test의 application.properties에 다음과 같이 설정한다.
#Mybatis
mybatis.type-aliases-package=hello.itemservice.domain
mybatis.configuration.map-underscore-to-camel-case=true
logging.level.hello.itemservice.repository.mybatis=trace-
type-aliases: XML 매퍼에서 resultType, parameterType 등을 작성할 때, 클래스의 전체 경로 대신 짧은 이름(클래스 이름)을 사용할 수 있다.
-
configuration.map-underscore-to-camel-case: DB의 column명의 underscore를 Spring 객체의 camel-case로 변경해준다.
1-2.Mybatis 매핑 인터페이스 정의
@Mapper
public interface itemMapper {
    void save(Item item);
    void update(@Param("id") Long id, @Param("updateParam")ItemUpdateDto updateParam);
    List<Item>findAll(ItemSearchCond itemSearchCond);
    Optional<Item>findById(Long id);
}
Mybatis 매핑 XML을 호출하여 DB에 쿼리를 날려주는 인터페이스이다. @Mapper 애노테이션이 있어야 하고, 쿼리 XML을 작성하자. resources 하위 폴더에 해당 인터페이스 패키지 위치와 맞춰 xml이 만들어져야 한다.
1-3.MyBatis 매핑 XML
<?xml version="1.0" encoding="UTF-8"?>
<!DOCTYPE mapper PUBLIC "-//mybatis.org//DTD Mapper 3.0//EN"
        "http://mybatis.org/dtd/mybatis-3-mapper.dtd">
<mapper namespace="hello.itemservice.repository.mybatis.ItemMapper">
    <insert id="save" useGeneratedKeys="true" keyProperty="id">
        insert into item(item_name,price,quantity)
        values(#{itemName},#{price},#{quantity)
    </insert>
회원 저장에서 인터페이스에 정의한 메서드를 id에 적어주고, 매퍼에서 넘긴 객체의 프로퍼티 이름을 #{}안에 적어준다. useGeneratedKeys는 DB PK키 생성 전략이 IDENTITY일때 True로 적용하고 KeyProperty는 반환된 객체에 생성된 id값을 매핑해준다.
    <update id="update">
        update item
        set item_name=#{updateParam.itemName},
            price=#{updateParam.price},
            quantity=#{updateParam.quantity}
        where id= #{id}
    </update>
인터페이스에서 파라미터가 2개일시 @Param을 지정해줘야 하고 객체 특성에 맞게 #{}를 작성하면 된다.
    <select id="findById" resultType="Item">
        select id,item_name,price,quantity
        from item
        where id=#{id}
    </select>

    <select id="findAll" resultType="Item">
        select id,item_name,price,quantity
        from item
        <where>
            <if test="itemName != null and itemName!=''">
                    and item_name like concat('%',#{itemName},'%')
            </if>
            <if test="maxPrice !=null ">
                and price $lt;= #{maxPrice}
            </if>
        </where>
    </select>
</mapper>
resultType(반환 타입)을 앞서 application.properties에 지정한 위치에 맞는 클래스를 찾아 바인딩 후, 반환해준다. findAll에서 동적 쿼리가 작성됬는데, where절 안에 if문이 하나라도 만족하지 않으면 where절은 생략된다. 만약 if문이 만족하면 첫번째 if문의 and를 제거하고 where가 삽입된다.
XML 특수문자
xml 데이터 영역에 <,>와 같은 특수문자를 사용할수 없다. 따라서 다음과 같은 구문을 사용한다.
< : <
> : >
& : &1-4.MyBatis Repository,config
MybatisItemRepository
 @Repository
 @RequiredArgsConstructor
 public class MyBatisItemRepository implements ItemRepository {
 	private final ItemMapper itemMapper;
    //이하 itemMapper를 통한 save,update,findById..
 }
ItemRepository 인터페이스를 상속받아 MyBatisItemRepository 저장소클래스를 만들어 도입해보자. 기존에 ItemMapper에서 등록한 @Mapper 애노테이션 덕분에 Spring으로 부터 itemMapper를 주입받을수 있다.
MybatisConfig
@Configuration
@RequiredArgsConstructor
public class MybatisConfig {

    private final ItemMapper itemMapper;

    @Bean
    public ItemService itemService() {
        return new ItemServiceV1(itemRepository());
    }

    @Bean
    public ItemRepository itemRepository() {
        return new MybatisItemRepository(itemMapper);
    }
}
config에선 Mybatis가 데이터 커넥션,트랜잭션 매니저를 자동으로 ItemMapper에 연결해주기 때문에 ItemMapper만 필드에 정의하여 Bean으로 주입 받으면 된다.
1-5.Mybatis Proxy
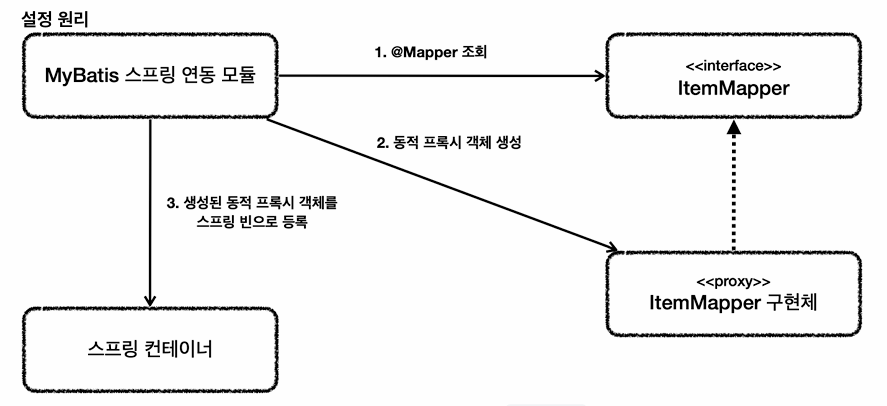
인터페이스의 구현체가 없는데 매핑 xml을 호출할수 있었던 이유는 Mybatis 스프링 연동 모듈에서 @Mapper 애노테이션을 검색하고, 해당 인터페이스에 대해 동적 프록시 객체를 생성하여 스프링 빈으로 등록하기 때문이다. 이를 통해 인터페이스의 메서드 호출이 매핑된 XML 쿼리와 연결되어 실행된다.
2.Mybatis 동적 쿼리 문법
1.if
 <select id="findActiveBlogWithTitleLike"
 resultType="Blog">
  SELECT * FROM BLOG
  WHERE state = ‘ACTIVE’
  <if test="title != null">
    AND title like #{title}
  </if>
 </select>
넘겨진 객체의 title이 null이 아니라면 if문으로 인해 쿼리에 AND title like #{title}가 더해진다.
2.choose, when, otherwise
<select id="findActiveBlogLike"
 resultType="Blog">
  SELECT * FROM BLOG WHERE state = ‘ACTIVE’
  <choose>
    <when test="title != null">
      AND title like #{title}
    </when>
    <when test="author != null and author.name != null">
      AND author_name like #{author.name}
    </when>
    <otherwise>
      AND featured = 1
    </otherwise>
  </choose>
 </select>
switch구문과 유사하다. choose는 조건문의 시작,when은 switch,otherwise는 위 조건문이 모두 false일때 실행된다.
3.where
<select id="findActiveBlogLike"
 resultType="Blog">
  SELECT * FROM BLOG
  <where>
    <if test="state != null">
         state = #{state}
    </if>
    <if test="title != null">
        AND title like #{title}
    </if>
    <if test="author != null and author.name != null">
        AND author_name like #{author.name}
    </if>
  </where>
 </select>
if문이 전부 만족하지 않으면 where은 생기지 않고, 첫번째 if문이 만족하면 AND는 삭제되어 쿼리에 더해진다.
4.foreach
 <select id="selectPostIn" resultType="domain.blog.Post">
  SELECT *
  FROM POST P
  <where>
    <foreach item="item" index="index" collection="list"
 open="ID in (" separator="," close=")" nullable="true">
          #{item}
    </foreach>
  </where>
 </select>
MyBatis 매핑 XML에서 컬렉션 자료구조(예: List, Set, 배열 등)가 파라미터로 전달되면, foreach를 사용하여 해당 컬렉션의 요소들을 반복 처리할 수 있다. open은 반복 시작시 추가할 문자열,separator는 각 요소를 구분하는 구분자,close는 반복 끝에 추가할 문자열로 쿼리문에 더해진다.
SQL 인젝션 방지
#{} 문법은 ?을 넣고 파라미터를 바인딩 하는 PreparedStatement를 사용한다. 따라서 바인딩 값을 SQL구문이 아닌 문자열로 바인딩하기 때문에 SQL 인젝션을 방지한다.