npm init으로 시작하는 typescript react 프로젝트 (3)
0
이번에는 project에 styled-components를 적용해볼 예정이다.
styled-components install
npm install -D styled-components @types/styled-components- 'styled-component'가 아닌 'styled-components'임에 유의
Component 작성
import styled from 'styled-components';

const Button = styled.button`
    background-color: black;
    height: 40px;
    color: white;
`

export default Button;
Component 적용
import React from 'react';
import styled from 'styled-components';
import Button from './components/Buttons';
const App = () => {
return (
<AppContainer>
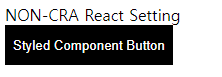
<Button>Styled Component Button</Button>
</AppContainer>
)
}
const AppContainer = styled.div`
width: 100%;
height: 100%;
`
export default App;잘 적용이 되었다.
webpack 설정은 필요없다.
styled-components가 새로운 파일을 만들어내는 것이 아니기 때문에
별도로 webpack에서 loader를 설정해줄 필요가 없다.
babel plugin 추가 및 설정
styled-components는 ES6 문법인 Template Literal로 구현되어 있다.
그래서 기본 babel 설정으로 충분하기 때문에 별도의 설정을 하지 않아도 된다.
하지만, 그냥 사용하게 된다면 난독화된 class name으로 인해
개발하면서 debugging이 굉장히 어려워지는 단점이 있다.
그래서 아래 플로그인을 설치하고
npm install -D babel-plugin-styled-components.bablerc에 아래와 같이 plugins 배열에 담아 주면 된다.
development환경에서만 적용하기 위해 env 하위에서 설정했다.
{
    "presets": [
        "@babel/preset-env",
        "@babel/preset-react",
        "@babel/preset-typescript"
    ],
    "env": {
        "development": {
            "plugins": ["babel-plugin-styled-components"]
        }
    }
}
적용한 상태에서 보면 Component의 이름이 접두어로 붙어 확인이 용이해진다.
production에서는 적용하지 않도록 설정할 수 있다.


아는 만큼 보인다