도커에 대한 설명은 다음에 첨부하겠다 이번 편에서는 설치과정만 알아보자
Docker Desktop for Windows
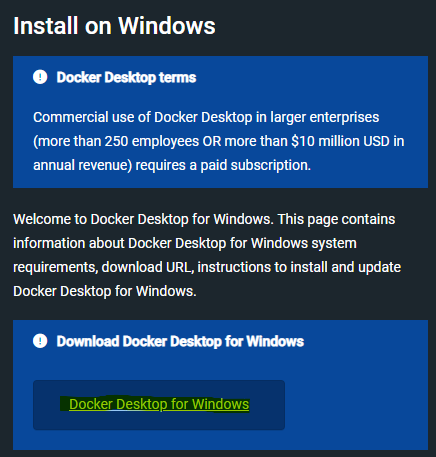
설치 후 회원가입 알아서 하고 로그인 해준다
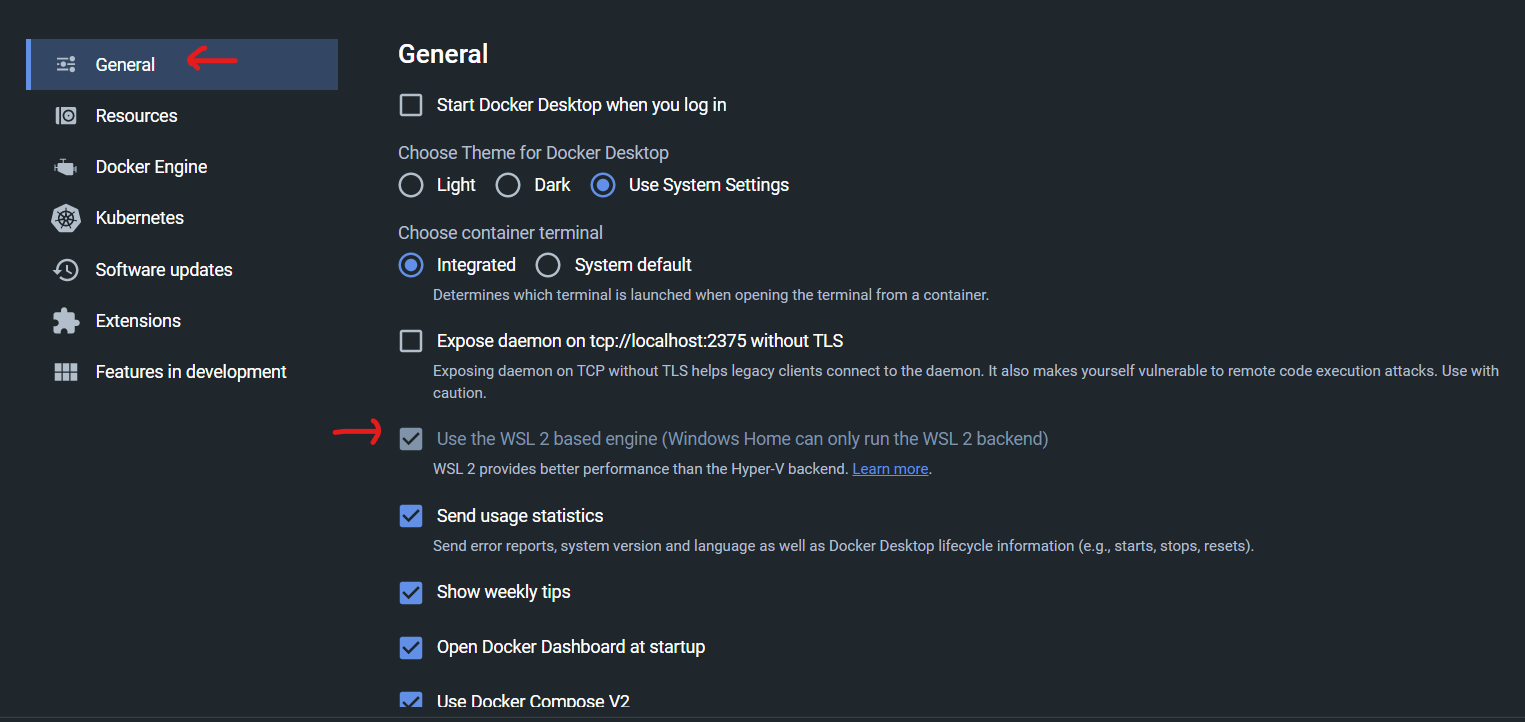
그리고 아래와 같이 설정을 들어가준다

General 탭에서 Use the WSL 2 based engine 을 아래와 같이 설정해 주는데 내 화면은 고정으로 선택되어 있다
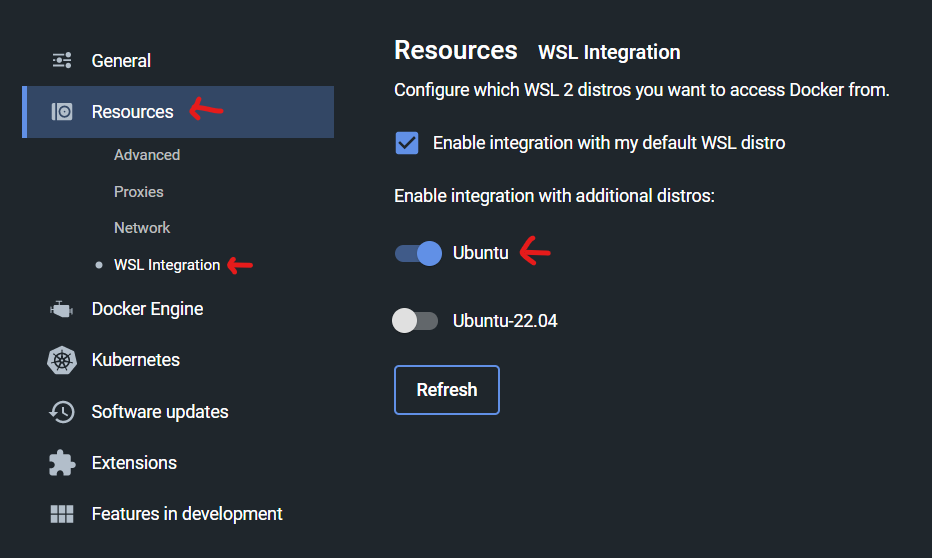
Resources 탭의 WSL Integration 에서 Ubuntu ( 혹은 본인이 WSL2 에서 사용하는 OS ) 를 선택해준다
docker --version 을 입력하면 다음과 같이 나온다.
혹은 안 나올 수도 있는데 Docker 를 꺼둔 것은 아닌지 확인해보면 된다.

ip addr show eth0 커맨드를 입력하면 내가 구동 중인 Virtual Machine ( WSL2 ) 의 ip를 확인할 수 있다. 하지만 재부팅시 ip가 초기화 되니 유의해야한다.

docker run -it -p 80:80 nginx:latest 를 처음 입력하면 아마 내 화면과 다른 화면이 나올텐데 조금 기다리다보면 Pull 머라고 뜰 것이다. 이미지를 가져오는 과정이니 좀 기다리면 된다.
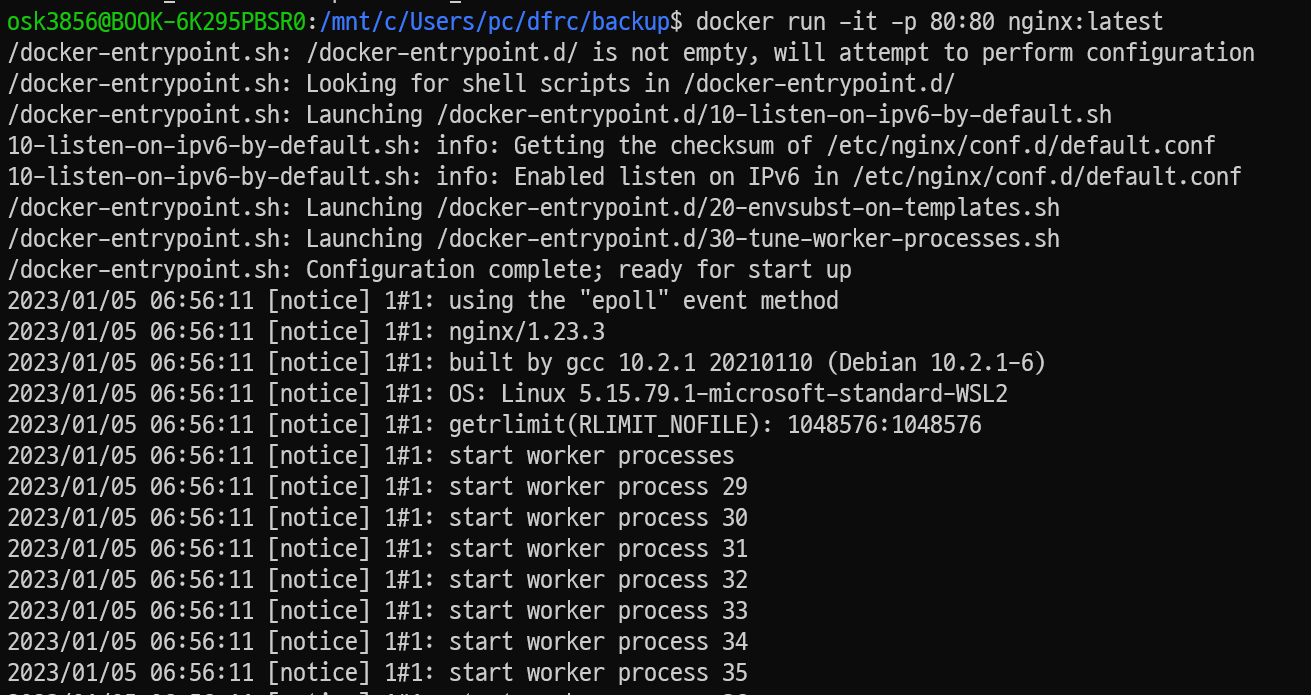
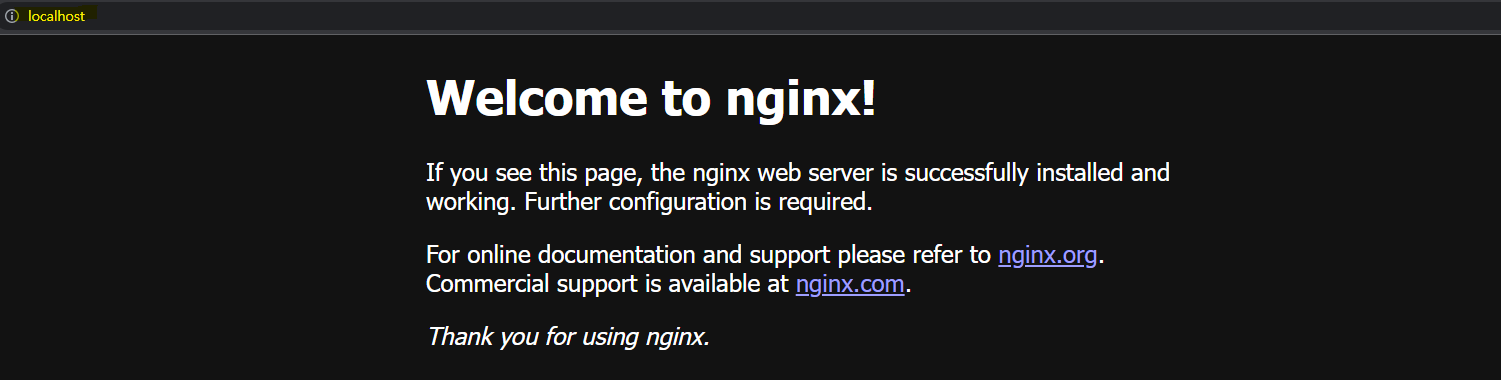
그리고 나와같이 start worker process {numbers} 가 뜨면 브라우저를 열어서 주소창에 localhost 를 입력하면 Welcome to nginx! 가 반겨줄 것이다.
(주소창에 localhost 대신에 127.0.0.1 을 입력해도 된다)
Docker 이미지 생성
3.8이나 3.9나 Docker 에 이미지 생성하는 것은 같다. 이 글에서는 3.8 버전 위주로 설명하겠다.
Python Version
- 3.8
- 3.9
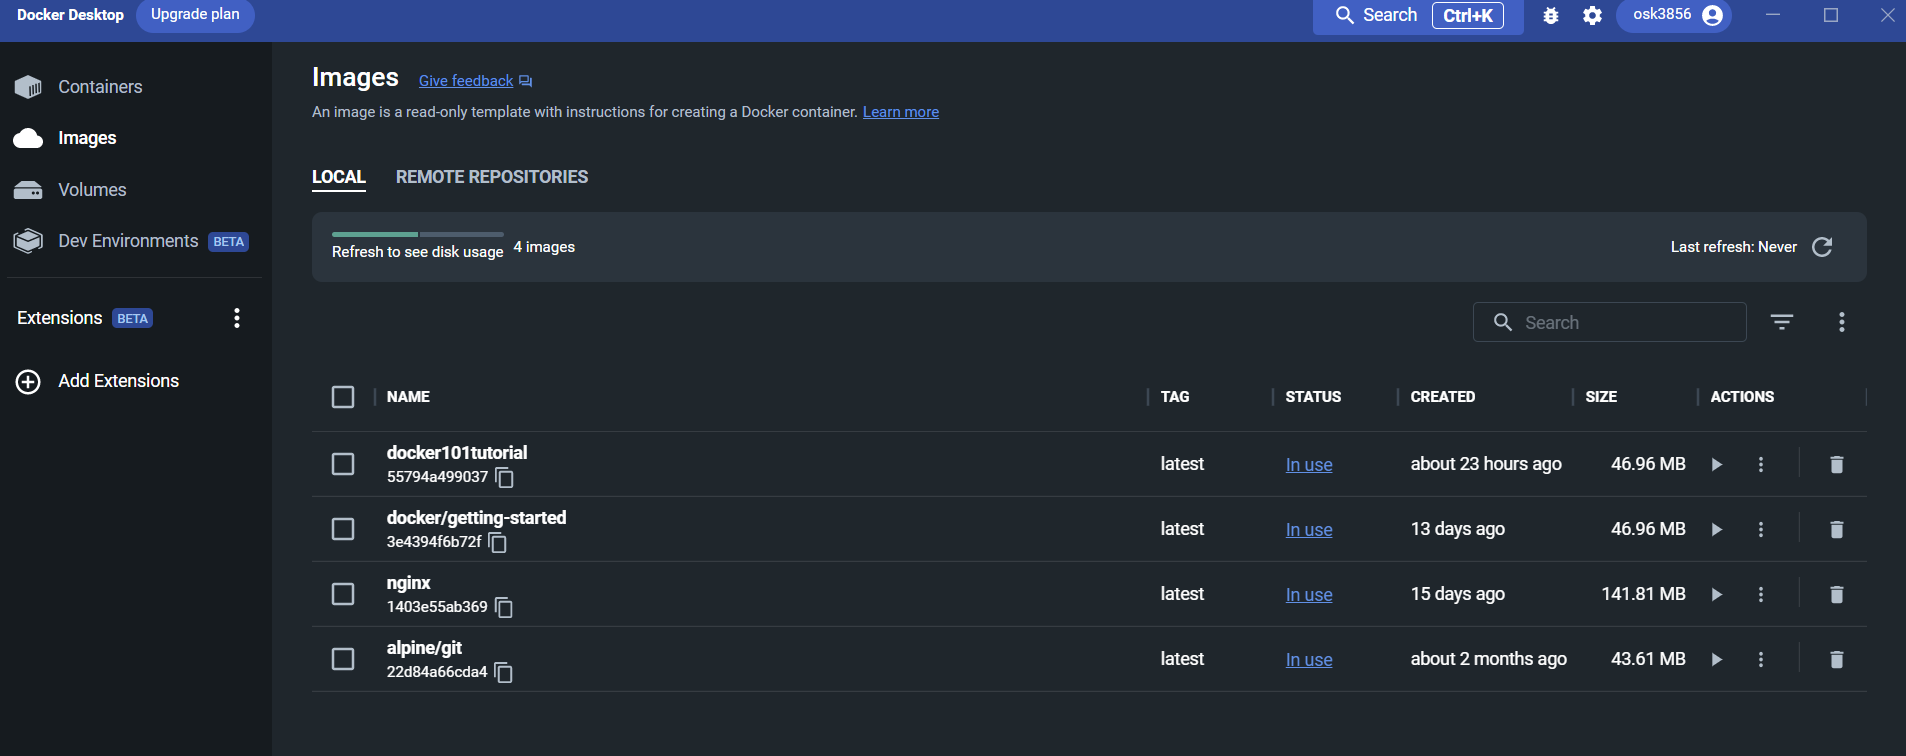
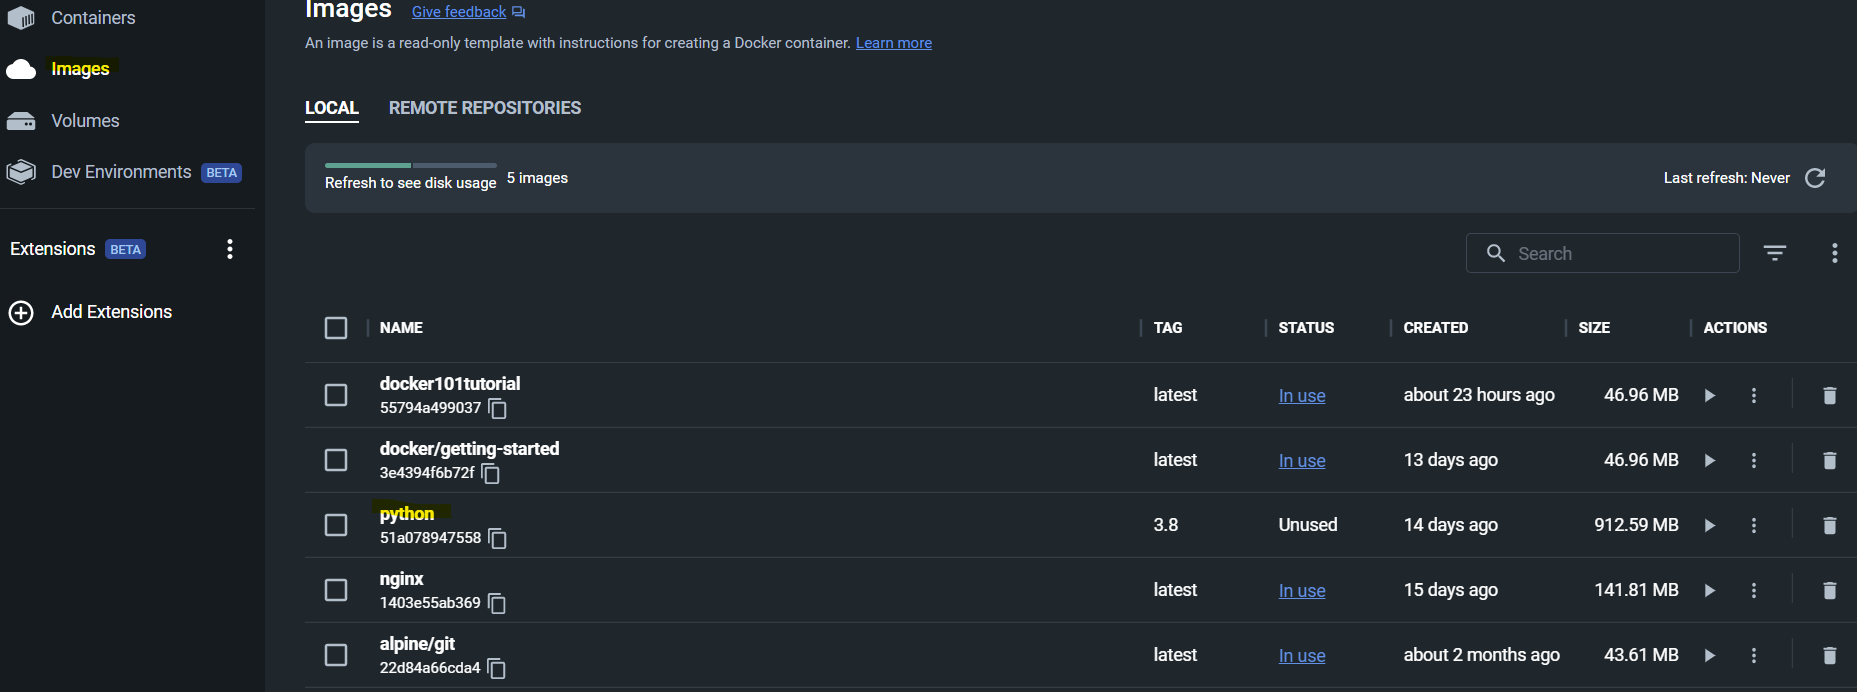
Docker 이미지 생성할 때 아래와 같이 도커-Images 화면 띄어두고 진행하면 Docker 이미지 생성의 이해를 도울 수 있다.
Docker 허브에서 Docker Image 가져오기
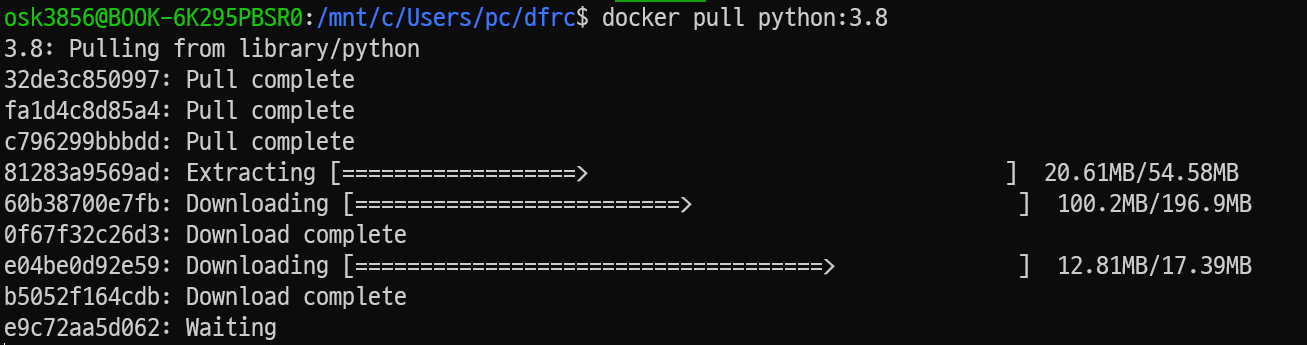
docker pull python:3.8
조금 기다려야 한다 기다리고 있으면 다음과 같은 설치 진행을 볼 수 있다
docker images
Docker 이미지 리스트들을 볼 수 있다. 방금전에 허브에서 가져온 Python 이 있는 것을 볼 수 있다.
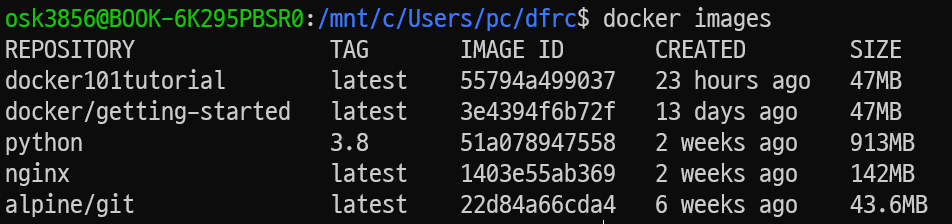
마찬가지로 Docker Desktop의 Images 에서도 확인할 수 있다
$ docker pull python:3.8

3.8: Pulling from library/python
32de3c850997: Pull complete
fa1d4c8d85a4: Pull complete
c796299bbbdd: Pull complete
81283a9569ad: Pull complete
60b38700e7fb: Pull complete
0f67f32c26d3: Pull complete
e04be0d92e59: Pull complete
b5052f164cdb: Pull complete
e9c72aa5d062: Pull complete
Digest: sha256:3a519327ab069a4e356a8aa279e80b7ef6270e17c5df1493dd0a5b281755e95a
Status: Downloaded newer image for python:3.8
docker.io/library/python:3.8

$  docker images

REPOSITORY               TAG       IMAGE ID       CREATED        SIZE
docker101tutorial        latest    55794a499037   23 hours ago   47MB
docker/getting-started   latest    3e4394f6b72f   13 days ago    47MB
python                   3.8       51a078947558   2 weeks ago    913MB
nginx                    latest    1403e55ab369   2 weeks ago    142MB
alpine/git               latest    22d84a66cda4   6 weeks ago    43.6MB
Docker 컨테이너 생성
Docker run 명령어 : 이미지로 컨테이너 생성
docker run [ 옵션 ] [ 이미지 ] [ 명령 ] [ 매개 변수 ]
{옵션}
- -i, --interactive
- 표준 입력(stdin)을 활성화하며, 컨테이너와 연결(attach)되어 있지 않더라도 표준 입력을 유지합니다.
- 보통 이 옵션을 사용하여 Bash 에 명령을 입력합니다.
- -t, --tty
- TTY 모드(pseudo-TTY)를 사용합니다.
- Bash를 사용하려면 이 옵션을 설정해야 합니다.
- 이 옵션을 설정하지 않으면 명령을 입력할 수는 있지만, 셸이 표시되지 않습니다.
- --name
- 컨테이너 이름을 설정합니다.
- -d, --detach
- Detached 모드입니다.
- 보통 데몬 모드라고 부르며, 컨테이너가 백그라운드로 실행됩니다.
- -p, --publish
- 호스트와 컨테이너의 포트를 연결합니다. (포트포워딩)
- <호스트 포트>:<컨테이너 포트>
- -p 80:80
- --privileged
- 컨테이너 안에서 호스트의 리눅스 커널 기능(Capability)을 모두 사용합니다.
- 호스트의 주요 자원에 접근할 수 있습니다.
- --rm
- 프로세스 종료시 컨테이너 자동 제거
- --restart
- 컨테이너 종료 시, 재시작 정책을 설정합니다.
- --restart="always"
- -v, --volume
- 데이터 볼륨을 설정입니다.
- 호스트와 컨테이너의 디렉토리를 연결하여, 파일을 컨테이너에 저장하지 않고 호스트에 바로 저장합니다. (마운트)
- -u, --user
- 컨테이너가 실행될 리눅스 사용자 계정 이름 또는 UID를 설정합니다.
- --user root
- -e, --env
- 컨테이너 내에서 사용할 환경 변수를 설정합니다.
- 보통 설정 값이나 비밀번호를 전달할 때 사용합니다.
- -e GRANT_SUDO=yes
- --link
- 컨테이너끼리 연결합니다.
- [컨테이너명 : 별칭]
- --link="db:db"
- -h, --hostname
- 컨테이너의 호스트 이름을 설정합니다.
- -w, --workdir
- 컨테이너 안의 프로세스가 실행될 디렉터리를 설정합니다.
- -a, --attach
- 컨테이너에 표준 입력(stdin), 표준 출력(stdout), 표준 에러(stderr) 를 연결합니다.
- -c, --cpu-shares
- CPU 자원 분배 설정입니다.
- 기본 값은 1024이며, 각 값은 상대적으로 적용됩니다.
- -m, --memory
- 메모리 한계를 설정합니다.
- <숫자><단위> 형식이며 단위는 b, k, m, g 를 사용할 수 있습니다
- --memory=”100000b”
- --gpus
- 컨테이너에서 호스트의 NVIDIA GPU 를 사용할 수 있도록 설정합니다.
- 호스트는 NVIDIA GPU 가 장착 된 Linux 서버여야하며,
- NVIDIA driver 가 설치되어 있어야하고,
- docker 19.03.5 버전 이상이어야합니다.
- GPU 모두 사용하기
- --gpus all
- GPU 지정해서 사용하기
- --gpus ‘”device=0,1”’
- --security-opt
- SELinux, AppArmor 옵션을 설정합니다.
- --security-opt=”label:level:TopSecret”
-
docker run -d -it --name python_prophet -p 10880:8888 python:3.8 -
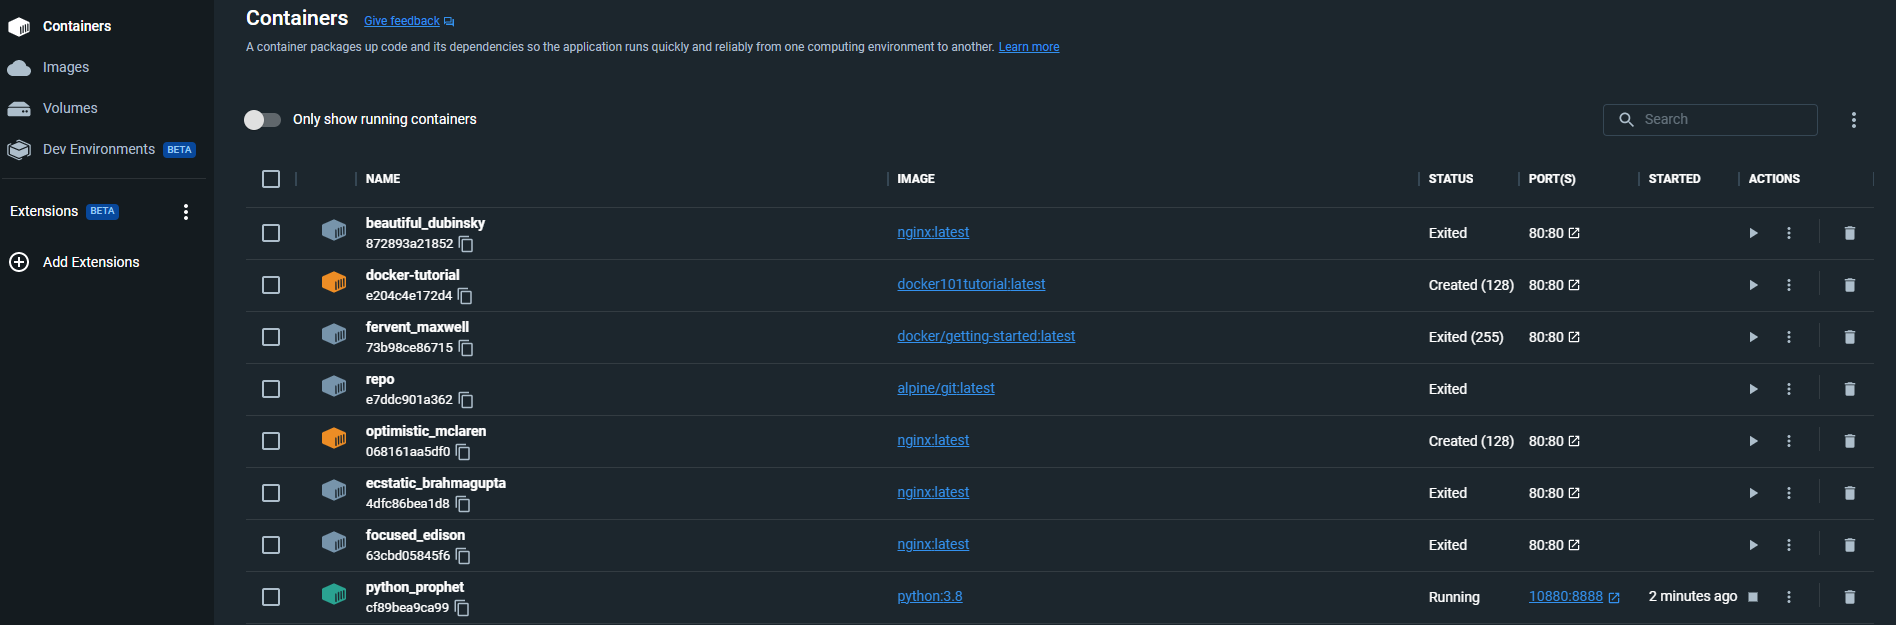
docker ps -a: 도커에 올라가있는 프로세스 확인

Docker Desktop 의 Containers 에 들어가보면 방금 만든 python_prophet 이 만들어진 것을 확인할 수 있다
$ docker run -d -it --name python_prophet -p 10880:8888 python:3.8

cf89bea9ca9986cd2d2e93a6f4881ddacbe26a859f2a21dfa5decd1ce87af4cf

$ docker ps -a

CONTAINER ID   IMAGE                    COMMAND                  CREATED          STATUS                      PORTS                     NAMES
cf89bea9ca99   python:3.8               "python3"                37 seconds ago   Up 36 seconds               0.0.0.0:10880->8888/tcp   python_prophet
872893a21852   nginx:latest             "/docker-entrypoint.…"   19 hours ago     Exited (0) 19 hours ago                               beautiful_dubinsky
e204c4e172d4   docker101tutorial        "/docker-entrypoint.…"   41 hours ago     Created                                               docker-tutorial
73b98ce86715   docker/getting-started   "/docker-entrypoint.…"   41 hours ago     Exited (255) 22 hours ago   0.0.0.0:80->80/tcp        fervent_maxwell
e7ddc901a362   alpine/git               "git clone https://g…"   41 hours ago     Exited (0) 41 hours ago                               repo
068161aa5df0   nginx:latest             "/docker-entrypoint.…"   41 hours ago     Created                                               optimistic_mclaren
4dfc86bea1d8   nginx:latest             "/docker-entrypoint.…"   41 hours ago     Exited (0) 41 hours ago                               ecstatic_brahmagupta
63cbd05845f6   nginx:latest             "/docker-entrypoint.…"   41 hours ago     Exited (0) 41 hours ago                               focused_edison
이미 생성했던 Docker Container 시작 및 종료
Docker Container Start
docker start {Container Name}
- 여기서는
docker start python_prophet을 하면 되겠다
Docker Container Stop
docker stop --time=0 {Container Name}OR
docker kill --signal=9 {Container Name}
컨테이너가 자동으로 멈출때까지 기다리는 시간을 0을 줘서 멈추는 방법과 프로세스 자체를 킬 하는 방법으로 도커 컨테이너를 종료할 수 있다
docker stop --time=0 python_prophetORdocker kill --signal=9 python_prophet
Docker 컨테이너 CLI 접속 후 파이썬 버전 확인
docker exec ?
- 실행중인 컨테이너에만 실행가능
- 특정한 컨테이너가 실행되는 환경에서 또 다른 프로세스를 실행할 수 있도록 해주는 명령어
- 컨테이너 내부 환경에 대해 알아보거나 디버깅 가능
docker exec -it python_prophet bin/bashpython --version
-it : cli 접속 하고 <컨테이너>(python_prophet) 에 있는 bin 파일의 bash를 실행

$ docker exec -it python_prophet bin/bash
root@cf89bea9ca99:/# python --version

Python 3.8.16
파이썬 가상환경 생성
virtualvenvinstallation 및 환경구성
cd homemkdir workspace: home directory 에서 작업공간 생성ls -apip install virtualenv: 가상환경 설치
$ cd home
$ mkdir workspace
$ ls -a
. .. workspace
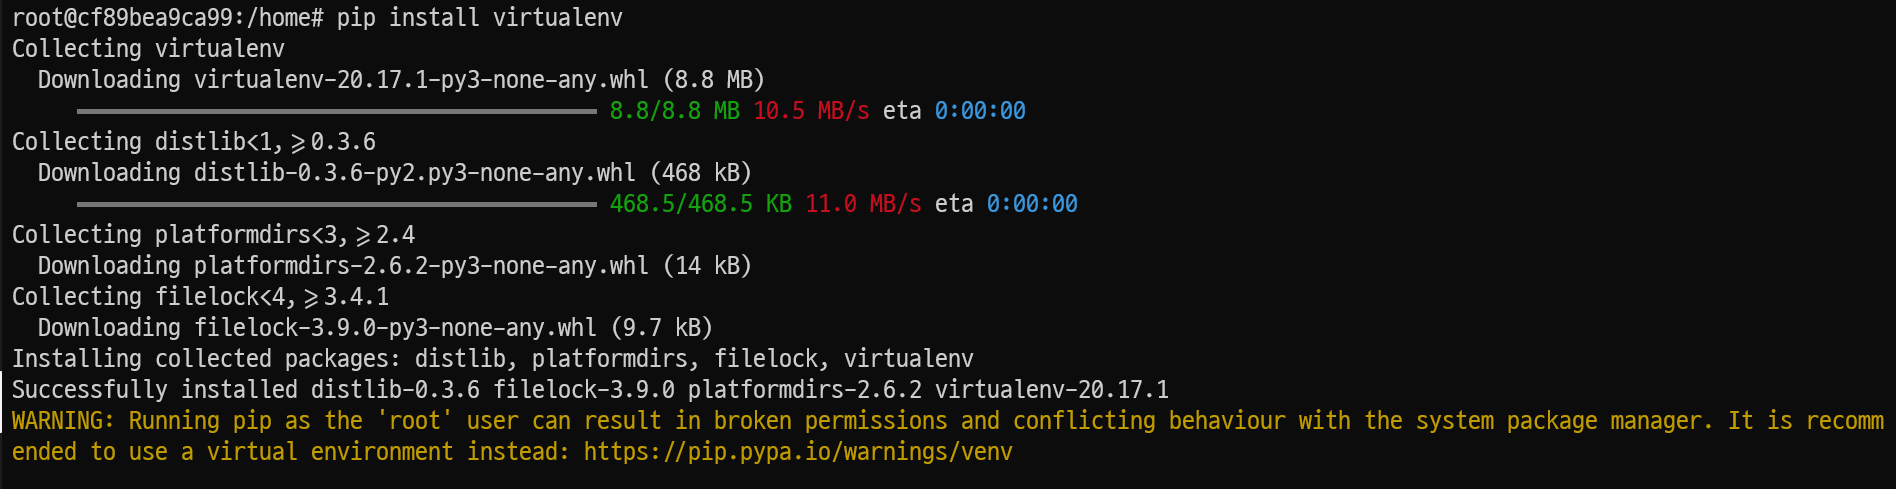
$ pip install virtualenv
Collecting virtualenv
Downloading virtualenv-20.17.1-py3-none-any.whl (8.8 MB)
━━━━━━━━━━━━━━━━━━━━━━━━━━━━━━━━━━━━━━━━ 8.8/8.8 MB 10.5 MB/s eta 0:00:00
Collecting distlib<1,>=0.3.6
Downloading distlib-0.3.6-py2.py3-none-any.whl (468 kB)
━━━━━━━━━━━━━━━━━━━━━━━━━━━━━━━━━━━━━━━━ 468.5/468.5 KB 11.0 MB/s eta 0:00:00
Collecting platformdirs<3,>=2.4
Downloading platformdirs-2.6.2-py3-none-any.whl (14 kB)
Collecting filelock<4,>=3.4.1
Downloading filelock-3.9.0-py3-none-any.whl (9.7 kB)
Installing collected packages: distlib, platformdirs, filelock, virtualenv
Successfully installed distlib-0.3.6 filelock-3.9.0 platformdirs-2.6.2 virtualenv-20.17.1
WARNING: Running pip as the 'root' user can result in broken permissions and conflicting behaviour with the system package manager. It is recommended to use a virtual environment instead: https://pip.pypa.io/warnings/venv
WARNING: You are using pip version 22.0.4; however, version 22.3.1 is available.
You should consider upgrading via the '/usr/local/bin/python -m pip install --upgrade pip' command.python -m venv {가상환경이름}: 가상환경 생성(가상환경 관리 폴더 생성)source ./{가상환경이름}/bin/activate: 가상환경 활성화bin/activate
쉘프롬프트 앞에 (.venv) 라고 붙으면서 가상환경이 활성화 됨which python: 가상환경 파이썬 위치 확인(나오면 파이썬 적용 된 것임)deactivate: 가상환경에서 빠져나오기
$ python -m venv .venv
$ ls -a

.  ..  .venv  workspace

$ source ./.venv/bin/activate
$ which python

/home/.venv/bin/python
가상환경에서 빠져나오려면
$ deactivate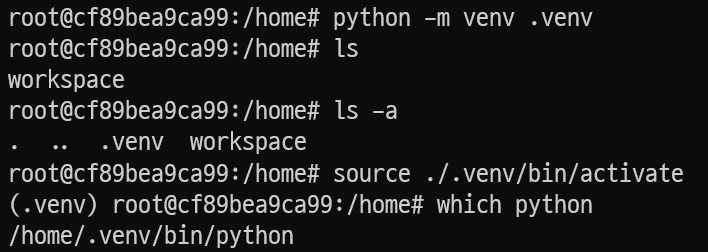
필요 패키지 다운
혹시 모를 충돌방지를 위해 pip 버전을 최신으로 업그레이드
jupyterlab 을 원하면 아래와 같이 jupyter notebook 을 원하면 jupyterlab 대신 jupyter notebook 을 입력하면 됨
pip install --upgrade pippip install jupyterlabapt-get updateapt-get install vim: 중간에 [Y/n] 동의를 구하는 화면이 나옴 Y 누르면 됨jupyter notebook --generate-config -y
$ pip install --upgrade pip
$ pip install jupyterlab
$ apt-get update
$ apt-get install vim
$ jupyter notebook --generate-config -y

Writing default config to: /root/.jupyter/jupyter_notebook_config.py
jupyter 설정파일 수정
ipython
$ ipython

Python 3.8.16 (default, Dec 21 2022, 19:32:01)
Type 'copyright', 'credits' or 'license' for more information
IPython 8.8.0 -- An enhanced Interactive Python. Type '?' for help.- jupyterlab(jupyter notebook) 의 password 를 입력
(난 A1234567890# 으로 비번 지정함 그럼 argon2 블라블라 나오는 것을 메모장에 저장) - 다 입력하면
Ctrl+z를 누르거나exit()를 입력해서 ipython 을 빠져나옴
In [1]: from notebook.auth import passwd
In [2]: passwd()

Enter password:
Verify password:
Out[2]: 'argon2:$argon2id$v=19$m=10240,t=10,p=8$xX2E7gxZ6nPASIdwRtW/EQ$EJrIvZlhU+DckfWHE0flnqGQU52jQjHZxxnTK8DitUM'
vi ~/.jupyter/jupyter_notebook_config.py: jupyter notebook 설정 파일 실행- ]] 를 누르거나
Ctrl+End를 눌러서 가장 밑줄로 이동
( 가장 앞 줄로 이동 :Ctrl+Home) i로 입력모드 진입
만약 가장 앞 줄 쪽에 c=get_config() 가 이미 입력되어 있다면
c=get_config() 부분은 빼도 됨
그리고 password 쪽은 아까 입력하고 출력으로 나왔던 것을 그대로 붙여넣기
c=get_config()

c.NotebookApp.ip='localhost'
c.NotebookApp.open_browser=False
c.NotebookApp.password='argon2:$argon2id$v=19$m=10240,t=10,p=8$xX2E7gxZ6nPASIdwRtW/EQ$EJrIvZlhU+DckfWHE0flnqGQU52jQjHZxxnTK8DitUM'
c.NotebookApp.password_required=True
c.NotebookApp.port=8888
c.NotebookApp.iopub_data_rate_limit=1.0e10
c.NotebookApp.terminado_settings={'shell_command': ['/bin/bash']} # terminal을 bash로 실행esc→:wq입력 해서 vim 에디터 종료
Jupyer 서버 실행
backgroud mode 로 실행 : 서버 돌리면서 다른 작업 가능
nohup<command입력>&
jupyter lab을 localhost로 root 권한을 부여하여 실행
PID : 818 ( process 넘버 )
nohup로 실행할 때는 엔터를 두번치면 됨
nohup jupyter lab --ip 0.0.0.0 --allow-root &ps -ef: 돌아가고 있는 프로세스 확인
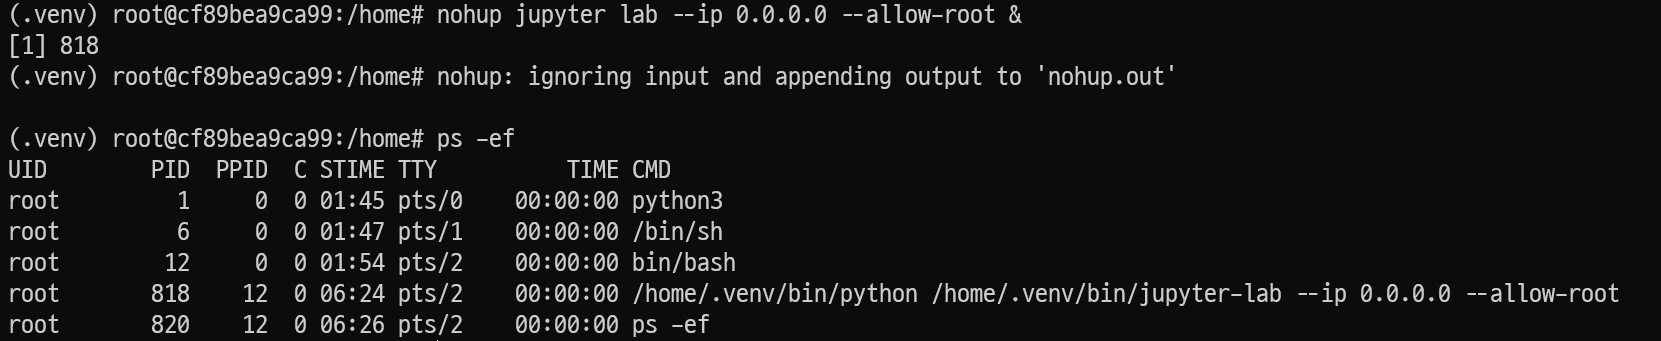
$ nohup jupyter lab --ip 0.0.0.0 --allow-root &

[1] 818
(.venv) root@cf89bea9ca99:/home# nohup: ignoring input and appending output to 'nohup.out'

$ ps -ef
UID        PID  PPID  C STIME TTY          TIME CMD
root         1     0  0 01:45 pts/0    00:00:00 python3
root         6     0  0 01:47 pts/1    00:00:00 /bin/sh
root        12     0  0 01:54 pts/2    00:00:00 bin/bash
root       818    12  0 06:24 pts/2    00:00:00 /home/.venv/bin/python /home/.venv/bin/jupyter-lab --ip 0.0.0.0 --allow-root
root       820    12  0 06:26 pts/2    00:00:00 ps -ef
Jupyter 접속
{portnumber} 는 포트번호 즉, 10880 을 넣으면 됩니다
1. 브라우저를 열어서 127.0.0.1:{portnumber} 또는 localhost:{portnumber}
2. 아까 입력했던 비밀번호 (A1234567890#) 를 password 공간에 입력
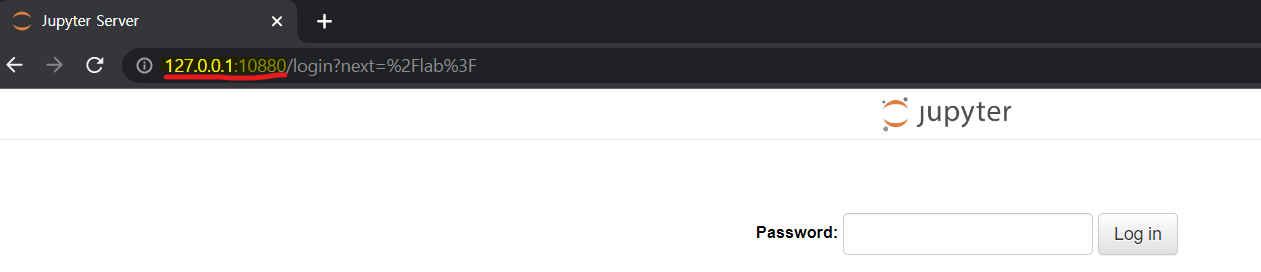
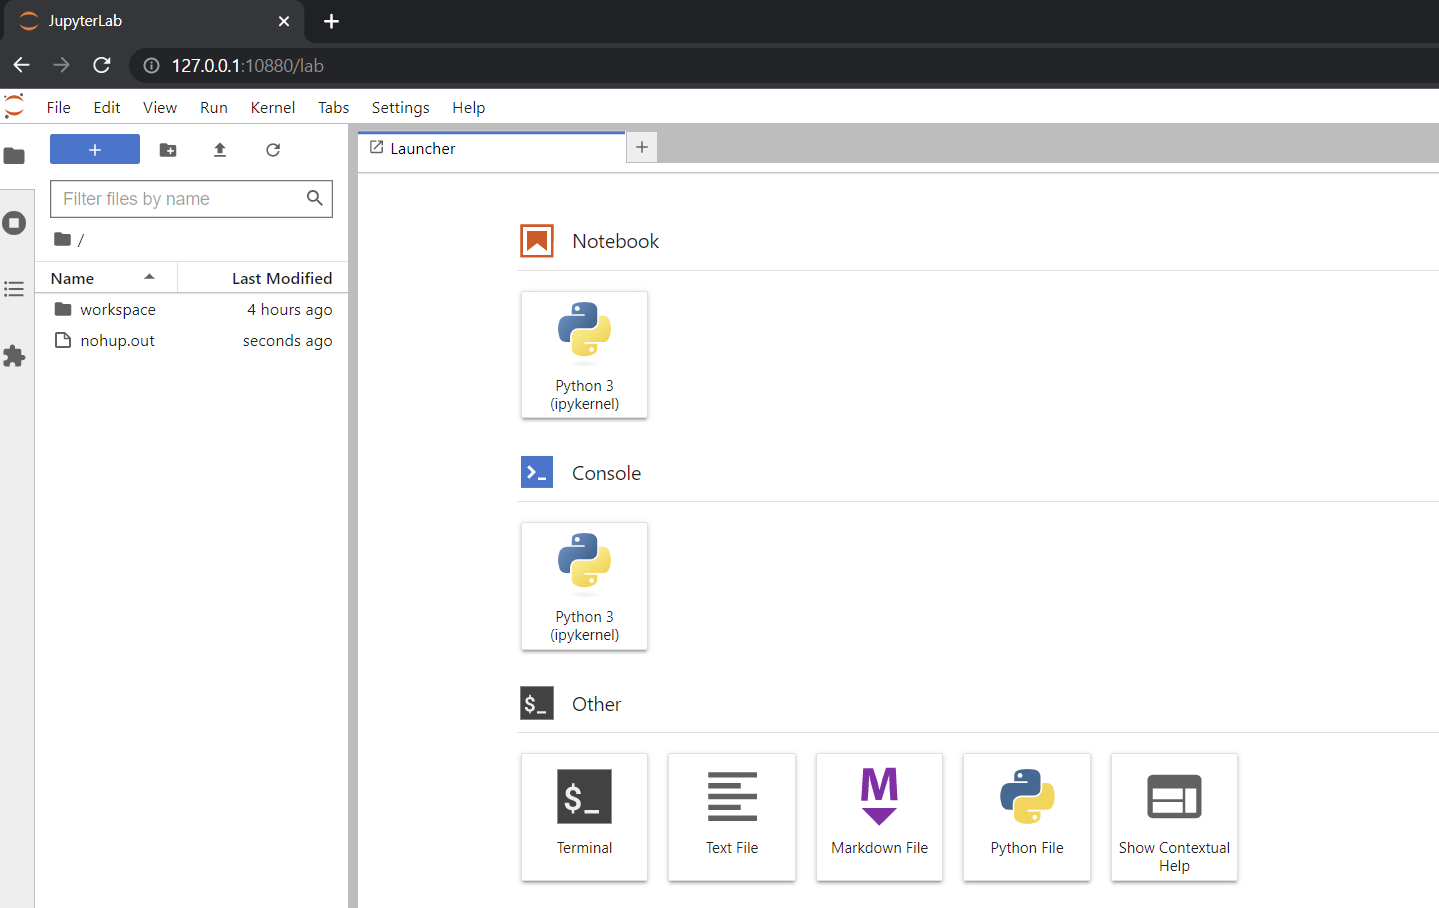
- /home 디렉토리 기준으로 jupyter lab 이 실행 됨
Docker 종료 및 종료 없이 나가기
- Docker Container 종료 :
exit,Ctrl+D- Docker Container 종료 없이 나가기 :
Ctrl+P+Q
컨테이너에 다시 들어가서 작업 가능( Detach )
Docker 컨테이너 및 이미지 삭제
-
docker ps: 동작중인 컨테이너 확인 -
docker ps -a: 정지된 컨테이너 확인 -
docker rm [컨테이너 id]: 컨테이너 삭제 -
docker rm [컨테이너 id], [컨테이너 id]: 복수 개 삭제 -
docker ps -a: 삭제되었는지 확인 -
docker ps -qa: 컨테이너의 ID 만 출력 -
docker rm $(docker ps -qa): 컨테이너 전체 삭제( 위 ID 출력을 응용 ) -
docker images: 현재 이미지 확인 -
docker rmi [이미지 id]: 이미지 삭제 -
docker rmi -f [이미지 id]: -f 옵션을 붙이면 해당 컨테이너도 강제 삭제 -
docker rmi $(docker images -q): 이미지 전체 삭제 -
docker image rm -f $(docker image ls -q): 이미지 전체 삭제 & 해당 컨테이너 강제 삭제
전체 SCRIPTS
$ docker pull python:3.8

3.8: Pulling from library/python
32de3c850997: Pull complete
fa1d4c8d85a4: Pull complete
c796299bbbdd: Pull complete
81283a9569ad: Pull complete
60b38700e7fb: Pull complete
0f67f32c26d3: Pull complete
e04be0d92e59: Pull complete
b5052f164cdb: Pull complete
e9c72aa5d062: Pull complete
Digest: sha256:3a519327ab069a4e356a8aa279e80b7ef6270e17c5df1493dd0a5b281755e95a
Status: Downloaded newer image for python:3.8
docker.io/library/python:3.8

$  docker images

REPOSITORY               TAG       IMAGE ID       CREATED        SIZE
docker101tutorial        latest    55794a499037   23 hours ago   47MB
docker/getting-started   latest    3e4394f6b72f   13 days ago    47MB
python                   3.8       51a078947558   2 weeks ago    913MB
nginx                    latest    1403e55ab369   2 weeks ago    142MB
alpine/git               latest    22d84a66cda4   6 weeks ago    43.6MB

$ docker run -d -it --name python_prophet -p 10880:8888 python:3.8

cf89bea9ca9986cd2d2e93a6f4881ddacbe26a859f2a21dfa5decd1ce87af4cf

$ docker ps -a

CONTAINER ID   IMAGE                    COMMAND                  CREATED          STATUS                      PORTS                     NAMES
cf89bea9ca99   python:3.8               "python3"                37 seconds ago   Up 36 seconds               0.0.0.0:10880->8888/tcp   python_prophet
872893a21852   nginx:latest             "/docker-entrypoint.…"   19 hours ago     Exited (0) 19 hours ago                               beautiful_dubinsky
e204c4e172d4   docker101tutorial        "/docker-entrypoint.…"   41 hours ago     Created                                               docker-tutorial
73b98ce86715   docker/getting-started   "/docker-entrypoint.…"   41 hours ago     Exited (255) 22 hours ago   0.0.0.0:80->80/tcp        fervent_maxwell
e7ddc901a362   alpine/git               "git clone https://g…"   41 hours ago     Exited (0) 41 hours ago                               repo
068161aa5df0   nginx:latest             "/docker-entrypoint.…"   41 hours ago     Created                                               optimistic_mclaren
4dfc86bea1d8   nginx:latest             "/docker-entrypoint.…"   41 hours ago     Exited (0) 41 hours ago                               ecstatic_brahmagupta
63cbd05845f6   nginx:latest             "/docker-entrypoint.…"   41 hours ago     Exited (0) 41 hours ago                               focused_edison

$ docker exec -it python_prophet bin/bash
$ python --version

Python 3.8.16

$ cd home
$ mkdir workspace
$ ls -a

.  ..  workspace

$ pip install virtualenv

Collecting virtualenv
  Downloading virtualenv-20.17.1-py3-none-any.whl (8.8 MB)
     ━━━━━━━━━━━━━━━━━━━━━━━━━━━━━━━━━━━━━━━━ 8.8/8.8 MB 10.5 MB/s eta 0:00:00
Collecting distlib<1,>=0.3.6
  Downloading distlib-0.3.6-py2.py3-none-any.whl (468 kB)
     ━━━━━━━━━━━━━━━━━━━━━━━━━━━━━━━━━━━━━━━━ 468.5/468.5 KB 11.0 MB/s eta 0:00:00
Collecting platformdirs<3,>=2.4
  Downloading platformdirs-2.6.2-py3-none-any.whl (14 kB)
Collecting filelock<4,>=3.4.1
  Downloading filelock-3.9.0-py3-none-any.whl (9.7 kB)
Installing collected packages: distlib, platformdirs, filelock, virtualenv
Successfully installed distlib-0.3.6 filelock-3.9.0 platformdirs-2.6.2 virtualenv-20.17.1
WARNING: Running pip as the 'root' user can result in broken permissions and conflicting behaviour with the system package manager. It is recommended to use a virtual environment instead: https://pip.pypa.io/warnings/venv
WARNING: You are using pip version 22.0.4; however, version 22.3.1 is available.

$ python -m venv .venv
$ ls -a

.  ..  .venv  workspace

$ source ./.venv/bin/activate
$ which python

/home/.venv/bin/python

$ pip install --upgrade pip
$ pip install jupyterlab
$ apt-get update
$ apt-get install vim
$ jupyter notebook --generate-config -y

Writing default config to: /root/.jupyter/jupyter_notebook_config.py

$ ipython

Python 3.8.16 (default, Dec 21 2022, 19:32:01)
Type 'copyright', 'credits' or 'license' for more information
IPython 8.8.0 -- An enhanced Interactive Python. Type '?' for help.
In [1]: from notebook.auth import passwd
In [2]: passwd()
Enter password:
Verify password:
Out[2]: 'argon2:$argon2id$v=19$m=10240,t=10,p=8$xX2E7gxZ6nPASIdwRtW/EQ$EJrIvZlhU+DckfWHE0flnqGQU52jQjHZxxnTK8DitUM'vi ~/.jupyter/jupyter_notebook_config.py... 가장 밑줄
c=get_config() # 가장 앞 줄 쪽에 이미 있으면 안 넣어도 됨
c.NotebookApp.ip='localhost'
c.NotebookApp.open_browser=False
c.NotebookApp.password='argon2:$argon2id$v=19$m=10240,t=10,p=8$xX2E7gxZ6nPASIdwRtW/EQ$EJrIvZlhU+DckfWHE0flnqGQU52jQjHZxxnTK8DitUM'
c.NotebookApp.password_required=True
c.NotebookApp.port=8888
c.NotebookApp.iopub_data_rate_limit=1.0e10
c.NotebookApp.terminado_settings={'shell_command': ['/bin/bash']} # terminal을 bash로 실행$ nohup jupyter lab --ip 0.0.0.0 --allow-root &
[1] 818
(.venv) root@cf89bea9ca99:/home# nohup: ignoring input and appending output to 'nohup.out'
$ ps -ef
UID PID PPID C STIME TTY TIME CMD
root 1 0 0 01:45 pts/0 00:00:00 python3
root 6 0 0 01:47 pts/1 00:00:00 /bin/sh
root 12 0 0 01:54 pts/2 00:00:00 bin/bash
root 818 12 0 06:24 pts/2 00:00:00 /home/.venv/bin/python /home/.venv/bin/jupyter-lab --ip 0.0.0.0 --allow-root
root 820 12 0 06:26 pts/2 00:00:00 ps -ef번외 - 파이썬 버전 별 가상환경 스위치
파이썬을 버전별로 바꿔 써야할 경우가 있다. 도커 컨테이너를 따로 설치해서 사용하는 것도 방법이겠지만 이 방법은 프로젝트의 성격이 완전 다를 때, 그래서 다른 버전을 꼭 써야만할 때 사용하는 것이 좋다. 그 것이 아닌경우에는
virtualenv와 같은 가상환경에서 스위치해주는 것이 더 간단하다.
파이썬 가상환경 설치 1번째 방법
1) virtualenv 가상환경 라이브러리 설치
pip install virtualvenv
2) 컴퓨터에 설치된 기본 파이썬 버전으로 가상환경 설치
virtualenv 가상환경이름
ex. virtualenv env
3) 버전 지정해서 설치
virtualenv 가상환경이름 --python=버전
ex. virtualenv env --python=3.9
파이썬 가상환경 설치 2번째 방법
-> venv 라이브러리는 pip install 과정이 필요없다.
1) 현재 컴퓨터에 있는 기본 파이썬 버전으로 가상환경 설치
python -m venv 가상환경이름
ex. python -m venv env
2) 버전 지정해서 설치
py -버전-m venv 가상환경이름
ex. py -3.9 -m venv env
REFERENCE