상어들의 먹이는 작은 플랑크톤부터 큰 고래까지 다양한데
본능적으로 복어같은 어류는 피한다고 한다.
아마 상어들의 어떤 본능적인센서에 의해 걸러지는 듯 하다.
wireshark라는 패킷분석 프로그램을 쓰면 http환경에서, 데이터패킷을 열어볼 수 있다.
이는 마치 상어 앞에서 먹음직스러운 물고기들이 줄줄이 지나다니는 꼴일 것이다.
https환경에서는 데이터 패킷의 내용이 아닌 타입만 열어볼 수 있다.
고로 복어와 같은 https를 구축한다면 사용자 데이터의 무결성과 기밀성을 유지할 수 있게 해주는
안전한 비공개 온라인 환경을 만들어 낼 수 있다.
📗 http
http 프로토콜은
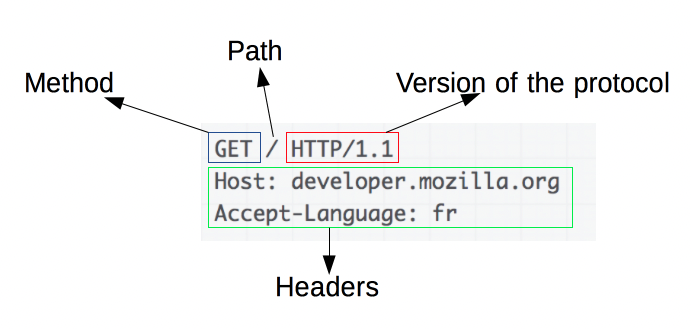
img source: MDNREQUEST LINE; request method, request url과 같은 정보
HEADER; content-type, access-conterol...등의 여러 헤더들
WHITE LINE; 헤더의 끝인 개행문
BODY; 요청에 대한 데이터가 담겨져 있다
요청메시지와
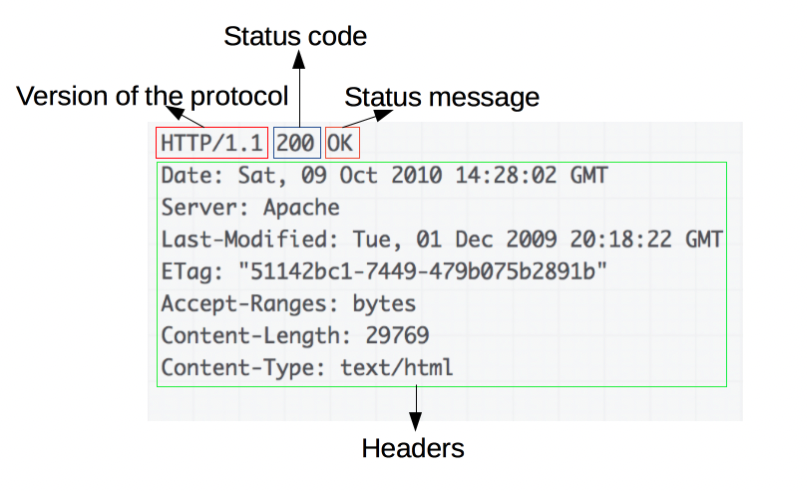
img source: MDNSTATUS LINE; response, status와 같은 정보
HEADER; 여러 헤더들
WHILTE LINE; 개행문
BODY; 서버에서 클라이언트로 전송된 데이터가 담겨져 있다
응답메시지의 구조로 이루어져 있다.
📗 https
Let's encrypt
ssl인증서를 발급해주는 CA(Certificate Authority)는 몇군데가 있고 AWS에서 인증서를 적용할 수도 있지만
Let's encrypt의 경우 아래와 같은 장점들이 있기 때문에 해당방법으로 진행하였다.
- 무료이다.
- 인증 및 발급 절차가 단순하다.
- 발급대기시간이 짧다.
- nginx환경에서의 편의성
- 자동으로 인증유효기간을 갱신해줄 수 있다.
aws서버에 접속했다면(ubuntu20.04)
$ sudo apt-get-repository ppa:certbot/certbot
$ sudo apt-get update
명령어를 통해 cerbot 저장소를 추가하고 업데이트해준다.
$ sudo apt-get install python3-certbot-nginx
$ sudo certbot --nginx -d {domain}
*{domain} -> www.exmaple.com
cerbot을 설치하고 도메인에 대해 인증서를 발급받는다.
이때, fullchain과 privkey는 /etc/letsencrypt/live/{domain} 아래에 위치한다.
nginx conf
server {
    listen 443 ssl;

    #ssl on;
    server_name {domain} www.{domain};
    ssl_certificate /etc/letsencrypt/live/{domain}/fullchain.pem;
    ssl_certificate_key /etc/letsencrypt/live/{domain}/privkey.pem;
    charset utf-8;
    client_max_body_size 128M;

    location / {
        proxy_headers_hash_max_size 512;
        proxy_headers_hash_bucket_size 128;

        proxy_set_header X-Forwarded-For $proxy_add_x_forwarded_for;
        proxy_set_header X-Forwarded-Proto $scheme;
        proxy_set_header X-Real-IP $remote_addr;

        include proxy_params;
        proxy_pass http://127.0.0.1:8000;
    }

    location /static/ {
        alias /var/www/{project}/config/static/;
    }
}
nginx 설정파일은 위와같다. domain 부분을 입력하고 static file이 존재한다면 이에 대한 경로설정도 해준다.
$ sudo cp -f /{project}/config/nginx/nginx.conf /etc/nginx/sites-available/nginx.conf
$ sudo ln -sf /etc/nginx/sites-available/nginx.conf /etc/nginx/sites-enabled/nginx.conf
nginx설정파일을 업데이트 해주었다면 aws서버에 위 명령어를 통해 적용시킨다.
$ sudo nginx -tnginx설정에 문제가 없는지(-t: 설정파일 체크 명령어) 점검해주고
$ sudo systemctl restart nginx
$ systemctl status nginx
nginx를 재시작한 후 정상적으로 재시작 했는지 확인한다.
Let's Encrypt의 기본 유효기간은 90일이다.
$ sudo certbot renew             #갱신하기
$ sudo certbot renew --dry-run   #갱신상태 확인하기
$ sudo certbot certificates      #유효기간 확인하기
이외에 crontab으로 자동갱신을 이루어지게 할 수 있다.
