이전 포스팅으로 next.js와 mongoDB의 연결에 대해서 다뤘습니다. DB 연결을 마치고 2번째로 스키마 정의와 데이터 입출력에 대해 정리해 보겠습니다.
스키마 정의
// schema.ts

const user = new mongoose.Schema(
  {
    email: { type: String },
    password: { type: String },
    name: { type: String, required: true },
    profile_img: { type: String, default: null },
    phone: { type: String },
    role: { type: String, enum: ["user", "pro", "admin"], default: "user" },
    position_tag: { type: String, default: "" },
    introduce: { type: String, default: "" },
    my_category: { type: [subLabelValue], default: [] },
    provider: { type: String },
    providerAccountId: { type: String },
  },
  { timestamps: true }
);


// 모델
export const User = mongoose.models?.User || mongoose.model("User", user);
유저에 대한 스키마 유형을 작성하고 required는 필수 정보의 옵션으로 true면 꼭 필수 정보가 포함이 되어야 합니다.
만약 필수 정보가 포함이 되지않았으면 에러가 나오게되고 enum은 지정한 값들만 허용되는 데이터로 다른 값이 들어오면 에러가 발생합니다.
그리고 스키마 정의를 했다면 기존 모델이 있는경우 그대로 사용하고 없으면 새로 추가합니다.
데이터 조회
//  userAction.ts

import { ProfileSchema } from "@/types/model/User";
import connectDB from "../db";
import { User } from "../schema";

export async function getUserData(userId: string) {
  if (!userId) {
    return { state: false, message: "유효한 id가 없습니다." };
  }

  await connectDB();

  try {
    const result: ProfileSchema | null = await User.findById(userId);

    if (!result) {
      return { state: false, message: "사용자 데이터를 찾을 수 없습니다." };
    }

    const data = JSON.parse(JSON.stringify(result));

    return { state: true, data };
  } catch (error: any) {
    console.error("error", error.message);
    return { state: false, message: "잘못된 시도입니다. userId: " + userId };
  }
}
정의된 스키마를 바탕으로 회원가입을 진행하고 로그인을 합니다.
MongoDB에서 문서를 추가 하게되면 문서의 고유 식별자인 _id가 기본 필드로 생성됩니다.
그럼 특정 문서를 조회할려면 문서 고유 식별자인 _id를 활용하여 조회가 가능합니다.
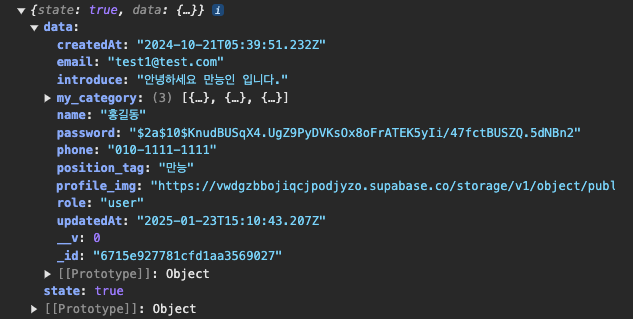
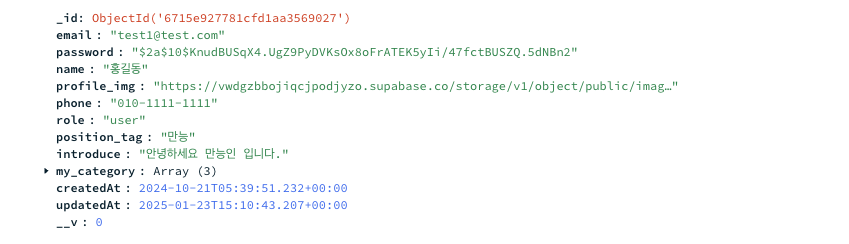
위처럼 별도의 action으로 해당 문서의 고유 식별자인 _id를 userId로 받고 findById 매서드를 활용해서 DB 문서를 id로 조회하여 해당 문서인 user에 대해 상세한 정보를 사용할 수 있습니다.
- getUserData Console
- MongoDB Atlas User 문서
또한 문서를 참조한다면 데이터 중복을 줄이면서 쉽게 데이터를 조회할 수 있고 실시간으로 데이터를 반영할 수 있습니다.
// comment 스키마 정의

const comment = new mongoose.Schema(
  {
    postId: { type: String, required: true },
    commentId: { type: String, required: true },
    content: { type: String, required: true },
    writer: {
      type: mongoose.Schema.Types.ObjectId,
      ref: "User",   // User 참조
      required: true,
    },
    reply: [subReply],
  },
  { timestamps: true }
);
위를 예시를 보면 댓글 스키마를 정의했습니다.
사용자가 댓글을 남기게되면 writer 필드를 현재 로그인한 유저와 참조하기 때문에 작성자를 따로 객체로 정의하지않아 데이터 중복을 방지하면서 별도로 관리합니다. 또한 참조관계로 사용자의 정보가 업데이트되면 댓글 조회시 writer 필드의 정보도 업데이트 됩니다.
.populate("comments") // comments 필드 전체 조회
.populate("writer", "name email role profile_img position_tag"); // writer 필드 > 참조된 User 문서에서 "name email role profile_img position_tag" 해당 데이터들만 조회
그리고 참조가 이루어지면 populate로 참조가 설정된 필드에서 다른 컬렉션의 문서를 가져오기 위해 사용할 수 있습니다.
populate를 사용하면 해당 필드에서 필요한 데이터만 조회할 수 있습니다. 이러면 필요없는 데이터를 가져오지않고 사용할 데이터만 조회하므로 효율적입니다.