진행도를 나타내기 위해 progress 태그를 찾았으나.... 이미 퍼블리싱은 완료된 상태였기 때문에, 못생긴 그것을 사용하고싶지 않았다.
그래서 div로 만든 것을 그대로 사용하였다.
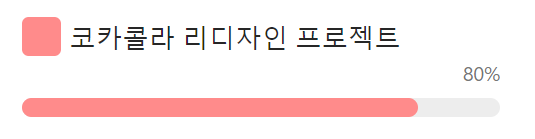
현재는 setRate값을 바꾸면 진행막대의 길이가 바뀌는 하드코딩..
이후 데이터를 받아와서 계산하여 나타낼 계획이다.
container.tsx
import { useEffect, useState } from "react";
import ProjectListUI from "./projectList.presenter";

export default function ProjectList() {

  const [rate, setRate] = useState(0)

    useEffect(()=>{
        setRate(80)
    },[])

  return <ProjectListUI
    rate={rate}
  />;
}
useEffect를 이용해 rate값이 바뀔때마다 다시 그려지게 설정했다.
rate값을 계속 사용하기위해 props
presenter.tsx
        <S.RateBox>
            <S.Rate >{props.rate}%</S.Rate>
            <S.RateBackground></S.RateBackground>
            <S.RateBar rate={props.rate}></S.RateBar>
        </S.RateBox>
props로 받은 rate를 bar왼쪽 위에 표시해주었다.
그리고 길이가 바뀔 RateBar에 rate를 스타일 부분으로 props해주었다.
styles.ts
export const RateBackground = styled.div`
position: absolute;
width: 29rem;
height: 1.2rem;
background-color: #EDEDED;
border-radius: 0.6rem;
`
export const RateBar = styled.div`
position: relative;
height: 1.2rem;
width: ${(props) => (props.rate)}%;
background-color: #FF8B8B;
border-radius: 0.6rem;
`
고정되어야할 부분(RateBackground)은 position: absolute로 주고,
길이가 변하는 부분(RateBar)는 position: relative 로 주어 두개가 겹치게 한다음
RateBar의 width 부분에 props로 받아온 rate에 %를 주면
setRate 값에따라 bar의 길이가 바뀐다.
😆

기억이 안되면, 기록을 -