안드로이드 개발을 해본 사람이라면 Context에 대해서는 얼핏 알고 있을 것입니다. 단순히 해석하여 문맥, 단락의 의미로서 컴포넌트들에 대한 기본 정보들을 담고 있는 클래스라고 생각했습니다. 개발하는 중에도 Context가 많이 필요하게 되는데 this(Activity), getContext, getApplicationContext에 대한 이해없이 대입해보고 되는 것을 설정할 때도 많았습니다. 이렇게 사용하다 보니 면접에서도 제대로 대답을 못하거나 개발하는 중에도 어려움이 있어 제대로 배워보고자 공부를 하고 글을 작성하게 되었습니다.
Context
공식문서에서 설명하기로는 Context는 안드로이드 애플리케이션의 환경 정보에 대한 인터페이스로, 상수와 추상메소드로 이뤄진 추상 클래스입니다. 이 때의 환경 정보란 애플리케이션 패키지 이름, 리소스 정보 등 애플리케이션이 실행되고 있는 환경 요소들을 나타냅니다. 실제로 Context들을 구현하는 클래스는 ContextImpl 클래스로 주로 안드로이드 시스템에서 제공받습니다. 이 Context를 통해서 액티비티를 시작하거나, 브로드캐스트를 발생시킬 수 있고, 서비스를 실행시킬 수 있습니다. 또한, 리소스들을 접근할 때도 Context가 필요하게 됩니다.
ContextImpl
추상클래스인 Context를 실제 구현한 클래스로 앱에서 직접 사용할 수 있는 클래스는 아니지만, 소스코드는 공개되어 있어서 확인할 수 있습니다. ContextImpl은 안드로이드 시스템에서 제공받을 수 있습니다.
ContextWrapper
ContextWrapper는 Context를 직접 상속한 클래스로 이름처럼 Context를 래핑하여 Context와 관련된 호출을 모두 담당하여 처리하게 됩니다.
public class ContextWrapper extends Context {
    @UnsupportedAppUsage
    Context mBase;

    public ContextWrapper(Context base) {
        mBase = base;
    }

    /**
     * Set the base context for this ContextWrapper.  All calls will then be
     * delegated to the base context.  Throws
     * IllegalStateException if a base context has already been set.
     *
     * @param base The new base context for this wrapper.
     */
    protected void attachBaseContext(Context base) {
        if (mBase != null) {
            throw new IllegalStateException("Base context already set");
        }
        mBase = base;
    }

    /**
     * @return the base context as set by the constructor or setBaseContext
     */
    public Context getBaseContext() {
        return mBase;
    }

    @Override
    public AssetManager getAssets() {
        return mBase.getAssets();
    }

    @Override
    public Resources getResources() {
        return mBase.getResources();
    }

    ...

}
위 코드는 ContextWrapper 클래스로 ContextWrapper(Context base) 생성자를 가지고 있습니다. 위 생성자와 attachBaseContext 메소드에서는 Context를 매개변수로 받고 있는데 이 때 대입되는 것이 Context의 구현체 ContextImpl 인스턴스가 전달됩니다. 코드를 자세히 살펴보면 ContextWrapper는 실제로 ContextImpl의 메소드를 대신 호출해주는 역할을 하게 됩니다.
ContextWrapper와 컴포넌트의 관계
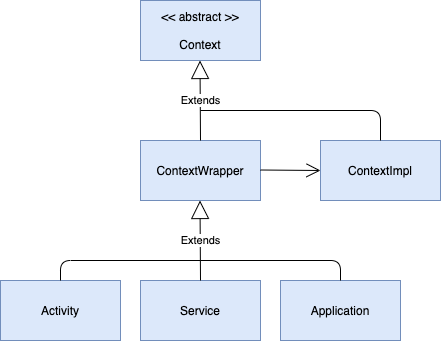
Context, ContextWrapper, ContextImpl, 컴포넌트(Activity, Service, Application)들의 클래스 다이어그램입니다. Context를 직접 상속한 클래스는 ContextWrapper이고, ContextWrapper를 상속한 것은 Activity, Service, Application입니다. Activity, Service, Application은 ContextWrapper의 기본 생성자를 사용하지 않고 attachBaseContext를 사용하여 Context를 설정하게 됩니다. 해당 컴포넌트들은 아래의 attach 메소드를 실행하고 내부에서 attachBaseContext를 실행하게 됩니다.
	@UnsupportedAppUsage
    final void attach(Context context, ActivityThread aThread,
            Instrumentation instr, IBinder token, int ident,
            Application application, Intent intent, ActivityInfo info,
            CharSequence title, Activity parent, String id,
            NonConfigurationInstances lastNonConfigurationInstances,
            Configuration config, String referrer, IVoiceInteractor voiceInteractor,
            Window window, ActivityConfigCallback activityConfigCallback, IBinder assistToken) {
        attachBaseContext(context);

        ...

    }
위 코드는 Activity의 attach 메소드로 안드로이드 시스템에 의해 ContextImpl을 제공받고 attach 메소드를 통해서 ContextWrapper에 ContextImpl 인스턴스가 대입된다고 볼 수 있습니다. 그리고 ContextWrapper는 ContextImpl을 프록시 형태로 구현하여 본연의 ContextImpl 클래스의 변경없이 원하는 기능, 동작들을 재정의 할 수 있습니다.
ContextImpl 이해
ContextWrapper에 전달된 ContextImpl에 대해서 자세히 알아보자면 Activity, Service, Application 컴포넌트에서 각각 안드로이드 시스템에서 제공받은 ContextImpl을 래핑하고 있고, getBaseContext 메소드는 제공받은 ContextImpl 인스턴스를 반환합니다. 또한 각 컴포넌트에서 getApplicationContext를 호출하면 ContextImpl의 getApplicationContext가 호출되고 ContextImpl에서는 ActivityThread의 getApplication 함수를 호출하게 됩니다. 아래 코드는 ContextImpl의 코드의 일부분을 가져왔습니다.
class ContextImpl extends Context {
    private final static String TAG = "ContextImpl";
    private final static boolean DEBUG = false;

    /**
     * Map from package name, to preference name, to cached preferences.
     */
    private static ArrayMap<String, ArrayMap<String, SharedPreferencesImpl>> sSharedPrefs;

    final ActivityThread mMainThread;

    private ContextImpl(ContextImpl container, ActivityThread mainThread,
            LoadedApk packageInfo, IBinder activityToken, UserHandle user, boolean restricted,
            Display display, Configuration overrideConfiguration, int createDisplayWithId) {
        mOuterContext = this;

        mMainThread = mainThread;

        ...
    }

    @Override
    public Context getApplicationContext() {
        return (mPackageInfo != null) ?
                mPackageInfo.getApplication() : mMainThread.getApplication();
    }

}
정리하면 ActivityThread에서 컴포넌트들이 시작되고 각 컴포넌트들은 attach 메소드에서 ActivityThread와 ContextImpl 인스턴스를 받게 됩니다. 이후 attach 메소드에서는 attachBaseContext 메소드가 호출됩니다. 따라서 getBaseContext를 호출하면 ContextImpl 인스턴스가 반환되고 getApplicationContext를 호출하면 ActivityThread의 Application 인스턴스가 반환됩니다. Application 컴포넌트 또한 ContextWrapper를 상속하고 있기 때문에 안드로이드 시스템에서 제공받은 ContextImpl을 반환하게 되고 Application 인스턴스는 앱에서 1개 밖에 없기 때문에 항상 동일한 인스턴스입니다.
ContextImpl 메소드
Context를 이용하여 액티비티 시작하거나, 브로드캐스트를 발생시키거나, 서비스 실행하는데 이는 ContextImpl 메소드를 이용합니다. 기능별로 헬퍼(helper), 퍼미션, 시스템 서비스 접근 관련한 3개의 그룹으로 나눌 수 있습니다.
- 앱 패지키 정보를 제공하거나, SharedPreference 설정 파일, 데이터 베이스 등을 사용하기 위한 헬퍼(helper) 메소드가 존재합니다.
- Activity, BroadcastReceiver, Service 같은 컴포넌트를 시작하는 메소드와 Permission Check 메소드들이 존재합니다.
- ActivityManagerService를 포함한 시스템 서비스에 접근하기 위해 getSystemService 메소드가 존재합니다. ContextImpl 클래스가 로딩될 때, 시스템 서비스를 매핑하고 getSystemService를 사용하여 매핑된 서비스를 사용할 수 있습니다.
ex) 시스템 서비스가 NOTIFICATION_SERVICE와 같은 상수명으로 매핑되어 있어 Context가 전달되는 클래스나 메소드라면 어디서든 getSystemService를 사용하여 시스템 서비스를 가져올 수 있습니다.
Context의 다양한 형태
- Activity 인스턴스 자신(this)
- getBaseContext를 통해 가져오는 ContextImpl 인스턴스
- getApplicationContext를 통해 가져오는 Application 인스턴스
3개의 인스턴스는 모두 다르기 때문에 제대로 알지 못하고 캐스팅을 하게 되면 ClassCastException이 발생하게 됩니다. Activity도 Context의 자식 클래스이고 ContextImpl도 Context의 자식 클래스지만 서로 다른 형태이기에 캐스팅은 함부러 하면 안됩니다.
	@Override
    protected void onCreate(Bundle savedInstanceState) {
        super.onCreate(savedInstanceState);
        setContentView(R.layout.activity_main);

        TextView textView = findViewById(R.id.textView);
        Log.d(TAG, "1st = "+(textView.getContext() == this));
        Log.d(TAG, "2nd = "+(textView.getContext() == getBaseContext()));
        Log.d(TAG, "3rd = "+(textView.getContext() == getApplicationContext()));
        Log.d(TAG, "4th = "+(textView.getContext() == getApplication()));
    }
Activity의 onCreate에서 setContentView를 통해 화면에 보여지는 View를 설정하게 됩니다. View 생성자에 Context가 필요한데 이 Context가 어디서 왔는지 확실히 알아야 합니다. 위 코드에서는 첫 번째 경우만 true가 반환하게 되는데 View와 연관성이 가장 큰 Activity라고 유추할 수 있습니다.
 	@NonNull
    public AppCompatDelegate getDelegate() {
        if (mDelegate == null) {
            mDelegate = AppCompatDelegate.create(this, this);
        }
        return mDelegate;
    }
하지만 정확하게 이해를 하자면, setContentView는 AppCompatActivity 클래스의 setContentView를 호출하고 내부에서 AppCompatDelegate의 setContentView를 호출합니다. AppCompatDelegate 초기화시에 위 코드와 같이 Activity 자신이 매개변수로 들어가기 때문에 1번에서 true가 된다는 것을 알 수 있습니다.
Context 사용 시 주의점
Context 사용 시에는 라이프 사이클을 잘 생각해서 사용하여야 합니다. ApplicationContext는 싱글톤으로 앱에서 1개의 인스턴스밖에 없기 때문에 싱글톤 오브젝트나 전역으로 사용하는 클래스 같은 경우에 사용하면 좋습니다. 하지만 Activity의 Context를 싱글톤 오브젝트에 참조하게 되면 Activity가 onDestory까지 갔지만 Context를 사용하기 때문에 null이 되지 않아 GC의 대상이 되지 않습니다.(Stronge Reference) 즉, Activity가 파괴되었지만 싱글톤에서 참조되고 있어 메모리릭이 발생할 수 있습니다. 따라서 Activity, Service, Application의 라이프 사이클을 잘 파악하고 Context를 사용해야 합니다.
참고
- 안드로이드 프로그래밍 Next Step p71~p76
- https://black-jin0427.tistory.com/220
- Context

최근 Context 관련해서 Deep-Dive중인데 정말 많은 도움이 되었습니다! 감사합니다.