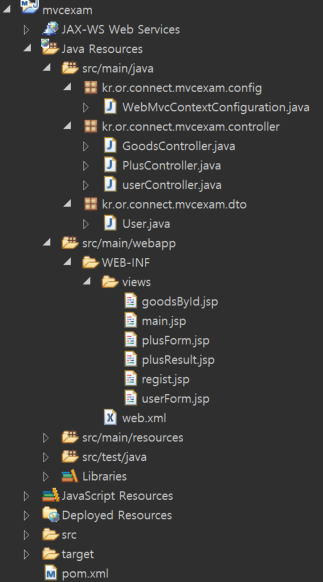
- Directory 구조
Controller작성 실습 2/3
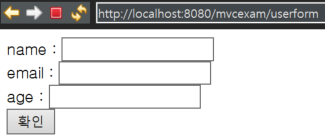
- http://localhost:8080/mvcexam/userform 으로 요청을 보내면 이름, email, 나이를 물어보는 폼이 보여진다.
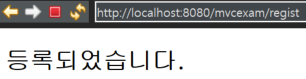
- 폼에서 값을 입력하고 확인을 누르면 post방식으로 http://localhost:8080/mvcexam/regist 에 정보를 전달하게 된다.
- regist에서는 입력받은 결과를 콘솔 화면에 출력한다.
- userForm.jsp 작성
<%@ page language="java" contentType="text/html; charset=EUC-KR"
    pageEncoding="EUC-KR"%>
<!DOCTYPE html PUBLIC "-//W3C//DTD HTML 4.01 Transitional//EN" "http://www.w3.org/TR/html4/loose.dtd">
<html>
<head>
<meta http-equiv="Content-Type" content="text/html; charset=EUC-KR">
<title>Insert title here</title>
</head>
<body>
<form method="post" action="regist">
name : <input type="text" name="name"><br>
email : <input type="text" name="email"><br>
age : <input type="text" name="age"><br>
<input type="submit" value="확인">
</form>
</body>
</html>- userController 작성
package kr.or.connect.mvcexam.controller;

import org.springframework.stereotype.Controller;
import org.springframework.web.bind.annotation.ModelAttribute;
import org.springframework.web.bind.annotation.RequestMapping;
import org.springframework.web.bind.annotation.RequestMethod;

import kr.or.connect.mvcexam.dto.User;

@Controller
public class userController {
	@RequestMapping(path = "/userform", method = RequestMethod.GET)
	public String userform() {
		return "userForm";
	}

	/* DTO를 만들고 @ModelAttribute 어노테이션으로 User객체에 값을 담는다.
	 * (@ModelAttribute User user) 선언만으로
	 * userform.jsp의 input 태그의 name 값들을 꺼내어 User 객체를 생성하고,
	 * 객체  안에 입력 값들을 넣어주는 일까지 자등으로 해준다.
	 * PlusController.java와 비교해서 매우 간단해짐
	 */
	@RequestMapping(path= "/regist", method = RequestMethod.POST)
	public String regist(@ModelAttribute User user){
		System.out.println("사용자가 입력한 user정보입니다. 해당 정보를 이용하는 코드가 와야 합니다.");
		System.out.println(user);
		return "regist";
	}
}- User.java 작성
package kr.or.connect.mvcexam.dto;

public class User {
	// ※ userForm.jsp에서 input값의 name과 반드시 일치 시켜야  Spring이 자동으로 값을 채울 수 있다.
	private String name;
	private String email;
	private int age;
	public String getName() {
		return name;
	}
	public void setName(String name) {
		this.name = name;
	}
	public String getEmail() {
		return email;
	}
	public void setEmail(String email) {
		this.email = email;
	}
	public int getAge() {
		return age;
	}
	public void setAge(int age) {
		this.age = age;
	}
	@Override
	public String toString() {
		return "User [name=" + name + ", email=" + email + ", age=" + age + "]";
	}
}- regist.jsp 작성
<%@ page language="java" contentType="text/html; charset=EUC-KR"
    pageEncoding="EUC-KR"%>
<!DOCTYPE html PUBLIC "-//W3C//DTD HTML 4.01 Transitional//EN" "http://www.w3.org/TR/html4/loose.dtd">
<html>
<head>
<meta http-equiv="Content-Type" content="text/html; charset=EUC-KR">
<title>Insert title here</title>
</head>
<body>
<h2>등록되었습니다.</h2>
</body>
</html>
결과
- 입력
- 출력 - 웹
- 출력 - 콘솔

Controller작성 실습 3/3
- http://localhost:8080/mvcexam/goods/{id} 으로 요청을 보낸다.
- 서버는 id를 콘솔에 출력하고, 사용자의 브라우저 정보를 콘솔에 출력한다.
- 서버는 HttpServletRequest를 이용해서 사용자가 요청한 PATH정보를 콘솔에 출력한다.
- goodsById.jsp 작성
<%@ page language="java" contentType="text/html; charset=EUC-KR"
    pageEncoding="EUC-KR"%>
<!DOCTYPE html PUBLIC "-//W3C//DTD HTML 4.01 Transitional//EN" "http://www.w3.org/TR/html4/loose.dtd">
<html>
<head>
<meta http-equiv="Content-Type" content="text/html; charset=EUC-KR">
<title>Insert title here</title>
</head>
<body>
id : ${id }<br>
user_agent : ${userAgent }<br>
path : ${path }<br>
</body>
</html>- GoodsController.java 작성
package kr.or.connect.mvcexam.controller;

import javax.servlet.http.HttpServletRequest;

import org.springframework.stereotype.Controller;
import org.springframework.ui.ModelMap;
import org.springframework.web.bind.annotation.GetMapping;
import org.springframework.web.bind.annotation.PathVariable;
import org.springframework.web.bind.annotation.RequestHeader;

// 꼭 사용할 수 밖에 없는 경우에는 HttpServletRequest도 사용할 수 있다.
@Controller
public class GoodsController {
	@GetMapping("/goods/{id}")
	public String getGoodsById(@PathVariable(name="id") int id,
			@RequestHeader(value="User-Agent", defaultValue="myBrowser") String userAgent,
			HttpServletRequest request,
			ModelMap model
			){
		String path = request.getServletPath();

		System.out.println("id : " + id);
		System.out.println("user_agent : " + userAgent);
		System.out.println("path : " + path);

		model.addAttribute("id", id);
		model.addAttribute("userAgent", userAgent);
		model.addAttribute("path", path);
		return "goodsById";
	}
}
결과
- 웹

- 콘솔


Enjoy to study