개요
1. 스웨거(Swagger)란?
- 스웨거는 Web API 문서화를 위한 도구이다.
- 스웨거 홈페이지(https://swagger.io)에서는 스웨거를 OAS(Open API Specification)라고 소개하고 있다.
- 말그대로 API들이 가지는 명세(Spec)을 관리하기 위한 프로젝트라고 말할 수 있다.
- Web API를 수동으로 문서화 하는 것은 굉장히 힘든 작업이다.
- Web API의 스펙이 변경되었을 때 문서 역시 변경이 되야 하는데 이를 유지하는 것이 쉽지가 않다.
- Swagger를 사용하면 Web API가 수정되더라도 상관 없다. 문서가 자동으로 갱신이 되기 때문이다.
2. 스웨거의 기능
- 스웨거 홈페이지에서 스웨거가 아래와 같은 기능이 있다고 말하고 있다.
1) API Design
2) API Development
3) API Documentation
4) API Testing
5) API Mocking and Virtualization
6) API Governance
7) API Monitoring
8) OpenAPI & Swagger - Web API를 만드는 개발자와 Web API를 이용하는 개발자가 있다고 생각해 보자.
- Web API를 이용하는 개발자는 Web API가 만들어질 때까지 기다린다면 작업이 상당히 느려질 수 있다.
- Web API를 만드는 사람과 Web API를 사용하는 사람 간에 미리 명세를 정의하고 공유할 수 있다면 개발이 상당히 편리해 질 것이다. 이를 가능하게 도구 중 하나가 Swagger 이다.
3. 스웨거 허브를 이용하여 API를 명세화 하고 테스트하기
- 스웨거 허브 사이트를 이용하면 Web API를 만들지 않더라도 Web API를 명세화할 수 있다.
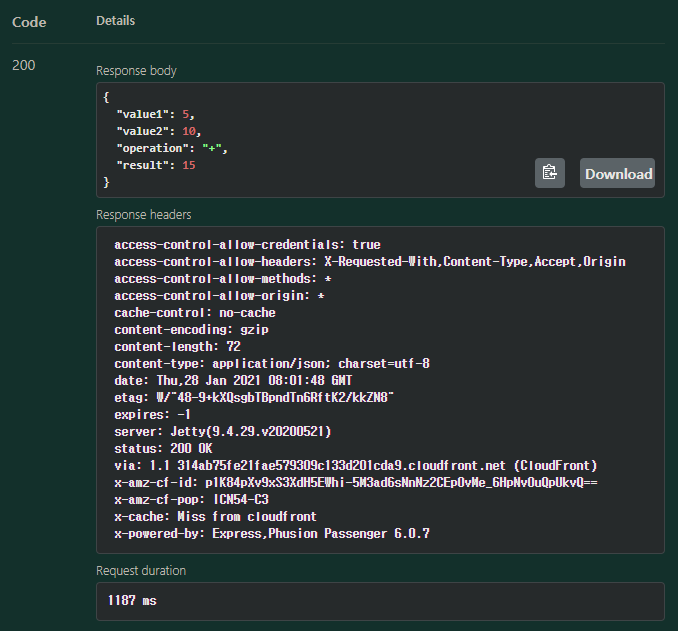
- 또한, Web API를 명세화만 하는게 아니라 간단히 테스트도 할 수 있다는 장점을 가지고 있다.
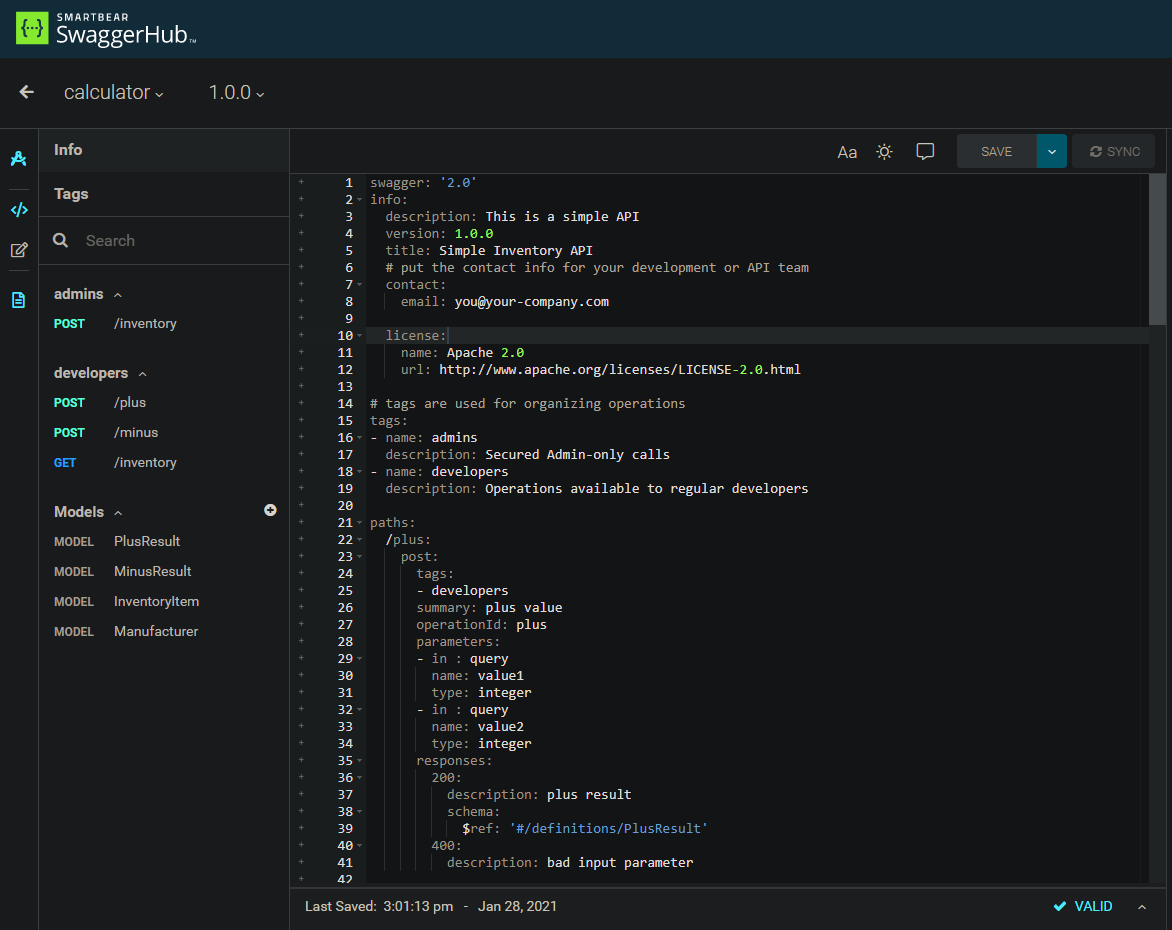
- SwaggerHub에서 paths, definitions에 코드 입력.
- paths항목에는 Web API 명세 정보 입력
- schema부분은 응답에서 사용할 정보. definitions/PlusResult에 설정된 정보를 사용하라는 의미
- definitions 항목의 PlusResult는 응답 메시지의 형태를 설정


- Simple Inventory API

설정
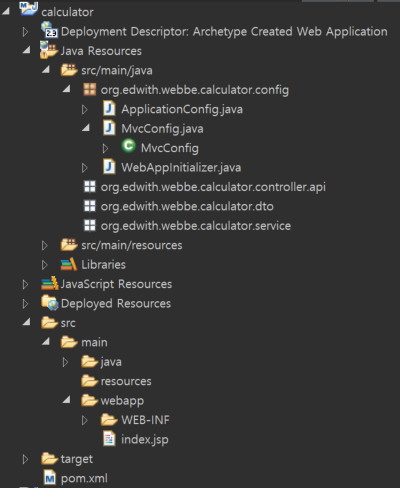
- Directory 구조

- pom.xml
<project xmlns="http://maven.apache.org/POM/4.0.0" xmlns:xsi="http://www.w3.org/2001/XMLSchema-instance"
	xsi:schemaLocation="http://maven.apache.org/POM/4.0.0 http://maven.apache.org/maven-v4_0_0.xsd">
	<modelVersion>4.0.0</modelVersion>
	<groupId>org.edwith.webbe</groupId>
	<artifactId>calculator</artifactId>
	<packaging>war</packaging>
	<version>0.0.1-SNAPSHOT</version>
	<name>calculator Maven Webapp</name>
	<url>http://maven.apache.org</url>
	<!-- web.xml 파일을 작성하지 않고 Java Config를 사용할 때
	failOnMissingWebXml를 false로 설정 -->
	<properties>
		<failOnMissingWebXml>false</failOnMissingWebXml>
		<spring.version>5.2.3.RELEASE</spring.version>
	</properties>

	<dependencies>
		<dependency>
			<groupId>junit</groupId>
			<artifactId>junit</artifactId>
			<version>4.12</version>
			<scope>test</scope>
		</dependency>

		<!-- java 9 이상에서 추가해야 한다. @PostConstruct 등을 사용하려면 필요함 -->
		<dependency>
			<groupId>javax.annotation</groupId>
			<artifactId>javax.annotation-api</artifactId>
			<version>1.3.2</version>
		</dependency>


		<!-- tomcat에 배포될 경우엔 사용되지 않도록 하기 위해서 scope를 provided로 설정 -->
		<dependency>
			<groupId>javax.servlet</groupId>
			<artifactId>javax.servlet-api</artifactId>
			<version>3.1.0</version>
			<scope>provided</scope>
		</dependency>
		<!-- tomcat에 배포될 경우엔 사용되지 않도록 하기 위해서 scope를 provided로 설정 -->
		<dependency>
			<groupId>javax.servlet.jsp</groupId>
			<artifactId>javax.servlet.jsp-api</artifactId>
			<version>2.3.2-b02</version>
			<scope>provided</scope>
		</dependency>
		<!-- jstl은 tomcat이 기본 지원하지 않는다. 그렇기 때문에 tomcat에도 배포가 되어야 한다. -->
		<dependency>
			<groupId>javax.servlet</groupId>
			<artifactId>jstl</artifactId>
			<version>1.2</version>
		</dependency>

		<!-- spring webmvc에 대한 의존성을 추가. spring webmvc에 대한 의존성을
		추가하게 되면 spring-web, spring-core등이 자동으로 의존성이 추가된다. -->
		<dependency>
			<groupId>org.springframework</groupId>
			<artifactId>spring-webmvc</artifactId>
			<version>${spring.version}</version>
		</dependency>

		<!-- RestController의 json 변환을 위해 필요함 -->
		<dependency>
			<groupId>com.fasterxml.jackson.core</groupId>
			<artifactId>jackson-core</artifactId>
			<version>2.9.8</version>
		</dependency>
		<dependency>
			<groupId>com.fasterxml.jackson.core</groupId>
			<artifactId>jackson-databind</artifactId>
			<version>2.9.8</version>
		</dependency>
		<dependency>
			<groupId>org.springframework</groupId>
			<artifactId>spring-test</artifactId>
			<version>${spring.version}</version>
		</dependency>

		<!-- swagger2 의존성 추가. Swagger 사용을 위해서는 구현체인
		springfox-swagger2 가 필요하며, 또 가장 중요한 UI적으로 확인을 위해서는
		springfox-swagger-ui 이렇게 2개의 라이브러리가 필요하다. -->
		<dependency>
			<groupId>io.springfox</groupId>
			<artifactId>springfox-swagger2</artifactId>
			<version>2.6.1</version>
		</dependency>
		<dependency>
			<groupId>io.springfox</groupId>
			<artifactId>springfox-swagger-ui</artifactId>
			<version>2.6.1</version>
		</dependency>
	</dependencies>
	<build>
		<finalName>calculator</finalName>
		<plugins>
			<plugin>
				<artifactId>maven-compiler-plugin</artifactId>
				<version>3.7.0</version>
				<configuration>
					<source>1.8</source>
					<target>1.8</target>
					<encoding>utf-8</encoding>
				</configuration>
			</plugin>
		</plugins>
	</build>
</project>- WebInitializer.java
package org.edwith.webbe.calculator.config;

import org.springframework.web.filter.CharacterEncodingFilter;
import org.springframework.web.servlet.support.AbstractAnnotationConfigDispatcherServletInitializer;

import javax.servlet.*;

public class WebAppInitializer extends AbstractAnnotationConfigDispatcherServletInitializer {
    // Spring 기본 설정파일 클래스를 지정
	// ApplicationConfig.class를 작성해야 한다.
    @Override
    protected Class<?>[] getRootConfigClasses() {
        return new Class<?>[]{ApplicationConfig.class};
    }

    // Spring MVC 설정 파일 클래스를 지정
    // MvcConfig.class를 작성해야 합니다.
    @Override
    protected Class<?>[] getServletConfigClasses() {
        return new Class<?>[]{MvcConfig.class};
    }

    /* DispatcherServlet이 동작할 맵핑정보를 설정한다.
	"/"를 설정한다는 것은 모든 요청을 DispatcherServlet이 처리한다는 것을 의미  */
    @Override
    protected String[] getServletMappings() {
        return new String[]{"/"};
    }

    // 필터를 설정. 여기에서는 인코딩 필터를 설정하고 있다.
    @Override
    protected Filter[] getServletFilters() {
        CharacterEncodingFilter encodingFilter = new CharacterEncodingFilter();
        encodingFilter.setEncoding("UTF-8");

        return new Filter[]{encodingFilter};
    }
}- ApplicationConfig.java
package org.edwith.webbe.calculator.config;

import org.springframework.context.annotation.ComponentScan;
import org.springframework.context.annotation.Configuration;

@Configuration
@ComponentScan(basePackages = {"org.edwith.webbe.calculator.service"})
public class ApplicationConfig {
}- MvcConfig.java
package org.edwith.webbe.calculator.config;

import org.springframework.context.annotation.Bean;
import org.springframework.context.annotation.ComponentScan;
import org.springframework.context.annotation.Configuration;
import org.springframework.web.servlet.config.annotation.*;
import springfox.documentation.builders.PathSelectors;
import springfox.documentation.builders.RequestHandlerSelectors;
import springfox.documentation.service.ApiInfo;
import springfox.documentation.service.Contact;
import springfox.documentation.spi.DocumentationType;
import springfox.documentation.spring.web.plugins.Docket;
import springfox.documentation.swagger2.annotations.EnableSwagger2;

// Spring MVC와 Swagger2의 기본 설정이 자동으로 설정
@Configuration
@EnableWebMvc
@EnableSwagger2
@ComponentScan(basePackages = {"org.edwith.webbe.calculator.controller"})
public class MvcConfig implements WebMvcConfigurer {
	/* DefaultServlet에 대한 설정을 한다.(non-Javadoc)
	 * DispatcherServlet이 처리하지 못하는 URL은 DefaultServlet이 처리한다.
	 * 해당 설정이 없으면 자동 생성된 Swaager 페이지를 볼 수 없다.	 */
	@Override
	public void configureDefaultServletHandling(DefaultServletHandlerConfigurer configurer) {
		configurer.enable();
	}

/*	Swagger 사용 시에는 Docket Bean 을 품고있는 설정 클래스 1개가 기본으로 필요하다.
	Spring Boot 에서는 이 기본적인 설정파일 1개로 Swagger 와 Swagger UI 를 함께 사용가능하지만,
	Spring MVC 의 경우 Swagger UI 를 위한 별도의 설정이 필요하다.
	이는, Swagger UI 를 ResourceHandler 에 수동으로 등록해야 하는 작업인데,
	Spring Boot 에서는 이를 자동으로 설정해주지만 Spring MVC 에서는 그렇지 않기 때문이다. */

	/* Swagger2를 사용하려면 Docket객체를 Bean으로 설정해야 한다.
	 * Docket객체에는 어떤 경로의 Web API들을 자동으로 문서화 할 것인지에
	 * 대한 설정과 문서 설명에 대한 내용이 포함된다. */
	@Bean
	public Docket api() {
		return new Docket(DocumentationType.SWAGGER_2)
				.select()
				.apis(RequestHandlerSelectors.any()) // 현재 RequestMapping으로 할당된 모든 URL 리스트를 추출
				.paths(PathSelectors.ant("/api/**")) // PathSelectors.any() 를 할경우 모든 경로가 다 사용된다. RestController가 아닌 것까지 사용된다.
				.build()
				.apiInfo(apiInfo())
				.useDefaultResponseMessages(false);
	}

	// API Info
	private ApiInfo apiInfo() {
		Contact contact = new Contact("최호연", "https://www.ajou.ac.kr", "chy1995@ajou.ac.kr");
		ApiInfo apiInfo =
				new ApiInfo("Swagger Sample", "APIs Sample", "Sample Doc 0.1v", "", contact, "This sentence will be display.", "/");
		return apiInfo;
	}
}
reference
Swagger 개요 - https://www.boostcourse.org/web326/lecture/58988
Spring MVC를 이용한 웹 페이지 작성 2