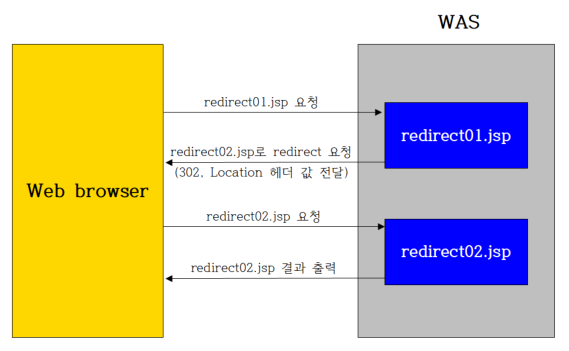
동작 과정
- 요청 : 웹 브라우저가 WAS에게 redirect01.jsp 요청
- 응답 : WAS가 웹 브라우저에게 redirect02.jsp로 리다이렉트 요청
(응답코드 302, location 헤더 값 : redirect02.jsp) - 요청 : 웹 브라우저는 WAS의 리다이렉트 요청을 받고 다시 WAS에게 redirect02.jsp를 요청
- 응답 : redirect02.jsp 결과 출력
redirect01이 처음 요청될 때 생성된 요청객체(1), 응답객체(2)와 redirect02가 요청될 때 생성된 요청객체(3), 응답객체(4)는 다르다!
실습
// redirect01.jsp
<%@ page language="java" contentType="text/html; charset=UTF-8"
    pageEncoding="UTF-8"%>
<%
    response.sendRedirect("redirect02.jsp");
%>
// redirect02.jsp
<%@ page language="java" contentType="text/html; charset=UTF-8"
pageEncoding="UTF-8"%>
<!DOCTYPE html>
<html>
<head>
<meta charset="UTF-8">
<title>Insert title here</title>
</head>
<body>
redirect된 페이지 입니다.
</body>
</html>결과
- redirect01.jsp를 실행한 결과 redirect02.jsp로 redirect된 것을 확인할 수 있다.

