1. 마스터 노드 EC2 인스턴스 설정
1.1 EC2 인스턴스 생성
-
AWS Management Console을 통해 EC2 인스턴스를 생성합니다. 필요한 설정은 다음과 같습니다:
-
이름: EC2-mywebserver-deploy
이미지: Amazon Linux 2 (또는 원하는 Linux 배포판)
인스턴스 유형: t2.micro (또는 필요한 스펙)
네트워크 설정: 기존 VPC 및 서브넷 선택 ( VEC-PRD-VPC-BASTION-PUB-2A )
키 페어: 생성해둔 키 페어 선택 (e.g., soldesk.pem)
보안 그룹: SSH(포트 22)를 허용하는 보안 그룹 선택
( 고급 네트워크 구성의 기본 IP: 10.250.4.207 ) -
user data 입력 ( ansible 설치 )
-
#!/bin/bash
sudo yum update -y
sudo amazon-linux-extras install epel -y
sudo yum install -y ansible
1.2 Ansible 설치
-
생성한 마스터 노드에 SSH로 접속하여 Ansible을 설치합니다:
- sudo yum update -y
sudo amazon-linux-extras install epel -y
sudo yum install -y ansible
- sudo yum update -y
- Ansible 설정
2.1 인벤토리 파일 작성
-
Ansible 인벤토리 파일 (inventory.ini)을 작성하여 워커 노드들을 정의합니다:
- [ngnix-webservers]
VEC-PRD-VPC-NGINX-PUB-2A ansible_host=<EC2_PUBLIC_IP> ansible_user=rocky ansible_ssh_private_key_file=~/.ssh/soldesk.pem
- [ngnix-webservers]
2.2 플레이북 작성
- 플레이북 (playbook.yml)을 작성하여 워커 노드들에 필요한 설정을 정의합니다. 앞서 작성한 플레이북을 사용하면 됩니다.
- 마스터 노드 설정
3.1 SSH 키 설정
-
마스터 노드에서 워커 노드에 접근할 수 있도록 SSH 키를 설정합니다. 키 파일 (soldesk.pem)을 마스터 노드에 업로드하고 적절한 권한을 설정합니다:
- chmod 400 soldesk.pem
3.2 Ansible 플레이북 실행
-
마스터 노드에서 플레이북을 실행하여 워커 노드 설정을 적용합니다:
- ansible-playbook -i inventory.ini playbook.yml
2. 워커 노드 EC2 인스턴스 설정
워커 노드 EC2 인스턴스 생성
-
AWS Management Console을 통해 워커 노드로 사용할 EC2 인스턴스를 생성합니다. 필요한 설정은 다음과 같습니다:
- 이름: VEC-PRD-VPC-NGINX-PUB-2A
이미지: 이미지 linux 2 AMI 선택 후
키 페어: 생성해둔 키 페어 선택 (e.g., soldesk.pem)
네트워크 설정: 생성해둔 VPC 선택 (vec-prd-vpc : 10.250.0.0/16)
서브넷: VEC-PRD-VPC-NGINX-PUB-2A
퍼블릭 IP: 자동 활성화
보안 그룹: 기존 보안 그룹 선택 (VEC-PRD-VPC-NGINX-PUB-SG-2A)
고급 네트워크 구성의 기본 IP : 10.250.1.212 로 구성
- 이름: VEC-PRD-VPC-NGINX-PUB-2A
워커노드 패키지 삭제 스크립트
- 모든 패키지를 한 번에 삭제하는 스크립트를 아래에 작성했습니다:
sudo rpm -e --nodeps wget curl
sudo yum remove -y unzip
sudo yum remove -y nano vim
sudo yum remove -y net-tools
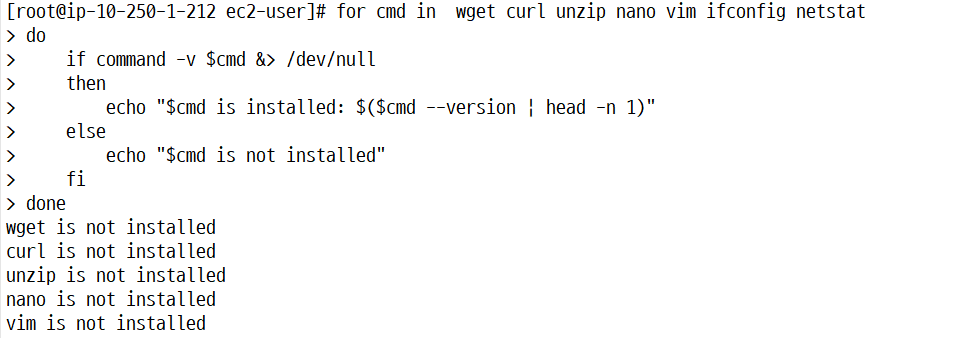
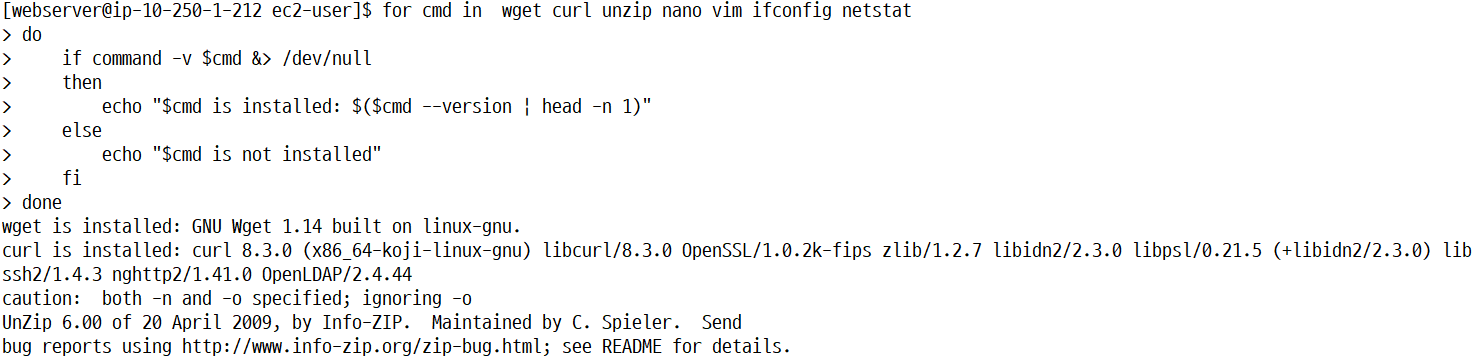
워커노드 패키지 확인 스크립트
- 아래 스크립트를 사용하면 한 번에 모든 명령어의 설치 상태를 확인할 수 있습니다:
echo "Checking installed versions..."

for cmd in  wget curl unzip nano vim ifconfig netstat
do
    if command -v $cmd &> /dev/null
    then
        echo "$cmd is installed: $($cmd --version | head -n 1)"
    else
        echo "$cmd is not installed"
    fi
done
사전 작업
html 파일 업로드
- /home/ec2-user/html 에 html 파일 업로드
인벤토리 파일 작성 (프라이빗 IP 사용)
-
다음과 같이 인벤토리 파일(inventory.ini)을 생성하고 작성합니다:
- [nginx-webservers]
VEC-PRD-VPC-NGINX-PUB-2A ansible_host=10.250.1.212 ansible_user=ec2-user ansible_ssh_private_key_file=~/.ssh/soldesk.pem.pem
- [nginx-webservers]
SSH 키 설정
- SSH 키 (soldesk.pem)를 마스터 노드에 업로드하고 적절한 권한을 설정합니다:
- chmod 400 ~/.ssh/soldesk.pem.pem
- nginx-PUB-2A 접속 확인 ( ssh -i ~/.ssh/soldesk.pem.pem ec2-user@10.250.1.212 )
플레이 북 설정
---
- name: Configure nginx-PUB-2A instance
  hosts: nginx-webservers
  become: yes
  vars:
    html_files:
      - create-survey.html
      - start-survey.html
      - take-survey.html
      - view-results.html
    src_path: /home/ec2-user/html
    dest_path: /usr/share/nginx/html
    user_name: nginx-webserver

  tasks:
    - name: Update all packages to the latest version
      yum:
        name: "*"
        state: latest
        update_cache: yes

    - name: Install Nginx from Amazon Linux Extras
      command: amazon-linux-extras install nginx1 -y

    - name: Start and enable Nginx
      systemd:
        name: nginx
        state: started
        enabled: yes

    - name: Upgrade and install required packages
      yum:
        name:
          - curl
          - wget
          - unzip
          - nano
          - vim
          - net-tools
          - python-firewall
        state: present

    - name: Create user {{ user_name }}
      user:
        name: "{{ user_name }}"
        state: present
        shell: /bin/bash

    - name: Create source HTML directory if it does not exist
      file:
        path: "{{ src_path }}"
        state: directory
        owner: ec2-user
        group: ec2-user

    - name: Create destination HTML directory if it does not exist
      file:
        path: "{{ dest_path }}"
        state: directory
        owner: nginx
        group: nginx

    - name: Copy HTML files to Nginx directory
      copy:
        src: "{{ src_path }}/{{ item }}"
        dest: "{{ dest_path }}/{{ item }}"
        owner: nginx
        group: nginx
        mode: '0644'
      with_items: "{{ html_files }}"
      ignore_errors: yes

    - name: Copy create-survey.html to index.html
      command: cp {{ dest_path }}/create-survey.html {{ dest_path }}/index.html
      ignore_errors: yes

    - name: Set create-survey.html as default index page
      lineinfile:
        path: /etc/nginx/nginx.conf
        regexp: 'index\s+index.html;'
        line: 'index create-survey.html;'
        state: present
스크린 샷 기록
워커 노드 기본 패키지가 미설치 / 오류로 미설치가 된 상황을 더블 체크해서 ansible을 통해 설치 ( ansible로 생성한 사용자로 접속 및 패키지 설치 확인 )
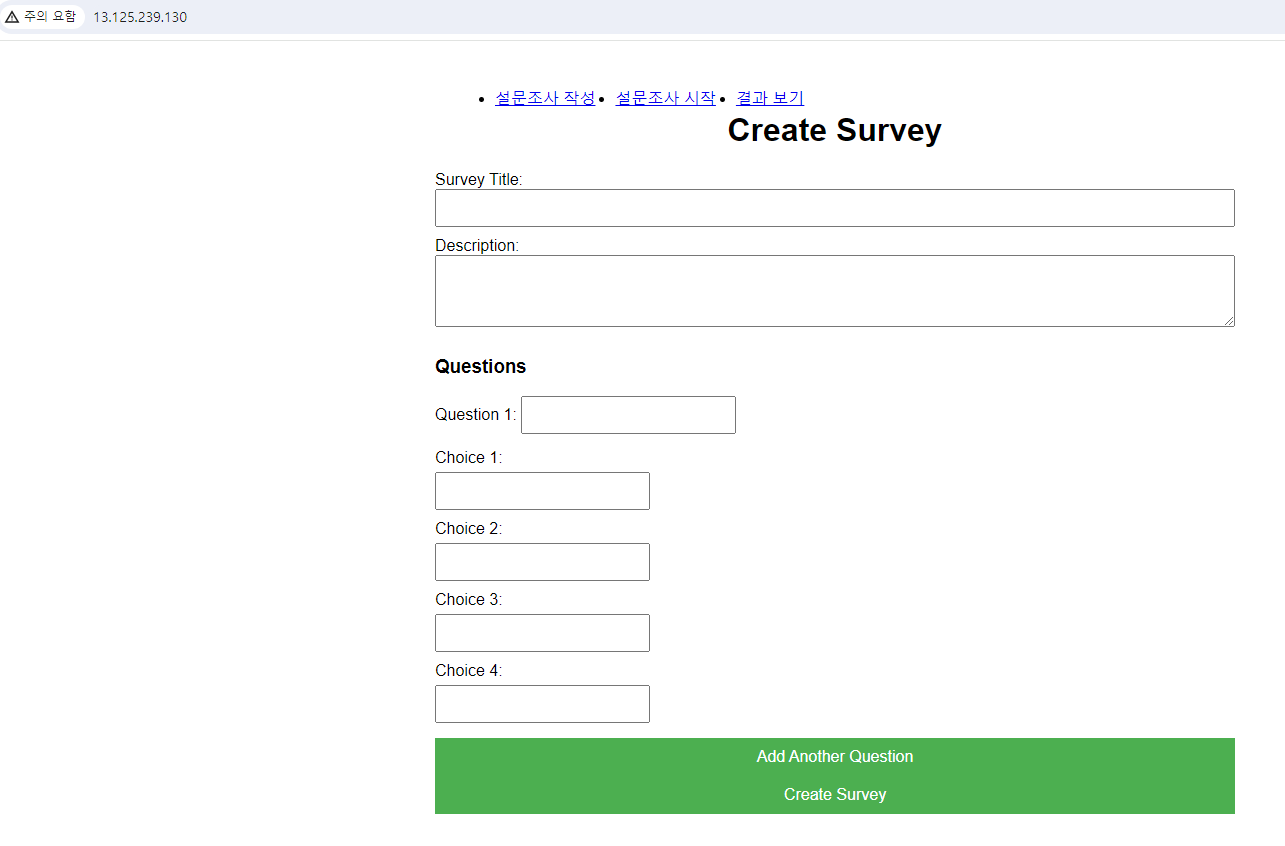
ansible로 배포한 html을 호스팅해주는 것 확인
추가로 진행할 사항
- ansible에 port 번호 변경
- 인스턴스 종료시 알람,
- 오토 스케일링 그룹(ALB 이용),
- CPU 증가량에 따른 증설 (선택 사항),
- 메모리 등 디테일한 정보 모니터링을 위해 CloudWatch 에이전트 사용
ansible을 이용하여 tomcat( 동적 웹사이트 호스팅 )을 배포
-
인스턴스 시작을 하여 인스턴스 생성 ( TOMCAT )
-
이름 : VEC-PRD-VPC-TOMCAT-PRI-2A
이미지 linux 2 AMI 선택 후
생성해둔 keypair 선택 ( soldesk.pem ) -
네트워크 설정에서 생성해둔 VPC 선택 ( vec-prd-vpc : 10.250.0.0/16 )
서브넷도 마찬가지로 선택 ( VEC-PRD-VPC-TOMCAT-PRI-2A )
퍼블릭 ip 비활성화
보안 그룹은 기존 보안 그룹 선택 ( VEC-PRD-VPC-TOMCAT-PRI-SG-2A ) -
고급 네트워크 구성의 기본 IP : 10.250.2.115 로 구성
-
사전 작업
-
두 인스턴스가 서로 통신할 수 있도록 보안 그룹 설정을 확인합니다. VEC-PRD-VPC-TOMCAT-PRI-SG-2A 보안 그룹이 VEC-PRD-VPC-Bastion-PUB-SG-2A 보안 그룹에서 오는 트래픽을 허용하는지 확인합니다.
- VEC-PRD-VPC-TOMCAT-PRI-SG-2A 보안 그룹에 아래와 같이 인바운드 규칙을 추가합니다.
유형: HTTP
포트 범위: 8080
소스: VEC-PRD-VPC-Bastion-PUB-SG-2A 보안 그룹의 ID
- VEC-PRD-VPC-TOMCAT-PRI-SG-2A 보안 그룹에 아래와 같이 인바운드 규칙을 추가합니다.
마스터 노드 설정
-
인벤토리 파일 작성 (프라이빗 IP 사용)
-
다음과 같이 인벤토리 파일(inventory.ini)을 생성하고 작성합니다:
- [tomcat-webservers]
VEC-PRD-VPC-TOMCAT-PRI-2A ansible_host=10.250.2.115 ansible_user=ec2-user ansible_ssh_private_key_file=~/.ssh/soldesk.pem.pem
- [tomcat-webservers]
-
html 파일과 ssh 키 설정은 nginx ansible을 실행했을 때와 동일
플레이북 작성
---
- name: Configure tomcat-PUB-2A instance
  hosts: tomcat-webservers
  become: yes
  vars:
    html_files:
      - create-survey.html
      - start-survey.html
      - take-survey.html
      - view-results.html
    src_path: /home/ec2-user/html
    dest_path: /var/lib/tomcat/webapps/ROOT
    user_name: tomcat-webserver

  tasks:
    - name: Update all packages to the latest version
      yum:
        name: "*"
        state: latest
        update_cache: yes

    - name: Install Tomcat
      yum:
        name:
          - tomcat
          - tomcat-webapps
          - tomcat-admin-webapps
        state: present

    - name: Start and enable Tomcat
      systemd:
        name: tomcat
        state: started
        enabled: yes

    - name: Upgrade and install required packages
      yum:
        name:
          - curl
          - wget
          - unzip
          - nano
          - vim
          - net-tools
          - python-firewall
        state: present

    - name: Create user {{ user_name }}
      user:
        name: "{{ user_name }}"
        state: present
        shell: /bin/bash

    - name: Create source HTML directory if it does not exist
      file:
        path: "{{ src_path }}"
        state: directory
        owner: ec2-user
        group: ec2-user

    - name: Create destination HTML directory if it does not exist
      file:
        path: "{{ dest_path }}"
        state: directory
        owner: tomcat
        group: tomcat

    - name: Copy HTML files to Tomcat directory
      copy:
        src: "{{ src_path }}/{{ item }}"
        dest: "{{ dest_path }}/{{ item }}"
        owner: tomcat
        group: tomcat
        mode: '0644'
      with_items: "{{ html_files }}"
      ignore_errors: yes

    - name: Copy create-survey.html to index.html
      command: cp {{ dest_path }}/create-survey.html {{ dest_path }}/index.html
      ignore_errors: yes
ansible 실행 후 public IP 가 없기 때문에 private IP로 확인
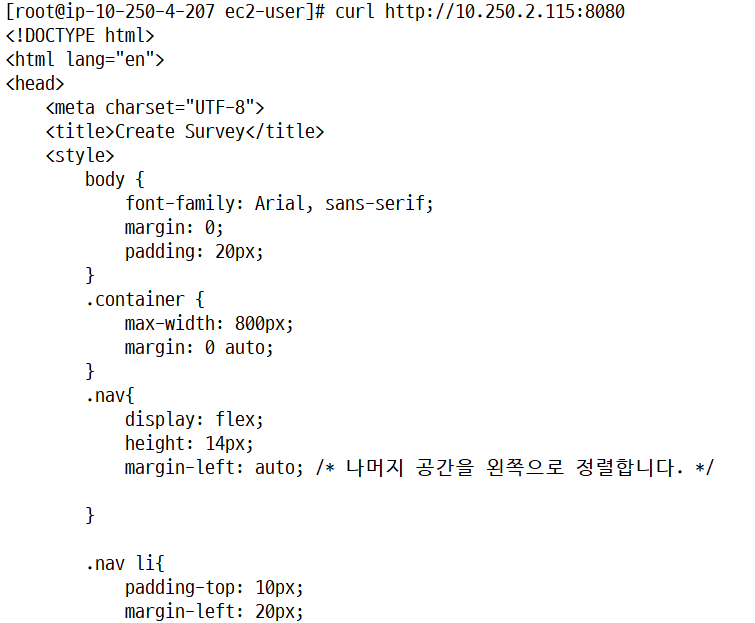
index html 확인
나머지 문서 확인
- curl http://10.250.2.115:8080/take-survey.html
curl http://10.250.2.115:8080/take-survey.html
curl http://10.250.2.115:8080/view-results.html
보안을 위해 ssh 접속 포트 번호를 2222번으로 수정하는 내용의 ansible 플레이북
---
- name: Change SSH port to 2222
  hosts: nginx-webservers
  become: yes
  vars:
    ssh_port: 2222

  tasks:
    - name: Allow port {{ ssh_port }} through the firewall
      firewalld:
        port: "{{ ssh_port }}/tcp"
        permanent: yes
        state: enabled
      notify: Reload Firewalld

    - name: Change SSH port to {{ ssh_port }}
      lineinfile:
        path: /etc/ssh/sshd_config
        regexp: '^#?Port 22'
        line: 'Port {{ ssh_port }}'
        state: present

    - name: Restart SSH service to apply changes
      service:
        name: sshd
        state: restarted

  handlers:
    - name: Reload Firewalld
      command: firewall-cmd --reload
이후 VEC-PRD-VPC-NGINX-PUB-2A 조치
-
VEC-PRD-VPC-NGINX-PUB-2A의 ssh 포트 번호가 2222번 으로 수정되었으므로 보안 그룹의 인바운드 규칙 에 tcp/2222번을 허용하는 권한 부여
-
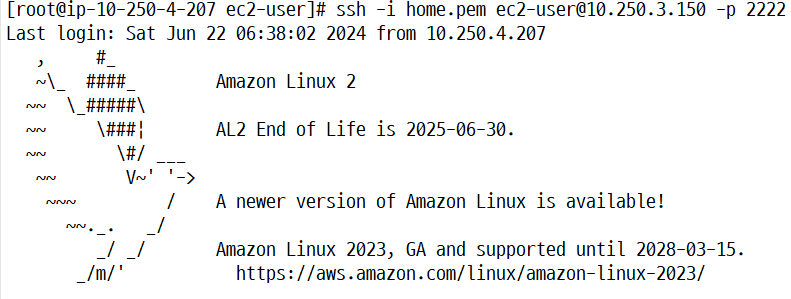
원격 접속할 때 ssh -i soldesk.pem.pem ec2-user@10.250.1.212 -p 2222 로 접속
-
inventory의 내용 수정
- [nginx-webservers]
VEC-PRD-VPC-NGINX-PUB-2A ansible_host=10.250.1.212 ansible_user=ec2-user ansible_ssh_private_key_file=~/.ssh/soldesk.pem.pem ansible_port=2222
- [nginx-webservers]
DB에 접근하는 ansible 플레이 북 작성
-
인스턴스 시작을 하여 인스턴스 생성 ( DB )
-
이름 : VEC-PRD-VPC-DB-PRI-2A
이미지 linux 2 AMI 선택 후
생성해둔 keypair 선택 ( soldesk.pem ) -
네트워크 설정에서 생성해둔 VPC 선택 ( vec-prd-vpc : 10.250.0.0/16 )
서브넷도 마찬가지로 선택 ( VEC-PRD-VPC-DB-PRI-2A )
퍼블릭 ip 비활성화
보안 그룹은 기존 보안 그룹 선택 ( VEC-PRD-VPC-DB-PRI-SG-2A ) -
고급 네트워크 구성의 기본 IP : 10.250.3.150 로 구성
-
-
인벤토리 파일 작성 (프라이빗 IP 사용)
-
다음과 같이 인벤토리 파일(inventory.ini)을 생성하고 작성합니다:
- [dynamodb-dbservers]
VEC-PRD-VPC-DB-PRI-2A ansible_host=10.250.3.150 ansible_user=ec2-user ansible_ssh_private_key_file=~/.ssh/soldesk.pem.pem
- [dynamodb-dbservers]
-
플레이 북 작성
---
- name: Configure dynamodb-DB-2A instance
hosts: dynamodb-dbservers
become: yes
vars:
user_name: dynamodb-dbserver
ssh_port: 2222
tasks:
- name: Update all packages to the latest version
yum:
name: "*"
state: latest
update_cache: yes
- name: Upgrade and install required packages
yum:
name:
- curl
- wget
- unzip
- nano
- vim
- net-tools
- python-firewall
- mysql
- firewalld
state: present
- name: Create user {{ user_name }}
user:
name: "{{ user_name }}"
state: present
shell: /bin/bash
- name: Start and enable firewalld
systemd:
name: firewalld
state: started
enabled: yes
- name: Install AWS CLI - Download ZIP
get_url:
url: "https://awscli.amazonaws.com/awscli-exe-linux-x86_64.zip"
dest: "/tmp/awscliv2.zip"
- name: Install AWS CLI - Unzip
unarchive:
src: "/tmp/awscliv2.zip"
dest: "/tmp/"
remote_src: yes
- name: Install AWS CLI - Run installer
command: sudo /tmp/aws/install
- name: Change SSH port to {{ ssh_port }}
lineinfile:
path: /etc/ssh/sshd_config
regexp: '^#?Port 22'
line: 'Port {{ ssh_port }}'
state: present
- name: Allow port {{ ssh_port }} through the firewall
firewalld:
port: "{{ ssh_port }}/tcp"
permanent: yes
state: enabled
notify: Reload Firewalld
- name: Restart SSH service to apply changes
service:
name: sshd
state: restarted
handlers:
- name: Reload Firewalld
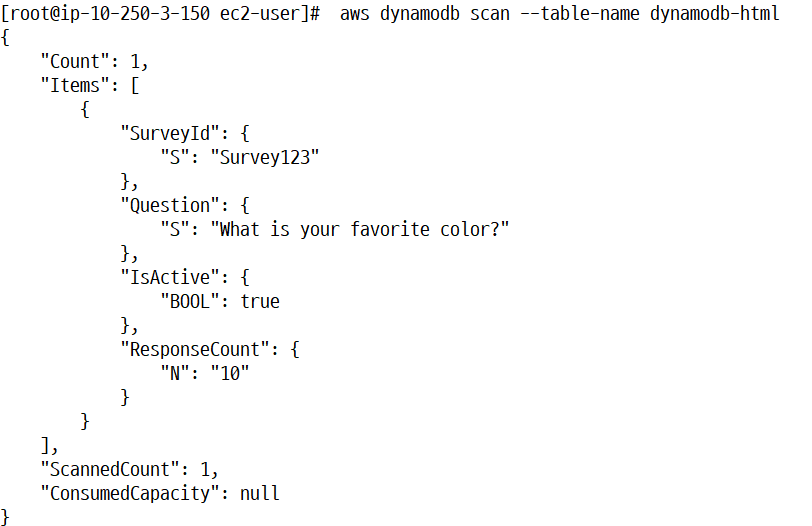
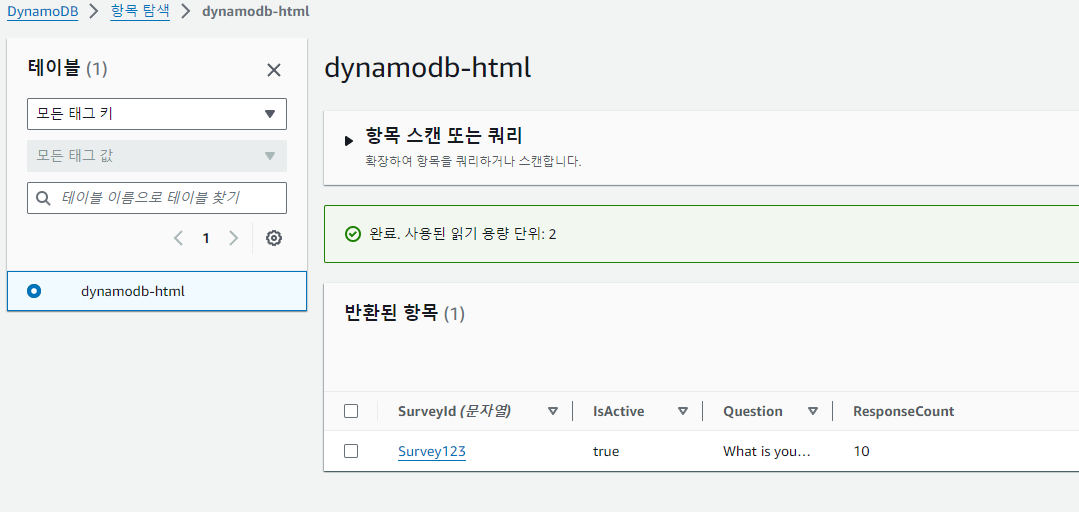
command: firewall-cmd --reloaddynamodb 테이블 추가 명령어
aws dynamodb put-item --table-name dynamodb-html --item '{
    "SurveyId": {"S": "Survey123"},
    "Question": {"S": "What is your favorite color?"},
    "ResponseCount": {"N": "10"},
    "IsActive": {"BOOL": true}
}'
dynamodb 테이블 확인 명령어
- aws dynamodb scan --table-name your-table-name
ssh 초기화
- ssh-keygen -R 10.250.1.212
VPC 엔드포인트를 생성하지 않았는데도 aws configure를 통해 db 인스턴스에서 접근 가능?
mysql를 통해 dynamodb에 접근하려면 동기화 필요
bastion 인스턴스에서 tomcat 인스턴스에서 호스팅한 웹 사이트를 접근한 모습
포트번호를 2222번으로 수정하고 접속한 모습
dynamodb 테이블에 item 추가하고 확인한 모습