
👩🏼💻 react-query 이해하기
리액트 쿼리 : DB가저오는메서드
실습 환경 만들기
// json-server 설치하기
npm install json-server
json-server : 백엔드가 없기 때문에 DB사용을 위해 설치함 ,연습용으로 쓸 수 있음

package.json에서 설치 완료 확인
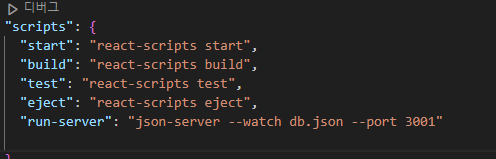
package.json 에서
"scripts": {
"start": "react-scripts start",
"build": "react-scripts build",
"test": "react-scripts test",
"eject": "react-scripts eject",
// 여기에 이렇게 추가
"run-server": "json-server --watch db.json --port 3001"
},
"run-server": "json-server --watch db.json --port 3001"
입력 후
json-server 실행
npm run run-server
(터미널 두개로 확인 하면 더 보기 쉬움,)
db.json 생겼는지 확인

axios 설치하기
npm install axios
(axios 사용이유 ?
fetch보다 사용이 편리하기 때문에 사용함)
React-query 사용하는 이유는 뭘까요?
-
react-query를 쓰지 않아도 백엔드로부터 데이터를 가져올 수 있습니다.
-
하지만 백엔드로부터 데이터를 가져올 때 매우 쉽게 관리할 수 있게 해줍니다.
- isLoading, isError 등을 직접 만들 필요가 없습니다.
- 주기적으로 데이터를 다시 가져오기 때문에 데이터를 최신 상태를 유지해줍니다. (코인거래소, SNS 등)
- 에러 발생 시 다시 데이터를 요청합니다. ( 진짜 에러인지 여부를 확인하고 에러 확인시 에러 화면을 보여줌 )
- 여러 컴포넌트에서 중복해서 사용해도 효율적으로 데이터를 가져와줍니다. (캐싱해준다고 합니다) - 여러 컴포넌트에 useQuery를 쓰면 props 없이 사용할 수 있음
React-query 사용을 위한 세팅
설치하기
npm install react-query
react-query를 사용하고 싶은 곳에 다음과 같이 감싸기 (index.js)
import { QueryClient, QueryClientProvider } from "react-query";
변수 선언하기
const queryClient = new QueryClient();
QueryClientProvider 로 감싸기
 root.render(
  <QueryClientProvider client={queryClient}>
    <React.StrictMode>
      <App />
    </React.StrictMode>
  </QueryClientProvider>
);
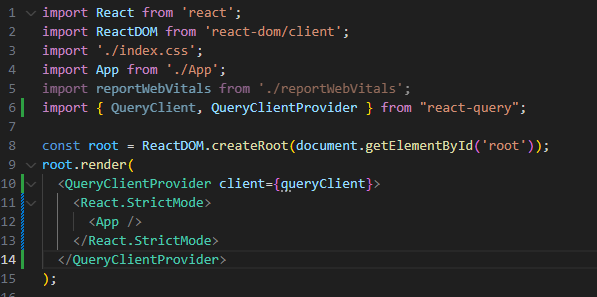
= App 안에서 React-query를 사용할 수 있음
(<React.StrictMode> 는 QueryClientProvider 밖으로 나와도 되고 크게 상관없음)
React-query로 백엔드로부터 데이터 가져오기
데이터를 가져오려는 컴포넌트에서 useQuery import 하기 ( App.js)
import { useQuery } from "react-query"
useQuery 사용하기
useQuery 작성하기 (axios import 빼먹지 마세요)
const result = useQuery(문자열로 이름짓기, 데이터 가져오는 함수);
import axios from "axios";
(생략)
const result = useQuery("posts", async () => {
    const response = await axios.get("http://localhost:3001/posts");
    return response.data;
  });

작성 예시
원하는 data값을 가저오기 위해서는
선언한 변수에 또 .data값을 넣어줘야함
이런 경우에는
구조분해 할당을 활용하면
원하는 data만 뽑아 낼 수 있음!
const { data } = useQuery("posts", async () => {
    const response = await axios.get("http://localhost:3001/posts");
    return response.data;
  });
완성 코드가 아님
위와 같은 코드를 짜면
데이터를 받아오는데 시간이 소요되기 때문에 언디파인으로 나옴
따라서!
isLoading을 사용해 주어야함
(리액트 쿼리에서 기본적으로 주어지는 기능임)
또는 삼항 연산자를 활용 할 수 있다.
{isLoading === true ? ():()}

에러 처리하기
useQuery에는 isError와 error라는 데이터도 존재함.
const { data, isLoading, isError, error } = useQuery("posts", async () => {
   const response = await axios.get("http://localhost:3001/posts");
   return response.data;
 });
구조 분해 할당으로 isError 와 error를 뽑아낼 수 있음
(error 데이터를 console.log로 확인해보면 message라는 데이터가 들어있음.)
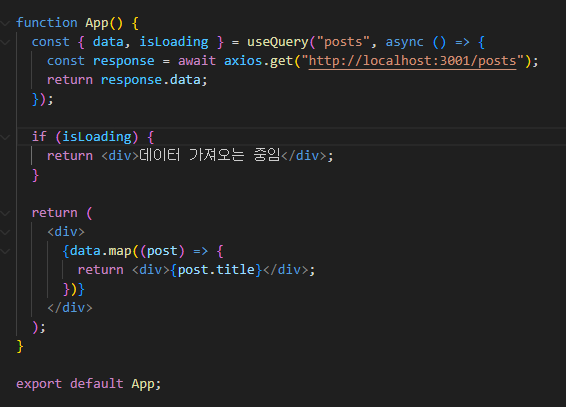
최종코드
import { useQuery } from "react-query";
import axios from "axios";

function App() {
  const { data, isLoading, isError, error } = useQuery("posts", async () => {
    const response = await axios.get("http://localhost:3001/posts");
    return response.data;
  });

  if (isLoading) {
    return <div>데이터 가져오는 중임</div>;
  }

  if (isError) {
    return <div>{error.message}</div>;
  }

  return (
    <div>
      {data.map((post) => {
        return <>{post.title}</>;
      })}
    </div>
  );
}
useMutation- 데이터 추가하기
useMutaion import 하기
import { useMutation } from "react-query";
useMutation 사용하기
const mutation = useMutation(데이터 추가 or 수정 or 삭제 관련 함수);
const mutation = useMutation(async () => {
  await axios.post("http://localhost:3001/posts", {
    id: nanoid(),
    title: "하하",
    author: "재석",
  });
}); axios.post("http://localhost:3001/posts", {
id: nanoid(),
title: "하하",
author: "재석",
});
post- 데이터 추가
("추가할주소", { 추가할 데이터});
추가하는 버튼 만들기 :
useMutation의 반환값에서 .mutate()를 붙여주기,
<button
    onClick={() => {
      mutation.mutate();
    }}

    데이터추가!!
  </button>

최종코드
가 아니였습니다!
ㅎㅎ
위와 같은 코드를 짜면
바로바로 업데이트 되지 않고
한번에 업데이트가됨
(React-query는 주기적으로 데이터를 받아 오기 때문에!)
데이터 추가, 수정, 삭제 후 화면 바로 변경하기
useQueryClient를 사용하면 된다.
useQueryClient를 import 합니다.
import { useQueryClient } from "react-query";
useQueryClient를 사용합니다.
const queryClient = new useQueryClient();
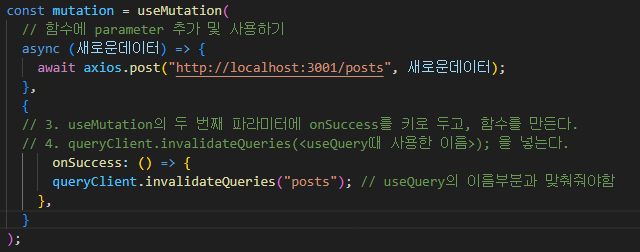
useMutation의 두번째 파라미터에 다음을 추가합니다.
- 이때 posts는 useQuery에서 데이터를 가져왔던 이름과 똑같아야 합니다.
{
onSuccess: () => {
  queryClient.invalidateQueries("posts");
},
}
고정된 데이터가 아니라 원하는 데이터를 유동적으로 넣기
매번 다른 값을 넣기 위해서 파라미터를 사용하기
const mutation = useMutation(
	// 함수에 parameter 추가 및 사용하기
 async (새로운데이터) => {
   await axios.post("http://localhost:3001/posts", 새로운데이터);
 },
 {
   onSuccess: () => {
     queryClient.invalidateQueries("posts");
   },
 }
);
mutation() 부분을 다음과 같이 변경
<button
onClick={() => {
  mutation.mutate({
    id: nanoid(),
    title: "useState로 입력된 title",
    author: "useState로 입력된 author",
  });
}}
>
데이터추가!!
</button>
이를 활용하여 input 입력 후 버튼 클릭하면 추가되는 것 구현하기
1)useState 선언,임포트해오기

2) 파라미터를 통해 새로운 값을 넣을 수 있도록 하기
3) 인풋과 버튼에 속성 넣어 주면 끝!
최종코드
// 1. useQueryClient import 하기
import { useQuery, useMutation, useQueryClient } from "react-query";
import axios from "axios";
import { nanoid } from "nanoid";
import { useState } from "react";
function App() {
// 2. useQueryClient를 다음과 같이 사용하기
const queryClient = new useQueryClient();
const { data, isLoading, isError, error } = useQuery("posts", async () => {
const response = await axios.get("http://localhost:3001/posts");
return response.data;
});
const mutation = useMutation(
// 함수에 parameter 추가 및 사용하기
async (새로운데이터) => {
await axios.post("http://localhost:3001/posts", 새로운데이터);
},
{
// 3. useMutation의 두 번째 파라미터에 onSuccess를 키로 두고, 함수를 만든다.
// 4. queryClient.invalidateQueries(<useQuery때 사용한 이름>); 을 넣는다.
onSuccess: () => {
queryClient.invalidateQueries("posts"); // useQuery의 이름부분과 맞춰줘야함
},
}
);
const [title,setTitle] = useState ("");
if (isLoading) {
return <div>데이터 가져오는 중임</div>;
}
if (isError) {
return <div>{error.message}</div>;
}
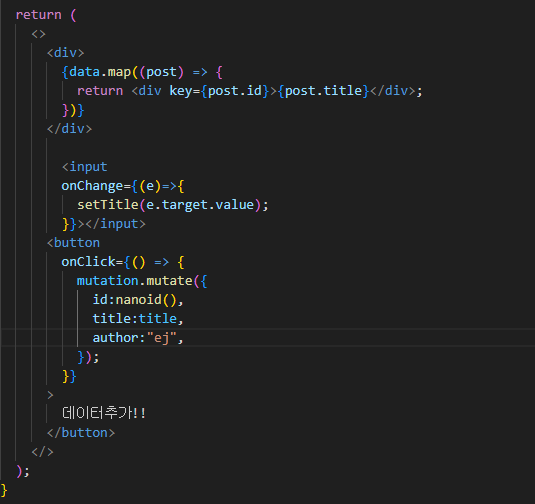
return (
<>
<div>
{data.map((post) => {
return <div key={post.id}>{post.title}</div>;
})}
</div>
<input
onChange={(e)=>{
setTitle(e.target.value);
}}></input>
<button
onClick={() => {
mutation.mutate({
id:nanoid(),
title:title,
author:"ej",
});
}}
>
데이터추가!!
</button>
</>
);
}
export default App;