1. 타임리프
1). 기본 기능
<!-- th:with -->
<div th:with="first=${users[0]}">
    <p>처음 사람의 이름은 <span th:text="${first.username}"></span></p>
</div>

<!-- SpringEL 표현식 -->
<ul>List
    <li>${users[0].username}    = <span th:text="${users[0].username}"></span></li>
    <li>${users[0]['username']} = <span th:text="${users[0]['username']}"></span></li>
    <li>${users[0].getUsername()} = <span th:text="${users[0].getUsername()}"></span></li>
</ul>

<ul>Map
    <li>${userMap['userA'].username} =  <span th:text="${userMap['userA'].username}"></span></li>
    <li>${userMap['userA']['username']} = <span th:text="${userMap['userA']['username']}"></span></li>
    <li>${userMap['userA'].getUsername()} = <span th:text="${userMap['userA'].getUsername()}"></span></li>
</ul>

<!-- 기본 객체 -->
<h1>편의 객체</h1>
<ul>
<li>Request Parameter = <span th:text="${param.paramData}"></span></li>
<li>session = <span th:text="${session.sessionData}"></span></li>
<!-- 빈에 접근해서 메서드 실행 가능 -->
<li>spring bean = <span th:text="${@helloBean.hello('Spring!')}"></span></li>
</ul>

<!-- 유틸리티 객체와 날짜 -->
<span th:text="${#temporals.format(localDateTime, 'yyyy-MM-dd HH:mm:ss')}"></span>
`#lists` , `#sets` , `#maps` : 컬렉션 관련 기능 제공
`#objects` : 객체 관련 기능 제공

<!-- URL 링크 -->
<li><a th:href="@{/hello}">basic url</a></li>
    <li><a th:href="@{/hello(param1=${param1}, param2=${param2})}">hello query param</a></li>
    <li><a th:href="@{/hello/{param1}/{param2}(param1=${param1}, param2=${param2})}">path variable</a></li>
    <li><a th:href="@{/hello/{param1}(param1=${param1}, param2=${param2})}">path variable + query parameter</a></li>

<!-- 연산 -->
<li>Elvis 연산자
        <ul>
            <li>${data}?: '데이터가 없습니다.' = <span th:text="${data}?: '데이터가 없습니다.'"></span></li>
            <li>${nullData}?: '데이터가 없습니다.' = <span th:text="${nullData}?: '데이터가 없습니다.'"></span></li>
        </ul>
    </li>
    <li>No-Operation
        <ul>
            <li>${data}?: _ = <span th:text="${data}?: _">데이터가 없습니다.</span></li>
            <li>${nullData}?: _ = <span th:text="${nullData}?: _">데이터가 없습니다.</span></li>
        </ul>
    </li>

<!-- Type Safe -->
<div th:if="${errors?.containsKey('globalError')}">
  <td th:text="${member.address?.city}"></td>
</div>

<!-- enum SpEL로 가져오기 -->
<div th:if="${comment.deleteStatus != T(kozin.erdDashBoard.domain.entity.type.DeleteStatus).delete}"> </div>
<div th:each="role : ${T(techit.velog.domain.user.entity.Role).values()}"></div>

<!-- 타임리프와 시큐리티 통합 -->
<!-- 인증되지 않은(로그인하지 않은) 사용자에게 보임 -->
<button sec:authorize="isAnonymous()" type="button" onclick="location.href='/admin/loginView'">로그인</button>
<!-- 인증된(로그인한) 사용자에게 보임 -->
<button sec:authorize="isAuthenticated()" type="button" onclick="location.href='/admin/logout'">로그아웃</button>

<!-- ROLE_ADMIN 권한을 가지고 있다면 보임 -->
<div sec:authorize="hasRole('ADMIN')">ROLE_ADMIN 권한이 있습니다.</div>
<!-- ROLE_SUB_ADMIN 권한을 가지고 있다면 보임 -->
<div sec:authorize="hasRole('SUB_ADMIN')">ROLE_SUB_ADMIN 권한이 있습니다.</div>
<!-- ROLE_USER 권한을 가지고 있다면 보임 -->
<div sec:authorize="hasRole('USER')">ROLE_USER 권한이 있습니다.</div>
<!-- ROLE_ADMIN 혹은 ROLE_SUB_ADMIN 권한을 가지고 있다면 보임 -->
<div sec:authorize="hasAnyRole('ADMIN, SUB_ADMIN')">ROLE_ADMIN 혹은 ROLE_SUB_ADMIN 권한이 있습니다.</div>

<br/>
<!--인증시 사용된 객체에 대한 정보-->
<b>Authenticated DTO:</b>
<div sec:authorize="isAuthenticated()" sec:authentication="principal"></div>

<br/>
<!--인증시 사용된 객체의 Username (ID)-->
<b>Authenticated username:</b>
<div sec:authorize="isAuthenticated()" sec:authentication="name"></div>

<br/>
<!--객체의 권한-->
<b>Authenticated admin role:</b>
<div sec:authorize="isAuthenticated()" sec:authentication="principal.authorities"></div>

th:if="${blog.loginId != #authentication.principal.getUsername()}"
2. 메시지, 국제화
- 하드코딩 되어있으면 화면에 보이는 단어를 변경하려면 화면들을 다 찾아서 고쳐야 한다
- 메시지를 한 곳에서 관리하는 기능을 메시지 기능이라고 한다
- 메시지 파일을 각 나라별로 별도로 관리하면 서비스를 국제화 할 수 있다
국제화
Accept-Lanaguage요청 헤더에 입력하면 국제화 메시지를 선택할 수 있다- 스프링부트에서는
Locale선택방식을 변경할 수 있도록LocaleResolver인터페이스 사용- 기본으로는 Accept-Lanaguage를 활용하는
AcceptHeaderLocalResolver를 사용한다
1). 설정
messages로 지정하면messages.properties파일을 읽어서 사용한다- 국제화 기능은
message_en.proeprties,messages_ko.properties와 같이 파일명 마지막에 언어정보를 주면 된다messages_ko.properties와 같이 파일명 마지막 언어정보를 주면 된다
	@Bean
	public MessageSource messageSource(){
		ResourceBundleMessageSource messageSource = new ResourceBundleMessageSource();
		messageSource.setBasenames("messages", "errors"); // messages랑 errors라는 파일을 읽는다
		messageSource.setDefaultEncoding("utf-8");
		return messageSource;
	}
환경설정에 등록
- spring.messages.basename=messages,config.i18n.messages
2). 사용
- 타임리프에서는
th:text="#{hello.name}"로 쓰면 된다
(1). 등록
hello=안녕
hello.name=안녕 {0}
(2). 사용
 // code, args, locale
@Autowired
MessageSource ms;

@Test
void helloMessage(){
 // code, args, locale
 String result = ms.getMessage("hello", null, null);
 String result2 = ms.getMessage("hello", null, "기본메시지",null);
 String result3 = ms.getMessage("hello.name", new Object[]{"Spring"}, "기본메시지",null);
 String result4 = ms.getMessage("hello.name", new Object[]{"Spring"}, "기본메시지", Locale.ENGLISH);
}
3. Validation
- 3가지 방법이 있다
- Validator, BindingResult로만 처리하기, Bean Validation
// bindingResult 사용
// 객체이름(소문자), field(무슨필드이름으로 오류가 나는가), 입력한 값, 데이터 자체가 넘어오는게 실패했는가?, codes(메시지 소스), arguments(메시지 소스에 들어갈 값), 디폴트 메시지

   //검증 로직
   if (!StringUtils.hasText(item.getItemName())) {
         bindingResult.addError(new FieldError("item", "itemName", item.getItemName(), false, new String[]{"required.item.itemName"}, null, null));
        }
        if (item.getPrice() == null || item.getPrice() < 1000 || item.getPrice() > 1000000) {
            bindingResult.addError(new FieldError("item", "price", item.getPrice(), false, new String[]{"range.item.price"}, new Object[]{1000, 1000000}, null));
        }
        if (item.getQuantity() == null || item.getQuantity() >= 9999) {
            bindingResult.addError(new FieldError("item", "quantity", item.getQuantity(), false, new String[]{"max.item.quantity"} ,new Object[]{9999}, null));
        }

        //특정 필드가 아닌 복합 룰 검증
        if (item.getPrice() != null && item.getQuantity() != null) {
            int resultPrice = item.getPrice() * item.getQuantity();
            if (resultPrice < 10000) {
                bindingResult.addError(new ObjectError("item",new String[]{"totalPriceMin"} ,new Object[]{10000, resultPrice}, null));
            }
        }

        // reject 사용
if (!StringUtils.hasText(item.getItemName())) {
            bindingResult.rejectValue("itemName", "required");
        }
        if (item.getPrice() == null || item.getPrice() < 1000 || item.getPrice() > 1000000) {
            bindingResult.rejectValue("price", "range", new Object[]{1000, 10000000}, null);
        }
        if (item.getQuantity() == null || item.getQuantity() >= 9999) {
            bindingResult.rejectValue("quantity", "max", new Object[]{9999}, null);
        }

        //특정 필드가 아닌 복합 룰 검증
        if (item.getPrice() != null && item.getQuantity() != null) {
            int resultPrice = item.getPrice() * item.getQuantity();
            if (resultPrice < 10000) {
                bindingResult.reject("totalPriceMin", new Object[]{10000, resultPrice}, null);
            }
        }

        //검증에 실패하면 다시 입력 폼으로
        if (bindingResult.hasErrors()) {
            log.info("errors={} ", bindingResult);
            return "validation/v2/addForm";
        }
1). Validator 사용
- 컨트롤러 요청이 될 때 WebDataBinder가 새로 생성이 되고 Validator를 항상 넣어놓는다
- 해당 컨트롤러에서만 적용이 된다. 글로벌하게 적용하려면
WebMvcConfigurer사용 - 모든 요청에 다 적용이 된다. Get에도 적용이 됨
@Component
public class ItemValidator implements Validator {

    @Override
    public boolean supports(Class<?> clazz) {
        return Item.class.isAssignableFrom(clazz);
    }

    @Override
    public void validate(Object target, Errors errors) {
        Item item = (Item) target;

        if (!StringUtils.hasText(item.getItemName())) {
            errors.rejectValue("itemName", "required");
        }
        if (item.getPrice() == null || item.getPrice() < 1000 || item.getPrice() > 1000000) {
            errors.rejectValue("price", "range", new Object[]{1000, 10000000}, null);
        }
        if (item.getQuantity() == null || item.getQuantity() >= 9999) {
            errors.rejectValue("quantity", "max", new Object[]{9999}, null);
        }

        //특정 필드가 아닌 복합 룰 검증
        if (item.getPrice() != null && item.getQuantity() != null) {
            int resultPrice = item.getPrice() * item.getQuantity();
            if (resultPrice < 10000) {
                errors.reject("totalPriceMin", new Object[]{10000, resultPrice}, null);
            }
        }
    }
}

	// 사용
	public class ValidationItemControllerV2 {

    private final ItemRepository itemRepository;
    private final ItemValidator itemValidator;

    @InitBinder
    public void init(WebDataBinder dataBinder) {
        dataBinder.addValidators(itemValidator);
    }


	@PostMapping("/add")
    public String addItemV6(@Validated @ModelAttribute Item item, BindingResult bindingResult, RedirectAttributes redirectAttributes, Model model) {

        //검증에 실패하면 다시 입력 폼으로
        if (bindingResult.hasErrors()) {
            log.info("errors={} ", bindingResult);
            return "validation/v2/addForm";
        }

        //성공 로직
        Item savedItem = itemRepository.save(item);
        redirectAttributes.addAttribute("itemId", savedItem.getId());
        redirectAttributes.addAttribute("status", true);
        return "redirect:/validation/v2/items/{itemId}";
    }
  }
4. 로그인 처리 - 쿠키, 세션
- 세션, 필터, 인터셉터
5. 예외처리
1). 오류 페이지
@Component
public class WebServerCustomizer implements WebServerFactoryCustomizer<ConfigurableWebServerFactory> {
    @Override
    public void customize(ConfigurableWebServerFactory factory) {
        ErrorPage errorPage404 = new ErrorPage(HttpStatus.NOT_FOUND, "/error-page/404");
        ErrorPage errorPage500 = new ErrorPage(HttpStatus.INTERNAL_SERVER_ERROR, "/error-page/500");

        ErrorPage errorPageEx = new ErrorPage(RuntimeException.class, "/error-page/500");

        factory.addErrorPages(errorPage404, errorPage500, errorPageEx);
    }
}
2). 필터
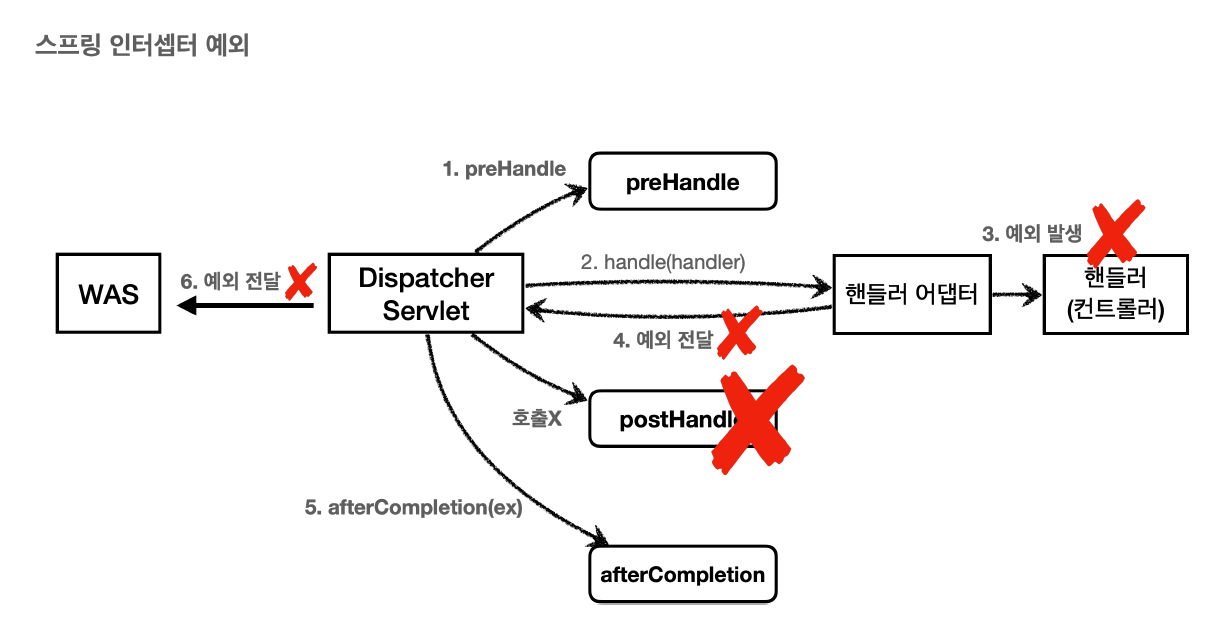
예외 발생시 와스에서 다시 한번 컨트롤러를 요청하기 때문에 필터와 인터셉터가 다시한번 호출된다
하지만 한 번더 호출되는 건 비효율적이다. 그래서 서블릿은 DispatcherType으로 호출안되게 만든다
인터셉터는 DispatcherType은 없고 excludePatten으로 오류페이지는 안걸리게 만든다
@Configuration
public class WebConfig implements WebMvcConfigurer {

    @Bean
    public FilterRegistrationBean<Filter> logFilter(){
        FilterRegistrationBean<Filter> filterRegistrationBean = new FilterRegistrationBean<>();
        filterRegistrationBean.setFilter(new LogFilter());
        filterRegistrationBean.setOrder(1);
        filterRegistrationBean.addUrlPatterns("/*");
        filterRegistrationBean.setDispatcherTypes(DispatcherType.REQUEST,DispatcherType.ERROR);
        -> 이 필터는 Request와 Error일 경우에 호출한다, 기본값은 Request만
        return filterRegistrationBean;
    }
}
3). API 예외처리
- ExceptionHandlerExceptionResolver -> @ExceptionHandler
- ResponseStatusExceptionResolver -> @ResponseStatus, ResponseStatusException
- DefaultHandlerExceptionResolver -> 스프링에서 자동으로 해주는 예외처리
(1).ExceptionHandlerExceptionResolver
- 정상로직으로 바뀌기 때문에 @ResponseStatus 붙이기
- mvc까지 처리가능하긴 함
	@ExceptionHandler(IllegalArgumentException.class)
    public ErrorResult illegalExcHandler(IllegalArgumentException ex) {
        log.error("[exceptionHandler] ex", ex);
        return new ErrorResult("Bad", ex.getMessage());
    }

    @ResponseStatus(HttpStatus.BAD_REQUEST) // 필수
    @ExceptionHandler(IllegalArgumentException.class)
    public ErrorResult illegalExcHandler(IllegalArgumentException ex) {
        log.error("[exceptionHandler] ex", ex);
        return new ErrorResult("Bad", ex.getMessage());
    }
    // ResponseEntity 가능
    @ExceptionHandler // 파라미터명과 같으면 생략 가능
    public ResponseEntity<ErrorResult> userExHandler(UserException e) {
        log.error("[exceptionHandler] ex", e);
        ErrorResult errorResult = new ErrorResult("User-ex", e.getMessage());
        return new ResponseEntity<>(errorResult, HttpStatus.BAD_REQUEST);
    }
(2). ResponseStatusExceptionResolver
- 개발자가 직접 변경할 수 없는 예외에는 적용할 수 없다(애노테이션을 넣어야 하는데 불가능)
- 조건에 따라 동적으로 변경하는 것도 어렵다 이럴때 ResponseStatusException 활용
// 메시지소스에 있는걸 받을 수 있음
@ResponseStatus(code = HttpStatus.BAD_REQUEST, reason = "error.bad")
public class BadRequestException extends RuntimeException{
}

// 사용
// ResponseStatusException
@GetMapping("/api/response-status-ex2")
    public String responseStatusEx2() {
        throw new ResponseStatusException(HttpStatus.NOT_FOUND, "error.bad", new IllegalArgumentException());
    }
    illegalAruemntException 일경우 Not_found로 바꾸고 메시지 소스에 있는 error.bad를 메시지로 출력
(3). ADVICE
- 아무것도 안하면 모든 restcontroller 적용
- 애노테이션, 클래스 레벨에서 적용가능
@RestControllerAdvice(basePackages = "hello.exception.api") // annotations = RestController.class
@Slf4j
public class ExControllerAdvice {
    @ResponseStatus(HttpStatus.BAD_REQUEST)
    @ExceptionHandler(IllegalArgumentException.class)
    public ErrorResult illegalExcHandler(IllegalArgumentException ex) {
        log.error("[exceptionHandler] ex", ex);
        return new ErrorResult("Bad", ex.getMessage());
    }

    @ExceptionHandler
    public ResponseEntity<ErrorResult> userExHandler(UserException e) {
        log.error("[exceptionHandler] ex", e);
        ErrorResult errorResult = new ErrorResult("User-ex", e.getMessage());
        return new ResponseEntity<>(errorResult, HttpStatus.BAD_REQUEST);
    }
    @ExceptionHandler
    @ResponseStatus(HttpStatus.INTERNAL_SERVER_ERROR)
    public ErrorResult exHandler(Exception e){
        log.error("[exceptionHandler] ex", e);
        return new ErrorResult("Internal Server Error", e.getMessage());
    }
}
6. 컨버터, 포매터
- json에서는 작동안됨, 잭슨라이브러리에 있는 포매터 기능을 쓰도록
1). 컨버터
// 컨버터 생성
@Slf4j
public class StringToIntegerConverter implements Converter<String, Integer> {

    @Override
    public Integer convert(String source) {
        log.info("convert source={}", source);
        return Integer.valueOf(source);
    }
}

// 컨버터 등록
public class WebConfig implements WebMvcConfigurer {
    @Override
    public void addFormatters(FormatterRegistry registry) {
        registry.addConverter(new StringToIntegerConverter());
        registry.addConverter(new IntegerToStringConverter());
        registry.addConverter(new IpPortToStringConverter());
        registry.addConverter(new StringToIpPortConverter());
    }
}
2). 포매터
- 똑같은 타입으로 변환하는 컨버터가 있다면 컨버터가 먼저 변환되기 때문에 포매터는 작동 안됨
// 포매터 생성
@Slf4j
public class MyNumberFormatter implements Formatter<Number> {


    @Override
    public Number parse(String text, Locale locale) throws ParseException {
        log.info("text={}, locale={}", text, locale);
        //"1,000" -> 1000
        NumberFormat format = NumberFormat.getInstance(locale);
        return format.parse(text);
    }

    @Override
    public String print(Number object, Locale locale) {
        log.info("object={}, locale={}", object, locale);
        return NumberFormat.getInstance(locale).format(object);
    }
}
// 포매터 등록
public class WebConfig implements WebMvcConfigurer {
    @Override
    public void addFormatters(FormatterRegistry registry) {
        registry.addFormatter(new MyNumberFormatter());
        }

  // 스프링이 제공하는 포매터 사용
  @Controller
public class FormatterController {

    @GetMapping("/formatter/edit")
    public String formatterForm(Model model) {
        Form form = new Form();
        form.setNumber(10000);
        form.setLocalDateTime(LocalDateTime.now());
        model.addAttribute("form", form);
        return "formatter-form";
    }

    @PostMapping("/formatter/edit")
    public String formatterEdit(@ModelAttribute Form form) {
        return "formatter-view";
    }

    @Data
    static class Form {
        @NumberFormat(pattern = "###,###")
        private Integer number;

        @DateTimeFormat(pattern = "yyyy-MM-dd HH:mm:ss")
        private LocalDateTime localDateTime;
    }
}
7. 파일업로드
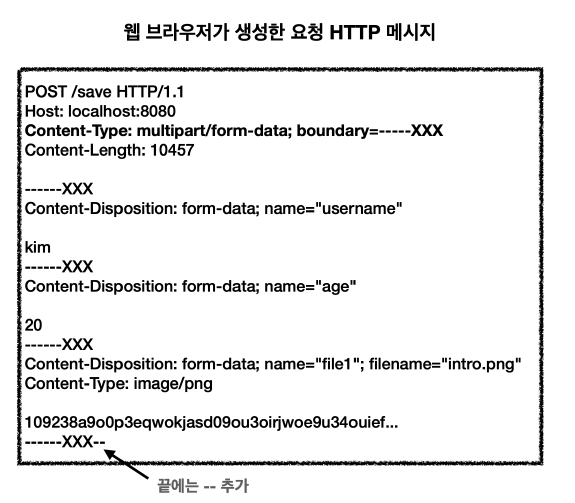
- 파일은 이름과 나이는 문자로 전송하고 첨부파일은 바이너리로 전송해야 한다.
- 이 문제를 위해 HTTP는
multipart/form-data라는 전송방식을 제공한다
1). 서블릿 파일업로드
<!DOCTYPE HTML>
<html xmlns:th="http://www.thymeleaf.org">
<head>
    <meta charset="utf-8">
</head>
<body>
<div class="container">
    <div class="py-5 text-center">
        <h2>상품 등록 폼</h2>
    </div>
    <h4 class="mb-3">상품 입력</h4>
    <form th:action method="post" enctype="multipart/form-data">
        <ul>
            <li>상품명 <input type="text" name="itemName"></li>
            <li>파일<input type="file" name="file" ></li>
        </ul>
        <input type="submit"/>
    </form>
</div> <!-- /container -->
</body>
</html>file.dir=C:/Users/fatum/OneDrive/바탕 화면/새 폴더/ << 마지막에 /(슬래시)가 포함되어있다
@Controller
@Slf4j
@RequestMapping("/servlet/v2")
public class ServletUploadControllerV2 {
@Value("${file.dir}")
private String fileDir;
@GetMapping("/upload")
public String newFile(){
return "upload-form";
}
@PostMapping("/upload")
public String saveFileV1(HttpServletRequest request) throws ServletException, IOException {
log.info("request={}",request);
String itemName = request.getParameter("itemName");
Collection<Part> parts = request.getParts();
log.info("parts={}",parts);
for (Part part : parts) {
log.info("==== PART =====");
log.info("name={}", part.getName());
Collection<String> headerNames = part.getHeaderNames();
for (String headerName : headerNames) {
log.info("header {}: {} " , headerName,part.getHeader(headerName));
}
// 편의 메서드
// content-disposition: filename
log.info("submittedFilename={}", part.getSubmittedFileName());
// 데이터 읽기
InputStream inputStream = part.getInputStream();
String body = StreamUtils.copyToString(inputStream, StandardCharsets.UTF_8);
// 파일에 저장하기
if (StringUtils.hasText(part.getSubmittedFileName())) {
String fullPath = fileDir + part.getSubmittedFileName();
part.write(fullPath);
}
}
return "upload-form";
}
}2). 스프링 파일업로드
@Slf4j
@Controller
@RequestMapping("/spring")
public class SpringUploadController {
    @Value("${file.dir}")
    private String fileDir;


    @GetMapping("/upload")
    public String newFile() {
        return "upload-form";
    }

    @PostMapping("/upload")
    public String saveFile(@RequestParam("itemName") String itemName,
                           @RequestParam("file") MultipartFile file) throws IOException {
        if(!file.isEmpty()) {
            String fullPath = fileDir + file.getOriginalFilename();
            file.transferTo(new File(fullPath));
        }
        return "upload-form";

    }
}
3). 업로드 예제
<!DOCTYPE HTML>
<html xmlns:th="http://www.thymeleaf.org">
<head>
    <meta charset="utf-8">
</head>
<body>
<div class="container">
    <div class="py-5 text-center">
        <h2>상품 등록</h2>
    </div>
    <form th:action method="post" enctype="multipart/form-data">
        <ul>
            <li>상품명 <input type="text" name="itemName"></li>
            <li>첨부파일<input type="file" name="attachFile" ></li>
            <li>이미지 파일들<input type="file" multiple="multiple"
                              name="imageFiles" ></li>
        </ul>
        <input type="submit"/>
    </form>
</div> <!-- /container -->
</body>
</html>
@Data
public class Item {
private Long id;
private String itemName;
private UploadFile attachFile;
private List<UploadFile> imageFiles;
}
@Slf4j
@Controller
@RequiredArgsConstructor
public class ItemController {
private final ItemRepository itemRepository;
private final FileStore fileStore;
@GetMapping("/items/new")
public String newItem(@ModelAttribute ItemForm form) {
return "item-form";
}
@PostMapping("/items/new")
public String saveItem(@ModelAttribute ItemForm form, RedirectAttributes rttr) throws IOException {
UploadFile attachFile = fileStore.storeFile(form.getAttachFile());
List<UploadFile> storeImageFiles = fileStore.storeFiles(form.getImageFiles());
// 데이터베이스에 저장
Item item = new Item();
item.setItemName(form.getItemName());
item.setAttachFile(attachFile);
item.setImageFiles(storeImageFiles);
itemRepository.save(item);
rttr.addAttribute("itemId",item.getId());
return "redirect:/items/{itemId}";
}
}4). 다운로드 예제
<!DOCTYPE HTML>
<html xmlns:th="http://www.thymeleaf.org">
<head>
    <meta charset="utf-8">
</head>
<body>
<div class="container">
    <div class="py-5 text-center">
        <h2>상품 조회</h2>
    </div>
    상품명: <span th:text="${item.itemName}">상품명</span><br/>
    첨부파일: <a th:if="${item.attachFile}" th:href="|/attach/${item.id}|"
             th:text="${item.getAttachFile().getUploadFileName()}" /><br/>
    <img th:each="imageFile : ${item.imageFiles}" th:src="|/images/${imageFile.getStoreFileName()}|" width="300" height="300"/>
</div> <!-- /container -->
</body>
</html> @GetMapping("/items/{id}")
public String itmes(@PathVariable long id, Model model) {
Item item = itemRepository.findById(id);
model.addAttribute("item", item);
return "item-view";
}
@ResponseBody
@GetMapping("/images/{filename}")
public Resource downloadImage(@PathVariable String filename) throws MalformedURLException {
// 이미지가 보이는게 다임
return new UrlResource("file:" + fileStore.getFullPath(filename));
}
@GetMapping("/attach/{itemId}")
public ResponseEntity<Resource> downloadAttach(@PathVariable long itemId) throws MalformedURLException {
Item item = itemRepository.findById(itemId);
String storeFileName = item.getAttachFile().getStoreFileName();
String uploadFileName = item.getAttachFile().getUploadFileName();
UrlResource urlResource = new UrlResource("file:" + fileStore.getFullPath(storeFileName));
// 한글은 깨질 가능성이 있음, 안해도 되긴하는데 혹시모르니까
String encodedUploadFilename = UriUtils.encode(uploadFileName, StandardCharsets.UTF_8);
// 적어줘야 다운로드가 됨, 하나의 규약
String contentDisposition = "attachment; filename=\"" + encodedUploadFilename +"\"";
return ResponseEntity.ok()
.header(HttpHeaders.CONTENT_DISPOSITION, contentDisposition)
.body(urlResource);
}