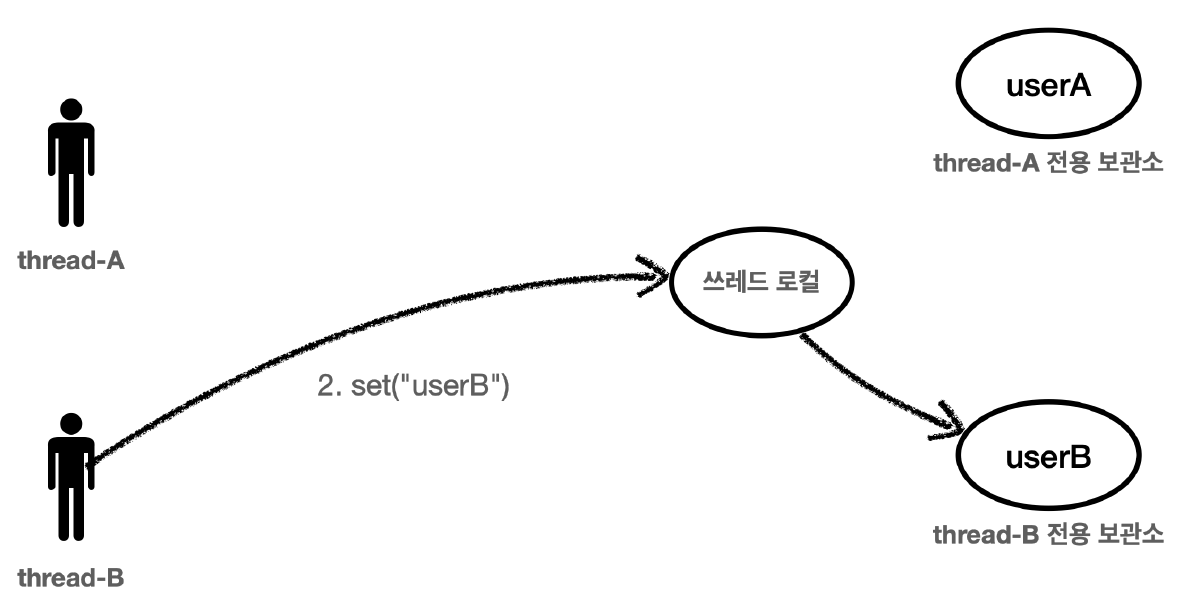
1. ThreadLocal
- 스프링은 기본적으로 싱글톤인데 traceHolder필드를 공유자원으로 쓰기 때문에 동시성 문제가 생긴다
- 쓰레드 로컬은 해당 쓰레드만 접근할 수 있는 특별한 저장소가 있다
- 쓰레드풀을 사용할 경우 ThreadLocal.remove를 하지 않으면 쓰레드의 데이터도 남아있다
2. 템플릿 메서드 패턴
- 템플릿이라는 틀에 변하지 않는 부분을 몰아둔다 그리고 일부 변하는 부분을 별도로 호출해서 해결
- 부모 클래스에 알고리즘의 골격인 템플릿을 정의하고, 일부 변경되는 로직은 자식 클래스에 정의
- 자식 클래스가 알고리즘의 전체구조를 변경하지 않고, 특정 부분만 재정의할 수 있다
- 상속과 오버라이딩을 통한 다형성으로 문제를 해결한다
- 상속으로 해결한다
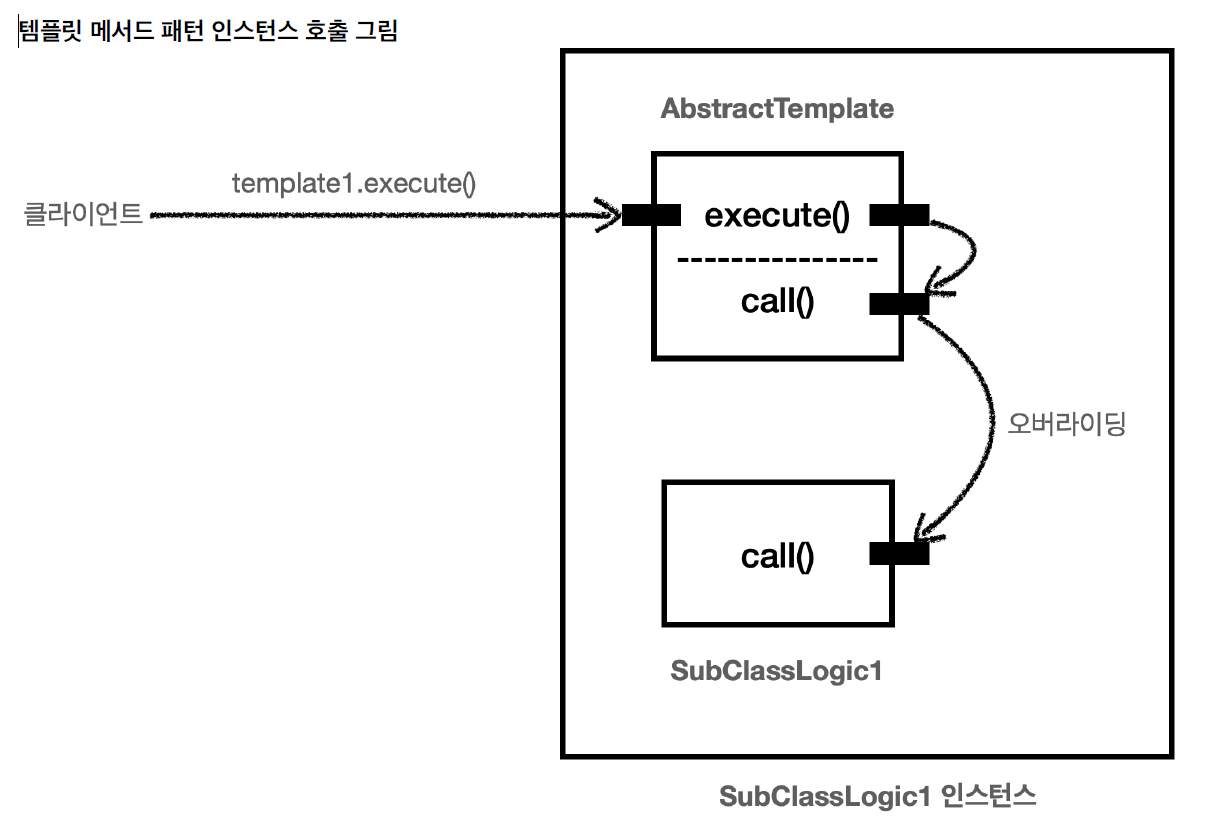
1). 사용
public abstract class AbstractTemplate {
private static final Logger log = LoggerFactory.getLogger(AbstractTemplate.class);
public void execute(){
long startTime = System.currentTimeMillis();
call();
long endtime = System.currentTimeMillis();
long resultTime = endtime - startTime;
log.info("resultTime = {}", resultTime);
}
protected abstract void call();
}
public class OrderControllerV4 {
private final OrderServiceV4 orderService;
private final LogTrace trace;
@GetMapping("/v4/request")
public String request(String itemId){
AbstractTemplate<String> template = new AbstractTemplate<>(trace) {
@Override
protected String call() {
orderService.orderItem(itemId);
return "ok";
}
};
return template.execute("OrderController.request()");
}
}
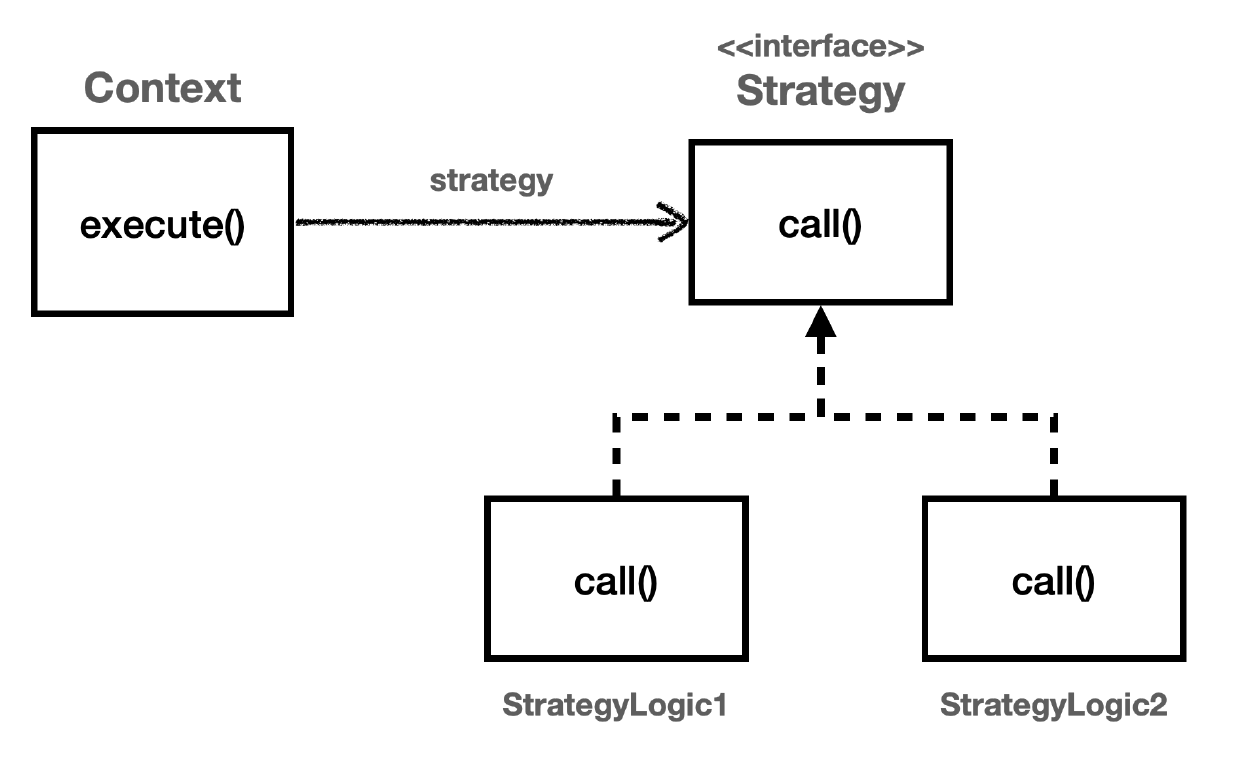
3. 전략패턴
- 상속이 아닌 위임으로 해결한다
- 필드와 파라미터 방식이 있다
- 필드는 생성자 방식으로 주입받는다
- 파라미터는 메서드를 실행할 때마다 주입받는다
public interface Strategy {
void call();
}
public class ContextV1 {
private Strategy strategy;
public ContextV1(Strategy strategy) {
this.strategy = strategy;
}
public void execute(){
long startTime = System.currentTimeMillis();
strategy.call();
long endTime = System.currentTimeMillis();
long resultTime = startTime - endTime;
System.out.println(resultTime);
}
}
new ContextV1(() -> log.info("테스트");
상속과 위임
- 상속
- 메서드 안에서 자식으로 필요한 로직을 실행한다
- 문제점: 비즈니스 로직이 템플릿에 강하게 종속된다
- 위임
- 비즈니스 로직을 다른곳에서 작성한뒤에 Context에 넣는다
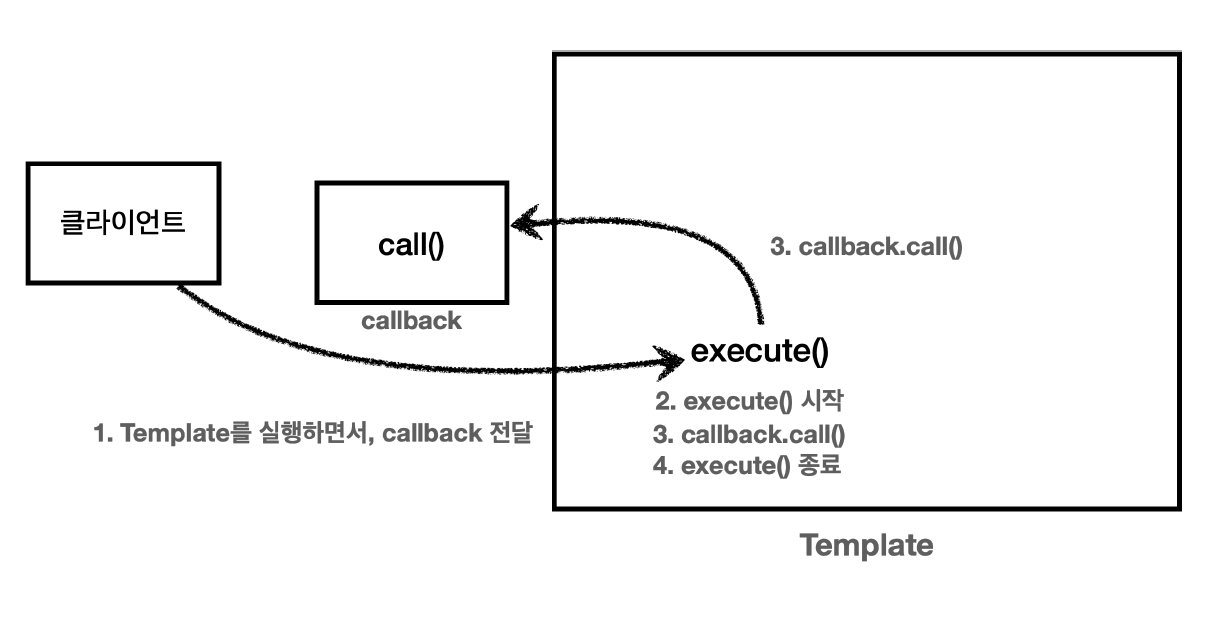
4. 템플릿 콜백 패턴
- 콜백
- 다른 코드의 인수로서 넘겨주는 실행 가능한 코드
- 코드가
호출(call)은 되는데 코드를 넘겨준 곳의 뒤(back)에서 실행 된다는 뜻
- 스프링에서는
JdbcTemplate 같은 Template에는 콜백패턴으로 만들어져 있다
- 전략 패턴 중 일부
- 파라미터 형식으로 받는걸 템플릿 콜백 패턴이라고 한다
public interface TraceCallback<T> {
T call();
}
public class TraceTemplate {
private final LogTrace trace;
public TraceTemplate(LogTrace trace) {
this.trace = trace;
}
public <T> T execute(String message, TraceCallback<T> callback) {
TraceStatus status = null;
try {
status = trace.begin(message);
T result = callback.call();
trace.end(status);
return result;
} catch (Exception e) {
trace.exception(status, e);
throw e;
}
}
}
@RestController
public class OrderControllerV5 {
private final OrderServiceV5 orderService;
private final TraceTemplate traceTemplate;
public OrderControllerV5(OrderServiceV5 orderService, LogTrace trace) {
this.orderService = orderService;
this.traceTemplate = new TraceTemplate(trace);
}
@GetMapping("/v5/request")
public String request(String itemId) {
return traceTemplate.execute("orderController", () -> {
orderService.orderItem(itemId);
return "OK";
});
}
}
5. 프록시, 프록시 패턴, 데코레이터 패턴
- 인터페이스 기반 프록시
- 인터페이스 기반 프록시는 상속이라는 제약에서 자유롭다
- 프로그램 관점에서도 인터페이스를 사용하는 것이 역할과 구현을 명확하게 나누기 때문에 좋다
- 클래스 기반 프록시
- 해당 클래스에만 적용할 수 있다
- 상속을 사용하기 때문에 몇가지 제약이 있다
- 부모 클래스의 생성자를 호출해야 한다
- 클래스에 final 키워드가 붙으면 상속이 불가능하다
- 메서드에 final 키워드가 붙으면 해당 메서드를 오버라이딩 할 수 없다
- 문제는 클래스마다 프록시를 만들어야 한다
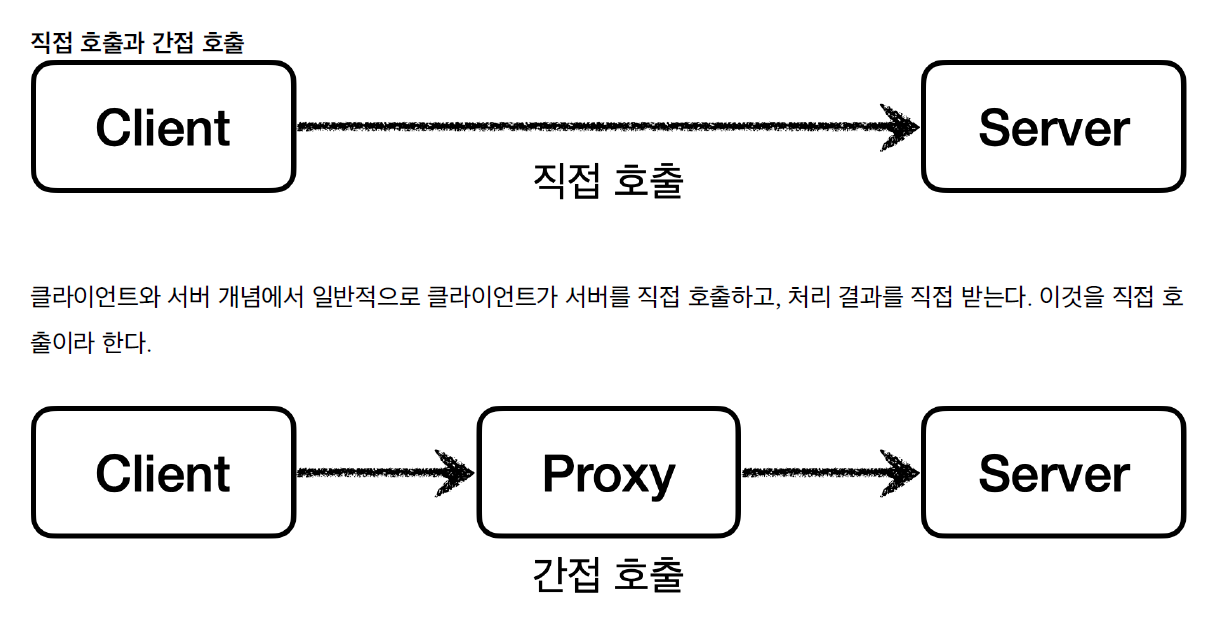
1). 프록시
- 서버에 직접 요청하는 것이 아니라 어떤 대리자를 통해서 대신 간접적으로 서버에 요청
- 대리자를 프록시라고 한다
- 프록시 패턴이나 데코레이터 패턴은 프록시를 이용하지만 의도에 따라서 구분한다
- 장점
- 간접호출을 하면 대리자가 중간에서 여러가지 일을 할 수 있다
- 접근 제어, 캐싱, 지연로딩
2). 프록시 패턴
public interface Subject {
String operation();
}
@Slf4j
public class CacheProxy implements Subject {
private Subject target;
private String cacheValue;
public CacheProxy(Subject target) {
this.target = target;
}
@Override
public String operation() {
log.info("프록시 호출");
if (cacheValue == null) {
cacheValue = target.operation();
}
return cacheValue;
}
}
@Slf4j
public class RealSubject implements Subject {
@Override
public String operation() {
log.info("실제 객체 호출");
sleep(1000);
return "data";
}
private void sleep(int millis) {
try {
Thread.sleep(millis);
} catch (InterruptedException e) {
e.printStackTrace();
}
}
}
public class ProxyPatternClient {
private Subject subject;
public ProxyPatternClient(Subject subject) {
this.subject = subject;
}
public void execute() {
subject.operation();
}
}
public class ProxyPatternTest {
@Test
void cacheProxyTest() {
RealSubject realSubject = new RealSubject();
CacheProxy cacheProxy = new CacheProxy(realSubject);
ProxyPatternClient client = new ProxyPatternClient(cacheProxy);
client.execute();
client.execute();
client.execute();
}
}
3). 데코레이터 패턴
- 객체에 추가 책임(기능)을 동적으로 추가하고, 기능 확장을 위한 유연한 대안 제공
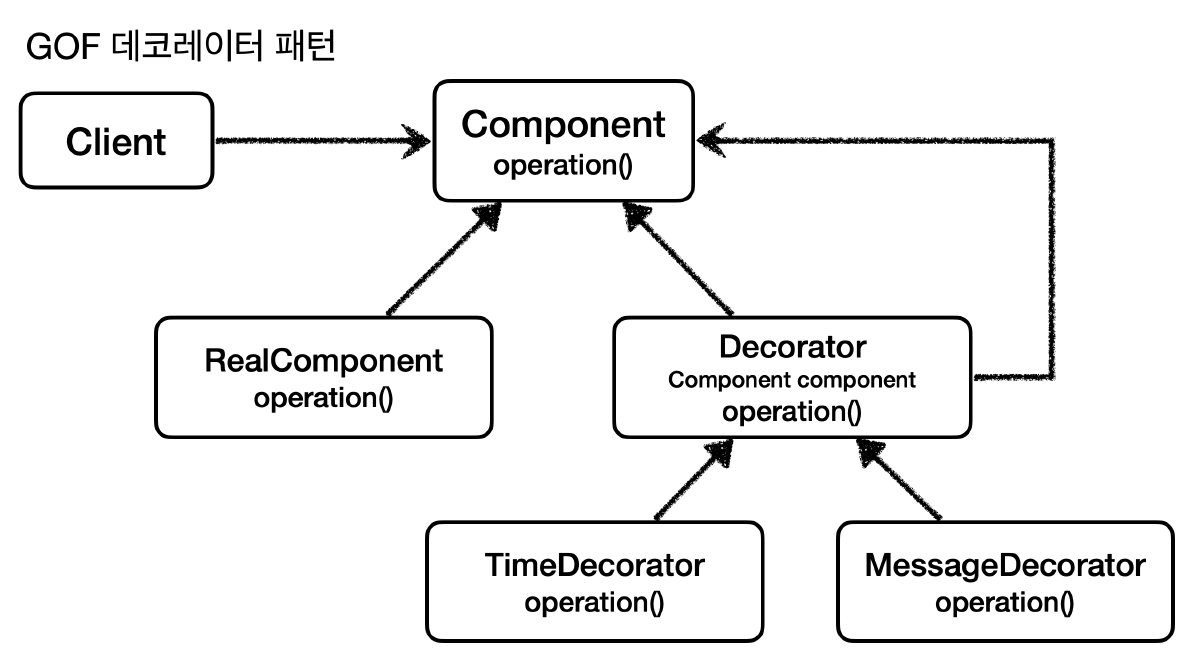
public interface Component {
String operation();
}
@Slf4j
public class MessageDecorator implements Component {
private Component component;
public MessageDecorator(Component component) {
this.component = component;
}
@Override
public String operation() {
log.info("MessageDecorator 실행");
String result = component.operation();
String decoResult = "*****" + result + "*****";
log.info("MessageDecorator 꾸미기 적용 전={}, 적용 후={}", result, decoResult);
return decoResult;
}
}
@Slf4j
public class RealComponent implements Component {
@Override
public String operation() {
log.info("RealComponent 실행");
return "data";
}
}
@Slf4j
public class DecoratorPatternClient {
private Component component;
public DecoratorPatternClient(Component component) {
this.component = component;
}
public void execute() {
String result = component.operation();
log.info("result={}", result);
}
}
@Slf4j
public class DecoratorPatternTest {
@Test
void decorator1() {
Component realComponent = new RealComponent();
Component messageDecorator = new MessageDecorator(realComponent);
DecoratorPatternClient client = new DecoratorPatternClient(messageDecorator);
client.execute();
}
}
6. 동적프록시
- 프록시 클래스를 하나만 만들어서 모든 곳에 적용하는 방법
- 자바는 기본적으로 JDK 동적 프록시랑 CGLIB 같은 프록시 기술을 제공한다
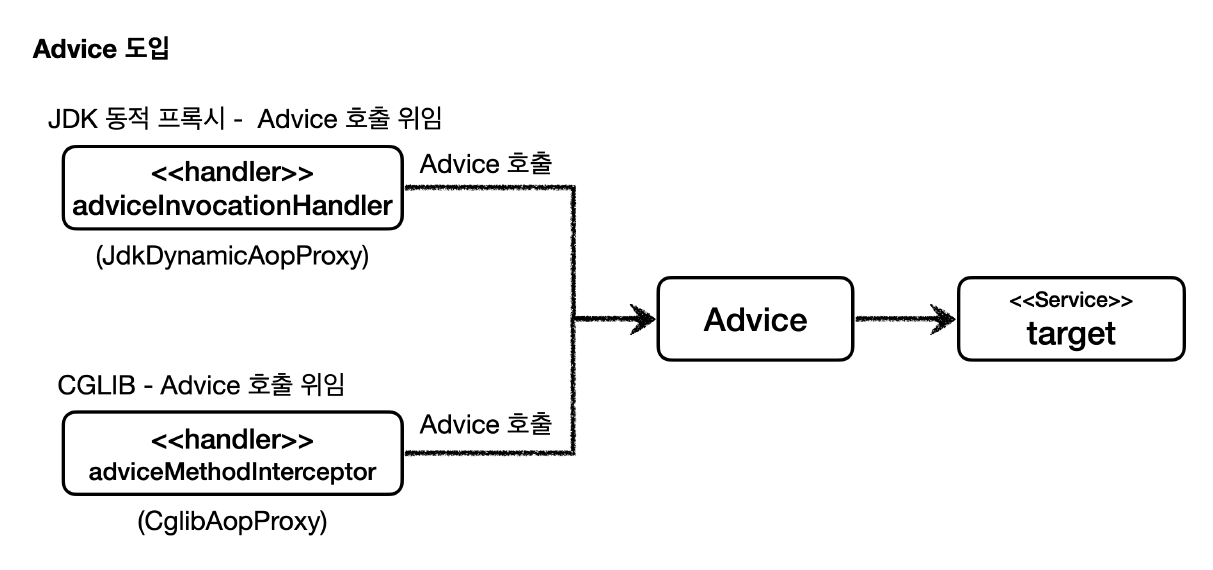
1). JDK 동적 프록시
- 인터페이스 기반 프록시
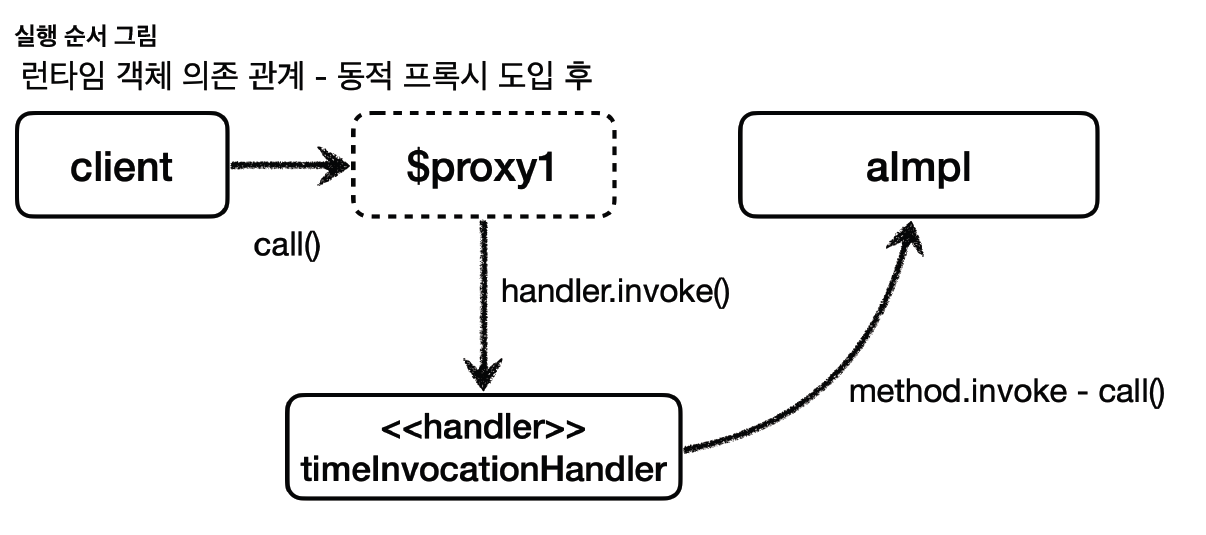
@Slf4j
public class TimeInvocationHandler implements InvocationHandler {
private final Object target;
public TimeInvocationHandler(Object target) {
this.target = target;
}
@Override
public Object invoke(Object proxy, Method method, Object[] args) throws Throwable {
log.info("TimeProxy 실행");
long startTime = System.currentTimeMillis();
Object result = method.invoke(target, args);
long endTime = System.currentTimeMillis();
log.info("TimeProxy 종료 resultTime={}", endTime - startTime);
return result;
}
}
@Slf4j
public class JdkDynamicProxyTest {
@Test
void dynamicA(){
AInterface target = new AImpl();
TimeInvocationHandler handler = new TimeInvocationHandler(target);
AInterface proxy = (AInterface)Proxy.newProxyInstance(
AInterface.class.getClassLoader(), new Class[]{AInterface.class}, handler);
proxy.call();
log.info("targetClass={}", target.getClass());
log.info("ProxyClass={}", proxy.getClass());
}
}
2). CGLIB
- Code Generator Libaray
- 바이트코드를 조작해서 동적으로 클래스를 생성하는 기술을 제공하는 라이브러리
- 구체 클래스로 동적 프록시
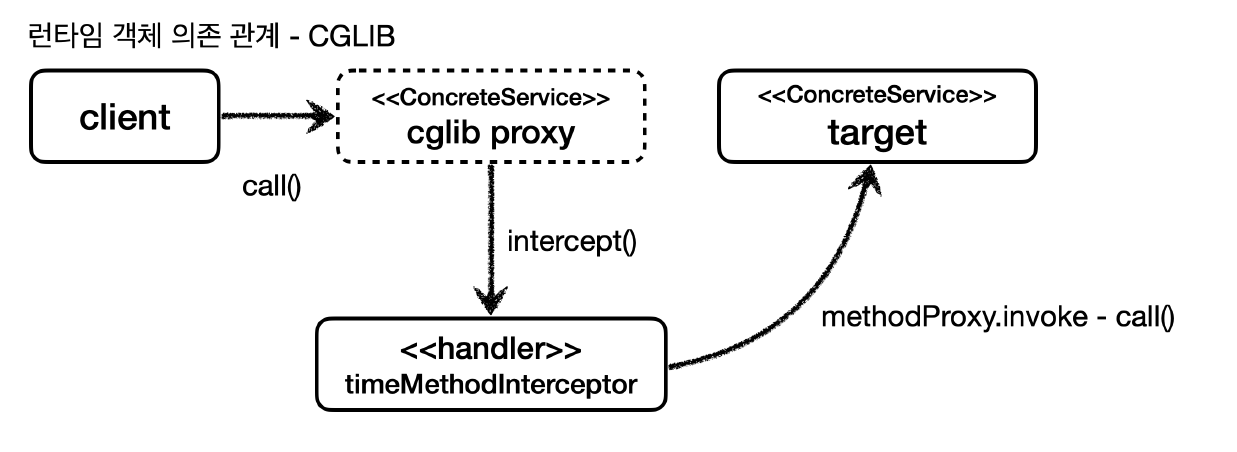
public class TimeMethodInterceptor implements MethodInterceptor {
private final Object target;
public TimeMethodInterceptor(Object target) {
this.target = target;
}
@Override
public Object intercept(Object obj, Method method, Object[] args, MethodProxy methodProxy) throws Throwable {
log.info("TimeProxy 실행");
long startTime = System.currentTimeMillis();
Object result = methodProxy.invoke(target, args);
long endTime = System.currentTimeMillis();
long resultTime = endTime - startTime;
log.info("timeProxy 종료 resultTIme={}", resultTime);
return result;
}
}
@Test
void cglib(){
ConcreteService target = new ConcreteService();
Enhancer enhancer = new Enhancer();
enhancer.setSuperclass(ConcreteService.class);
enhancer.setCallback(new TimeMethodInterceptor(target));
ConcreteService proxy = (ConcreteService) enhancer.create();
log.info("targetClass={}", target.getClass());
log.info("proxyClass={}", proxy.getClass());
}
7. 프록시 팩토리
- JDK, CGLIB를 동적으로 적용
- 프록시가 제공하는 기능을 Advice라고 한다
- Advice를 통해 호출하면 된다
- Advice로 target을 호출한다
- 조건에 맞을때만 프록시 로직을 적용
- 프록시 만드는건 프록시 팩토리
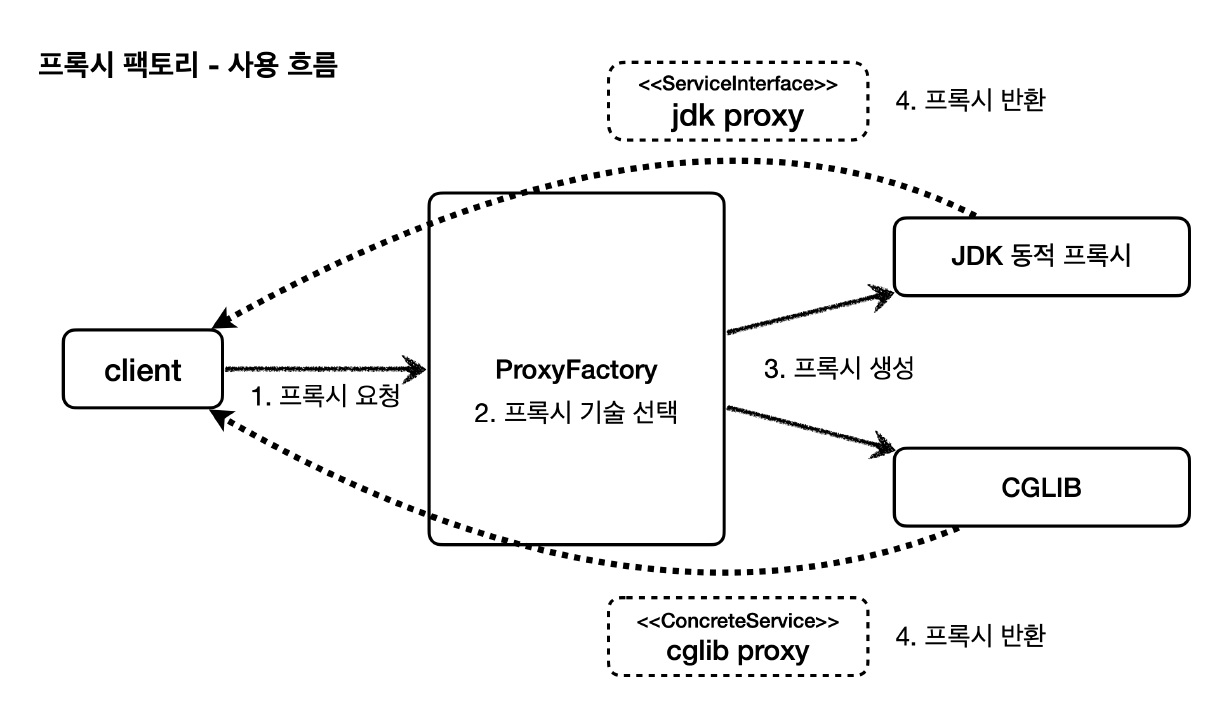
- 부가기능 적용은 Advice
스프링 기본 설정
- 스프링은 기본적으로
proxyTargetClass=true로 설정해서 사용한다
- 따라서 인터페이스가 있어도 항상 CGLIB를 사용해서 구체클래스 기반으로 프록시를 생성한다
@Slf4j
public class TimeAdvice implements MethodInterceptor {
@Override
public Object invoke(MethodInvocation invocation) throws Throwable {
log.info("TimeProxy 실행");
long startTime = System.currentTimeMillis();
Object result = invocation.proceed();
long endTime = System.currentTimeMillis();
log.info("TimeProxy 종료 resultTime={}", endTime - startTime);
return result;
}
}
@Slf4j
public class ProxyFactoryTest {
@Test
@DisplayName("인터페이스가 있으면 JDK 동적 프록시 사용")
void interfaceProxy() throws Exception {
ServiceInterface target = new ServiceImpl();
ProxyFactory proxyFactory = new ProxyFactory(target);
proxyFactory.addAdvice(new TimeAdvice());
proxyFactory.setProxyTargetClass(true);
ServiceInterface proxy = (ServiceInterface) proxyFactory.getProxy();
log.info("targetClass={}", target.getClass());
log.info("proxyClass={}", proxy.getClass());
proxy.save();
assertThat(AopUtils.isAopProxy(proxy)).isTrue();
assertThat(AopUtils.isJdkDynamicProxy(proxy)).isTrue();
assertThat(AopUtils.isCglibProxy(proxy)).isFalse();
}
}
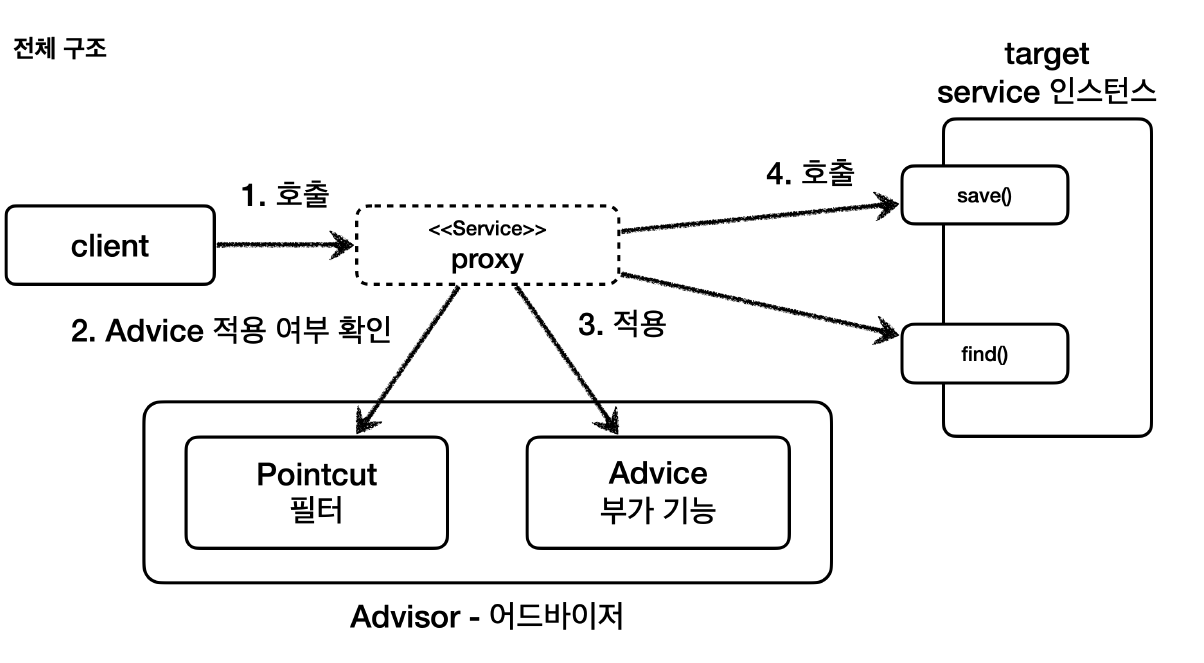
1). 포인트컷, 어드바이스, 어드바이저
- 포인트컷
- 어디에 부가 기능을 적용할지, 적용하지 않을지 판단하는 필터링 로직
- 대상 여부를 확인하는 필터 역할만 담당한다
- 어드바이스
- 프록시가 호출하는 부가 기능
- 부가 기능 로직만 담당한다
- 어드바이저
정리
- 조언(
Advice)를 어디(PointCut)에 할것인가
- 조언자(
Advisor)는 어디(PointCut)에 조언(Advice)을 해야할지 알고 있다
- 프록시에 맞춰서 적었다. AOP랑은 조금 다름
2). 직접 만든 포인트컷
public class AdvisorTest {
@Test
void advisorTest1(){
ServiceImpl target = new ServiceImpl();
ProxyFactory proxyFactory = new ProxyFactory(target);
DefaultPointcutAdvisor advisor = new DefaultPointcutAdvisor(Pointcut.TRUE, new TimeAdvice());
proxyFactory.addAdvisor(advisor);
ServiceInterface proxy = (ServiceInterface) proxyFactory.getProxy();
proxy.save();
proxy.find();
}
@Test
@DisplayName("직접 만든 포인트컷")
void advisorTest2(){
ServiceImpl target = new ServiceImpl();
ProxyFactory proxyFactory = new ProxyFactory(target);
DefaultPointcutAdvisor advisor = new DefaultPointcutAdvisor(new MyPointCut(), new TimeAdvice());
proxyFactory.addAdvisor(advisor);
ServiceInterface proxy = (ServiceInterface) proxyFactory.getProxy();
proxy.save();
proxy.find();
}
static class MyPointCut implements Pointcut{
@Override
public ClassFilter getClassFilter() {
return ClassFilter.TRUE;
}
@Override
public MethodMatcher getMethodMatcher() {
return new MyMethodMatcher();
}
}
@Slf4j
static class MyMethodMatcher implements MethodMatcher{
private String matchName = "save";
@Override
public boolean matches(Method method, Class<?> targetClass) {
boolean result = method.getName().equals(matchName);
log.info("포인트컷 호출 method={} targetClass={}", method.getName(), targetClass);
log.info("포인트컷 결과 result={}",result);
return result;
}
@Override
public boolean isRuntime() {
return false;
}
@Override
public boolean matches(Method method, Class<?> targetClass, Object... args) {
return false;
}
}
}
3). 스프링에서 제공하는 포인트컷
- NameMatchMethodPointCut
- 메서드 기반 매칭
- PatternMatchUtils를 사용한다. *사용 가능
- JdkRegexpMethodPointcut
- TruePointcut
- AnnotationMatchingPointcut
- AspectJExpressionPointcut
@Test
@DisplayName("스프링에서 제공하는 포인트컷")
void advisorTest3(){
ServiceImpl target = new ServiceImpl();
ProxyFactory proxyFactory = new ProxyFactory(target);
NameMatchMethodPointcut pointcut = new NameMatchMethodPointcut();
pointcut.setMappedNames("save");
DefaultPointcutAdvisor advisor = new DefaultPointcutAdvisor(pointcut, new TimeAdvice());
proxyFactory.addAdvisor(advisor);
ServiceInterface proxy = (ServiceInterface) proxyFactory.getProxy();
proxy.save();
proxy.find();
}
