서론
스프링 시큐리티는 기본적으로 JSON 기반 로그인을 지원하지 않는다. 기본으로 제공하는 FormLogin 기능은 application/json 대신 application/x-www-form-urlencoded 컨텐츠 타입의 username, password를 받아서 인증을 수행하기 때문이다. 그래서 기존에 진행하던 프로젝트에서는 대개 /login, /logout 엔드포인트를 열어두고 JSON 요청을 받을 수 있는 REST컨트롤러에서 직접 인증, 로그아웃, 세션 처리 등을 수행하였다.
그렇지만 요즘 새로 개인 프로젝트도 시작해보면서 스프링 부트 버전을 3.x 버전대로 올렸는데 그에 따라 스프링 시큐리티 버전도 6.x 버전대로 같이 올라갔고 그러면서 스프링 시큐리티의 핵심인 필터 체인을 제대로 활용하지 못하고 있는 것 같아 이번엔 다른 방식으로 로그인, 로그아웃을 구현해보았다.
본론
인증 방식은 구현하기 나름이지만 나는 이미 DAO 기반 인증(DaoAuthenticationProvider)을 수행하기 위해 별도로 UserDetailsService, PasswordEncoder 등의 Bean을 등록해두었다. 여기서는 인증을 어떻게 넘기는지 즉 스프링 시큐리티의 구조로 말하자면 AuthenticationManager의 관점에서 보도록 하겠다.
JSON 요청을 읽을 수 있는 필터
필터 이름은 짓기 나름이지만 나는 JsonUsernamePasswordAuthenticationFilter 라고 생성하였다. 일단 코드는 다음과 같다.
class JsonUsernamePasswordAuthenticationFilter(
    authenticationManager: AuthenticationManager, // (1)
) : AbstractAuthenticationProcessingFilter(
        AntPathRequestMatcher("/login", "POST", true), // (2)
        authenticationManager,
    ) {
    init {
        setAuthenticationSuccessHandler(JsonLoginSuccessHandler()) // (3)
        setSecurityContextRepository(HttpSessionSecurityContextRepository()) // (4)
    }

    override fun attemptAuthentication(
        request: HttpServletRequest?,
        response: HttpServletResponse?,
    ): Authentication {
        val authRequest = // (5)
            request?.reader.let {
                val loginRequest = jsonReader.readValue(it, AuthRequest::class.java)
                val username = loginRequest.username
                val password = loginRequest.password
                UsernamePasswordAuthenticationToken(username, password)
            }
        return authenticationManager.authenticate(authRequest) // (6)
    }

    private val jsonReader = ObjectMapper().registerKotlinModule()
}- 실제로 필터에서 인증을 수행하려면 스프링 시큐리티의
AuthenticationManager가 필요하기 때문에 설정 파일에서 주입할 수 있도록 생성자에 의존성을 등록한다.
그럼 원래 있던 UsernamePasswordAuthenticationFilter는 어떻게 이걸 주입받지 않고도 동작하는지 의아할 수 있는데 스프링 시큐리티에서 FormLogin 기능을 활성화할 시 동작하는 FormLoginConfigurer, 정확히는 그 위의 AbstractAuthenticationFilterConfigurer에서 이를 setter를 통해 주입하고 있는 것을 볼 수 있다.
this.authFilter.setAuthenticationManager(http.getSharedObject(AuthenticationManager.class));
this.authFilter.setAuthenticationSuccessHandler(this.successHandler);
this.authFilter.setAuthenticationFailureHandler(this.failureHandler);
그래서 원래는 이번에 추가하는 필터도 이렇게 Configurer를 만들어 보고 싶었지만 Customizer 등 프레임워크 내부의 수많은 제너릭스를 뚫고 구현해야 할 코드가 많았다. 그리고 일단은 AuthenticationManager만 주입받으면 끝나는 문제였기 때문에 제일 빠르게 구현할 수 있는 방법인 의존성 주입을 택했다.
- 기존 로그인 요청과 동일하게 POST
/login요청만 받을 수 있도록 Ant matcher를 설정했다.
안 그런 경우도 있겠지만 지금까지 해왔던 프로젝트도, 지금 하는 프로젝트도 둘 다 서버에서 직접 로그인 페이지를 제공하지 않고 JSON 요청을 받아서 인증을 수행하기 때문에 UsernamePasswordAuthenticationFilter가 등록되지 않는다. 대신 동일한 위치에 이 JsonUsernamePasswordAuthenticationFilter를 등록하였다.
- 인증이 완료된 후 별도의 페이지로 이동하지 않고 마찬가지로 JSON으로 인증완료 응답을 주기 위해 별도의 핸들러를 등록하였다.
이 부분은 평소처럼 FormLogin을 비활성화하고 AuthController처럼 스프링 내부의 컨트롤러까지 가서 인증하는 방식에서는 볼 수 없는 문제였다. 왜냐면 지금 이 방식은 스프링 시큐리티의 필터 단에서만 일어나는 일이기 때문이다. 만약 저렇게 핸들러를 오버라이드하지 않고 그냥 인증하면 어떻게 될까?
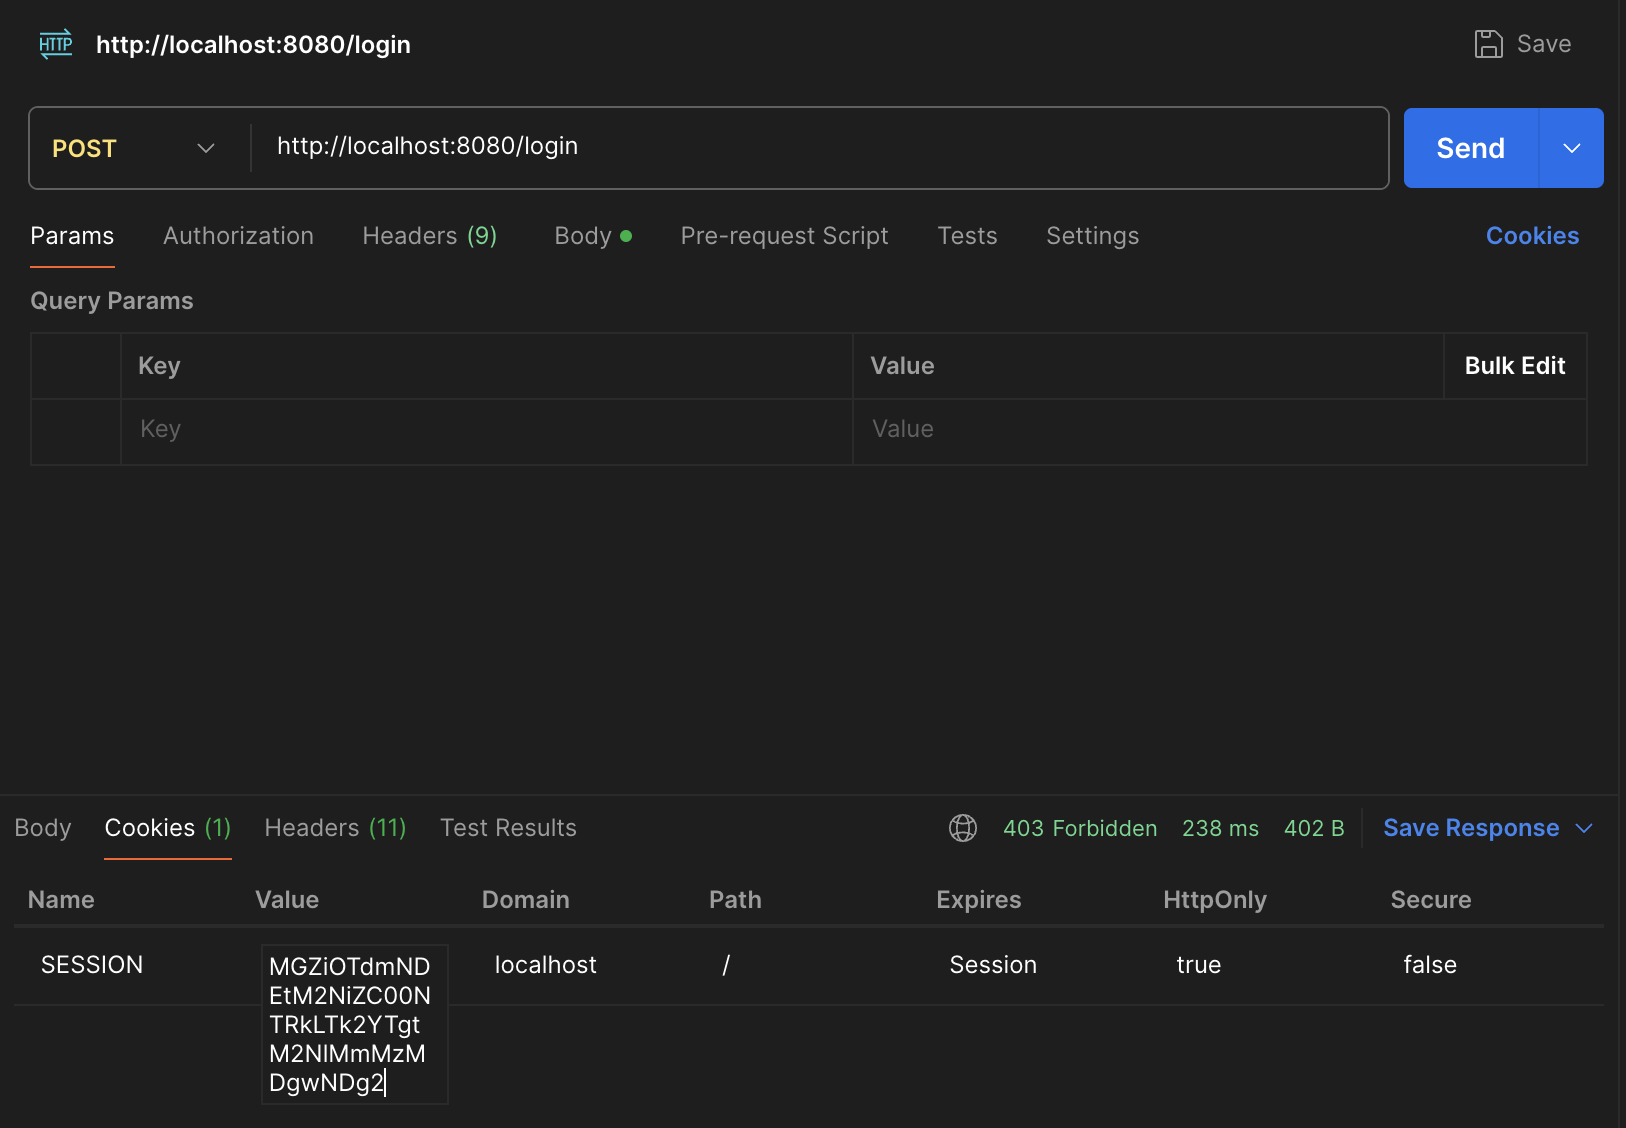
위의 사진에서 볼 수 있듯이 실제로 인증이 성공해서 세션쿠키가 생성되었지만 응답은 403이 돌아온 것을 볼 수 있다. 401로 Unauthorized가 떨어진 것도 아니고 403이라니? 아무런 API도 요청하지 않았는데? 그래서 여기서 한참 헤맸지만 스프링 시큐리티 로그 레벨을 좀 더 낮춘 결과 다음과 같은 리다이렉트가 존재하는 것을 알 수 있었다.
o.s.security.web.FilterChainProxy        : Invoking JsonUsernamePasswordAuthenticationFilter (6/11)
o.s.s.authentication.ProviderManager     : Authenticating request with DaoAuthenticationProvider (1/1)
o.s.s.a.dao.DaoAuthenticationProvider    : Authenticated user
o.s.s.web.DefaultRedirectStrategy        : Redirecting to /
1, 2번째 로그는 TRACE고 3, 4번째 로그는 DEBUG다. 여기서는 실제로 우리가 생성한 필터가 스프링 시큐리티 필터 체인에 잘 등록됐고 DAO 인증까지 성공한 것을 볼 수 있다. 그런데 맨 마지막에 갑자기 왜 루트 경로로 리다이렉트하는 걸까? 이는 우리가 생성한 필터의 부모 클래스인 AbstractAuthenticationProcessingFilter에서 SavedRequestAwareAuthenticationSuccessHandler라는 핸들러를 사용하고 있기 때문이다.
@Override
public void onAuthenticationSuccess(...) {
	SavedRequest savedRequest = this.requestCache.getRequest(request, response);
	if (savedRequest == null) {
		super.onAuthenticationSuccess(request, response, authentication);
		return;
	}

    // (중략)

	String targetUrl = savedRequest.getRedirectUrl();
	getRedirectStrategy().sendRedirect(request, response, targetUrl);
}
스프링 시큐리티에는 RequestCache라는 개념이 있다. 대부분의 웹 애플리케이션이 그렇듯이 사용자가 특정 리소스에 접근하려고 했지만 권한 부족으로 인가되지 않은 경우 사용자는 로그인같은 인증 화면으로 이동하도록 되어있다. 이 때 로그인이 성공했다면 다시 원래 접근하려고 했던 리소스로 이동할 수 있도록 스프링 시큐리티에서 세션에 저장해두는 기능인데 이 핸들러가 그걸 꺼내와서 리다이렉트해주는 것이다.
지금같은 상황에서는 그냥 API만 요청해서 접근했기 때문에 이전에 접근하려던 리소스가 없어서 그런지 최상위 경로로 이동하려는 모습이다. 어쨌든 이건 현재 상황에서 필요하지도 않고 리다이렉트 자체를 원하는 기능도 아니기 때문에 별도의 핸들러를 다음처럼 작성할 수 있다.
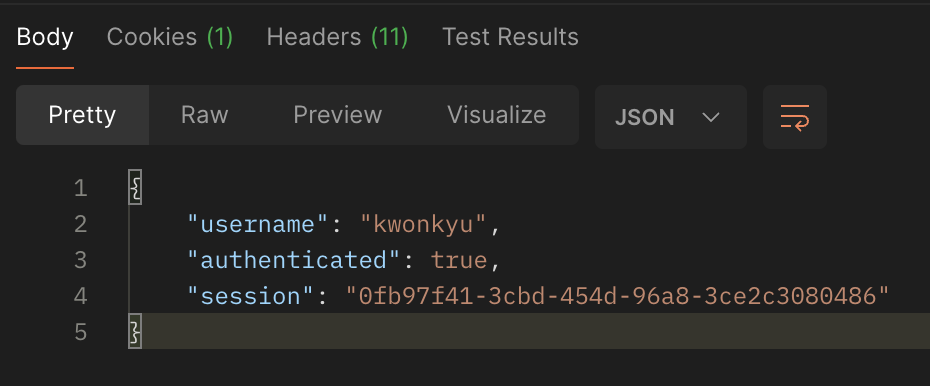
class JsonLoginSuccessHandler : AuthenticationSuccessHandler {
    private val converter: HttpMessageConverter<Any> = MappingJackson2HttpMessageConverter()

    override fun onAuthenticationSuccess(
        request: HttpServletRequest,
        response: HttpServletResponse,
        authentication: Authentication,
    ) {
        converter.write(
            AuthenticationSuccess(
                username = authentication.name,
                authenticated = authentication.isAuthenticated,
                session = request.session.id,
            ),
            MediaType.APPLICATION_JSON,
            ServletServerHttpResponse(response),
        )
    }

    class AuthenticationSuccess(
        val username: String,
        val authenticated: Boolean,
        val session: String,
    )
}
위 코드는 HttpMessageConverterAuthenticationSuccessHandler라는 기존에 비슷한 용도로 존재하던 핸들러를 반환 타입만 바꾸기 위해 복사해서 살짝 바꾼 것이다. 이걸 필터에서 인증성공 핸들러로 등록한 경우 더 이상 리다이렉트되지 않고 onAuthenticationSuccess가 보낸 JSON 응답이 돌아오는 것을 볼 수 있다.
- 스프링 시큐리티 컨텍스트를 세션에 저장할 수 있도록 리포지토리를 지정한다.
따로 언급하진 않았지만 세션 관리를 위해 Spring Session 기능을 사용하고 있으며 Redis에 세션 정보를 저장하고 있다. 이때 이렇게 HttpSessionSecurityContextRepository를 SecurityContextRepository로 등록해주지 않으면 이 커스텀 필터에서 세션에 시큐리티 컨텍스트를 저장하지 못하기 때문에 추후 인증된 세션 토큰으로 요청을 전달해도 필터에서 컨텍스트를 복구할 수 없어 403 에러가 발생한다.
이건 갑자기 만나서 당황스러운 에러였는데 프로젝트 구성 초기에는 별다른 계정 권한이 없어서 인증만 신경썼지 인가는 고려하지 않았기 때문이다. 다행히 시큐리티 로그를 쭉 읽어본 결과...
- 시큐리티 컨텍스트를 불러오는 필터에서 컨텍스트를 불러오지 못함(Did not find SecurityContext in HttpSession ... using the SPRING_SECURITY_CONTEXT session attribute)
- 세션 정보가 저장되는 Redis에 접속해서 value 값을 확인한 결과 SPRING_SECURITY_CONTEXT가 존재하지 않음
- 스프링 시큐리티 6에서 새로 등장한
SecurityContextHolderFilter가SecurityContextRepository를 이용하여 컨텍스트를 불러오는 것을 확인 - 이 리포지토리는 SessionManagementConfigurer가 만든
HttpSessionSecurityContextRepository로 설정 클래스에서 관련 필터에 주입된다.
그래서 만약 FormLogin 기능이 활성화되어있다면 UsernamePasswordAuthenticationFilter 상위의 AbstractAuthenticationFilterConfigurer에서는 이 리포지토리를 불러와서 하위의 필터에 자동으로 주입해준다.

그렇지만 우리가 하는 JSON 로그인은 딱히 Configurer 클래스가 등록된 게 아니라서 직접 세션에서 컨텍스트를 가져오는 HttpSessionSecurityContextRepository를 넣어줘야 하는 것이다.
다행히 스프링 시큐리티 필터 클래스의 주석에는 어떤 Shared Object(AuthenticationManager, SecurityContextRepository 등 시큐리티 필터 체인 전반적으로 공유되는 객체들)을 만들고 사용하는지 자세히 적혀있기 때문에 효율적으로 탐색할 수 있었다.
- 서블릿 요청에서 바디값을 읽어서 객체로 구성(역직렬화)한 후 토큰을 생성한다.
이 부분도 UsernamePasswordAuthenticationFilter에서 하는 것과 비슷하게 요청 서블릿에서 필요한 값을 읽어와서 AuthenticationManager에 넘기기 위한 토큰을 생성한다. 이때 스프링에 내장된 Jackson2 ObjectMapper를 사용하고 있으며 AuthRequest 클래스는 별도로 정의되어 있다.
- 이제
authenticationManager를 참조하여 인증을 수행한다.
인증 방식은 하기 나름이지만 보통 아이디, 비밀번호 기반의 DaoAuthenticationProvider를 많이 사용하고 이 포스트에서도 해당 Bean 객체가 미리 등록되어 있다고 가정하고 진행한다.
HttpSecurity 설정
이렇게 만든 필터를 실제로 스프링 시큐리티 필터 체인에 등록하려면 다음처럼 구성할 수 있다.
@Configuration
@EnableWebSecurity
class WebSecurityConfiguration {
    @Bean
    fun securityFilterChain( // (1)
        http: HttpSecurity,
        authenticationManager: AuthenticationManager, // (2)
    ): SecurityFilterChain =
        http
            .csrf { it.disable() } // (3)
            .authorizeHttpRequests {
                it.requestMatchers("/actuator/**").permitAll()
                it.anyRequest().authenticated()
            }.logout {
                it.permitAll()
                it.logoutSuccessHandler(
                    HttpStatusReturningLogoutSuccessHandler(HttpStatus.OK) // (4)
                )
            }.addFilterBefore( // (5)
                JsonUsernamePasswordAuthenticationFilter(authenticationManager),
                UsernamePasswordAuthenticationFilter::class.java,
            ).build()

    @Bean
    fun authenticationManager(authenticationConfiguration: AuthenticationConfiguration): AuthenticationManager =
        authenticationConfiguration.authenticationManager

    // (후략)
}SecurityFilterChain자체를 Bean 객체로 등록하면서 시큐리티 설정을 추가할 수 있다.
스프링 시큐리티 6으로 넘어오면서 뭔가 기존의 빌더 패턴보다 DSL를 많이 활용하려는 모습이다.
- 이전에 언급한
AuthenticationManager를 필터에 넣어주기 위해 의존성으로 추가하였다.
실제 구현체는 아래 authenticationManager(...) 메서드에서 얻어올 수 있다. 사실 처음에는 당연히 Bean으로 등록되어있을 줄 알았는데 시큐리티 내부 아키텍처라 그런지 따로 노출되어 있지 않아서 의아했다.
-
CSRF 방어 로직은 필요하지 않기 때문에 비활성화한다.
-
로그아웃 성공 시 별도 응답을 주지 않고 HTTP 상태값만 설정할 수 있도록 커스텀한다.
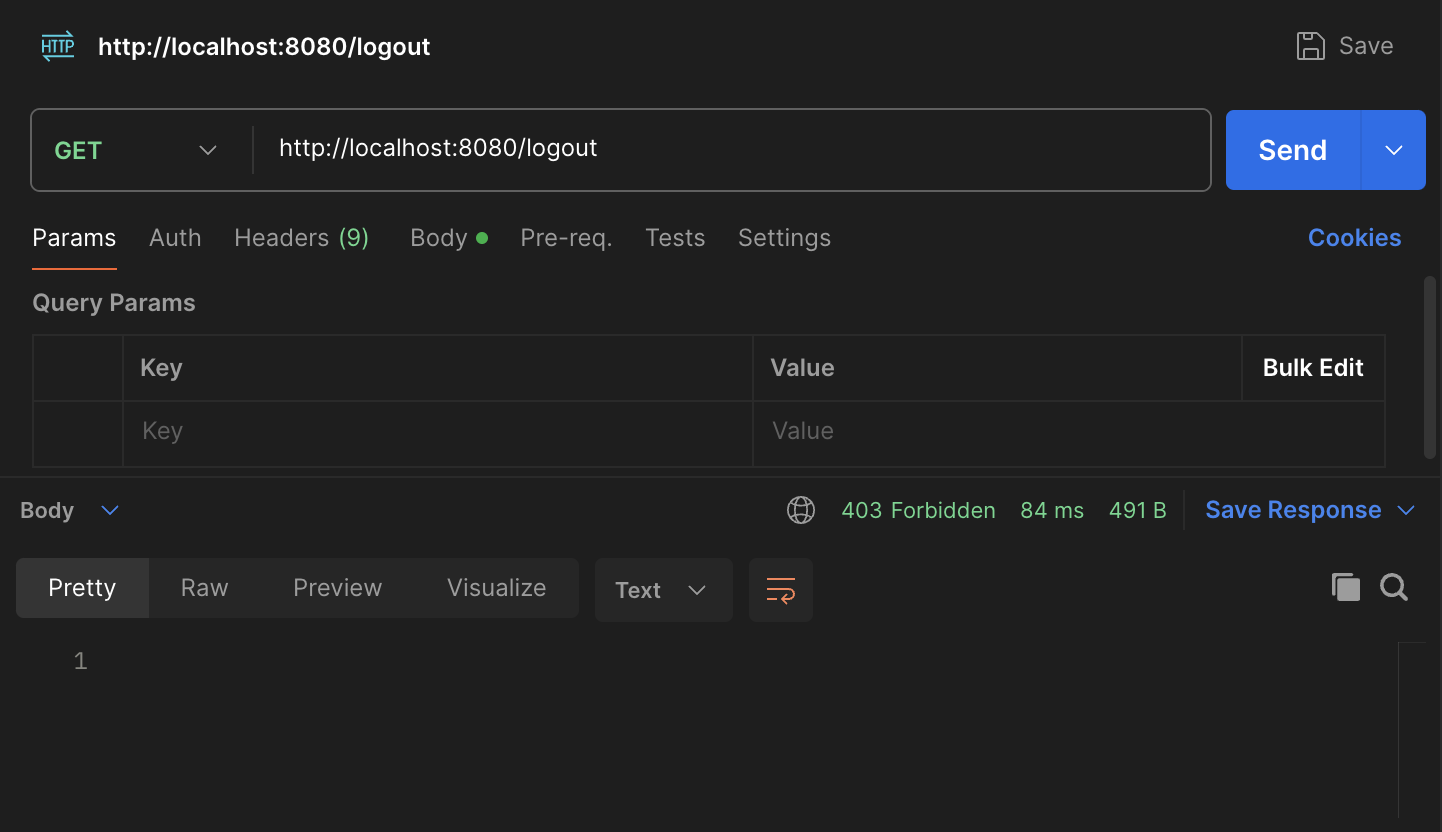
또 지긋지긋한 403이다. 긴말 할 필요없이 LogoutConfigurer를 보면 된다.
public LogoutSuccessHandler getLogoutSuccessHandler() {
	LogoutSuccessHandler handler = this.logoutSuccessHandler;
	if (handler == null) {
		handler = createDefaultSuccessHandler();
		this.logoutSuccessHandler = handler;
	}
	return handler;
}

private LogoutSuccessHandler createDefaultSuccessHandler() {
	SimpleUrlLogoutSuccessHandler urlLogoutHandler = new SimpleUrlLogoutSuccessHandler();
	urlLogoutHandler.setDefaultTargetUrl(this.logoutSuccessUrl);
	if (this.defaultLogoutSuccessHandlerMappings.isEmpty()) {
		return urlLogoutHandler;
	}
	DelegatingLogoutSuccessHandler successHandler = new DelegatingLogoutSuccessHandler(
			this.defaultLogoutSuccessHandlerMappings);
	successHandler.setDefaultLogoutSuccessHandler(urlLogoutHandler);
	return successHandler;
}
로그아웃 핸들러는 기존에 따로 등록된 게 없을 경우 createDefaultSuccessHandler를 통해 SimpleUrlLogoutSuccessHandler를 생성하며 이는 내부적으로 AbstractAuthenticationTargetUrlRequestHandler로 작업을 위임한다. 그리고 이 핸들러에서는 놀랍지 않게도 다음처럼 리다이렉트를(또!) 하고 있다.
protected void handle(...) {
	String targetUrl = determineTargetUrl(request, response, authentication);
	// (중략)
	this.redirectStrategy.sendRedirect(request, response, targetUrl);
}determineTargetUrl은 HTTP 레퍼러 헤더를 참고하거나 최상위 경로로 지정된다. 그리고 이 경우에도 마찬가지로 해당 리소스에 접근할 경로가 없기 때문에 필터의 로그인 성공 핸들러를 커스텀했던 것처럼 로그아웃 성공 핸들러도 커스텀해준다. 이 때는 별도로 핸들러를 만들지 않고 기존에 등록된 HttpStatusReturningLogoutSuccessHandler를 사용했다.
이 필터는 이름에서 볼 수 있듯이 HTTP 상태만 반환하는 간단한 핸들러로 별다른 응답이 필요하지 않은 로그아웃에 적절한 객체인데 Basic 인증 방식에서 사용하는 로그아웃 핸들러로 등록되어 있다.
- 실제로 필터를
UsernamePasswordAuthenticationFilter이전에 추가한다.
지금 로직상으로는 UsernamePasswordAuthenticationFilter를 사용하지 않기 때문에 없는 필터에 대해서도 어떻게 이전, 이후에 추가할 수 있는 건가 싶었는데 HttpSecurity 내부에서 사용하는 FilterOrderRegistration이 스프링 시큐리티의 필터들을 하나하나 추가하고 있었다. 필터들이 상수 고정값을 가진 건 아니고 별도의 Step 기반 가산기를 사용하며 100 단위로 추가하고 있기 때문에 우리가 어떤 필터의 전이나 후에 필터를 추가하면 해당 필터의 순서값에서 1을 빼거나 더하면서 필터의 순서를 산정하는 것이다.
결론
좀 헤매긴 했지만 생각보다 간단하게 JSON 요청을 주고받을 수 있는 인증 기능을 추가할 수 있었다. 뭔가 Customizer, Configurer를 잘 등록하면 커스텀 필터, 핸들러를 쉽게 등록할 수 있을 것 같은데 아직까지는 잘 감이 잡히지 않는다. 이건 추후 목표로 남겨둬도 괜찮을 것 같다. 잘 되면 라이브러리가 될 수 있을지도?
이렇게 하는거랑 맨 처음에 언급했던 것처럼 로그인, 로그아웃 URL을 무조건 허용하고 컨트롤러에서 서비스를 활용해서 인증하는 방법이랑 드라마틱한 차이는 없다. 하지만...
- 불필요하게 인증 컨트롤러를 추가하지 않아도 된다.
- 애플리케이션 내부 서비스에서 AuthenticationManager를 의존하지 않아도 된다.
2.1. 이건 지금 프로젝트가 육각형 아키텍처를 적용하면서 의존성을 분리하고 있기 때문에 더 와닿는 것 같다. - 로그인, 로그아웃 후 직접 HttpSession, SecurityContextHolder을 관리하는 수고를 덜 수 있다.
- 스프링 시큐리티에 좀 더 심리스하게 녹아들 수 있다.
'심리스하게' 이거는 코파일럿이 해준 말이긴 하다. 어쨌든 우리가 직접 AuthenticationManager를 불러서 인증 토큰을 넘기고 인증이 성공하면 SecurityContextHolder에 Authentication 객체를 넣어주고 하면서 이미 프레임워크가 해주고 있는 기능을 다시 구현하던 것보다는 좀 더 스프링스럽게 기능을 추가할 수 있었으니 개인적으로는 만족스럽다.