1) RecyclerView 관련 implementation
 implementation "androidx.recyclerview:recyclerview:1.1.0"
 implementation "androidx.recyclerview:recyclerview-selection:1.1.0-rc03"
2) RecyclerView 기본 절차

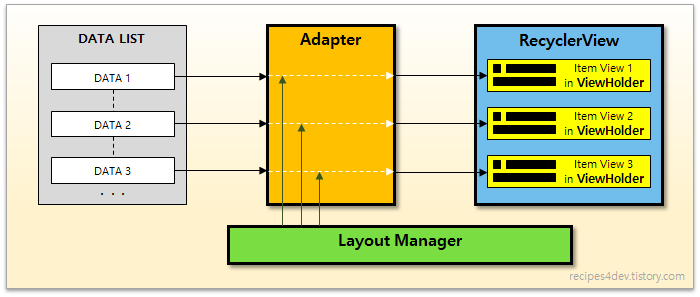
3) RecyclerView 구성요소
1.안에 들어갈 Item 만들기
데이터 Class와 안에 들어갈 아이템의 레이아웃 파일을 만든다.
student.class
package com.lg.pratice;

public class Student {

    private String name;
    private int grade;

    public Student(String name, int grade) {
        this.name = name;
        this.grade = grade;
    }

    public String getName() {
        return name;
    }

    public void setName(String name) {
        this.name = name;
    }

    public int getGrade() {
        return grade;
    }

    public void setGrade(int grade) {
        this.grade = grade;
    }
}
student.xml
<?xml version="1.0" encoding="utf-8"?>
<LinearLayout
    xmlns:android="http://schemas.android.com/apk/res/android" android:layout_width="match_parent"
    android:layout_height="match_parent"
    android:orientation="horizontal"
    android:padding="40dp"
    android:gravity="center">

    <TextView
        android:layout_width="wrap_content"
        android:layout_height="wrap_content"
        android:text="이름"
        android:textSize="30dp"
        android:textStyle="bold"
        android:layout_marginRight="100dp"
        android:layout_marginLeft="30dp"

        ></TextView>


    <TextView
        android:layout_width="wrap_content"
        android:layout_height="wrap_content"
        android:text="학년"
        android:textSize="30dp"
        android:textStyle="bold"

        ></TextView>

</LinearLayout>
main.xml
<?xml version="1.0" encoding="utf-8"?>
<LinearLayout xmlns:android="http://schemas.android.com/apk/res/android"
    xmlns:app="http://schemas.android.com/apk/res-auto"
    xmlns:tools="http://schemas.android.com/tools"
    android:layout_width="match_parent"
    android:layout_height="match_parent"
    tools:context=".MainActivity"
    android:orientation="vertical"
    android:gravity="center">

    <Button
        android:text="정보 입력"
        android:layout_width="wrap_content"
        android:layout_height="wrap_content"
        >

    </Button>
    <Button
        android:text="정보 출력"
        android:layout_width="wrap_content"
        android:layout_height="wrap_content"
        >

    </Button>

    <Button
        android:text="프로그램 종료"
        android:layout_width="wrap_content"
        android:layout_height="wrap_content"
        >

    </Button>

    <androidx.recyclerview.widget.RecyclerView
        android:layout_width="wrap_content"
        android:layout_height="wrap_content"
        android:id="@+id/recyclerView"
        >

    </androidx.recyclerview.widget.RecyclerView>


</LinearLayout>
어댑터를 만든다.
StudentAdapter
package com.lg.pratice;

import android.content.Context;
import android.view.LayoutInflater;
import android.view.View;
import android.view.ViewGroup;
import android.widget.TextView;

import androidx.annotation.NonNull;
import androidx.recyclerview.widget.RecyclerView;

import org.w3c.dom.Text;

import java.util.ArrayList;

public class StudentAdapter extends RecyclerView.Adapter<StudentAdapter.ViewHolder> { //리사이클.어탭터 클래스 상속받는다.

    private ArrayList<Student> mList = null; //학생 목록을 받아올 리스트 선언

    // 아이템 뷰를 저장하는 뷰 홀더 클래스
    public class ViewHolder extends RecyclerView.ViewHolder {

        TextView name;
        TextView grade;
        public ViewHolder(@NonNull View itemView) {
            super(itemView);

            name = itemView.findViewById(R.id.name);
            grade = itemView.findViewById(R.id.grade);
        }
    }

    StudentAdapter(ArrayList<Student> list) { //클래의 생성자를 만든다. 인자는 아이템 리스트를 받는다.
        mList = list;
    }

    @NonNull
    @Override

    // 아이템 뷰를 위한 뷰홀더 객체 생성하여 리턴.
    public StudentAdapter.ViewHolder onCreateViewHolder(@NonNull ViewGroup parent, int viewType) {
        Context context = parent.getContext();
        LayoutInflater inflater = (LayoutInflater) context.getSystemService(Context.LAYOUT_INFLATER_SERVICE);

        View view = inflater.inflate(R.layout.student,parent,false);
        StudentAdapter.ViewHolder vh = new StudentAdapter.ViewHolder(view);
        return vh;
    }


    @Override    //position에 해당하는 데이터를 뷰홀더의 아이템뷰에 표시
    public void onBindViewHolder(@NonNull StudentAdapter.ViewHolder holder, int position) {
        String name =mList.get(position).getName();
        int grade = mList.get(position).getGrade();
        holder.name.setText(name);
        holder.grade.setText(grade);
    }

    @Override
    public int getItemCount() {
        return mList.size();
    }
}
메인에서 리사이클뷰와 어댑터,레이아웃 매니저 연결하기
    @Override
    protected void onCreate(Bundle savedInstanceState) {
        super.onCreate(savedInstanceState);
        setContentView(R.layout.activity_print);
        Student student = new Student();
        student.list.add(new Student("홍길동",1));
        student.list.add(new Student("조조",2));

        RecyclerView recyclerView = findViewById(R.id.recyclerView); //리사이클러뷰 불러오기
        recyclerView.setLayoutManager(new LinearLayoutManager(this)); //리사이클러뷰에 레이아웃 매니저 연결

        StudentAdapter studentAdapter = new StudentAdapter(student.list);//어탭터 불러오기
        recyclerView.setAdapter(studentAdapter); //어뎁터 연결해주기
    }
}

자바 공부중