의존성 주입(Dependency Injection)
- Dependency Injection(DI)
- IoC의 패턴 중에 하나
- Object간의 의존성을 낮춘다.
- 외부에서 객체를 생성하고 전달한다.
Dependency Inversion Principle
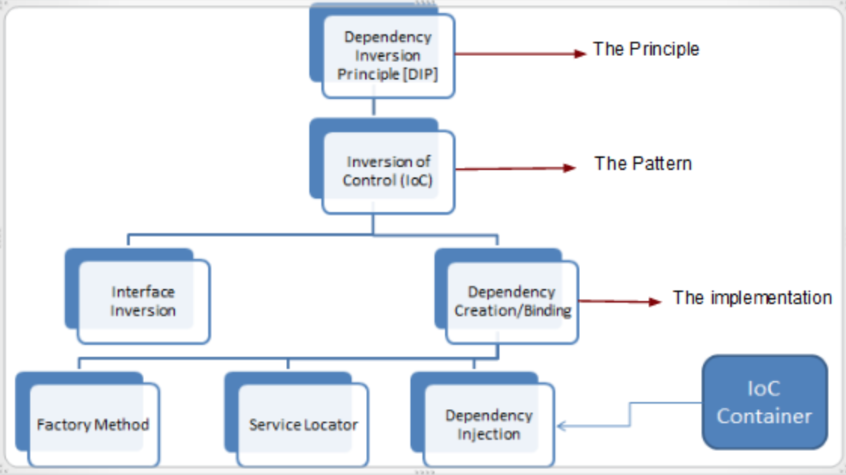
- 상위 모듈이 하위 모듈에 의존관계를 가지지 않도록 구현해야 한다.
- 추상클래스는 그 구현체의 내용에 의존관계를 가지지 않는다.
- 구현체가 추상클래스에 의존관계를 가질 수 있다.
Factory Method 패턴
문제
- 사용자에게 다양한 문서를 읽어서 객체로 결과를 반환하는 프레임워크를 개발해야 한다.
- Application 클래스와 Document 클래스로 추상화할 수 있는데, 이 두 클래스는 모두 추상 클래스이고 이 클래스들을 상속해서 문서의 종류에 따른 대응을 할 수 있다.
- Application 클래스는 언제 Document 클래스를 생성하고 사용해야 하는지는 알 수 있지만 프레임워크에서 구체적으로 어떤 문서를 처리할 Document를 생성해야 하는지는 결정할 수 없다.
해법
- Document의 서브클래스 중 어느 클래스를 생성하는지는 Application 클래스의 서브클래스가 결정하도록 설계한다.
- Application 클래스의 서브 클래스는 추상화된 createDocument() 메서드를 정의하여 적당한 Document 클래스의 서브클래스를 반환하도록 한다.
- createDocument() 메서드를 factory method라고 부른다.
public abstract class Application {
    public void openDocument() {
        // do something
        Document document = createDocument();
        document.open();
        // do something
    }

    // 구현 객체가 runtime 에 결정된다.(Dependency Injection)
    protected abstract Document createDocument();
}
public abstract class Document {
public abstract void open();
}public class CsvApplication extends Application {
@Override
protected Document createDocument() {
return new CsvDocument();
}
}public class CsvDocument extends Document {
@Override
public void open() {
System.out.println("csvDocument opened");
}
}public class Main {
public static void main(String[] args) {
Application csvApplication = new CsvApplication();
csvApplication.openDocument();
Application jsonApplication = new JsonApplication();
jsonApplication.openDocument();
}
}결과
- 구체적인 클래스(CsvDocument)가 추상클래스(Application)에 종속되지 않도록 구현할 수 있다.
스프링 프레임워크 DI를 사용하면 Application 클래스와 같이 사용할 클래스의 구현체를 확정하지 않는 업무코드를 작성할 수 있다.
Dependency Injection
-
DI 정의
프로그래밍에서 구성 요소간의 의존관계가 소스코드 내부가 아닌 외부의 설정파일 등을 통해 정의되게 하는 디자인 패턴 중의 하나
-
DI는 디자인 패턴이다. 핵심 원칙은 의존성 이슈로부터 행동(behaviour)를 분리시키는 것이다.
-
DI는 IoC의 구현일뿐이다.
Annotation 기반 설정
- XML 방식으로 Bean 의존성 주입을 Annotation으로 구현할 수 있다.
Annotation 기반 설정을 가능하게 하려면 설정을 변경해야 한다.
- beans.xml에 <context:annotation-config/>을 추가한다.
- context 네임스페이스가 동작하도록 수정해야 한다.
@Required
- 반드시 의존성이 주입되어야 함을 강제하는 Annotation이다.
- spring framework 5부터 deplicated 되었다.
- deplicated : 사용을 권장하지 않으며 차기 버전에서 삭제될 수 있다라는 뜻
- 하지만 Legacy 어플리케이션에서는 사용하고 있을 수 있다.
- org.springframework.beans.factory.annotation.RequiredAnnotationBeanPostProcessor 가 클래스로 설정되어 있는 bean을 추가해야 한다.
Java version
- LTS : Long turm version
- non-LTS : non Long turm version
Autowired를 annotation에 쓰면 확장할 수 있다.
@Autowired
- @Autowired를 이용하여 XML의 autowire 속성을 대신할 수 있다.
- @Target이 정의된 위치에 @Autowired 어노테이션을 사용할 수 있다.
- setter 메서드에 @Autowired를 설정하여 의존성을 주입할 수 있다.
- field에 직접 @Autowired를 설정하여 의존성을 주입할 수 있다.
- constructor에 @Autowired를 설정하여 의존성을 주입할 수 있다.
- Spring Framework에서 권장하는 생성자 방식으로 의존성을 주입한다.
- Spring 4.3 부터 생성자 1개인 경우 생략 가능
- 같은 타입의 객체가 여러개 존재하는 경우, 배열이나 Collection으로 의존성을 주입할 수 있다.
public class GreetingService {
    private final List<Greeter> greeters;

    @Autowired
    public GreetingService(List<Greeter> greeters) {
        // EnglishGreeter, KoreanGreeter 스프링 빈이 주입 됨.
        // 순서는 알 수 없다.
        this.greeters = greeters;
    }

    public void greet() {
        greeters.forEach(Greeter::sayHello);
    }
}
Stream
Stream에 대해서 함수 조작을 한 결과를 Stream으로 반환하는 중간조작과 처리 결과를 Data로 반환하는 종단조작이 있다.
중간처리
- filter : 지정된 조건에 따라 값이 추출된다.
- map : 전달된 값을 가공한다.
- sorted : 요소를 정렬해준다.
- skip/limit
- skip : m번째까지의 요소를 잘라 획득
- limit : n + 1번째 이후의 요소를 잘라 획득
- peek : Stream의 도중 상태를 확인한다. peek 메소드 자체는 Stream에 영향을 주지 않으므로, 주로 디버그용으로 사용된다.
- distinct : 값의 중복을 제거해준다.
종단처리
- forEach : 각각의 요소를 순서대로 처리한다.
- findFirst : 맨 앞의 값을 획득한다. 빈 Stream의 경우가 있으므로, findFirst의 메서드의 반환값은 Optional형이다.
- anyMatch/allMatch/noneMatch : 값이 특정의 조건을 만족하는가를 판정한다. 순서대로 조건식이 true가 되는 요소가 존재하는가, 조건식을 모두 true로 충족하는가, 조건식 모두 true가 되지 않는가이다.
- toArray : Stream 처리의 결과를 문자열 배열로 변환해준다.
- collect(컬렉션 변환) : Stream 처리의 결과를 Collection으로 변환한다. collect 메소드에는 Collectors 클래스로 제공되고 있는 변환 메소드를 전달한다. List으로의 변환은 toList, Set으로의 변환은 toSet, Map으로의 변환은 Map을 사용한다.
- min/max : 최소값, 최대값을 구한다. 인수에는 비교 규정(Comparator)을 지정할 필요가 있다. 반환값이 Optional형이므로, orElse를 경유하게 된다.
- count : 요소의 개수를 구한다.
- reduce : Stream의 값을 하나로 묶는다(Reduction). reduce 메서드는 3종류의 오버로드를 제공하고 있다.
- Optional reduce(BinaryOperator accumulator);
- T reduce(T identity, BinaryOperator accumulator);
- U reduce(U identity, BiFunction accumulator, BinaryOperator combiner);
@Autowired 미세조정
required 속성
- @Required 어노테이션과 동일한 효과를 가진다.
- 기본 값은 true이다.
Optional 타입
- 스프링빈을 Optional 타입으로 받으면 자동으로 required=false 옵션이 설정된다고 볼 수 있다.
type으로 autowired한 경우, 같은 타입의 여러 빈이 존재할 경우에 오류가 발생한다. 이 때, 특정 빈을 지정하는 방법을 제공한다.
primary 속성
- 빈 설정에 primary를 설정해 주면 같은 타입의 빈이 있더라도 우선 적용할 수 있다.
<bean id="koreanGreeter" class="com.nhn.edu.springframework.ioc.helloworld.KoreanGreeter" scope="prototype" primary="true" >
</bean>
@Qualifier
- @Autowired 할 때, @Qualifier를 지정하여 빈의 이름으로 의존성을 주입할 수 있다.
커스텀 @Qualifier
- 개발자가 직접 @Qulifier를 대신하는 어노테이션을 만들 수 있다.
@Target({ElementType.FIELD, ElementType.PARAMETER})
@Retention(RetentionPolicy.RUNTIME)
@Qualifier
public @interface Lang {
    String value();
}- 위에서 선언한 @Lang 어노테이션을 다음과 같이 사용하면 @Qualifier 역할을 하도록 한다.
	@Autowired
    public GreetingService(@Lang("englishGreeter") Greeter greeter) {
        this.greeter = greeter;
}- value 없는 Annotation을 생성하여 Annotation을 설정하는 것 만으로도 처리를 할 수 있다.
@Target({ElementType.FIELD, ElementType.PARAMETER})
@Retention(RetentionPolicy.RUNTIME)
@Qualifier
public @interface Lang {

}- 위에서 선언한 @Lang 어노테이션을 다음과 같이 사용하면 @Qualifier 역할을 하도록 한다.
    @Autowired
    public GreetingService(@Lang Greeter greeter) {
        this.greeter = greeter;
}- @Lang 어노테이션을 동작하게 하려면 Bean 설정에서 Qualifier 설정을 추가한다.
    <bean id="englishGreeter" class="com.nhnacademy.edu.springframework.greeting.service.EnglishGreeter" scope="singleton">
        <qualifier type="com.nhnacademy.edu.springframework.greeting.annotation.Lang"/>
</bean>- 커스텀 Qualifier는 value 뿐만아니라 다른 이름의 속성들을 정의하여 지정할 수 있다.
@Target({ElementType.FIELD, ElementType.PARAMETER})
@Retention(RetentionPolicy.RUNTIME)
@Qualifier
public @interface GreeterQualifier {
  Language language();
  boolean dummy();
}
public enum Language {
KOREAN, ENGLISH
} @Autowired
public GreetingProcessor(@GreeterQualifier(language = Language.ENGLISH, dummy = false) Greeter greeter) {
this.greeter = greeter;
}- @GreeterQualifier 어노테이션을 동작하게 하려면 Bean 설정에서 Qualifier 설정을 추가한다.
    <bean id="englishGreeter" class="com.nhn.edu.springframework.ioc.helloworld.EnglishGreeter" scope="singleton" init-method="init">
        <qualifier type="GreeterQualifier">
            <attribute key="language" value="ENGLISH"/>
            <attribute key="dummy" value="false"/>
        </qualifier>
    </bean>
CustomAutowireConfigurer
- 커스텀 Qualifier를 등록하기 위한 BeanFactoryPostProcessor의 구현체이다.
- Custom Qualifier에 @Qualifier를 설정하지 않아도 동작하도록 구성할 수 있다.
@Value
- @Value는 주로 외부 속성을 주입하기 위해서 사용한다.
- 외부 속성은 src/main/resouces 디렉토리에 greeting.properties에 다음과 같이 설정할 수 있다.
from=Manty<beans>
....
<context:property-placeholder location="classpath:greeter.properties" />
</beans> - 이 속성을 주입하려면 @Value 어노테이션을 사용한다.
public class GreetingService {

    private final Greeter greeter;

    @Value("${from}")
    private String from;

    @Autowired
    public GreetingService(@Qualifier("koreanGreeter") Greeter greeter) {
        this.greeter = greeter;
    }

    public boolean greet() {
        // 인터페이스의 메소드를 호출하지만 실제 구현 객체의 메소드가 실행됩니다.
        System.out.println("From : " + from);
        return greeter.sayHello();
    }
}
Annotation 기반 설정 장점
- 짧고 간결하게 설정을 할 수 있다.
- java 코드와 동일한 방식으로 구성할 수 있어 배우기 쉽다.
Annotation 기반 설정 단점
- 침습적(invasive) : Annotation을 사용하면 스프링 빈 코드에 Spring Framework의 의존성이 발생한다. 더이상 POJO가 아니라고 할 수 있다.
- 설정을 변경하려면 컴파일을 해야 한다. (XML은 컴파일이 필요하지 않다.)
- 설정이 여기저기 분산되어서 관리가 어렵다는 의견이 있다.
Spring Bean에서만 Application context에 등록한 설정을 사용할 수 있다.
Java Configuration
Java Based Bean Configuration
- spring-javaconfig라는 모듈이 개발되었으며 2009년 spring framework 3.0 부터 core에 포함하여 제공하기 시작했다.(당시에 XML 지옥에서 벗어날 수 있다고...)
- Spring IoC 컨테이너 설정을 순수한 Java로만 작성할 수 있는 도구이다.
Spring JavaConfig 클래스 작성
- Spring JavaConfig 클래스에는 @Configuration 어노테이션을 설정해야 한다.
- Spring JavaConfig 클래스는 @Bean 어노테이션을 설정한 메소드로 구성된다.
Bean 생성
@Bean (Java Config)
- Java Configuration은 다음과 같이 작성한다.
@Configuration
public class JavaConfig {
    @Bean/*(name = "dbms")*/
    public String dbms() {
        return new String("MYSQL");
    }
}
위의 설정은 다음의 XML 설정과 동일하다.
  <bean id="dbms" class="java.lang.String">
        <constructor-arg type="java.lang.String" value="MYSQL" />
  </bean>
default method
default
- default 메소드를 가진 인터페이스를 구현하는 방식으로 두 설정을 합성할 수 있다.
public interface BaseJavaConfig {
    @Bean
    default String dbms() {
        return new String("MYSQL");
    }
}

@Configuration
public class JavaConfig implements BaseJavaConfig{
}
AnnotationConfigApplicationContext
- AnnotationConfigApplicationContext의 생성자 파라미터로 받을 수 있는 클래스는 다음과 같다.
AnnotationConfigApplicationContext(Class<?>... componentClasses)- @Configuration 설정한 클래스
- @Component 설정한 클래스
- AnnotationConfigApplicationContext의 생성자 파라미터에 basePackages(문자열)를 사용하면 패키지 하위의 Component 설정한 클래스를 검색하여 등록한다.
AnnotationConfigApplicationContext(String... basePackages)Bean Lifecycle
- @Bean Annotation에 빈의 생성, 소멸의 콜백 메소드를 지정할 수 있다.
- XML 설정의 init-method, destroy-method 속성과 동일한 기능을 제공한다.
public class GreetingService {
    private final Greeter greeter;

    @Autowired
    public GreetingService(@GreeterQualifier(language = Language.KOREAN, dummy = false) Greeter greeter) {
        this.greeter = greeter;
    }

    public void greet() {
        greeter.sayHello();
    }

    public void init() {
        System.out.println(this.getClass().getCanonicalName()+ ": init!!");
    }

    public void cleanup() {
        System.out.println(this.getClass().getCanonicalName()+ ": cleanup!!");
    }
}


@Configuration
public class BeanConfig {
    @Bean(initMethod = "init", destroyMethod = "cleanup")
    public GreetingService greetingService(Greeter greeter) {
        GreetingService greetingService = new GreetingService(greeter);
        return greetingService;
    }
}
암묵적인 destroyMethod
- 빈 클래스에 public인 close, shutdown 메소드가 존재하면 자동으로 소멸 callback으로 등록한다.
- 이 동작을 비활성화 하려면 다음과 같이 @Bean(destroyMethod="")를 설정하면 된다.
@Bean(destroyMethod="")
public DataSource dataSource() throws NamingException {
    return (DataSource) jndiTemplate.lookup("MyDS");
}
Bean Scope
- @Bean annotation을 사용한 경우, @Scope을 설정해서 scope을 설정할 수 있다.
    @Bean
    @Scope("prototype")
    public Greeter koreanGreeter() {
        return new KoreanGreeter();
    }
Bean Naming
- java configuration에서 선언한 스프링빈의 이름은 메소드 이름이다.
- 이 이름은 @Bean annotation의 name 속성으로 변경할 수 있다.
    // 아래 스프링빈의 이름은 korean 입니다.
    @Bean(name="korean")
    public Greeter koreanGreeter() {
        return new KoreanGreeter();
    }
Bean Aliasing
- java configuration에서 선언한 스프링빈의 이름을 2개 이상 설정할 수 있다.
    // 아래 스프링빈의 alias 는 korean, koreanGreeter 입니다.
    @Bean(name={"korean", "koreanGreeter"})
    public Greeter koreanGreeter() {

    }
Bean Dependencies
- 메서드 파라미터 전달
@Configuration
public class JavaConfig {
    @Bean
    public ARepository aRepository() {
        return new ARepositoryImpl();
    }

    @Bean
    public AService aService(ARepository aRepository) {
        return new ASergice(aRepository);
    }
}- 메서드 호출
- 빈이 같은 클래스 내에서 선언된 경우에만 사용할 수 있다.
@Configuration
public class JavaConfig {
    @Bean
    public ARepository aRepository() {
        return new ARepositoryImpl();
    }

    // with method parameter
    @Bean
    public AService aService() {
        return new AService(aRepository());
    }
}- 메서드 호출에서 주의할 것
- @Configuration annotation에서 의존성 주입을 위해서 호출된 메소드는 CGLIB 기술을 사용하여 scope에 따라 스프링 빈을 반환한다.
- @Autowired
- 다른 곳에서 설정된 Bean으로 의존성 주입을 하기 위해 @Autowired annotation을 사용할 수 있다.
@Configuration
public class JavaConfig {
    @Autowired
    private ARepository aRepository;

    @Bean
    public AService aService() {
        return new AService(aRepository);
    }

    @Bean
    public BService bService() {
        return new ASergice(aRepository);
    }
}- fully qualifying 주입
- 다른 곳에서 설정된 Bean으로 의존성 주입을 하기 위해 Configuration 객체 자체를 가져올 수 있다.
@Configuration
public class JavaConfig {
    @Autowired
    private ARepositoryConfig aRepositoryConfig;

    @Bean
    public AService aService() {
        return new AService(aRepositoryConfig.aRepository());
    }
}- 생성자 주입
- 다른 곳에서 설정된 Bean으로 의존성 주입을 하기 위해 생성자를 사용할 수 있다.
@Configuration
public class JavaConfig {
    private final ARepository aRepository;

    public JavaConfig(ARepository aRepository) {
        this.aRepository = aRepository;
    }

    @Bean
    public AService aService() {
        return new AService(aRepository);
    }

    @Bean
    public BService bService() {
        return new ASergice(aRepository);
    }
}
@Conditional 어노테이션
- 조건에 따라 @Configuration이나 @Bean이 동작하거나 동작하지 않도록 설정할 수 있다.
- @Conditional은 Condition 인터페이스 구현을 설정해야 한다.
- Condition 인터페이스는 matches 메소드를 제공하는데, 반환값이 true 이면 설정은 동작한다. 반대로 반환값이 false이면 설정은 동작하지 않는다.
	@Conditional(TestCondition.class)
    @Bean
    public GreetingService greetingService(Greeter greeter) {
        GreetingService greetingService = new GreetingService(greeter);
        return greetingProcessor;
    }
class TestCondition implements Condition {
@Override
public boolean matches(ConditionContext context, AnnotatedTypeMetadata metadata) {
return true;
}
}- @Profile 어노테이션이 @Conditional을 활용한 대표적인 예이다.
Bean Scanning
- Bean Scanning을 이용한 방법
- Bean Scanning = Component Scanning = Classpath Scanning
Component Scan
- @Comfiguration을 지정한 클래스에 @ComponentScan을 설정하여 스캐닝을 활성화 할 수 있다.
@Configuration
@ComponentScan(basePackages = "com.nhnacademy.edu.springframework.greeting")
public class BeanConfig {
  // .. 생략 ..
}
Stereotype annotations
Bean Scanning의 대상이 되는 어노테이션들
- @Configuration - 스프링 설정 관리 컴포넌트
- @Component - 기본 스프링 관리 컴포넌트
- @Controller - Spring Web Mvc에서 Controller
- @Service - Service layer의 컴포넌트 마커
- @Repository - Data Access Object를 의미하는 marker 어노테이션 (Exception Translation 기능 제공)
Component Scan - Filter
- @ComponentScan 어노테이션은 includeFilters와 excludeFilters 속성으로 스캔할 대상 빈을 선별한다.
@Configuration
@ComponentScan(basePackages = "org.example",
        includeFilters = @Filter(type = FilterType.REGEX, pattern = ".*Stub.*Repository"),
        excludeFilters = @Filter(Repository.class))
public class AppConfig {
    // ...
}| Filter type | Example Expression | 설명 |
|---|---|---|
| annotation(default) | org.example.SomeAnnotation | 어노테이션이나 메타 어노테이션이 설정된 컴포넌트 |
| assignable | org.example.SomeClass | 특정 클래스를 상속/구현(extends/implements)한 컴포넌트 |
| aspectj | org.example..*Service+ | Aspect 표현식에 대응 되는 컴포넌트 |
| regex | org\.example\.Default.* | 정규식 표현에 대응되는 컴포넌트 |
| custom | org.example.MyTypeFilter | org.springframework.core.type.TypeFilter 인터페이스의 커스텀 구현체 |
Component 내부에서 Bean 사용
- @Component 클래스에서도 @Configuration과 동일하게 @Bean을 선언할 수 있다.
- @Configuration 클래스에서 작성한 것과 마찬가지로 @Scope, @Qualifier, @Lazy등을 사용할 수 있다.
@Component
public class FactoryMethodComponent {

    @Bean
    @Qualifier("public")
    public TestBean publicInstance() {
        return new TestBean("publicInstance");
    }

    public void doWork() {
        // Component method implementation omitted
    }
}
@Component 빈 이름
- @ComponentScan으로 @Component 빈을 설정할 때 빈의 이름은 BeanNameGenerator 전략으로 생성이 된다.
- @Component의 이름이 지정되지 않으면 기본 BeanNameGenerator가 소문자화된 클래스 이름으로 생성한다.
- 이름이 지정되면 그 값으로 생성한다.
- 기본 BeanNameGenerator의 방식과 다른 이름을 쓰고 싶다면 BeanNameGenerator를 재정의 할 수 있다.
- 개발자가 정의한 BeanNameGenerator를 지정하고 싶으면 아래와 같이 설정할 수 있다.
@Configuration
@ComponentScan(basePackages = "org.example", nameGenerator = MyNameGenerator.class)
public class AppConfig {
    // ...
}
AOP는 OOP의 확장이다.
AOP(Aspect-Oriented Programming)
- AOP란 프로그램 구조를 다른 방식으로 생각하게 함으로서 OOP를 보완한다.
- OOP에서 모듈화의 핵심단위는 클래스이지만 AOP에서 모듈화의 핵심 단위는 관점(aspect)이다.
- 관점은 다양한 타입과 객체에 걸친 트랜젝션 관리같은 관심(concern)을 모듈화할 수 있게 한다.
- cross-cutting concerns : 횡단 관심사
- core concerns : 주요 관심사
- 횡단 관심사와 주요 관심사를 분리하여 관점별로 각각 기능을 모듈화 할 수 있다.
- 설정을 추가하여 Weaving 한다.
cross-cutting concerns을 각각 모듈로 분리할 수 있다.
유지보수성 때문에 Spring AOP를 사용한다고 해도 과언이 아니다.
AOP 주요 용어
Aspect
- 여러 클래스에 걸친 횡단 관심사의 모듈(클래스)
- 하나 이상의 Pointcut과 advice의 조함으로 만들어지는 AOP의 기본 모듈
- Spring framework에서는 @Aspect를 사용하거나 XML에서 설정할 수 있다.
Join point
- 프로그램 실행 중의 어떤 포인트를 의미(메소드 실행, Exception 처리 등)
- Pointcut의 후보라고 생각할 수 있다.
- Spring AOP에서는 메소드만 실행 대상이다.
public interface JoinPoint {

     /* 중간 생략 */

    /**
     * The legal return values from getKind()
     */
	String METHOD_EXECUTION = "method-execution";
    String METHOD_CALL = "method-call";
    String CONSTRUCTOR_EXECUTION = "constructor-execution";
    String CONSTRUCTOR_CALL = "constructor-call";
    String FIELD_GET = "field-get";
    String FIELD_SET = "field-set";
    String STATICINITIALIZATION = "staticinitialization";
    String PREINITIALIZATION = "preinitialization";
    String INITIALIZATION = "initialization";
    String EXCEPTION_HANDLER = "exception-handler";
    String SYNCHRONIZATION_LOCK = "lock";
    String SYNCHRONIZATION_UNLOCK = "unlock";

    String ADVICE_EXECUTION = "adviceexecution";
}
Advice
- 타겟에 제공할 부가기능을 담은 모듈
- 특정 Join Point에서 Aspect가 취하는 행동
- Ex.)around, before, after
Pointcut
- Advice를 적용할 Join Point를 선별하는 작업 또는 그 기능을 적용한 모듈
- Advice는 Pointcut 표현식과 연결되고 Pointcut이 매치한 Join Point에서 실행된다.
Target object
- 부가기능을 부여할 대상
- 하나 이상의 Aspect로 어드바이스된(advices) 객체
- adviced object라고 부르기도 함
AOP Proxy
- 클라이언트와 타겟 사이에 투명하게 존재하면서 부가기능을 제공하는 오브젝트
- aspect 계약(어드바이스 메서드 실행 등)을 위해 AOP에 의해 생성된 객체
Advisor
- Pointcut과 Advice를 하나씩 갖고 있는 객체
- 스프링 AOP에서만 사용되는 용어
Weaving
- 다른 어플리케이션 타입이나 어드바이즈된 객체를 생성하는 객체와 관점을 연결하는 행위를 의미
Spring AOP vs @AspectJ
- Spring AOP
- AOP 개념을 스프링 빈에 적용하기 위한 것
- Spring Bean 대상이므로 ApplicationContext가 처리한다.
- 런타임 Weaving
- AspectJ
- AOP 개념을 모든 객체에 적용하기 위한 것
- 컴파일 시점, 로드 시점 Weaving
@AspectJ (Annotation) 지원
- @AspectJ 스타일은 일반 java에 annotation을 설정하는 방식이다.
- 스프링 프레임워크는 AspectJ 5 의 annotation을 사용하지만 AspectJ의 컴파일러나 위버(Weaver)를 사용하지 않는다.
- e.g. import org.aspectj.lang.annotation.Aspect
@AspectJ 지원 활성화
- Java @Configuration에서 @AspectJ 지원을 활성화 하려면 @EnableAspectJAutoProxy를 사용하여 설정한다.
포인트컷
- 타겟의 여러 조인포인트 중에 어드바이스를 적용할 대상을 지정하는 키워드이다.
- 스프링 AOP는 스프링 빈의 메소드 실행 조인포인트만 지원한다.
- 포인트컷 선언은 포인트컷 표현식과 포인트컷 시그니처로 구성된다.
@Pointcut("execution(* transfer(..))") // the pointcut expression
private void anyOldTransfer() {} // the pointcut signature- 위의 예제는 anyOldTransfer가 포인트컷의 이름이고 모든 스프링 빈에서의 transfer 메서드 실행에 매칭이 된다.
포인트컷 표현식
@Pointcut(
          "execution("           // Pointcut Designator
           + "[접근제한자 패턴] "   // public
           + "리턴타입 패턴"       // long
           + "[패키지명, 클래스 경로 패턴]"          // com.nhnacademy.GreetingService
           + "메소드명 패턴(파라미터 타입 패턴|..)"  // .greet(User, String)
           + "[throws 예외 타입 패턴]"
           +")"
          )

@Pointcut("execution(public boolean com.nhnacademy.edu.springframework.greeting.service.Greeter.sayHello(..))
Pointcut Designator
- 스프링 AOP에서 지원하는 포인트컷 지정자
execution
- 메서드 실행 조인포인트와 매칭
- 스프링 AOP의 주요 포인트컷 지정자
within
- 주어진 타입(클래스)으로 조인 포인트 범위를 제한
execution vs within
- execution은 메서드를 지칭하지만, within은 클래스를 지칭한다.
- 코드 비교
@Pointcut("execution(boolean com.nhnacademy.edu.springframework.greeting.service.Greeter.sayHello())")
public void greeterPointCut(){}

@Pointcut("within(com.nhnacademy.edu.springframework.greeting.service.Greeter)")
public void greeterPointCut(){}
this
- 주어진 타입을 구현한 스프링 AOP Proxy 객체에 매칭
- 보통 Proxy 객체를 Advice 파라미터에 바인딩하는 용도로 쓰인다.
target
- 주어진 타입을 구현한 타겟 객체에 매칭
- 보통 타겟 객체를 Advice 파라미터에 바인딩하는 용도로 쓰인다.
args
- 주어진 타입의 인수들을 이용해 매칭
- 보통 메소드 인자를 Advice 파라미터에 바인딩하는 용도로 쓰인다.
@target
- 주어진 타입의 애너테이션을 가진 클래스의 인스턴스를 매칭
@args
- 실제 인수의 런타임 타입이 주어진 타입의 애너테이션을 가질 경우 매칭
@within
- 주어진 타입의 애너테이션을 타입들로 제한하여 매칭
@annotation
- 주어진 애너테이션을 가지고 있을 경우 매칭
bean
- 스프링 AOP에서 지원하는 추가적인 포인트컷 지정자
- 스프링 빈의 이름에 해당하는 메서드 실행을 매칭
bean(idOrNameOfBean)포인트컷 - 조합
- 포인트컷 표현식은 &&, ||, !으로 조합할 수 있다.
// anyPublicOperation 포인트컷은 모든 public 메소드 실행에 매칭 됩니다.
@Pointcut("execution(public * *(..))")
private void anyPublicOperation() {}

// inTrading 포인트컷은 com.xyz.myapp.trading 패키지 내의 메소드 실행에 매칭
@Pointcut("within(com.xyz.myapp.trading..*)")
private void inTrading() {}

// tradingOperation 포인트컷은 com.xyz.myapp.trading 패키지 내의 퍼블릭 메소드 실행에 매칭
@Pointcut("anyPublicOperation() && inTrading()")
private void tradingOperation() {}
포인트컷 - 공통 포인트컷 공유
- 대규모 시스템에서 공통적인 포인트컷을 정의하여 참조하는 방식을 사용하는 것이 유리하다.
import org.aspectj.lang.annotation.Aspect;
import org.aspectj.lang.annotation.Pointcut;

@Aspect
public class CommonPointcuts {

    /**
     * com.xyz.myapp.web 패키지와 서브패키지(web layer)를
     * 지정하는 포인트컷
     */
    @Pointcut("within(com.xyz.myapp.web..*)")
    public void inWebLayer() {}

    /**
     * com.xyz.myapp.service 패키지와 서브패키지(service layer)를
     * 지정하는 포인트컷
     */
    @Pointcut("within(com.xyz.myapp.service..*)")
    public void inServiceLayer() {}

    /**
     * com.xyz.myapp.dao 패키지와 서브패키지(data access layer)를
     * 지정하는 포인트컷
     */
    @Pointcut("within(com.xyz.myapp.dao..*)")
    public void inDataAccessLayer() {}

    /**
     * 아래 businessService 포인트컷 정의는 서비스인터페이스가 service 패키지에 있고
     * 구현체가 service 패키지 하위에 포한된 것을 가정하고 선언되어 있습니다.
     *
     * com.xyz.myapp.send.service, com.xyz.myapp.receive.service 와 같이 기능단위의 패키지 구성이라면  "execution(* com.xyz.myapp..service.*.*(..))" 포인트컷 표현식을 사용할 수 있습니다.
     *
     * 만약 스프링빈 이름이 Service 로 항상 끝난다면 "bean(*Service)" 표현식을 사용할 수도 있습니다.
     */
    @Pointcut("execution(* com.xyz.myapp.service.*.*(..))")
    public void businessService() {}

    /**
     * 아래 dataAccessOperation 포인트컷 정의는 Dao 인터페이스가 dao 패키지에 있고
     * 구현체가 dao 패키지 하위에 포한된 것을 가정하고 선언되어 있습니다.
     */
    @Pointcut("execution(* com.xyz.myapp.dao.*.*(..))")
    public void dataAccessOperation() {}

}
포인트컷 - 공통 포인트컷 참조
- 공유된 포인트컷 Aspect는 다른 설정에서 참조할 수 있다.
<aop:config>
    <aop:advisor
        pointcut="com.xyz.myapp.CommonPointcuts.businessService()"
        advice-ref="tx-advice"/>
</aop:config>

<tx:advice id="tx-advice">
    <tx:attributes>
        <tx:method name="*" propagation="REQUIRED"/>
    </tx:attributes>
</tx:advice>
포인트컷 - 표현식 예제
- Spring AOP는 주로 execution 포인트컷 지정자를 사용한다.
execution(modifiers-pattern? ret-type-pattern declaring-type-pattern?name-pattern(param-pattern) throws-pattern?)- 모든 public 메서드
execution(public * *(..))- get~으로 시작하는 모든 메서드
execution(* get*(..))- com.nhnent.edu.spring_core 패키지에 있는 모든 메서드
execution(* com.nhnent.edu.spring_core.*.*(..))- com.nhnent.edu.spring_core.service.MemberService 인터페이스에 정의된 모든 메소드
execution(* com.nhnent.edu.spring_core.service.MemberService.*(..))- com.nhnent.edu.spring_core.service 패키지의 모든 메소드실행
within(com.nhnent.edu.spring_core.service.*)- TestServoce 프록시 구현체의 메서드 실행
this(com.nhnent.edu.spring_core.service.TestService)- TestService 인터페이스의 구현 객체의 메소드 실행
target(com.nhnent.edu.spring_core.service.TestService)- 런타임에 Serializable 타입의 단일 파라미터가 전달되는 메소드 실행 (인자값 검사 기능에 많이 사용됩니다.)
args(java.io.Serializable)- @Transactional 어노테이션을 가진 모든 타겟 객체의 메서드 실행
@target(org.springframework.transaction.annotation.Transactional)