
개요
Spring Security는 여러가지 필터 덩어리로 이루어져 있다.
Filter이므로, DispatcherServlet보다도 앞에 서서 (마치 문지기마냥) 요청을 가장 먼저 받아보고, 적절하게 인증, 인가 처리를 하는 아주 야무진 녀석이다.
하지만 IoC에 의해서 작동하기 때문에 내부에서 어떻게 실제 인증, 인가가 이루어지는지 와닿지가 않는다.
그래서 천천히 뜯어보면서 공부해보았다.
전체적인 흐름은 이러하다
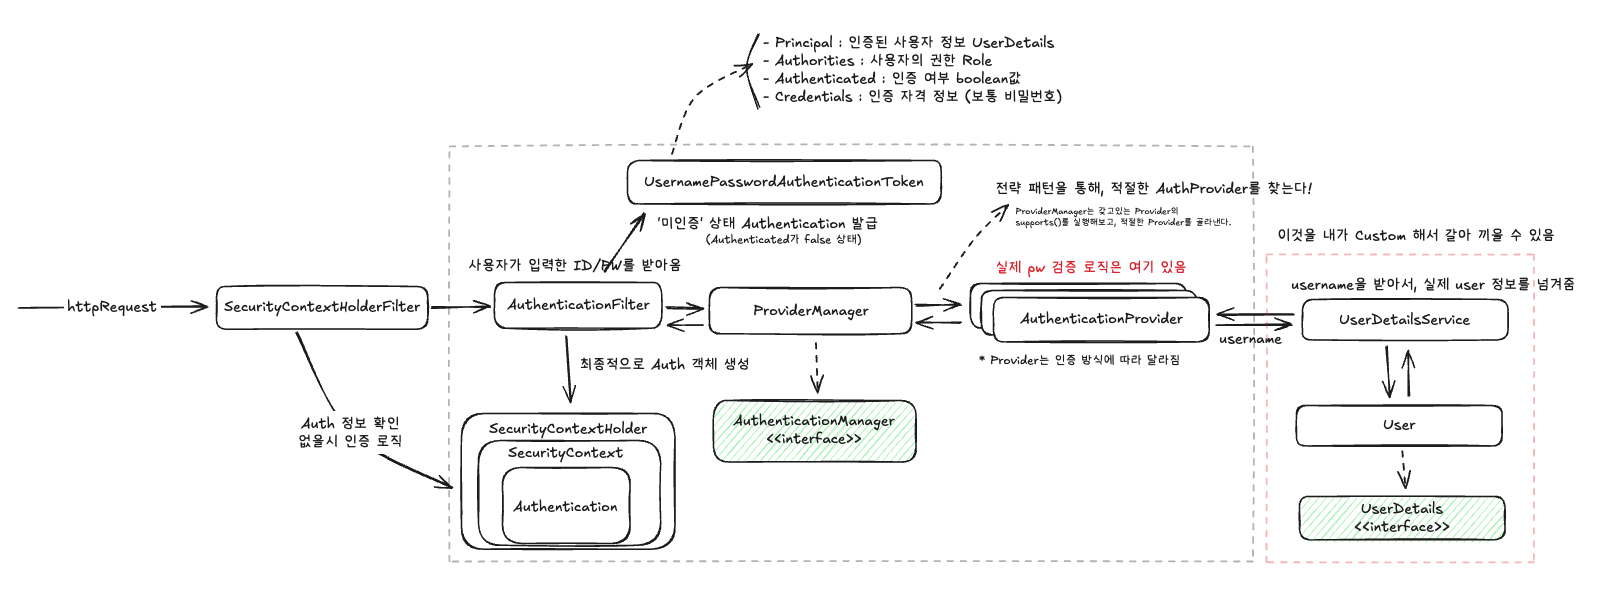
📌 세션 방식을 사용했다.
인증 Authentication vs 인가 Authorization
인증이란 사용자가 누구인지 식별하는 과정이고,
인가란 인증된 사용자가 어디까지 접근하느냐를 구성하는 것이다.
📌 인증에 실패하면 401을 응답받고, 인가에 실패(권한 없는 접근)하면 403을 응답받는다.
Security의 인증 과정
세션 방식을 사용했으므로 일단 모든 요청을 보낼 때, 쿠키에 세션ID를 지참해서 보내줘야 한다.
그럼 그 쿠키가 없는 경우가 바로 로그인이 안된 경우(인증이 안된 상황)라고 할 수 있다.
0. SecurityContextHolderFilter
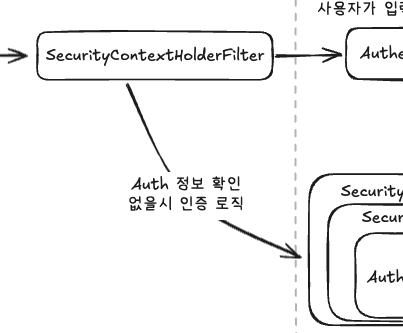
- FilterChain의 가장 앞단에 서서 가장 먼저 지참한 쿠키를 까본다.
- 쿠키에 적힌 세션ID를 확인하고, 세션 저장소에 해당 세션이 있는지 확인한다.
- 만약 존재한다? 그럼 그 세션의 Authentication 객체를 SecurityContextHolder에 꽂아넣어준다.
📝 여기서 잠깐!!
SecurityContextHolder는 뭘까?
그건 바로 처리하는 Thread의 ThreadLocal을 의미한다.
다른 Thread가 접근할 수 없는 Thread 내부 독립된 공간에 Auth 객체를 보관한다.
Controller, Service, Repository등을 신나게 돌아다니다 사용자를 식별해야하는 경우가 생기면 ThreadLocal에서 Auth 객체를 꺼내보는거다.
- 만약 존재하지 않으면
AuthenticationFilter로 넘겨서 인증 과정(로그인)을 거치도록 한다.
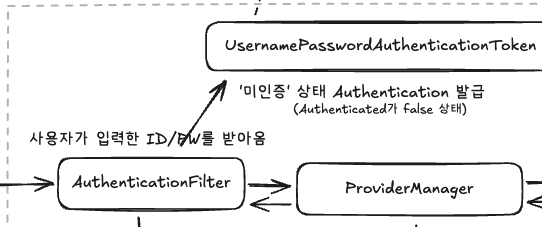
1. AuthenticationFilter
-
사용자가 보내온 ID/PW를 받아본다.
-
그리고
UsernamePasswordAuthenticationToken을 발급해준다.📝
여기서 UsernamePasswordAuthenticationToken은 말 그대로 Username과 Password를 입력받아 인증하는 고전적인 방식에서 사용되는 토큰이다.
다른 인증 방식에서는 다른 토큰을 입력받는다.❓그럼 어떻게 알고
UsernamePasswordAuthenticationFilter와 Token을 발급해준걸까?
그건 내가 SecurityConfig에다 설정을 해두었기 때문이다.
// SecurityConfig.java
http
.formLogin(form -> form // <<<<<<<<< 이 설정을 켜면 해당 filter가 활성화된다.
.loginPage("/login")
.loginProcessingUrl("/login")
.usernameParameter("email")
.passwordParameter("pa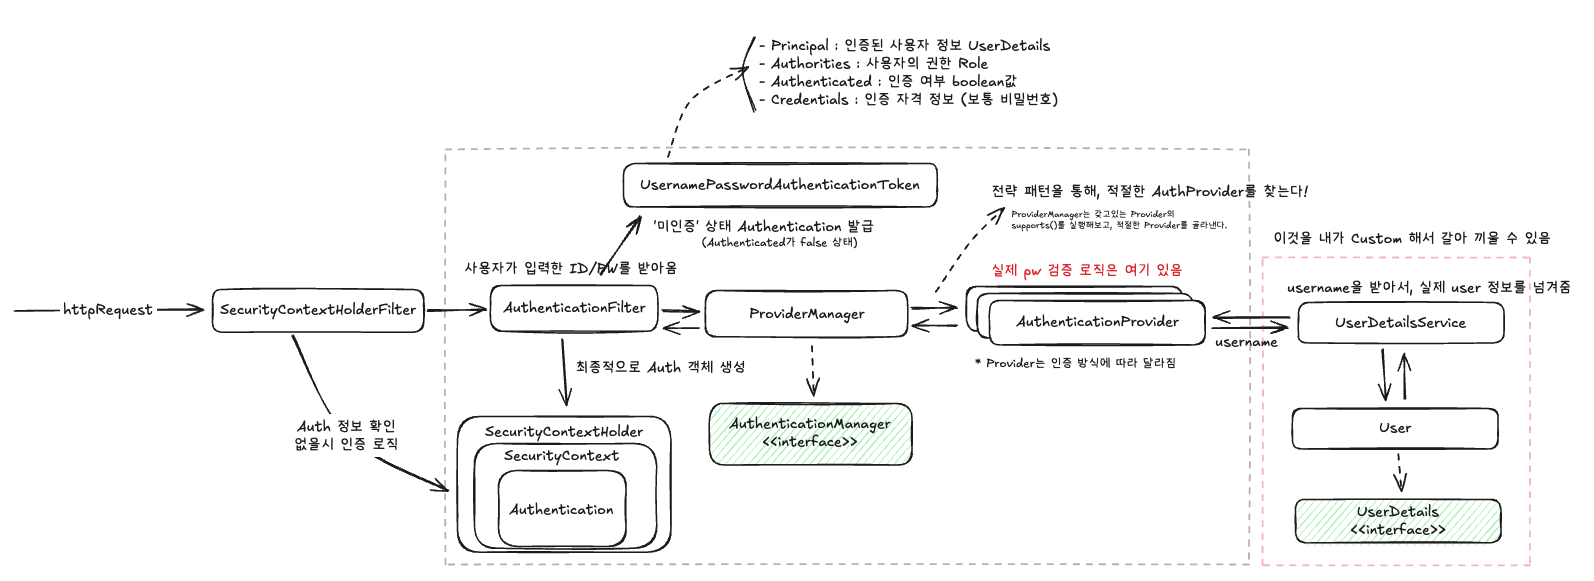
ssword")
.defaultSuccessUrl("/main")
)
.userDetailsService(userDetailService) 이 토큰이 바로 다름아닌 Authentication 객체이다.
단지, 아직 미인증 상태일 뿐이다.
public class UsernamePasswordAuthenticationFilter extends AbstractAuthenticationProcessingFilter {
...

    public Authentication attemptAuthentication(HttpServletRequest request, HttpServletResponse response) throws AuthenticationException {
        if (this.postOnly && !request.getMethod().equals("POST")) {
            throw new AuthenticationServiceException("Authentication method not supported: " + request.getMethod());
        } else {
            String username = this.obtainUsername(request);
            username = username != null ? username.trim() : "";
            String password = this.obtainPassword(request);
            password = password != null ? password : "";
            UsernamePasswordAuthenticationToken authRequest = UsernamePasswordAuthenticationToken.unauthenticated(username, password);
            this.setDetails(request, authRequest);
            return this.getAuthenticationManager().authenticate(authRequest);
        }
    }
2. AuthenticationManager (ProviderManager)
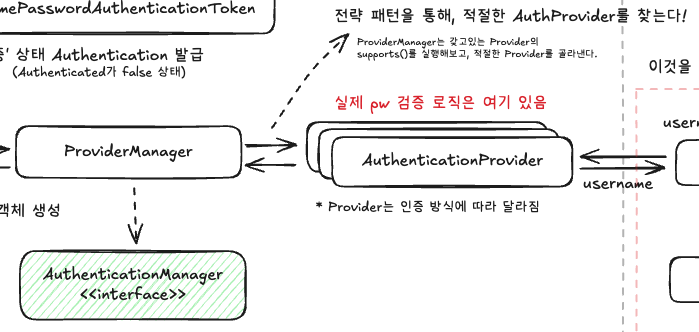
📌 AuthenticationManager는 인터페이스이고, ProviderManger가 그 구현체이다.
1. 앞서 말했듯, 인증 방식은 여러가지이다.
2. 그러므로 실제 '인증' 로직을 처리할 여러 AuthenticationProvider들 중에서 적절한 Provider를 찾는 역할을 한다.
3. AuthenticationProvider를 순회하면서 해당 인증을 할 수 있는 Provider를 찾는다.
📝
여기서 사용되는 디자인패턴이 바로 전략 패턴 Strategy Pattern이다.
Provider들은supports()메서드를 갖고 있고, ProviderManager가 해당 메서드를 실행해보면서
인증 절차를 처리할 수 있는 녀석인지 식별한다.
// ProviderManager.class

@Override
public Authentication authenticate(Authentication authentication) throws AuthenticationException {
    Class<? extends Authentication> toTest = authentication.getClass();
    AuthenticationException lastException = null;
    AuthenticationException parentException = null;
    Authentication result = null;
    Authentication parentResult = null;
    int currentPosition = 0;
    int size = this.providers.size();
    for (AuthenticationProvider provider : getProviders()) {
       if (!provider.supports(toTest)) {  // <<<<<<<<<<< 갖고있는 provider 순회하면서 supports() 실행
          continue;
       }
       if (logger.isTraceEnabled()) {
          logger.trace(LogMessage.format("Authenticating request with %s (%d/%d)",
                provider.getClass().getSimpleName(), ++currentPosition, size));
       }
       try {
          result = provider.authenticate(authentication);
          if (result != null) {
             copyDetails(authentication, result);
             break;
          }
       }
       ...
3. AuthenticationProvider

- 이제 얘가 진짜 사용자인지 검증하는 로직을 실행하게 된다.
- 무엇을 검증하는가?
- 요청에 담겨온 ID/PW
- 내 서비스가 저장하고 있는 ID/PW
이 두개를 비교해서 맞으면 인증된 사용자인 것이다. (당연한 소리)
- 그래서 내 서비스가 저장하고 있는 ID/PW를 가져와야 한다.
- 하지만 서비스마다 저장, 조회 방식이 다른데 어떡할까?? 하고 스프링은 당황할 수 있다.
- 여기서부터 개발자가 두두등장 해야한다.
@Override
protected final UserDetails retrieveUser(String username, UsernamePasswordAuthenticationToken authentication)
       throws AuthenticationException {
    prepareTimingAttackProtection();
    try {
       UserDetails loadedUser = this.getUserDetailsService().loadUserByUsername(username);
	   // <<<<<<<<< 내가 작성한 UserDetailsService를 호출하는 (건방진) 모습
       if (loadedUser == null) {
          throw new InternalAuthenticationServiceException(
                "UserDetailsService returned null, which is an interface contract violation");
       }
       return loadedUser;
    }
4. UserDetailsService
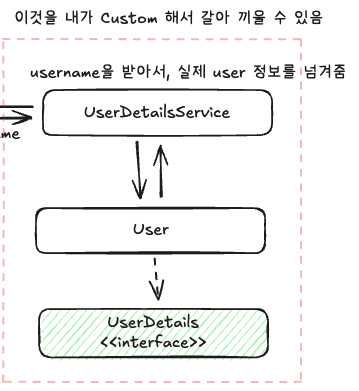
📝
AuthenticationProvider 까지는 요청만 보내면 스프링이 알아서 일해주는 영역이다.
그러나 서비스를 설계한 내가 적절하게 저장된 ID와 PW(그니까.. 사용자 정보)넘겨줘야한다.
- UserDetailsService를 구현한다.
@Slf4j
@RequiredArgsConstructor
@Service
public class CustomUserDetailService implements UserDetailsService {
    private final UserRepository userRepository;
    @Override
    public UserDetails loadUserByUsername(String email) throws UsernameNotFoundException {

        User user = userRepository.findByEmail(email).orElseThrow(() -> new EntityNotFoundException("해당 사용자를 찾을 수 없습니다."));

        return new CustomUserDetails(user);  // <<<<<< Provider가 원하는 형태로 넘겨줌
    }
}AuthenticationProvider는 요청에 담겨온 ID를UserDetailsService에 넘겨준다.- 넘어온 ID를 토대로 내 DB에 저장된 사용자를 찾아서 Provider에게 넘겨준다.
⚠ 검증을 내가 하는게 아니다. 단순히 나는 저장된 사용자 정보를 넘겨주기만 하고, 그 정보를 넘겨받은 Provider가 검증하는 것이다!
📝
내가 작성한 코드를 스프링이 호출해서 (loadUserByUsername()) 정보를 받아가고 있으니 이게 바로 제어 역전 IoC라 할 수 있겠다!
- 사용자 정보(
UserDetails)를 넘겨받은 AuthenticationProvider는 실제 검증을 한다.
5. 인증이 완료된 이후
- 인증이 되었다면, 그때 비로소
SecurityContextHolder에Authentication객체를 넣어준다! - 여기서 Authentication 객체는 아까 발급받은 토큰이고,
Authenticated값이 true가 된다. 즉 인증 완료 되었다는 의미이다. - 여기에 넣어줄 뿐 아니라 세션 저장소에도 넣어준다.
- 그리고 클라이언트에게 세션ID를 건네주고, 다음 요청부터는 클라이언트가 쿠키를 싸와야 한다. (HTTP의 무상태성 어쩌구 저쩌구..)
[!warning]
요청이 마무리된 이후 ThreadLocal은 반드시 초기화해주어야 한다.
요청 하나당 Thread 하나가 배정되어서 일을 하는데, 다음 요청 처리하려고 봤더니 ThreadLocal에 이전의 Auth 정보가 남아있다면?
⇒ 대참사
기타 궁금한 사항
Q. Authentication 객체는 무엇을 담고 있을까?
Principal: 인증된 사용자의 주체 (user details).
Credentials: 사용자의 인증 자격 증명 (보통 비밀번호).
Authorities: 사용자의 권한 (roles or permissions).
Authenticated: 인증 여부를 나타내는 boolean 값.
배운 점
- IoC가 이런 거구나, 내가 짠 코드를 스프링이 호출한다는게 이런거구나
- 스프링은 진짜 개쩌는구나 진짜 이걸 설계한 조상님들은 대단하다.
- 이제 스프링 프레임워크가 제공하는 규격만 지키면 필요한 부분을 적절히 커스텀해서 쓸수 있다. 예를 들면, OAuth같은거
- 진짜 개쩐다 스프링