스프링 부트와 코틀린 사용해서 블로그 웹 만들기 (1)
스프링부트 + 코틀린 사용을 익히기위한 예제 실습
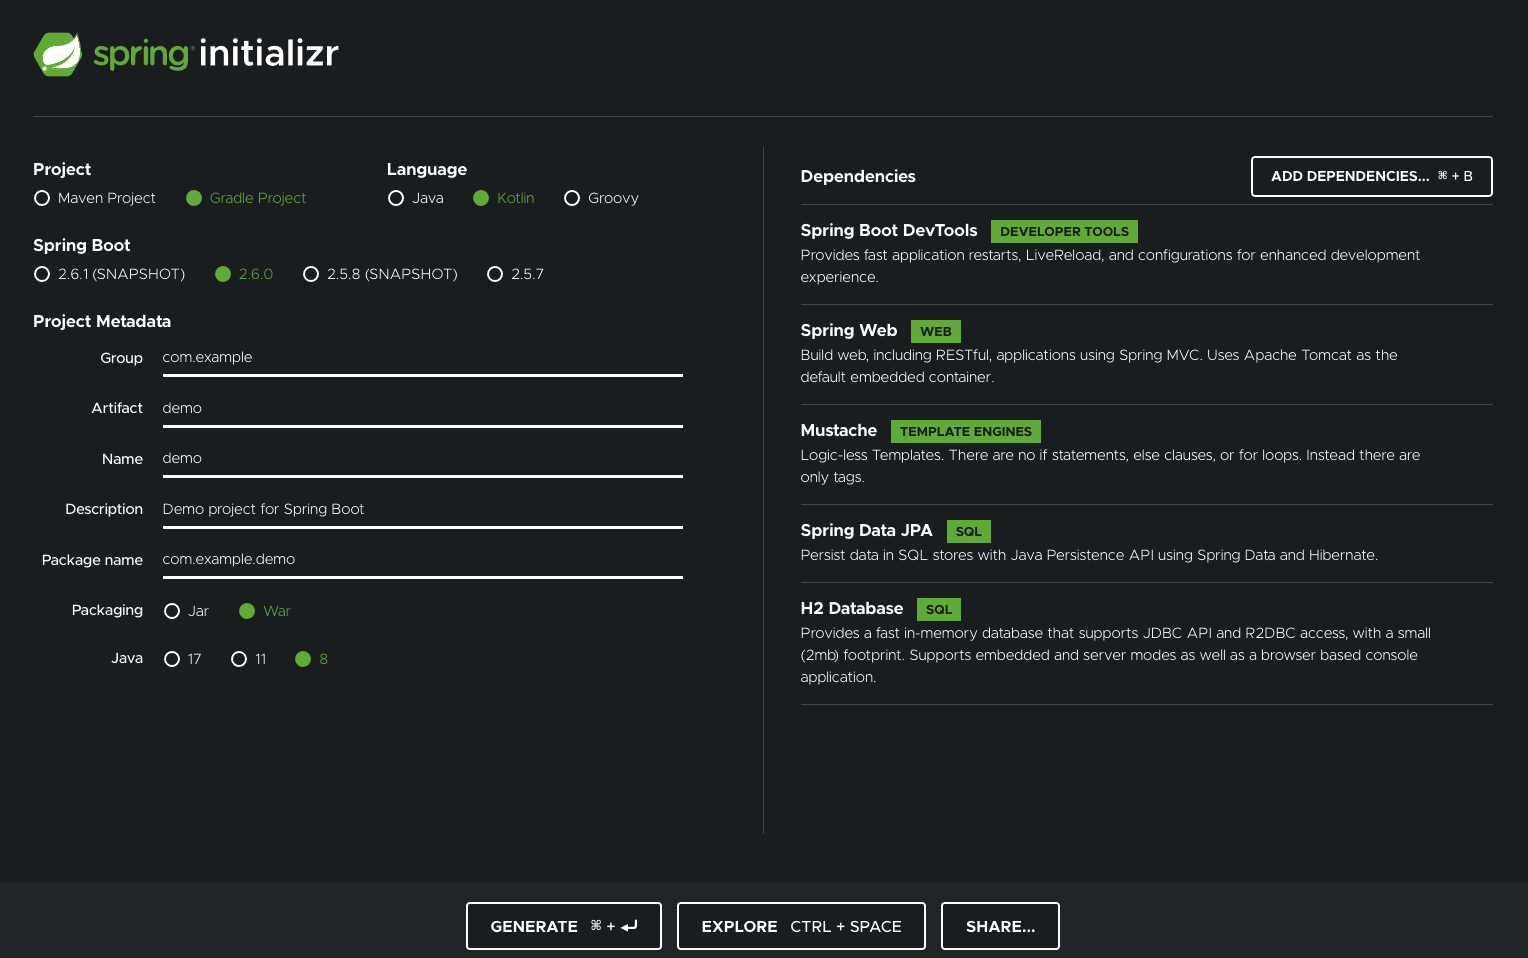
새 프로젝트 생성하기
스프링부트 초기 프로젝트 생성 사이트(https://start.spring.io) 이용
1. 빌드 툴 Gradle Project와 Kotlin 언어 선택
2. 다음 의존성 추가
- Spring Boot DevTools
- Spring Web
- Mustache
- Spring Data Jpa
- H2 Database
3. GENERATE 클릭
Controller 작성하기
src/main/kotlin/com/example/demo/HtmlController.kt
package com.example.demo

import org.springframework.stereotype.Controller
import org.springframework.ui.Model
import org.springframework.ui.set
import org.springframework.web.bind.annotation.GetMapping

@Controller
class HtmlController {

    @GetMapping("/")
    fun blog(model:Model): String{
        model["title"]  = "Blog"
        return "blog"
    }
}
org.springframework.ui.set은 model.addAttribute("title", "Blog")의 표현을 model["title"]처럼 사용 가능하게 만들어준다
Mustache 템플릿 추가
src/main/resources/templates/header.mustache
<html>
<head>
  <title>{{title}}</title>
</head>
<body>
src/main/resources/templates/footer.mustache
</body>
</html>
src/main/resources/templates/blog.mustache
{{> header}}
<h1>{{title}}</h1>
{{> footer}}
http://localhost:8080/에 들어가면 방금 만든 따끈따끈한 웹페이지를 확인할 수 있다
Junit5로 테스팅하기
src/test/kotlin/com/example/demo/IntegrationTests.kt
package com.example.demo

import org.assertj.core.api.Assertions.assertThat
import org.junit.jupiter.api.Test
import org.springframework.beans.factory.annotation.Autowired
import org.springframework.boot.test.context.SpringBootTest
import org.springframework.boot.test.web.client.TestRestTemplate
import org.springframework.boot.test.web.client.getForEntity
import org.springframework.http.HttpStatus

@SpringBootTest(webEnvironment = SpringBootTest.WebEnvironment.RANDOM_PORT)
class IntegrationTests(@Autowired val restTemplate: TestRestTemplate) {

    @Test
    fun `Assert blog page title, content and status code`() {
        val entity = restTemplate.getForEntity<String>("/")
        assertThat(entity.statusCode).isEqualTo(HttpStatus.OK)
        assertThat(entity.body).contains("<h1>Blog</h1>")
    }

}
TestRestTemplate을 통해 URL을 호출해 결과를 확인한다.
앞으로 통합테스트를 여기에서 진행할 예정이다
LifeCyle Instance를 설정하고 테스트하기
코틀린에서는 테스트 클래스가 테스트 한번당 인스턴스화 되기 때문에 @BeforeAll, @AfterAll을 사용하려면 따로 설정이 필요하다
src/test/resources/junit-platform.properties
junit.jupiter.testinstance.lifecycle.default = per_class이제 @BeforeAll, @AfterAll을 사용해보자
src/test/kotlin/com/example/demo/IntegrationTests.kt
package com.example.demo

import org.aspectj.lang.annotation.After
import org.assertj.core.api.Assertions.assertThat
import org.junit.jupiter.api.AfterAll
import org.junit.jupiter.api.BeforeAll
import org.junit.jupiter.api.Test
import org.springframework.beans.factory.annotation.Autowired
import org.springframework.boot.test.context.SpringBootTest
import org.springframework.boot.test.web.client.TestRestTemplate
import org.springframework.boot.test.web.client.getForEntity
import org.springframework.http.HttpStatus

@SpringBootTest(webEnvironment = SpringBootTest.WebEnvironment.RANDOM_PORT)
class IntegrationTests(@Autowired val restTemplate: TestRestTemplate){
    @BeforeAll
    fun setup(){
        println(">> Setup")
    }

    @Test
    fun `Assert blog page title, content and status code`() {
        println(" >> Assert blog page test, content and status code")
        val entity = restTemplate.getForEntity<String>("/")
        assertThat(entity.statusCode).isEqualTo(HttpStatus.OK)
        assertThat(entity.body).contains("<h1>Blog</h1>")
    }

    @Test
    fun `Assert article page title, content and status code`() {
        println(">> Assert article page title, content and status code")
        val entity = restTemplate.getForEntity<String>("/article")
        assertThat(entity.statusCode).isEqualTo(HttpStatus.OK)
        assertThat(entity.body).contains("<h1>Article</h1>")
    }

    @AfterAll
    fun teardown(){
        println(">> Tear down")
    }
}
지금까지 블로그란 웹페이지를 생성하고 테스트까지 진행해보았다
Reference