
앱/웹을 개발하면서 회원가입/로그인 기능이 있다면 필수적으로 해주어야하는 토큰인증/인가! JWT와 Spring Security를 활용한 accessToken/refreshToken 발급으로 회원을 쉽게 인증해줄 수 있다.
우선 JWT가 무엇인지 알아보자
JWT(JSON Web Token)란?
JSON Web Token라는 명칭에서도 알 수 있듯이, JSON 형식으로 사용자의 인증 정보를 안전하게 전송하기 위한 토큰이다. 이는 서버와 클라이언트 간의 인증/인가가 이루어질 때 사용된다.
JWT의 구조는 아래 세가지로 나눌 수 있다.
1. Header(Algorithm & Token type)
인코딩 : base64
{
	"alg": "HS256",   // 암호화 알고리즘 HMAC-SHA256를 사용
	"typ": "JWT"
}
서명 알고리즘과 토큰의 타입 정보를 담고 있다.
2. Payload(Data)
{
	"sub": "1234567890,  //subject로 토큰의 주체를 식별하는 값
	"name": "Dodo",
	"email": "pdy0207@naver.com"
}
보이는 것과 같이 사용자 정보나 권한 등의 데이터를 담고 있다.
페이로드 데이터의 각 Key를 claim이라고 부른다.
claim의 3종류
- registered claim : 등록된 클레임(3글자, iss, exp, sub, aud, iat..)
- public claim : 공개 클레임, 사용자가 자유롭게 정의(name, email..)
- private claim : 비공개 클레임
Payload 부분은 누구나 Base64로 디코딩할 수 있으므로 password와 같은 결정적인 요소들을 담으면 안된다 !
3. Verify Signature
헤더와 페이로드를 합친 후 비밀 키로 서명한 값으로, 이를 통해 토큰의 변조 여부를 파악한다.
HMACSHA256(
  base64UrlEncode(header) + "." +
  base64UrlEncode(payload),
  secret    //비밀코드, 어렵고 길게 작성
)
JWT를 직접 생성해보고 싶다면 아래 사이트에서 쉽게 생성해볼 수 있다.
https://jwt.io
🤔 그래서 JWT가 필요한 이유??
1. 인증(Authentication)
사용자가 누구인지 신원을 확인하는 과정이다.
사용자가 아이디/비밀번호와 같은 자격 증명으로 인증에 성공하면, 서버는 사용자에게 JWT 토큰을 발급한다.
2. 인가(Authorization)
사용자가 접근할 수 있는 권한이 있는지를 확인하는 과정이다. 클라이언트 측에서 JWT를 포함하여 서버에 요청을 보내면, 서버는 권한 여부를 통해 허용/거부를 결정한다.
여기서 Spring Security의 도움을 받으면 더욱 효과적인 인증/인가를 구현할 수 있다.
Spring Security
애플리케이션에서 보안 기능을 제공하는 Spring의 프레임워크이다.
그럼 이제 코드로 직접 구현을 해보자.
코드 구현
build.gradle 의존성 추가
// JWT 의존성 추가
implementation 'io.jsonwebtoken:jjwt-api:0.11.5'
implementation 'io.jsonwebtoken:jjwt-impl:0.11.5'
implementation 'io.jsonwebtoken:jjwt-jackson:0.11.5'

// Spring Security 의존성 추가
implementation 'org.springframework.boot:spring-boot-starter-security'
application.yml 환경변수 설정
jwt:
  secretKey: ${JWT_Secret}
SecurityConfig 추가
우선 Spring Security의 과정을 간략하게 나타난 그림을 살펴보자.
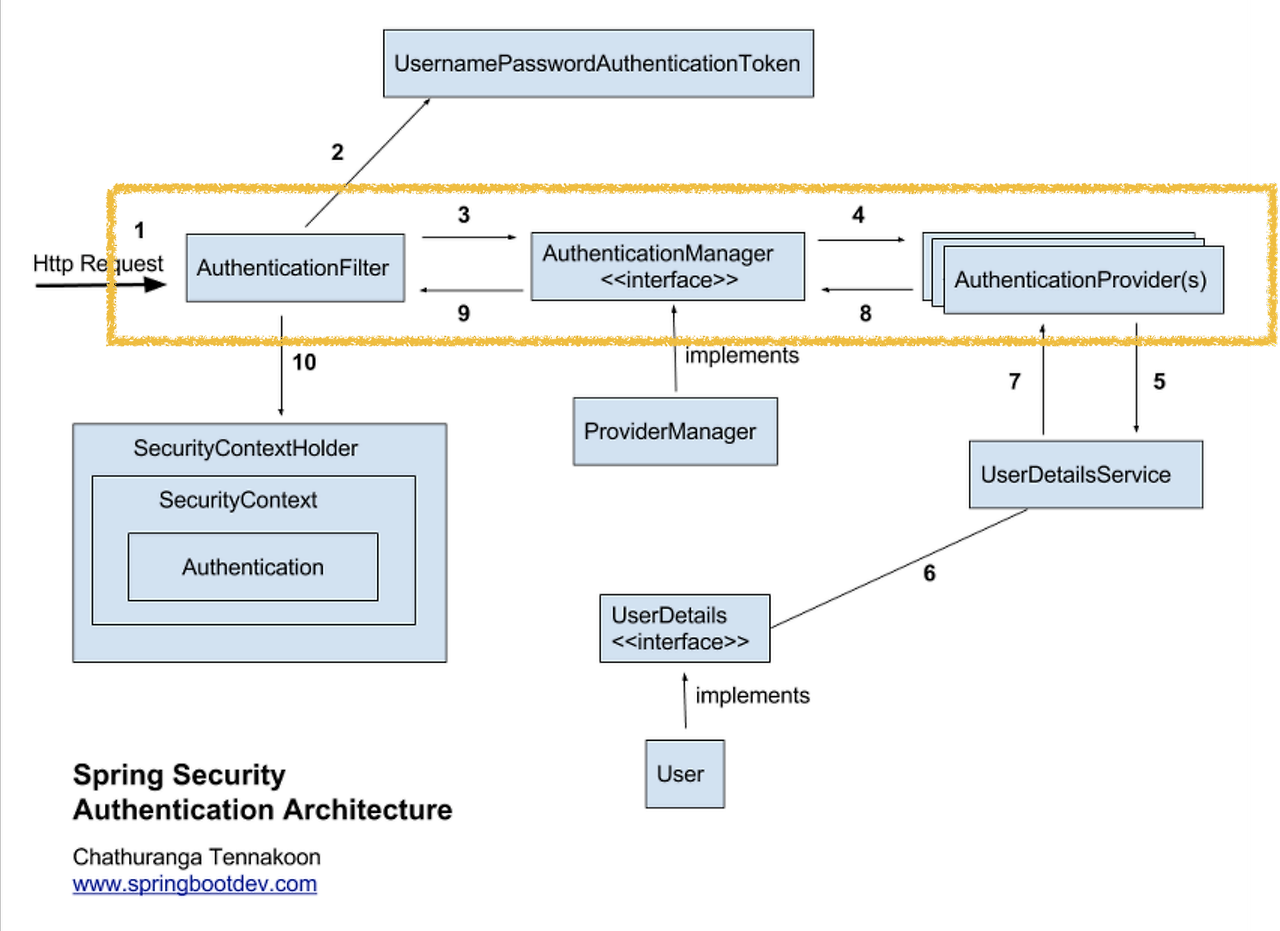
클라이언트가 로그인 요청을 보내면, UsernamePasswordAuthenticationFilter가 사용자 이름과 비밀번호를 추출한 뒤 AuthenticationManager에 인증 요청을 보낸다. AuthenticationManager는 UserDetailsService를 호출하여 사용자의 정보를 가져오고, 비밀번호를 검증한다. 인증에 성공하면 Authentication 객체를 반환하여 SecurityContext에 저장하고, 이후 요청 처리에 사용한다.
SecurityConfig.java
Spring Security를 사용하여 애플리케이션의 보안 설정을 구성하는 클래스
@Configuration
@RequiredArgsConstructor
@EnableWebSecurity
public class SecurityConfig {

    private final AuthenticationConfiguration  authenticationConfiguration;

    @Autowired
    private final JwtService jwtService;

    @Bean AuthenticationManager authenticationManager(AuthenticationConfiguration authConfiguration) throws Exception
    { return authConfiguration.getAuthenticationManager(); }

    @Bean
    protected SecurityFilterChain filterChain(HttpSecurity http) throws Exception {
        http
                .csrf(AbstractHttpConfigurer::disable)
                .formLogin(Customizer.withDefaults())
                .sessionManagement((sessionManagement) ->
                                sessionManagement.sessionCreationPolicy(SessionCreationPolicy.STATELESS)
                )
                .authorizeHttpRequests((authorizeRequests) ->
                        authorizeRequests
                                .requestMatchers(
                                        AntPathRequestMatcher.antMatcher("/api/auth/**")   //특정 경로에 대해 인증이 필요하다는 코드, 자유롭게 커스텀
                                ).authenticated()
                                .anyRequest().authenticated()
                )
                .headers(
                        headersConfigurer ->
                                headersConfigurer.frameOptions(HeadersConfigurer.FrameOptionsConfig::sameOrigin)
                )
                .addFilterBefore(new JwtAuthenticationFilter(authenticationManager(authenticationConfiguration), jwtService),
                        UsernamePasswordAuthenticationFilter.class);

        return http.build();
    }
}- csrf() : csrf 공격을 방지. 여기서는 세션을 사용하지 않고 무상태 통신을 하기 때문에 CSRF 검사를 하지 않도록 설정한다.
- sessionManagement() : JWT는 세션을 관리하지 않는 토큰 기반 인증이므로 무상태 설정을 해준다.
- authorizeHttpRequests() : 인증이 필요한 경로 설정
- addFilterBefore() : JwtAuthenticationFilter를 UsernamePasswordAuthenticationFilter 앞에 추가하여 JwtAuthenticationFilter가 먼저 실행되도록 해준다. (JWT 기반 인증이 사용자 이름과 비밀번호 기반 인증보다 먼저 처리됨)
JwtAuthenticationFilter
JWT를 사용하여 인증을 처리해주는 필터이다.
@Slf4j
public class JwtAuthenticationFilter extends BasicAuthenticationFilter{

    private JwtService jwtService;

    public JwtAuthenticationFilter(AuthenticationManager authenticationManager, JwtService jwtService) {
        super(authenticationManager);  //BasicAuthenticationFilter 클래스의 생성자를 호출
        this.jwtService =jwtService;
    }

    @Override
    protected void doFilterInternal(HttpServletRequest request, HttpServletResponse response, FilterChain chain) throws IOException, ServletException {

        // 헤더에서 토큰 가져오기
        String token = jwtService.resolveToken(request);
        //String requestURI = request.getRequestURI();

        // 토큰 존재 여부 및 토큰 검증
        if (StringUtils.isNotEmpty(token)) {
            if (jwtService.validateTokenBoolean(token)) {
                logger.info("토큰 검증");

                //유효한 토큰을 통해 사용자 정보 추출
                Authentication authentication = jwtService.getAuthentication(token);

                //SecurityContext에 인증 정보 저장
                SecurityContextHolder.getContext().setAuthentication(authentication);
                request.setAttribute("username", authentication.getName());
                logger.info("SecurityContext에 인증 정보를 저장했습니다");
            } else {
                // 유효하지 않은 토큰 처리
                throw new ExpiredJwtException(null, null, "유효하지 않은 AccessToken 입니다.");
            }
        } else {
            logger.warn("Authorization 헤더가 없거나 비어 있습니다");
        }

        chain.doFilter(request, response);
    }
}
헤더에서 받아온 토큰(보통 Authorization으로 accessToken을 사용)이 유효하면 SecurityContext에 인증 정보를 저장해주고, 유효하지 않으면 오류를 반환해준다.
JwtService
JWT를 생성하고 유효성을 검사하는 클래스
@Slf4j
@RequiredArgsConstructor
@Component
@Service
public class JwtService {

    @Value("${jwt.secretKey}")    //application.yml에 저장된 시크릿키
    private String JWT_SECRET;

    public static final String AUTHORIZATION_HEADER = "Authorization";

    private final UserDetailServiceImpl userDetailService;
    private static final String IDENTITY_TOKEN_VALUE_DELIMITER = "\\.";
    private static final int HEADER_INDEX = 0;

    private final ObjectMapper objectMapper;

    private Long accesstokenValidTime = 1000L * 60 * 60 * 24; // 1d
    private Long refreshTokenValidTime = 1000L * 60 * 60 * 24 * 7; // 7d

    //Secret Key 인코딩
    public String encodeBase64SecretKey(String secretKey) {
        return Encoders.BASE64.encode(secretKey.getBytes(StandardCharsets.UTF_8));
    }

    //JWT 서명에 사용할 Secret Key 생성
    private Key getKeyFromBase64EncodedKey(String base64EncodedSecretKey) {
        byte[] keyBytes = Decoders.BASE64.decode(base64EncodedSecretKey);
        return Keys.hmacShaKeyFor(keyBytes);
    }

    // access token 생성
    public String generateAccessToken(Long memberId) {
        Date now = new Date();
        String base64EncodedSecretKey = encodeBase64SecretKey("" + JWT_SECRET);  //사용자 설정 secret 키 인코딩
        Key key = getKeyFromBase64EncodedKey(base64EncodedSecretKey);            //JWT 서명에 사용할 키 생성

        return Jwts.builder()
                .setHeaderParam(Header.TYPE, Header.JWT_TYPE)   // JWT 헤더 설정, "typ" : "JWT"
                .setIssuer("사용자 지정")  // 발행자 설정
                .setIssuedAt(now)       // JWT 발행 일자 설정
                .setSubject(String.valueOf(memberId))  // JWT sub 설정
                .setExpiration(new Date(now.getTime() + accesstokenValidTime))  // JWT 만료 일자 설정(1d)
                .claim("memberId", memberId)  // 커스텀 클레임 설정
                .signWith(key)          // 서명을 위한 Key 객체 설정
                .compact();             // JWT 생성 및 직렬화
    }

    // refresh token 생성
    public String generateRefreshToken(Long memberId) {
        Date now = new Date();
        String base64EncodedSecretKey = encodeBase64SecretKey("" + JWT_SECRET);
        Key key = getKeyFromBase64EncodedKey(base64EncodedSecretKey);

        return Jwts.builder()
                .setIssuedAt(now)
                .setSubject(memberId.toString())
                .setExpiration(new Date(now.getTime() + refreshTokenValidTime))
                .claim("memberId", memberId)
                .signWith(key)
                .compact();
    }

    // JWT 토큰 으로부터 memberId 추출
    public Long getMemberIdFromJwtToken(String token) {
        try {
            String base64EncodedSecretKey = encodeBase64SecretKey("" + JWT_SECRET);
            Key key = getKeyFromBase64EncodedKey(base64EncodedSecretKey);

            Claims claims = Jwts.parserBuilder()
                    .setSigningKey(key)
                    .build()
                    .parseClaimsJws(token)
                    .getBody();
            return Long.parseLong(claims.getSubject());
        } catch(Exception e) {
            throw new JwtException(e.getMessage());
        }
    }

    // token 추출
    public String resolveToken(HttpServletRequest request) {
        String bearerToken = request.getHeader(AUTHORIZATION_HEADER);
        if (bearerToken != null && bearerToken.startsWith("Bearer ")) {
            return bearerToken.substring(7);
        }
        return null; // 혹은 적절한 예외 처리
    }

    // 토큰 유효성 + 만료일자 확인
    public Boolean validateTokenBoolean(String token) {
        Date now = new Date();

        try{
            String base64EncodedSecretKey = encodeBase64SecretKey("" + JWT_SECRET);
            Key key = getKeyFromBase64EncodedKey(base64EncodedSecretKey);

            // 주어진 토큰을 파싱하고 검증.
            Jws<Claims> claims = Jwts.parser()
                    .setSigningKey(key)
                    .parseClaimsJws(token);
            return !claims.getBody().getExpiration().before(new Date(now.getTime()));
        }catch (JwtException e){
            log.error("유효하지 않은 토큰입니다. {}", e.getMessage());
            return false;
        }
    }

    //JWT 토큰 인증 정보 조회 (토큰 복호화)
    public Authentication getAuthentication(String token) {
        UserDetails userDetails = userDetailService.loadUserByUsername(this.getMemberIdFromJwtToken(token).toString());
        return new UsernamePasswordAuthenticationToken(userDetails, token, userDetails.getAuthorities());
    }
}
accessToken과 refreshToken 생성은 JWT 검증 시 사용하지는 않지만, 새로운 회원을 등록하거나 토큰 만료 시 재발급에 사용된다.
이렇게 JWT를 사용하여 토큰을 인증하고 인가하는 방법을 알아보았습니다람쥐
소셜 로그인을 구현하는 경우, 소셜로그인에서 발급해주는 인증정보를 받아, 위 내용을 활용하여 토큰을 생성/발급해줄 수 있다.