우선, 프로젝트 폴더 안에 client라는 리액트 프로젝트는 이전글에서 만들어준 걸로 사용한다.
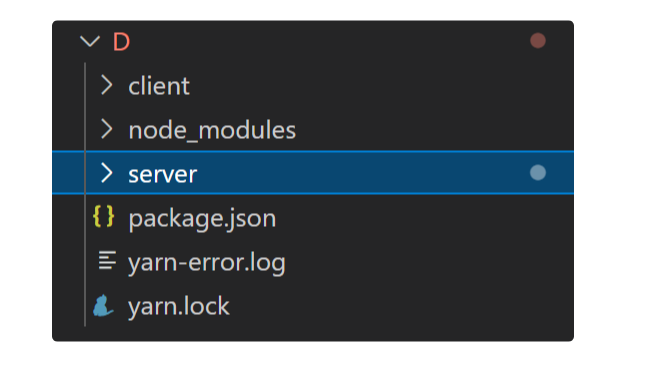
client와 형제 관계에server라는 폴더 생성, 하단 그림과 같이 만들면 된다.
- 프로젝트 폴더 위치에서 cmd를 열어준 뒤, 하단 명령어를 입력해 모두 설치해준다.
yarn global add typescript
yarn add express
yarn add ts-node
yarn add @types/node
yarn add @types/express- 설치가 됐으면
package.json이 생성되는데, dependencies 아래에 하단 처럼 입력해준다. 하단 문서를 아예 복사해도 좋다.
{
  "dependencies": {
    "@types/express": "^4.17.13",
    "@types/node": "^17.0.18",
    "express": "^4.17.3",
    "global": "^4.4.0",
    "ts-node": "^10.5.0",
    "typescript": "^4.5.5"
  },
  "scripts": {
    "start": "ts-node ./server/server.ts"
  }
}- 그런 뒤에, 1에 만들어준
server폴더에 하단처럼 파일/폴더들을 만들어준다.
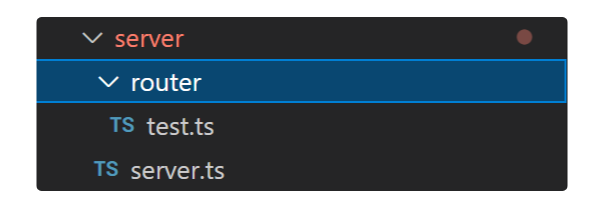
test.ts에 들어갈 내용은 다음과 같다. 복사/붙여넣기 해주면 된다.
const express = require("express");
const router = express.Router();

router.get("/", (req: any, res: any) => {
    res.send("hi");
})

module.exports = router;server.ts에 들어갈 내용은 다음과 같다. 복사/붙여넣기 해주면 된다.
import express from 'express';

const app = express();
const test = require("./router/test");

app.use("/api", test);

const port: number = 5000;
app.listen(port, () => console.log(`${port}`));- 다 만들었으면 이제 실행을 해 볼 차례다. 프로젝트 폴더 위치에서
yarn start입력하여 터미널 창에 5000이 떠 있으면 성공! 이제http://localhost:5000/api로 가보자.hi라는 말이 화면에 출력되면 타입스크립트로 서버 띄우기까지 성공한거다! - 이제 client단과 연결을 해줘야 한다. 추가적으로
nodemon과concurrently를 설치해준다.
nodemon: 개발 시 변경사항을 실시간으로 업데이트 해주기 위한 패키지로,--dev명령어는 개발환경에서만 적용하기 위한 명령어다. 우린, 개발 시에만nodemon을 사용할 것이므로,--dev명령어를 추가하여 설치해준다.concurrently: 리액트 서버와 노드 서버를 동시에 실행 시키기 위한 모듈
yarn add nodemon --dev
yarn add concurrently- 8을 다 설치한 뒤,
package.json에 하단 스크립트들을 넣어준다. 다 넣고yarn start로 실행했을 때http://localhost:5000/api와http://localhost:3000둘 다 확인해보자. 잘 나오면 성공! 서버 설치는 끝났다. 이제, react 서버와 노드 서버를 연결시켜줘야 할 차례다.
{
  "dependencies": {
    "@types/express": "^4.17.13",
    "@types/node": "^17.0.18",
    "concurrently": "^7.0.0",
    "express": "^4.17.3",
    "global": "^4.4.0",
    "ts-node": "^10.5.0",
    "typescript": "^4.5.5"
  },
  "scripts": {
    "server": "cd server && nodemon server",
    "client": "cd client && yarn start",
    "start": "concurrently --kill-others-on-fail \"yarn server\" \"yarn client\" \"ts-node ./server/server.ts\""
  },
  "devDependencies": {
    "nodemon": "^2.0.15"
  }
}- react 서버와 노드 서버간의 데이터를 주고 받기 위해서는 프록시 모듈을 설치해야 한다. 또, 데이터 통신을 위한 방법 중 Fetch API 대신 Axios 라이브러리를 사용하기 위해 설치를 해야한다. 먼저 프록시 설정을 위해
client폴더의src내에setupProxy.js를 생성한다.
- 여기서 잠깐! TypeScript 쓴대놓고 갑자기 웬 js?
-> “2021년 7월 14일 기준 Typescript template CRA는 http-proxy-middleware을 지원하지 않는다.” 는 슬픈 소식, 그래서 js로 설정할 수밖에 없었다! .js로 하면 자동으로 CRA가 인식하고 바꿔준다!
- 모듈 설치를 위해
client폴더 위치에서 cmd를 열고yarn add http-proxy-middleware를 입력해준다. - 설치 완료 후
setupProxy.js에 하단 소스를 복사/붙여넣기 해주면 된다.
const { createProxyMiddleware } = require("http-proxy-middleware");

module.exports = function (app) {
    app.use(
        createProxyMiddleware("/api", {
            target: "http://localhost:5000",
            changeOrigin: true,
        })
    );
};- 통신을 위한 Axios 라이브러리 설치를 위한 명령어를 실행해준다.
yarn add axios - 테스트를 위해
server/router/test.ts와client/src/App.tsx의 내용을 수정한다.
server/router/test.ts
const express = require("express");
const router = express.Router();

router.get("/", (req: any, res: any) => {
    res.send({ test : "hi"});
})

module.exports = router;
client/src/App.tsx
import React, { useEffect } from 'react';
import axios from 'axios';
import './App.css';

function App() {
  const callApi = async () => {
    axios.get("/api").then((res) => console.log(res.data.test));
  }

  useEffect(() => {
    callApi();
  }, []);

  return <div>테스트</div>
}

export default App;- 설정 완료 후 프로젝트 폴더 위치에서
yarn start로 실행시켜 본다.http://localhost:3000에서hi라는 콘솔이 나오면 연동 성공!

휘발방지