구현할 것
Spring Boot 3과 Next.js 14 간에
HTTPS CORS 통신을 주고받는 과정에서 어려움을 겪어
기록을 남겨 반복된 시행착오를 줄이려고 한다.
준비물
두 서버가 CORS 정책을 만족시키면서 HTTPS 통신을
HTTPS 통신을 위한 인증 파일이 필요하다.
[Next.js 14]
- .key 파일
- .cert 파일
[spring boot 3]
- keystore.p12
Spring
HTTPS 설정
HTTPS 통신을 하기위해서는 keystore.p12와
application.yml설정이 필요하다.
키 파일 발급은 아래글을 참고하자
https://velog.io/@penloo/%EB%82%B4%EB%B6%80%EB%A7%9D-HTTPS-%EC%9D%B8%EC%A6%9D%EC%84%9C-%EB%B0%9C%EA%B8%89%ED%95%98%EA%B8%B0
.gitignore
keystore.p12 파일이 깃에 올라가지 않도록 설정해주자.
### Local HTTPS ###
application-local.yml
keystore.p12
application.yml
로컬에서만 사용할 인증서이기 때문에
spring.profiles.active=local로
application-local.yml파일 설정을 가져와주자.
spring:
  thymeleaf:
    cache: false
  application:
    name: {프로젝트명}
  profiles:
    active: local
application-local.yml
# local HTTPS Configuration
server:
  ssl:
    enabled: true
    key-store: classpath:keystore.p12
    key-store-password: {p12 키 비밀번호}
    key-store-type: PKCS12
    key-alias: {p12 키 별명}
client:
  server:
    domain1: https://localhost:3000/
    domain2: https://{클라이언트 도메인1}/
    domain3: https://{클라이언트 도메인2}/
keystore.p12파일을
../src/main/resources/keystore.p12 경로에 두면
key-store: classpath:keystore.p12
이 설정에서 인식할 수 있다.
CORS 설정
CorsConfig
package com.myweapon.hourglass.config;

import org.springframework.beans.factory.annotation.Value;
import org.springframework.context.annotation.Configuration;
import org.springframework.web.servlet.config.annotation.CorsRegistry;
import org.springframework.web.servlet.config.annotation.WebMvcConfigurer;

@Configuration
public class CorsConfig implements WebMvcConfigurer {
    // 클라이언트 서버 도메인 주소
    @Value("${client.server.domain1}")
    private String clientServerDomain1;
    @Value("${client.server.domain2}")
    private String clientServerDomain2;
    @Value("${client.server.domain3}")
    private String clientServerDomain3;

    // 전역 CORS 설정
    @Override
    public void addCorsMappings(CorsRegistry registry) {
        registry.addMapping("/api/**")
                .allowedOrigins(clientServerDomain1) // 필요한 도메인 추가
                .allowedOrigins(clientServerDomain2)
                .allowedOrigins(clientServerDomain3)
                .allowedMethods("*")
                .allowedHeaders("*")
                .allowCredentials(true);
    }
}
SecurityConfig
package com.myweapon.hourglass.config;

import org.springframework.beans.factory.annotation.Value;
import org.springframework.context.annotation.Bean;
import org.springframework.context.annotation.Configuration;
import org.springframework.security.config.annotation.web.builders.HttpSecurity;
import org.springframework.security.config.annotation.web.configuration.EnableWebSecurity;
import org.springframework.security.config.annotation.web.configurers.AbstractHttpConfigurer;
import org.springframework.security.config.http.SessionCreationPolicy;
import org.springframework.security.web.SecurityFilterChain;
import org.springframework.web.cors.CorsConfiguration;
import org.springframework.web.cors.UrlBasedCorsConfigurationSource;

@Configuration
@EnableWebSecurity
public class SecurityConfig {

    @Value("${client.server.domain1}")
    private String clientServerDomain1;

    @Value("${client.server.domain2}")
    private String clientServerDomain2;

    @Value("${client.server.domain3}")
    private String clientServerDomain3;

    @Bean
    public SecurityFilterChain configure(HttpSecurity http) throws Exception {
        return http.csrf(AbstractHttpConfigurer::disable)
                .httpBasic(AbstractHttpConfigurer::disable)
                .cors(cors -> cors.configurationSource(corsConfigurationSource())) // CORS 설정 추가
                .sessionManagement(sessionManagementConfig ->
                        sessionManagementConfig
                                .sessionCreationPolicy(SessionCreationPolicy.STATELESS))
                .authorizeHttpRequests(authorize -> authorize
                        .anyRequest().permitAll()
                )
                .formLogin(AbstractHttpConfigurer::disable)
                .build();
    }

    @Bean
    public UrlBasedCorsConfigurationSource corsConfigurationSource() {
        UrlBasedCorsConfigurationSource source = new UrlBasedCorsConfigurationSource();
        CorsConfiguration config = new CorsConfiguration();
        config.setAllowCredentials(true);
        config.addAllowedOrigin(clientServerDomain1);
        config.addAllowedOrigin(clientServerDomain2);
        config.addAllowedOrigin(clientServerDomain3);
        config.addAllowedHeader("*");
        config.addAllowedMethod("*");
        source.registerCorsConfiguration("/**", config);
        return source;
    }
}
WebSocketConfig
package com.myweapon.hourglass.config;

import com.myweapon.hourglass.webchat.util.SignalSocketHandler;
import org.springframework.beans.factory.annotation.Value;
import org.springframework.context.annotation.Bean;
import org.springframework.context.annotation.Configuration;
import org.springframework.web.socket.WebSocketHandler;
import org.springframework.web.socket.config.annotation.WebSocketConfigurer;
import org.springframework.web.socket.config.annotation.WebSocketHandlerRegistry;
import org.springframework.web.socket.server.standard.ServletServerContainerFactoryBean;

@Configuration
public class WebSocketConfig implements WebSocketConfigurer {
    // 클라이언트 서버 도메인 주소
    @Value("${client.server.domain1}")
    private String clientServerDomain1;
    @Value("${client.server.domain2}")
    private String clientServerDomain2;
    @Value("${client.server.domain3}")
    private String clientServerDomain3;

    @Override
    public void registerWebSocketHandlers(WebSocketHandlerRegistry registry) {
        registry.addHandler(signalHandler(), "/signal")
                .setAllowedOrigins(clientServerDomain1, clientServerDomain2, clientServerDomain3)
                .withSockJS();
    }

    @Bean
    public WebSocketHandler signalHandler() {
        return new SignalSocketHandler();
    }

    @Bean
    public ServletServerContainerFactoryBean createWebSocketContainer() {
        ServletServerContainerFactoryBean container = new ServletServerContainerFactoryBean();
        container.setMaxTextMessageBufferSize(8192);
        container.setMaxBinaryMessageBufferSize(8192);
        return container;
    }
}
테스트 API Controller
Next.js와 Spring Boot 간에 통신을 주고받을 수 있는지
CORS 정책에 막히지 않는지 확인하기 위한 테스트용 API다.
package com.myweapon.hourglass.webchat.controller;

import org.springframework.http.ResponseEntity;
import org.springframework.web.bind.annotation.GetMapping;

@org.springframework.web.bind.annotation.RestController
public class RestController {
    @GetMapping("/api/hello")
    public ResponseEntity<String> hello() {
        ResponseEntity<String> response = ResponseEntity.ok("Hello, World!");
        return response;
    }
}
Next.js 14
Next.js HTTPS 통신을 위해
dev.cert, dev.key를 생성하고 챙겨주자.
.gitignore
# local HTTPS
dev.key
dev.cert
server-local.js
로컬 테스트환경에서만 쓸 파일이 깃에 올라가지 않도록 설정해주자.
package.json
{
  "name": "your_project_name",
  "version": "0.1.0",
  "private": true,
  "scripts": {
    "dev": "next dev",
    "build": "next build",
    "lint": "next lint",
    "local": "node server-local.js",
    "start": "next start -p 3000"
  },
  "dependencies": {
    "@types/date-fns": "^2.6.0",
    "date-fns": "^3.6.0",
    "dotenv": "^16.4.5",
    "env-cmd": "^10.1.0",
    "http-proxy-middleware": "^3.0.0",
    "js-cookie": "^3.0.5",
    "jwt-decode": "^4.0.0",
    "next": "14.2.4",
    "react": "^18",
    "react-dom": "^18",
    "yarn": "^1.22.22",
    "zustand": "^4.5.4"
  },
  "devDependencies": {
    "@types/js-cookie": "^3.0.6",
    "@types/node": "^20",
    "@types/react": "^18",
    "@types/react-dom": "^18",
    "eslint": "^8",
    "eslint-config-next": "14.2.4",
    "postcss": "^8",
    "tailwindcss": "^3.4.1",
    "typescript": "^5"
  }
}
"local": "node server-local.js",
npm run local 명령어를 실행하면 server-local.js 파일이
실행되도록 파일 내용을 수정했다.
테스트 할 때 Next.js Server를
npm run local로 켜주도록 하자.
.env.localhost
NEXT_PUBLIC_RUN_MODE=localserver-local.js
const { createServer } = require('https');
const { parse } = require('url');
const next = require('next');
const fs = require('fs');
const path = require('path');

require('dotenv').config({ path: '.env.localhost' }); // 환경 변수 로드

const dev = process.env.NODE_ENV !== 'production';
const app = next({ dev });
const handle = app.getRequestHandler();

// 인증서 파일 경로 설정
const httpsOptions = {
  key: fs.readFileSync(path.resolve(__dirname, 'dev.key')),
  cert: fs.readFileSync(path.resolve(__dirname, 'dev.cert')),
};

const port = process.env.PORT || 3000; // 로컬에서는 3000 포트 사용

app.prepare().then(() => {
  const server = createServer(httpsOptions, (req, res) => {
      res.setHeader('Access-Control-Allow-Origin', 'https://localhost:3000');
      res.setHeader('Access-Control-Allow-Methods', 'GET,POST,PUT,DELETE,OPTIONS');
      res.setHeader('Access-Control-Allow-Headers', 'Content-Type, Authorization');
      res.setHeader('Access-Control-Allow-Credentials', 'true');

      if (req.method === 'OPTIONS') {
          res.writeHead(204);
          res.end();
          return;
      }

      const parsedUrl = parse(req.url, true);
      handle(req, res, parsedUrl);
  });

  server.listen(port, (err) => {
      if (err) throw err;
      console.log(`> Ready on https://localhost:${port}/`);
  });
});
// 인증서 파일 경로 설정
const httpsOptions = {
key: fs.readFileSync(path.resolve(__dirname, 'dev.key')),
cert: fs.readFileSync(path.resolve(__dirname, 'dev.cert')),
};이 파일로 하면 루트 디렉토리에 있는 dev.key, dev.cert파일을
인식할 수 있다.
page.tsx
테스트 API 요청할 버튼을 만들어서 클릭하면
API 요청을 하고 콘솔에 메시지를 출력하도록 설정하자.
'use client'
import { useState, useEffect } from "react";
export default function TestPage() {

    async function test() {
        try {
            const response = await fetch('https://localhost:8081/api/hello', {
                method: 'GET',
                headers: {
                    'Content-Type': 'application/json'
                }
            });
            const data = await response.text(); // 텍스트 형식의 응답을 받음
            console.log(data);
        } catch (error) {
            console.error('Error fetching data:', error);
        }
    }

  useEffect (() => {

  },[])


  return (
    <div className="flex">
    <button onClick={test}>Test</button>
    </div>
    );
}
테스트
무사히 출력된다.

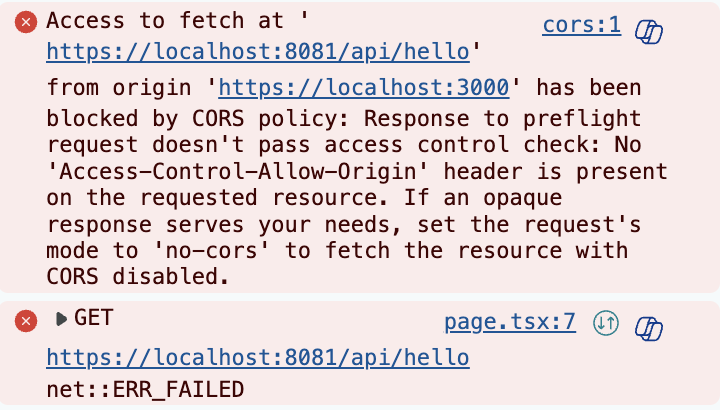
만약 설정을 잘못 건드려서 CORS가 막혀있다면
아래 같은 메시지가 나온다.
정리
Next.js서버와 Spring서버가 HTTPS 통신을 해서
데이터를 잘 주고받으려면 CORS 설정이 잘 되어있어야한다.
- Spring의 경우 웹소켓까지 사용한다면
3개의 설정 파일이 있어야한다.
public class CorsConfig implements WebMvcConfigurer
: 글로벌 허용
public class SecurityConfig
: 보안설정 허용
public class WebSocketConfig implements WebSocketConfigurer
3개 중에 중복이 되는줄 알고 CorsConfig이 파일을 지웠더니
글로벌 허용이 안되서 CORS 에러가 발생했다. -_-
POST Man 같은 API테스트로는 요청을 해도 잘 될 수 있다.
하지만 Next.js에서 렌더링한 버튼으로 요청을 하면 안 될 수 있는데
왜냐하면 PostMan-Spring 간의 통신은 브라우저-서버 통신이라 CORS 정책과 무관하지만
Next.js-Spring 간의 통신은 서버-서버 통신이라 CORS 정책이 허용되어있어야하기 때문이다.
이걸 잘 모르는 팀원들에게 왜 포스트맨 되는데 Next.js 안 되는지를 설명하느라
애를 먹었었다.
그래도 무사히 연결이 되서 다행이고
이제 AWS 배포해서 맞춰봐야겠다.