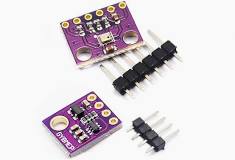
드라이버 개요
- Device Tree 없이도 동작
SMBus함수만 사용 → 모든 I²C 어댑터에서 호환성 좋음- Forced Mode + 정수 보정 → 전력, 성능 모두 최적
- Datasheet
Driver Flow
insmod bmp280.ko
    ↓
모듈 초기화 (mod_init)
    ├─ ① /dev/bmp280 캐릭터 디바이스 생성
    ├─ ② I²C 버스(i2c-1) 열기 & BMP280 클라이언트 생성
    ├─ ③ Soft Reset → Chip ID 확인(0x58) → 보정계수(dig_T*) 읽기
    └─ ④ 성공 → "cat /dev/bmp280" 준비 완료!

cat /dev/bmp280
    ↓
driver_read() 호출
    ↓
read_temperature() 실행
    ├─ ⑤ Forced Mode 명령 (0xF4 레지스터)
    ├─ ⑥ 20비트 raw 온도 읽기 (0xFA~0xFC)
    └─ ⑦ 정수 보정 공식 적용 → ℃ × 100 단위로 변환 → 사용자 공간에 문자열 전달
헤더 파일 및 I²C 클라이언트 생성
#include <linux/module.h>
#include <linux/init.h>
#include <linux/fs.h>
#include <linux/version.h>
#include <linux/cdev.h>
#include <linux/uaccess.h>
#include <linux/slab.h>
#include <linux/i2c.h>
#include <linux/kernel.h>

#define DRIVER_NAME "bmp280"          // 드라이버 이름 (sysfs 등에서 확인 가능 )
#define DRIVER_CLASS "bmp280Class"    // 디바이스 클래스 이름

// I²C 어댑터(컨트롤러)와 클라이언트(슬레이브 장치) 구조체 선언
static struct i2c_adapter *bmp_i2c_adapter = NULL;
static struct i2c_client *bmp280_i2c_client = NULL; -
i2c_adapter→ 구조체 : 버스 컨트롤러 -
i2c_client 구조체: i2c devicer (센서 slave 장치)
Slave Address
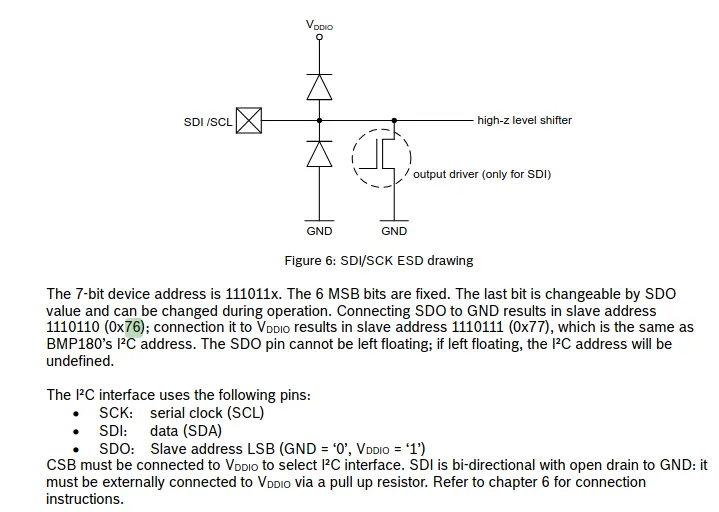
// I²C 버스 번호와 BMP280 슬레이브 주소 (Raspberry Pi 기본값)
#define SLAVE_DEVICE_NAME "BMP280"              // 디바이스/드라이버 이름
#define I2C_BUS_AVAILABLE 1                     // Raspberry Pi의 I²C-1 버스
#define BMP280_SLAVE_ADDRESS 0x76 // BMP280 기본 I²C 주소 (i2cdetect로 확인 가능)- SDO를 GND에 연결한 경우 slave address = 0x76
- SDO를 VCC에 연결한 경우 : 0x77
드라이버 관련 변수 및 구조체 선언
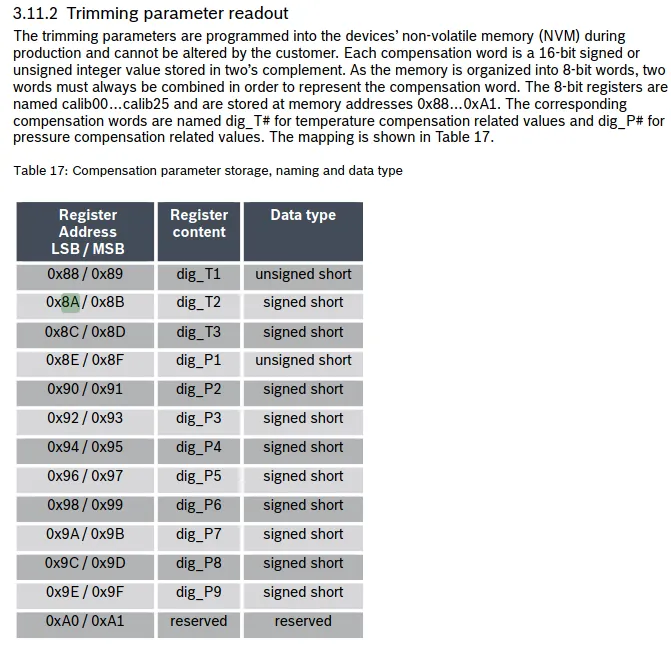
// 온도 보정 계수 (Trimming parameters, BMP280 데이터시트 p.21~22)
s32 dig_T1, dig_T2, dig_T3;                     // dig_T1, dig_T2, dig_T3 (부호 있는 16비트)

// I²C 디바이스 ID 테이블 (드라이버와 장치 매칭)
static const struct i2c_device_id bmp_id[] = {
    { SLAVE_DEVICE_NAME, BMP280_SLAVE_ADDRESS }, // 이름과 주소 매핑
    { }
};

// I²C 드라이버 구조체 (probe/remove 함수 연결)
static struct i2c_driver bmp_driver = {
    .driver = {
        .name = SLAVE_DEVICE_NAME,
        .owner = THIS_MODULE
    }
};

// I²C 보드 정보 (Device Tree 없이도 동작 가능, 런타임에 클라이언트 생성용)
static struct i2c_board_info bmp_i2c_board_info = {
    I2C_BOARD_INFO(SLAVE_DEVICE_NAME, BMP280_SLAVE_ADDRESS)
};

// 캐릭터 디바이스 관련 변수
static dev_t myDeviceNr;                        // 디바이스 번호 (major/minor)
static struct class *myClass;                   // /sys/class/bmp280Class
static struct cdev myDevice;                    // 캐릭터 디바이스 구조체
Read_temperature() 함수 동작
// BMP280 온도 읽기 함수 (raw → 보정 → ℃ 변환)
s32 read_temperature(void) {
    int var1, var2;
    s32 raw_temp;
    s32 d1, d2, d3;
    s32 T;

    // 1. Force Mode로 전환 (측정 1회 후 자동 Sleep)
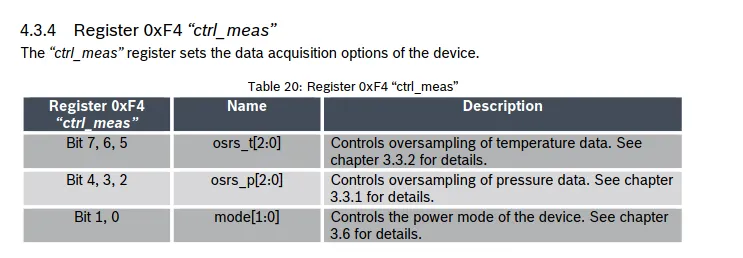
    // ctrl_meas 레지스터 (0xF4): osrs_t=001 (×1), osrs_p=001 (×1), mode=001 (Forced)
i2c_smbus_write_byte_data(bmp280_i2c_client, 0xF4, (1<<5 | 1<<2 | 1<<0));-
0xF4 == > ctrl_meas 레지스터(0xF4) 비트 구조 (데이터 시트 p.25)
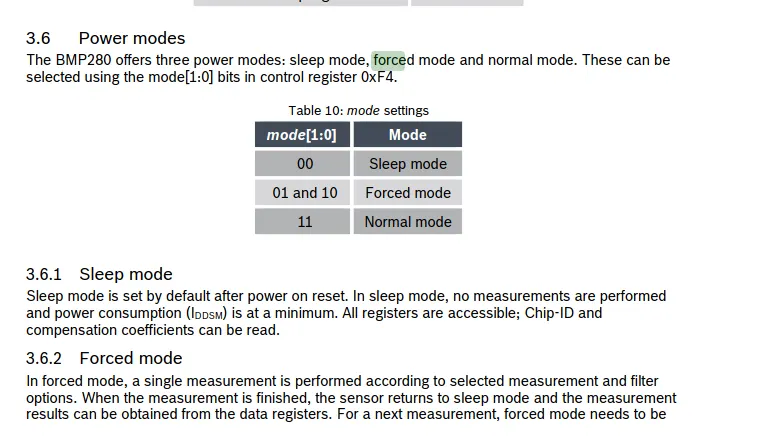
    7 6 5  4 3 2  1 0
    ┌─┬─┬─┐┌─┬─┬─┐┌─┬─┐
    │ osrs_t │ osrs_p │ mode │
    └─┴─┴─┘└─┴─┴─┘└─┴─┘
-
osrs_t (Bit 7:5) → 온도 오버샘플링 (Temperature oversampling)
- 001 = ×1 (1회 샘플링) -
osrs_p (Bit 4:2) → 압력 오버샘플링 (Pressure oversampling)
- 001 = ×1 (1회 샘플링) -
mode (Bit 1:0) → 동작 모드
- 01 = Forced Mode (강제 측정 모드)→ (1<<5 | 1<<2 | 1<<0) = Bit5 = 1 → osrs_t = 001 Bit2 = 1 → osrs_p = 001 Bit0 = 1 → mode = 01 (Forced)
-
    // 2. 온도 데이터 읽기 (0xFA~0xFC, 20비트)
    d1 = i2c_smbus_read_byte_data(bmp280_i2c_client, 0xFA); // MSB
    d2 = i2c_smbus_read_byte_data(bmp280_i2c_client, 0xFB); // LSB
    d3 = i2c_smbus_read_byte_data(bmp280_i2c_client, 0xFC); // XLSB

    // 3. 20비트 원시 온도 값 계산 (MSB<<12 | LSB<<4 | XLSB>>4)
    raw_temp = ((d1 << 16) | (d2 << 8) | d3) >> 4;

printk("raw_temp from bmp280 is : %d\n", raw_temp);-
온도 데이터 읽기 → 20비트 [ P-27]
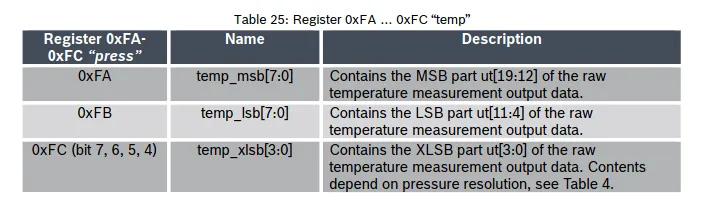
- d1 << 16 → MSB를 최상위 8비트 위치로 이동 (T19~T12를 19~12번 비트로)
- d2 << 8 → LSB를 중간 8비트 위치로 이동 (T11~T4를 11~4번 비트로)
- d3 → XLSB(하위 4비트 + 0000)를 최하위에 붙임 (T3~T0 + 0000)
>> 4→ 전체를 오른쪽으로 4비트 시프트 → T19~T0만 남김 (하위 4비트 0000 버림
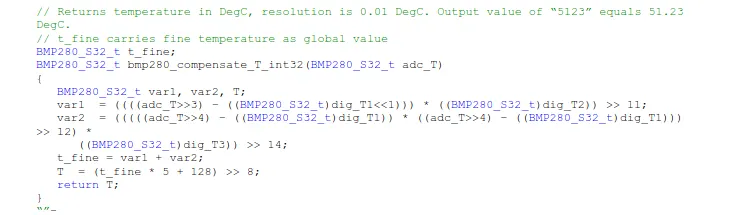
    // 4. 온도 보정 공식 (데이터시트 p.23~24, 부동소수점 버전 대신 정수 버전 사용)
    // t_fine 계산
    var1 = ((((raw_temp >> 3) - (dig_T1 << 1))) * dig_T2) >> 11;
    var2 = (((((raw_temp >> 4) - dig_T1) * ((raw_temp >> 4) - dig_T1)) >> 12) * dig_T3) >> 14;
    s32 t_fine = var1 + var2;

    // 최종 온도 (℃ × 100 단위)
    T = ((t_fine * 5 + 128) >> 8);

    printk("compensated Temperature : %d\n", T); // 00.00 'C 단위로 출력

    return T;
}- Datasheet 보정 공식 구현 p-23 ~24
driver_read 동작
// 사용자 공간에서 cat /dev/bmp280 실행 시 호출 (온도 읽기)
static ssize_t driver_read(struct file *File, char *user_buffer, size_t count, loff_t *offs) {
    int to_copy, not_copied, delta;
    char out_string[20];
    int temperature;

    to_copy = min(sizeof(out_string), count);

    temperature = read_temperature();               // 온도 읽기 (100배 단위)
    sprintf(out_string, "%d.%d\n", temperature/100, temperature%100); // 25.32 형식

    not_copied = copy_to_user(user_buffer, out_string, to_copy);
    //사용자 공간으로 전달.
    printk("translated Temperature : %s\n", out_string);

    delta = to_copy - not_copied;
    return delta;
}
모듈 초기화 및 구조체 설정
// 디바이스 파일 열기/닫기 (로그만)
static int driver_open(struct inode *deviceFile, struct file *instance) {
    printk("opens\n");
    return 0;
}
static int driver_close(struct inode *deviceFile, struct file *instance) {
    printk("close\n");
    return 0;
}

// 파일 운영 구조체
static struct file_operations fops = {
    .owner = THIS_MODULE,
    .open = driver_open,
    .read = driver_read,
    .release = driver_close,
};

// 모듈 초기화 (insmod 시 호출)
static int __init mod_init(void) {
    int ret = -1;
    u8 id;

    printk("(mod)init");

    // 1. 캐릭터 디바이스 번호 할당 (/dev/bmp280)
    if (alloc_chrdev_region(&myDeviceNr, 0, 1, DRIVER_NAME) < 0) {
        printk("Device Nr. could not be allocated!\n");
        return -1;
    }

    // 2. 클래스 생성 (/sys/class/bmp280Class)
    if ((myClass = class_create(THIS_MODULE, DRIVER_CLASS)) == NULL) {
        printk("Device Class can not be created!\n");
        goto ClassError;
    }

    // 3. 디바이스 파일 생성 (/dev/bmp280)
    if (device_create(myClass, NULL, myDeviceNr, NULL, DRIVER_NAME) == NULL) {
        printk("Can not create device file!\n");
        goto FileError;
    }

    // 4. cdev 등록
    cdev_init(&myDevice, &fops);
    if (cdev_add(&myDevice, myDeviceNr, 1) == -1) {
        printk("Registering of device to kernel failed!\n");
        goto KernelError;
    }
I2C Adapter 연결하기
    // 5. I²C 버스 어댑터 가져오기 (i2c-1)
    bmp_i2c_adapter = i2c_get_adapter(I2C_BUS_AVAILABLE);
    if (bmp_i2c_adapter != NULL) {
        // 6. BMP280 클라이언트 생성 (런타임에 I²C 장치 등록)
        bmp280_i2c_client = i2c_new_client_device(bmp_i2c_adapter, &bmp_i2c_board_info);
        if (bmp280_i2c_client != NULL) {
            // 7. I²C 드라이버 등록 (probe/remove 연결)
            if (i2c_add_driver(&bmp_driver) != -1) {
                ret = 0;
            } else {
                printk("Can't add driver...\n");
            }
        } else {
            i2c_put_adapter(bmp_i2c_adapter); // 실패 시 어댑터 반환
            goto KernelError;
        }
    }

    printk("BMP280 Driver added!\n");
BMP280 초기화
    // 8. BMP280 초기화
    // 8-1. Soft Reset (0xE0 = 0xB6)
    i2c_smbus_write_byte_data(bmp280_i2c_client, 0xE0, 0xB6);

    // 8-2. Chip ID 읽기 (0xD0, 정상값 0x58)
    id = i2c_smbus_read_byte_data(bmp280_i2c_client, 0xD0);
    printk("============================================\n");
    printk("Bosch bmp280 ID is(should be 0x58) : 0x%x\n", id);
    printk("============================================\n");

    printk(" to see: $ cat /dev/bmp280\n ");

    // 8-3. Force Mode 설정 (ctrl_meas: osrs_t=001, osrs_p=001, mode=001)
    i2c_smbus_write_byte_data(bmp280_i2c_client, 0xF4, (1<<5 | 1<<2 | 1<<0));

    // 8-4. Config (필터 off, 기본값)
    i2c_smbus_write_byte_data(bmp280_i2c_client, 0xF5, 0);

    // 8-5. 온도 보정 계수 읽기 (0x88~0x8C, signed 16bit)
    dig_T1 = i2c_smbus_read_word_data(bmp280_i2c_client, 0x88);
    dig_T2 = i2c_smbus_read_word_data(bmp280_i2c_client, 0x8A);
    dig_T3 = i2c_smbus_read_word_data(bmp280_i2c_client, 0x8C);

    // 부호 있는 값으로 변환 (데이터시트 p.23~24)
    if (dig_T2 > 32767) dig_T2 -= 65536;
    if (dig_T3 > 32767) dig_T3 -= 65536;

    return ret;
Datasheet p-17,21,24
- Soft Reset
-
Register 0xE0 “reset”
The “reset” register contains the soft reset word reset[7:0]. If the value 0xB6 is written to the register, the device is reset using the complete power-on-reset procedure. Writing other values than 0xB6 has no effect. The readout value is always 0x00.B6 입력 시 reset - > 읽을 때는 항상 00으로 나온다 ,
-
- Register 0xD0 “id”
- The “id” register contains the chip identification number chip_id[7:0], which is 0x58. This number can be read as soon as the device finished the power-on-reset.
- dig_T1,dig_T2,dig_T3 ⇒ 레지스터에서 값 읽어와서 저장
모듈 제거 처리
// 모듈 제거 (rmmod 시 호출)
static void __exit mod_exit(void) {
    printk("(mod)exit");

    // I²C 클라이언트 및 드라이버 정리
    i2c_unregister_device(bmp280_i2c_client);
    i2c_del_driver(&bmp_driver);

    // 캐릭터 디바이스 정리
    cdev_del(&myDevice);
    device_destroy(myClass, myDeviceNr);
    class_destroy(myClass);
    unregister_chrdev_region(myDeviceNr, 1);
}

module_init(mod_init);
module_exit(mod_exit);
MODULE_LICENSE("GPL");
→모듈 정리(clean-up) 필수 ❗
주요 기능
/dev/bmp280캐릭터 디바이스 파일 생성cat /dev/bmp280실행 시 현재 온도(℃, 소수점 2자리) 출력- Force Mode로 1회 측정 → 보정 → 출력
이렇게 Datasheet에 근거한 BMP280 I2C 드라이버 구현을 분석해보았습니다.
세상의 어려운 문제를 해결하자