Kubespray 설치 ( in GCP )
- 동양북스의 쿠버네티스 입문을 보고 정리한 글입니다.
사전 준비
- instance-1에서 ssh-key 생성
ssh-keygen.exe -t rsa-
SSH Shell에서 공개 키의 내용을 복사할 때는 한 행씩 나눠서 복사될 수 있으므로 편집이게 붙여넣어 한 행으로 만든 후 다시 복사해야 한다.
-
GCP → Compute Engine → Metadata 메뉴를 실행하여 SSH 키를 추가한다.
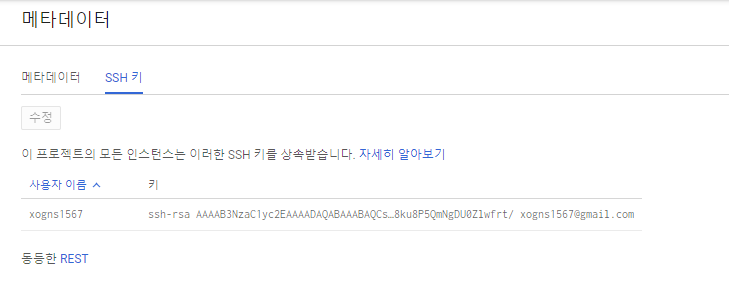
GCP에서는 이렇게 local에서 생성한 공개키를 메타데이터 메뉴에서 직접 넣어줄 수 있지만 그 외에도 여러가지 방법이 존재한다.
SSH 공개키 배포
1) ssh-copy-id 계정이름@서버IP
.ssh/authorized_keys 파일 안에 공개 키를 직접 복사
2) vi .ssh/authorized_keys
- 접속 Test
- instance-2 ~ 5까지 ssh 접속을 실시해본다.
=> ansible은 ssh 기반으로 접속하여 설치를 진행하기 때문이다.
xogns1567@instance-1:~$ ssh instance-5
The authenticity of host 'instance-5 (10.142.0.5)' can't be established.
ECDSA key fingerprint is SHA256:zH5e+YkWTJzCKsIARkRYvvRrCsDZmBQRFHgSOspyQ/0.
Are you sure you want to continue connecting (yes/no)? yes
Warning: Permanently added 'instance-5,10.142.0.5' (ECDSA) to the list of known hosts.
Welcome to Ubuntu 16.04.7 LTS (GNU/Linux 4.15.0-1092-gcp x86_64)

 * Documentation:  https://help.ubuntu.com
 * Management:     https://landscape.canonical.com
 * Support:        https://ubuntu.com/advantage

0 packages can be updated.
0 of these updates are security updates.

The programs included with the Ubuntu system are free software;
the exact distribution terms for each program are described in the
individual files in /usr/share/doc/*/copyright.

Ubuntu comes with ABSOLUTELY NO WARRANTY, to the extent permitted by
applicable law.

xogns1567@instance-5:~$ exit
logout
Connection to instance-5 closed.
Kubespray 설치
- Master #1 역할인 instance-1에서 진행한다.
# Ubuntu Package Manager를 최신 상태로 업데이트
sudo apt update

# kubespray는 필요한 관련 패키지를 pip(파이썬 패키지 매니저)로 설치한다.
sudo apt -y install python-pip

# 버전 확인
pip --version

# Git Clone
git clone https://github.com/kubernetes-sigs/kubespray.git

cd kubespray

cat requirements.txt
ansible==2.9.16
jinja2==2.11.1
netaddr==0.7.19
pbr==5.4.4
jmespath==0.9.5
ruamel.yaml==0.16.10

# 관련 패키지 설치
sudo pip install -r requirements.txt

# ansible 버전 확인
ansible --version
Kubespray 설정
# Directory 생성
mkdir inventory/mycluster

# 복사
cp -rfp inventory/sample/* inventory/mycluster

# Tree로 구조 확인
tree inventory/mycluster/

inventory/mycluster/
├── credentials
│   └── kubeadm_certificate_key.creds
├── group_vars
│   ├── all
│   │   ├── all.yml
│   │   ├── aws.yml
│   │   ├── azure.yml
│   │   ├── containerd.yml
│   │   ├── coreos.yml
│   │   ├── docker.yml
│   │   ├── gcp.yml
│   │   ├── oci.yml
│   │   ├── openstack.yml
│   │   └── vsphere.yml
│   ├── etcd.yml
│   └── k8s-cluster
│       ├── addons.yml
│       ├── k8s-cluster.yml
│       ├── k8s-net-calico.yml
│       ├── k8s-net-canal.yml
│       ├── k8s-net-cilium.yml
│       ├── k8s-net-flannel.yml
│       ├── k8s-net-kube-router.yml
│       ├── k8s-net-macvlan.yml
│       ├── k8s-net-weave.yml
│       └── offline.yml
└── inventory.ini

4 directories, 23 files- inventory.ini 수정
# ## Configure 'ip' variable to bind kubernetes services on a
# ## different ip than the default iface
# ## We should set etcd_member_name for etcd cluster. The node that is not a etcd member do not need to set the value, or can set the empty string value.
[all]
instance-1 ansible_ssh_host=10.142.0.2 ip=10.142.0.2 etcd_member_name=etcd1
instance-2 ansible_ssh_host=10.142.0.7 ip=10.142.0.7 etcd_member_name=etcd2
instance-3 ansible_ssh_host=10.142.0.4 ip=10.142.0.4 etcd_member_name=etcd3
instance-4 ansible_ssh_host=10.142.0.6 ip=10.142.0.6
instance-5 ansible_ssh_host=10.142.0.5 ip=10.142.0.5

# ## configure a bastion host if your nodes are not directly reachable
# [bastion]
# bastion ansible_host=x.x.x.x ansible_user=some_user

[kube-master]
instance-1
instance-2
instance-3

[etcd]
instance-1
instance-2
instance-3

[kube-node]
instance-4
instance-5

[calico-rr]

[k8s-cluster:children]
kube-master
kube-node
calico-rr-
playbook 실행
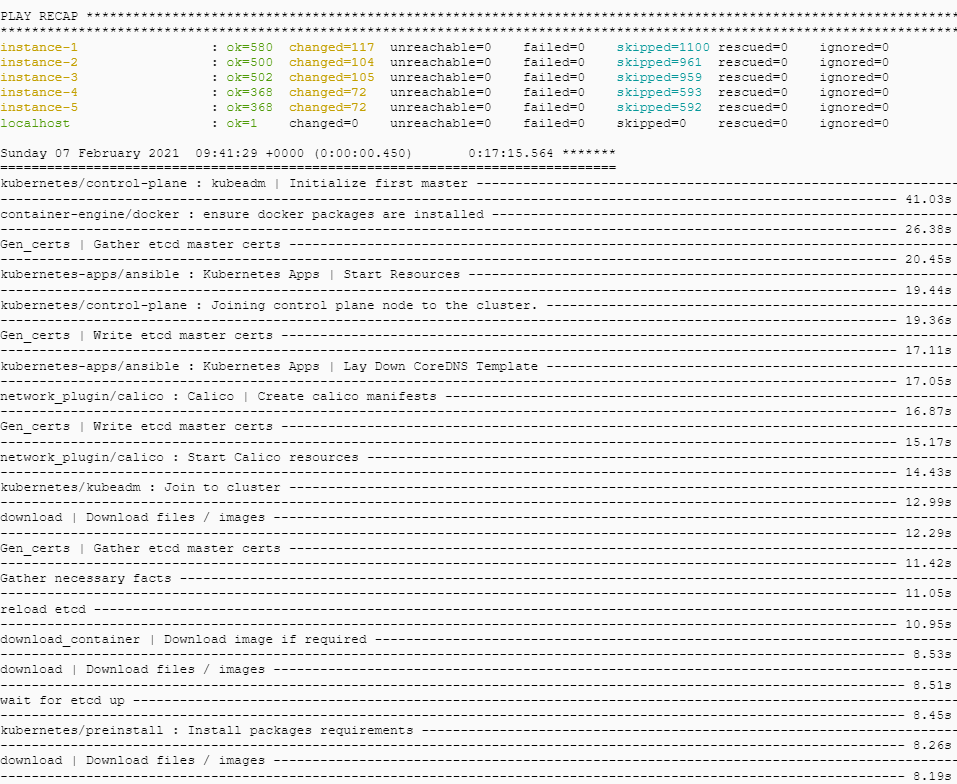
설치까지 완료되는 데 20분 이상 소요
ansible-playbook -i inventory/mycluster/inventory.ini \
-v --become --become-user=root cluster.yml- 완료 화면에 구성 과정별 소요 시간과 instance-1 같은 호스트네임 옆에 failed=0이 표시된다면 실패 없이 정상적으로 구성한 것이다.
# 클러스터 구성 완료한 이후 Master Node에서 root 계정으로 kubectl 관련 명령 사용이 가능해짐
sudo -i

# kubectl get node 명령 수행

root@instance-1:~# kubectl get node
NAME         STATUS   ROLES                  AGE   VERSION
instance-1   Ready    control-plane,master   16m   v1.20.2
instance-2   Ready    control-plane,master   16m   v1.20.2
instance-3   Ready    control-plane,master   15m   v1.20.2
instance-4   Ready    <none>                 14m   v1.20.2
instance-5   Ready    <none>                 14m   v1.20.2
설치 후 초기
- kube-system 네임스페이스 내의 Pod들을 확인
root@instance-1:~/.kube# kubectl get pods -n kube-system
NAME                                       READY   STATUS    RESTARTS   AGE
calico-kube-controllers-847f479bc5-bw7tk   1/1     Running   1          85m
calico-node-2clmb                          1/1     Running   0          87m
calico-node-c248c                          1/1     Running   1          87m
calico-node-hqw5t                          1/1     Running   0          87m
calico-node-tjl64                          1/1     Running   0          87m
calico-node-txv2f                          1/1     Running   2          87m
coredns-847f564ccf-bt2sz                   1/1     Running   0          84m
coredns-847f564ccf-qngwh                   1/1     Running   0          84m
dns-autoscaler-b5c786945-2xv9d             1/1     Running   0          84m
kube-apiserver-instance-1                  1/1     Running   0          89m
kube-apiserver-instance-2                  1/1     Running   0          89m
kube-apiserver-instance-3                  1/1     Running   0          89m
kube-controller-manager-instance-1         1/1     Running   0          89m
kube-controller-manager-instance-2         1/1     Running   0          89m
kube-controller-manager-instance-3         1/1     Running   0          89m
kube-proxy-8rdld                           1/1     Running   0          88m
kube-proxy-cz6ms                           1/1     Running   0          88m
kube-proxy-qjkxf                           1/1     Running   0          88m
kube-proxy-qqqmt                           1/1     Running   0          88m
kube-proxy-x6ntb                           1/1     Running   0          88m
kube-scheduler-instance-1                  1/1     Running   0          89m
kube-scheduler-instance-2                  1/1     Running   1          89m
kube-scheduler-instance-3                  1/1     Running   0          89m
nginx-proxy-instance-4                     1/1     Running   0          88m
nginx-proxy-instance-5                     1/1     Running   0          88m
nodelocaldns-kr2zg                         1/1     Running   0          84m
nodelocaldns-lnhct                         1/1     Running   0          84m
nodelocaldns-md9rs                         1/1     Running   0          84m
nodelocaldns-rqtxd                         1/1     Running   0          84m
nodelocaldns-t2rl7 1/1 Running 0 84m- 현재 Context 확인
root@instance-1:~# kubectl config current-context
kubernetes-admin@cluster.local- .kube/config 파일의 내용 확인 → 인증 관련
root@instance-1:~# cd .kube/

root@instance-1:~/.kube# cat config
apiVersion: v1
clusters:
- cluster:
    certificate-authority-data:
    ..
..- kubectl config view
root@instance-1:~/.kube# kubectl config view
apiVersion: v1
clusters:
- cluster:
    certificate-authority-data: DATA+OMITTED
    server: https://<<IP>>:6443
  name: cluster.local
contexts:
- context:
    cluster: cluster.local
    user: kubernetes-admin
  name: kubernetes-admin@cluster.local
current-context: kubernetes-admin@cluster.local
kind: Config
preferences: {}
users:
- name: kubernetes-admin
  user:
    client-certificate-data: REDACTED
    client-key-data: REDACTED
Cloud Infra Engineer & interested in python, IaC, k8s