Service
Concept
- 파드에 접근할 수 있는 IP를 제공 ( ~= L4 Load Balancer 역할과 비슷 )
- Pod는 Controller가 관리하므로 Cluster 내의 Node를 이곳 저곳 돌아다니게 되며 IP 또한 동적으로 변하게 된다. 이렇게 동적으로 변하는 Pod들에 고정적으로 접근하고자 할 때 사용하는 Object가 Service이다.
[1] ClusterIP
- Default 서비스 타입이며 Cluster 내부에서만 사용할 수 있다. 클러스터 외부에서는 이용 X
Example
- type : ClusterIP ( default가 clusterIP이긴 하다. )
apiVersion: v1
kind: Service
metadata:
  name: clusterip-service
spec:
  type: ClusterIP
  selector:
    app: nginx-for-svc
  ports:
    - protocol: TCP
      port: 80
targetPort: 80- Check
root@instance-1:~/kubernetes-sample/service# kubectl get svc
NAME                TYPE        CLUSTER-IP     EXTERNAL-IP   PORT(S)   AGE
clusterip-service   ClusterIP   10.233.23.13   <none>        80/TCP    5s
kubernetes          ClusterIP   10.233.0.1     <none>        443/TCP   6d3h

root@instance-1:~/kubernetes-sample/pod# kubectl describe service clusterip-service
Name:              clusterip-service
Namespace:         default
Labels:            <none>
Annotations:       <none>
Selector:          app=nginx-for-svc
Type:              ClusterIP
IP Families:       <none>
IP:                10.233.23.13
IPs:               10.233.23.13
Port:              <unset>  80/TCP
TargetPort:        80/TCP
Endpoints:         10.233.118.26:80
Session Affinity:  None
Events:            <none>

root@instance-1:~/kubernetes-sample/pod# kubectl get ep
NAME                ENDPOINTS                                         AGE
clusterip-service   10.233.118.26:80                                  4m11s
kubernetes          10.142.0.2:6443,10.142.0.4:6443,10.142.0.7:6443   6d3h

root@instance-1:~/kubernetes-sample/pod# kubectl get pods -o wide
NAME                                 READY   STATUS      RESTARTS   AGE     IP              NODE         NOMINATED NODE   READINESS GATES
hello-concurrency-1613220000-7hfmq   1/1     Running     0          25m     10.233.125.27   instance-4   <none>           <none>
kubernetes-simple-pod                1/1     Running     0          5h37m   10.233.118.7    instance-5   <none>           <none>
nginx-fot-svc 1/1 Running 0 34s 10.233.118.26 instance-5 <none> <none>- netshoot Container로 Test
root@instance-1:~/kubernetes-sample/service# kubectl run -it --image nicolaka/netshoot testnet bash

bash-5.1# curl 10.233.118.26
<!DOCTYPE html>
<html>
<head>
<title>Welcome to nginx!</title>
<style>
    body {
        width: 35em;
        margin: 0 auto;
        font-family: Tahoma, Verdana, Arial, sans-serif;
    }
</style>
</head>
<body>
<h1>Welcome to nginx!</h1>
<p>If you see this page, the nginx web server is successfully installed and
working. Further configuration is required.</p>

<p>For online documentation and support please refer to
<a href="http://nginx.org/">nginx.org</a>.<br/>
Commercial support is available at
<a href="http://nginx.com/">nginx.com</a>.</p>

<p><em>Thank you for using nginx.</em></p>
</body>
</html>
[2] NodePort
- 서비스 하나에 모든 Node의 지정된 Port를 사용한다. 클러스터 외부에서 이용 O
- 클러스터 외부에서 클러스터 내부 pod로 접근할 때 사용할 수 있는 가장 간단한 방법이다.
Example
apiVersion: v1
kind: Service
metadata:
  name: my-service
spec:
  # NodePort
  type: NodePort
  # key가 app이고 value가 MyApp인 Label을 찾아서 Endpoint로 바라본다.
  selector:
    app: nginx-for-svc
  ports:
      # By default and for convenience,
      # the `targetPort` is set to the same value as the `port` field.
    - port: 80
      targetPort: 80
      # Optional field
      # By default and for convenience,
      # the k8s master will allocate a port from a range (default: 30000-32767)
nodePort: 30007- Check
root@instance-1:~/kubernetes-sample/service# kubectl get ep
NAME                ENDPOINTS                                         AGE
clusterip-service   10.233.118.26:80                                  144m
kubernetes          10.142.0.2:6443,10.142.0.4:6443,10.142.0.7:6443   6d5h
my-service          10.233.118.26:80                                  9s

root@instance-1:~/kubernetes-sample/service# kubectl get svc
NAME                TYPE        CLUSTER-IP      EXTERNAL-IP   PORT(S)        AGE
clusterip-service   ClusterIP   10.233.23.13    <none>        80/TCP         144m
kubernetes          ClusterIP   10.233.0.1      <none>        443/TCP        6d5h
my-service NodePort 10.233.53.193 <none> 80:30007/TCP 21s- Test
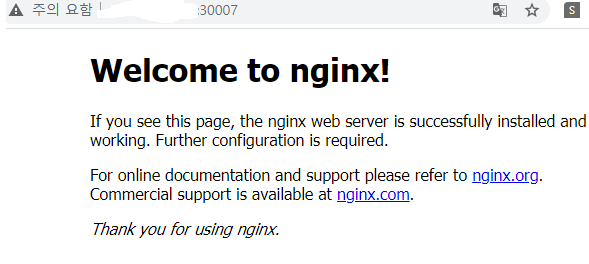
임의의 Node의 externam IP address:30007 로 접속하니 정상적으로 뜨고 있음을 확인 가능
[3] LoadBalancer
- AWS, Azure, GCP 등 Public Cloud와 Openstack 등 Private Cloud, K8S를 지원하는 LB 장비에서 사용한다.
- LB와 Pod를 연결한 후 해당 LB의 IP를 이용하여 클러스터 외부에서 내부의 파드로 접근할 수 있도록 해준다.
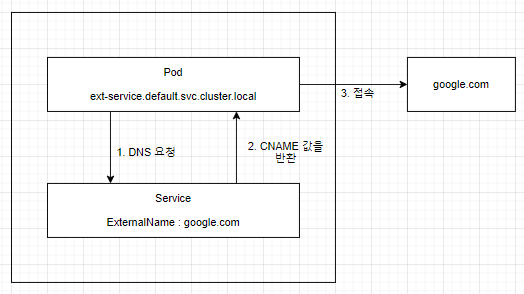
[4] ExternalName
- 서비스 ↔ externalName에 설정한 값과 연결한다. ( 외부에 접근할 때 사용 )
- 설정해 둔 CNAME을 이용하여 클러스터 외부에 접근할 수 있다.
- selector가 필요 없다.
Example
apiVersion: v1
kind: Service
metadata:
  name: ext-service
#   namespace: default
spec:
  type: ExternalName
externalName: google.com- Check
root@instance-1:~/kubernetes-sample/service# kubectl get svc
NAME                TYPE           CLUSTER-IP      EXTERNAL-IP   PORT(S)        AGE
clusterip-service   ClusterIP      10.233.23.13    <none>        80/TCP         150m
ext-service         ExternalName   <none>          google.com    <none>         13s
kubernetes          ClusterIP      10.233.0.1      <none>        443/TCP        6d5h
my-service          NodePort       10.233.53.193   <none>        80:30007/TCP   6m11s
그림으로 그려보자면 아래와 같다.
Headless Service
-
LB가 필요 없거나 단일 Service IP가 필요 없을 때 사용한다.
-
헤드리스 서비스에 셀렉터를 설정하면 Kubernetes API로 확인할 수 있는 Endpoint가 만들어진다 서비스와 연결된 파드를 직접 가리키는 DNS A 레코드 또한 만들어진다.
-
Check
CLUSTER-IP와 EXTERNAL-IP 항목이 none임을 확인할 수 있다.
또한, describe로 확인해 볼 때 IP 항목은 None이지만 Endpoints는 파드들의 IP와 포트 정보를 확인할 수 있다.
root@instance-1:~/kubernetes-sample/service# kubectl get svc
NAME                TYPE           CLUSTER-IP      EXTERNAL-IP   PORT(S)        AGE
clusterip-service   ClusterIP      10.233.23.13    <none>        80/TCP         167m
ext-service         ExternalName   <none>          google.com    <none>         17m
headless-svc        ClusterIP      None            <none>        80/TCP         8s
kubernetes          ClusterIP      10.233.0.1      <none>        443/TCP        6d6h
my-service          NodePort       10.233.53.193   <none>        80:30007/TCP   23m

root@instance-1:~/kubernetes-sample/service# kubectl describe svc headless-svc
Name:              headless-svc
Namespace:         default
Labels:            <none>
Annotations:       <none>
Selector:          app=nginx-for-svc
Type:              ClusterIP
IP Families:       <none>
IP:                None
IPs:               None
Port:              <unset>  80/TCP
TargetPort:        80/TCP
Endpoints:         10.233.118.26:80
Session Affinity:  None
Events: <none>-
Test
testnet 파드로 접속하여 dig 명령어를 날려보자.
A 레코드가 생성되었음을 확인할 수 있다.
bash-5.1# dig headless-svc.default.svc.cluster.local

; <<>> DiG 9.16.11 <<>> headless-svc.default.svc.cluster.local
;; global options: +cmd
;; Got answer:
;; WARNING: .local is reserved for Multicast DNS
;; You are currently testing what happens when an mDNS query is leaked to DNS
;; ->>HEADER<<- opcode: QUERY, status: NOERROR, id: 21632
;; flags: qr aa rd; QUERY: 1, ANSWER: 1, AUTHORITY: 0, ADDITIONAL: 1
;; WARNING: recursion requested but not available

;; OPT PSEUDOSECTION:
; EDNS: version: 0, flags:; udp: 4096
; COOKIE: d8378db6e57d6dfa (echoed)
;; QUESTION SECTION:
;headless-svc.default.svc.cluster.local.        IN A

;; ANSWER SECTION:
headless-svc.default.svc.cluster.local. 5 IN A  10.233.118.26

;; Query time: 8 msec
;; SERVER: 169.254.25.10#53(169.254.25.10)
;; WHEN: Sat Feb 13 15:53:55 UTC 2021
;; MSG SIZE  rcvd: 133
Kube-proxy
- Kubernetes에서 Service를 만들었을 때 Cluster IP나 Node Port로 접근할 수 있게 만들어 실제 조작을 하는 컴포넌트이다.
- Cluster 내부의 Node마다 1개씩 실행되며 Cluster 내부 IP로 연결하려는 요청을 적절한 파드로 전달해주는 역할을 한다.
- userspace, iptables, IPVS 3가지 방법으로 관리하는데 userspace는 Legacy 관리 모드이므로 제외하겠다.
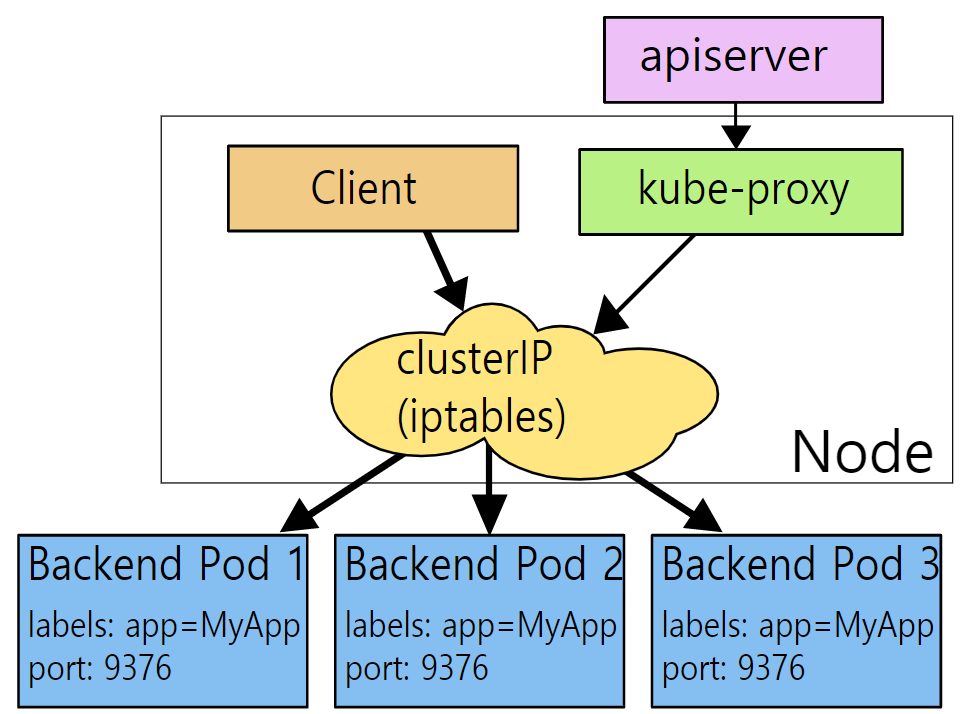
[1] iptables Mode
- kube-proxy가 iptables를 관리해주는 역할을 한다.
- 클라이언트에서 오는 모든 요청은 iptables를 거쳐서 Pod로 직접 전달이 된다.
- iptables 모드에서는 Pod 하나로의 연결 요청이 실패하면 재시도하지 않고 그냥 요청이 실패되었다고 간주한다.
- 컨테이너에 readinessProbe가 설정되었고 그에 따른 HealthCheck가 정상적으로 되어야 연결 요청이 이루어진다.
[2] IPVS Mode
- IPVS (IP Virtual Server) 모드는 Linux Kernel에 있는 L4 로드밸런싱 기술이다.
- 리눅스 커널 안 네트워크 관련 프레임워크인 넷필터(Netfilter)에 포함되어 있다.
- 따라서 IPVS 커널 Module이 Node에 설치되어 있어야 한다.
⇒ IPVS Mode는 Kernel space에서 동작하고 Data Structure를 Hash table로 저장하기 때문에 iptables보다 빠르고 좋은 성능을 낼 수 있다. 또한 더 많은 LB Algorithm을 제공한다.

( rr, lc, dh, sh, sed, nq, .. )

Cloud Infra Engineer & interested in python, IaC, k8s