이걸해냄 시리즈는 위코드 실습 과제를 진행하면서 성공/실패 사례를 모아놓은 시리즈입니다.리펙토링이 이루어질 시 수정된 코드가 올라옵니다.
webucks project_220221
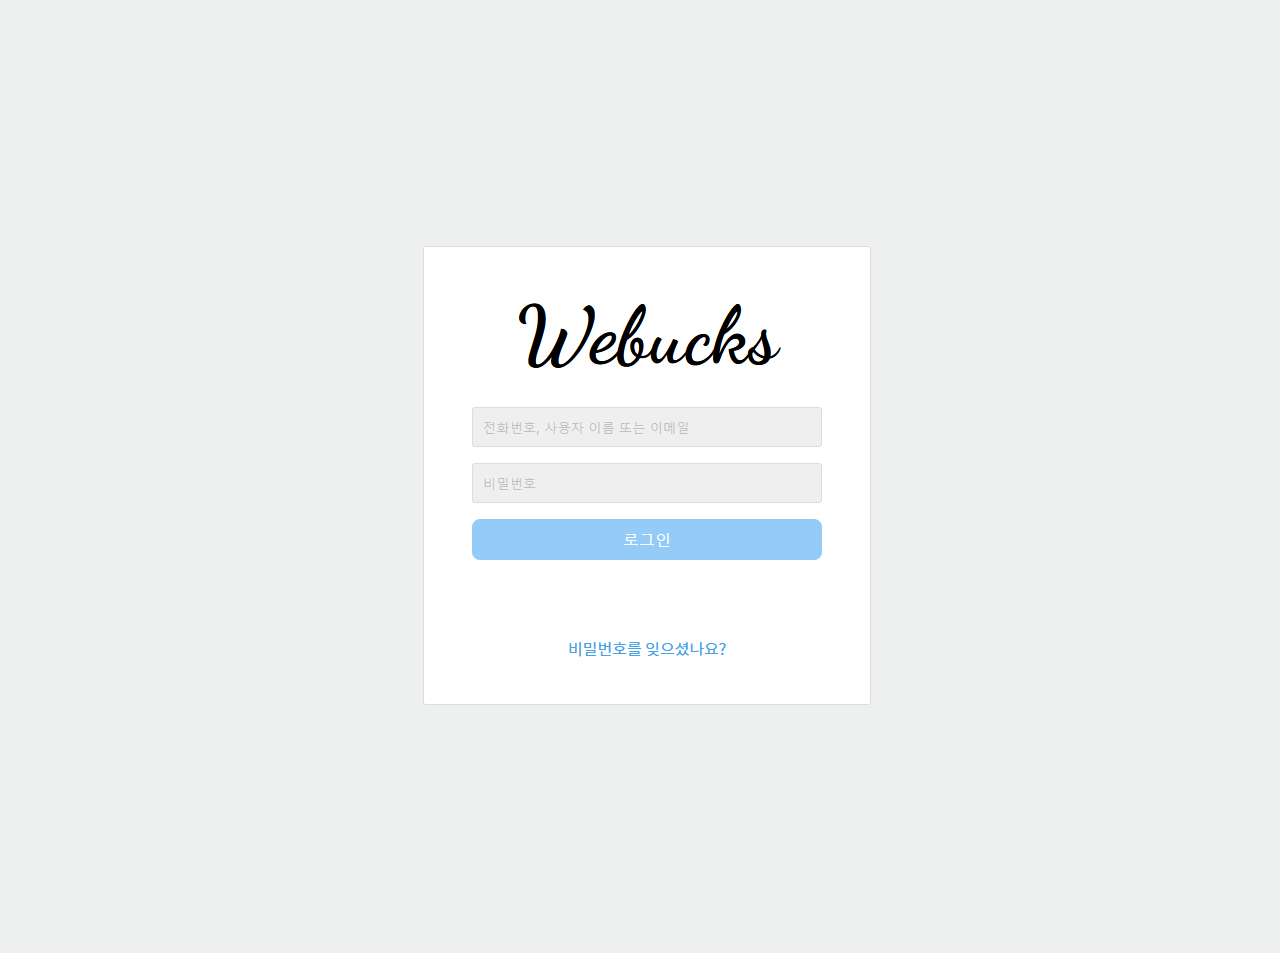
1. 화면구현
이런 걸 만들었습니다.
css는 금방 만들었으므로, 설명을 생략합니다!
구조
<body class="gray-body">
    <div class="wrap-login">
        <section class="login-section">
            <h2 class="hidden">로그인 폼</h2>
            <h1 class="webucks-logo big-logo">webucks</h1>
            <!--form Start-->
            <form class="login-form">
                <div class="input-box">
                    <input id="inputId" type="text" class="input-default" placeholder="전화번호, 사용자 이름 또는 이메일" />
                </div>
                <div class="input-box">
                    <input id="inputPw" type="password" class="input-default" placeholder="비밀번호" />
                </div>
                <button type='button' id="loginBtn" class="btn primary" disabled>로그인</button>

                <div class="form-end">
                    <a class="inline-link" href="$">비밀번호를 잊으셨나요?</a>
                </div>
            </form>
            <!--form End-->
        </section>
    </div>
    <script type="text/javascript" src="js/webucks.js"></script>
</body>
2. 기능구현
기능 구현에서 실행시켜야 할 기능은 이것들입니다.
- id에 @가 포함되고, password가 8자 이상이 되면 버튼이 활성화 되도록 해주세요.
- 원래 연한 파란색이었다가 → 활성화 되면 밝고 진한 파란색으로
- id, password가 조건에 맞을 때 로그인 버튼을 누르면 list 페이지로 이동해야 합니다.
그런데 저는 그것으로 만족하지 못했습니다. 저 화면의 회색 input 입력창이 보이시나요?
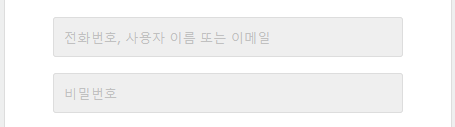
이부분, 텍스트를 입력할 때에도 여전히 회색일텐데 굉장히 기분이 찝찝하지 않나요?
input창에서 텍스트 입력 시 배경이 흰색이 되며, 텍스트가 하나도 적히지 않을 때에는 다시 회색으로 돌아옴.
이것까지 만들 겁니다.
2-1. 흐름 설정
위의 기능을 구현하기 위해 흐름을 정리하였습니다.
input 동작
- 변수 지정
- id 입력칸이나 pw 입력칸의 값이 0일 경우, 함수 시작
2-1. 여기서 아이디에 @가 들어가고 비밀번호가 8자 이상이면 로그인 버튼 활성화
login button 동작
- 변수 지정
- enter 키를 눌러도 로그인 버튼이 눌리도록 기능 추가
좀더 욕심을 부려 로그인버튼에 2번 기능을 하나 더 추가했습니다.
이때까지는 이걸 금방 만들 줄 알았죠.

2-2. 코드 작성
변수 지정
let inputBox = document.querySelectorAll('.input-box');//ⓐ

const inputId = document.getElementById('inputId'),//ⓑ
    inputPw = document.getElementById('inputPw'),//ⓒ
    loginBtn = document.getElementById('loginBtn');//ⓓ
const idLength = inputId.value.length;//id의 값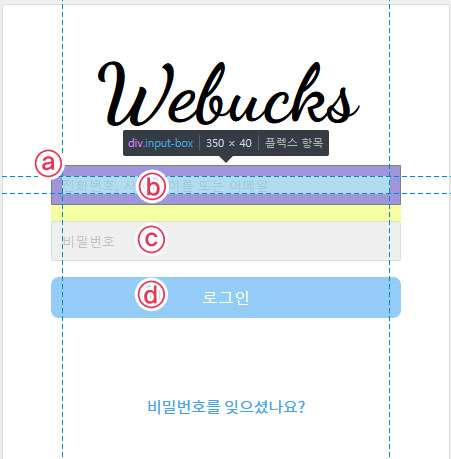
저는 입력란의 input을 바깥 div로 한번 더 감싸주는 짓을 저질렀기 때문에 사실상 배경색이 바뀌어야 하는건 저 ⓐ부분입니다.
//html이 이런 구조다.
<div class="input-box">
    <input id="inputId" type="text" class="input-default" placeholder="전화번호, 사용자 이름 또는 이메일" />
</div>
저의 input은 그냥 공간만 차지하고 투명한 스타일을 가졌어요.
input 새로고침 후 id 입력칸에 값이 있을 시 인풋 백그라운드 색 변경
(inputId.value.length > 0) ? inputId.parentNode.style.backgroundColor = '#fff': inputId.parentNode.style.backgroundColor = '#efefef';
loginBtn.disabled = true;
뭔가 요상한 문법이 나왔습니다.
이번에 새로 배운 삼항 조건 연산자라는 것을 써봤습니다.
어쨌든 inputId의 입력값이 0개가 넘어가있으면, inputId의 부모 요소인 div를 찾아 그것의 backgroundColor를 흰색으로 바꿔주라는 이야기에요. 그리고 loginBtn 은 멋대로 불이 들어오지 못하게 disabled 속성을 유지합니다.
문제가 생겼는데
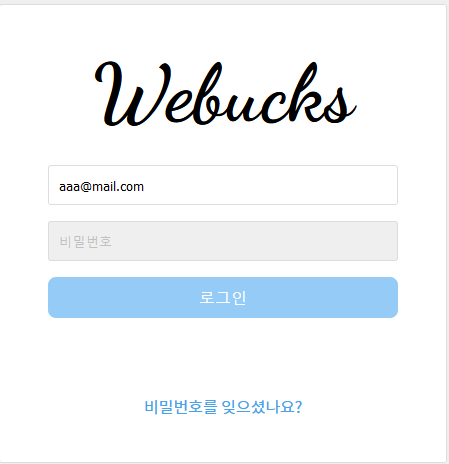
이렇게 값을 입력한 상태에서 페이지를 새로고침하면, id를 담은 입력란은 저 값을 유지하고 있어요.패스워드 입력칸은 자연스럽게 리셋이 됩니다.
그런데 aaa@mail.com에다가 패스워드를 8자 입력해서 로그인버튼이 활성화 된 채 새로고침을 해도 로그인 버튼에 불이 들어와있더라고요.
해결했어요
새로고침 현상이 있어도 흰색 배경을 유지할 수 있도록 위처럼 명령을 따로 빼줬습니다.
input 창에 key event 발생시 background 변경
inputBox.forEach((item, index) => {
    let inputText = inputBox[index].firstElementChild;
});
일단 두 inputBox에다가 기능을 먹여줘야 할것 같아서 forEach를 썼습니다. 사실 저걸 쓰기 싫었는데 for in문이라던가, 그걸로 잘 안 되더라고요. 매개변수에 index 한개만 받고 싶었지만 그러는 순간 index를 인식하지 못하는 문제가 생겨 어쩔수 없이 필요없는 item까지 받음.
inputBox.forEach((item, index) => {
    let inputText = inputBox[index].firstElementChild;

    inputText.addEventListener('keyup', e => {
        const changeInputBgColor = () => {
            let inputBgColor = e.target.parentNode.style;
            //backgroundColor까지 변수로 지정할경우 백그라운드 컬러를 잡아내지 못함
            if (!!e.target.value > 0) {
                //!!이 없으면 작동하지 않음.
                inputBgColor.backgroundColor = "#fff";
                //01-3.id 창에 @이 포함되고, 비밀번호가 8자 이상인지 체크
                if (inputId.value.includes('@') && inputPw.value.length >= 8) {
                    loginBtn.disabled = false;
                }
            } else {
                inputBgColor.backgroundColor = '#efefef';
                loginBtn.disabled = true;
            }
        }
        changeInputBgColor();
    });
});
inputText에다가 keyup이벤트가 일어나면 함수를 실행하도록 했습니다. 함수 이름은 changeInputBgColor에요.
이벤트가 일어난 input의 부모인 div의 스타일을 지정합니다. 그런데 이상하게 backgroundColor 속성까지 변수로 지정하면 그걸 못 읽어내어 backgroundColor는 직접 지정해주기로 했습니다.
input에 값이 하나라도 입력되는 순간 .input-box의 배경색은 흰색으로 바뀔거에요.여기서도 사실 if문 대신 삼항조건 연산자를 쓰려 했는데,이렇게 조건이 여러개인 경우는 어떻게 써야할지 몰라서 if문을 썼어요.(물론 시도해봤지만 실패)
문제
if (!!e.target.value > 0) {...} 여기서 앞의 !!연산자가 없으면 작동하지 않습니다. 왜 그럴까요?
 일단
일단 !이 NOT 연산자고, !!이렇게 쓰면 값을 불린형으로 변환할 수 있습니다.
하지만 if문의 지정한 조건이 true인 경우 명령문을 자동으로 실행할텐데요.
해결 못함
- 22.02.25 업데이트
if (e.target.value.length > 0)값의 글자수라고 지정을 해줘야 했습니다. 이런 실수를...
해결!
이제 나머지는 위의 조건에 맞게, if문으로 아이디에 @이 들어가고 패스워드가 8자 이상이 입력되면 loginBtn을 활성화시키라는 명령만 넣어줬습니다.
잊어버리지 않고 changeInputBgColor 함수도 호출하기.
login btn을 누르면 다른 페이지로 이동
일단 제일 간단한 방법은 시맨틱 태그인 <form>에다가 action을 추가하여 이동할 페이지를 지정해주는 것입니다.
<form class="login-form" action="coffeelist.html">
                <div class="input-box">
                    <input id="inputId" type="text" class="input-default" placeholder="전화번호, 사용자 이름 또는 이메일" />
                </div>
                <div class="input-box">
                    <input id="inputPw" type="password" class="input-default" placeholder="비밀번호" />
                </div>
                <button type='button' id="loginBtn" class="btn primary" disabled>로그인</button>

                <div class="form-end">
                    <a class="inline-link" href="$">비밀번호를 잊으셨나요?</a>
                </div>
 </form>
하지만 저는 이렇게 하지 않고 로그인 버튼을 눌렀을때 함수를 실행하는 형식으로 했습니다.
function goUrl() {
    let link = 'coffeelist.html';
    location.href = link;
}
loginBtn.addEventListener('click', goUrl);
일단 페이지를 이동하는 메소드 자체는 location.href 을 통해 간단히 구현이 가능했습니다.
그런데...
문제
페이지가 자꾸 새로고침되는 현상으로 약 1.5일을 허비한 것 같습니다.
이렇게 해결
<button type='button' id="loginBtn" class="btn primary" disabled>로그인</button>여기서 버튼 태그에 type='button'을 추가해주는 이유가 있습니다.
버튼 태그는 기본적으로 type='submit'속성을 가지고 있기에 타입 지정을 따로 해주지 않으면
form태그 안에 들어있을때 무한 새로고침을 하게 됩니다.
이 글을 보고 해결했어요
이렇게 해도 됩니다
<!--html-->
<button type='button' id="loginBtn" class="btn primary" onclick="goUrl()" disabled>로그인</button>
이렇게 onclick 속성을 준 후
//loginBtn.addEventListener('click', goUrl);addEventListener를 삭제해도 됩니다.
enter key를 눌러도 login 버튼이 작동
document.onkeyup = function (e) {
    let keyCode = e.keyCode;
    if (keyCode === 13) goUrl();
}
페이지 내에서 enter키코드를 가진 keyup이벤트가 발생하면,이 함수가 실행됩니다.
구현에 큰 문제는 없던 것으로!
버튼 활성화/비활성화시 색이 바뀌는건요?
이걸 잊어버릴뻔했네요! 간단하게 css로 처리가 가능합니다.
.btn:disabled {
    opacity: 0.5;
}
버튼이 비활성화 되면 투명도가 50%로 낮아져, 활성화 시 이런 색이 됩니다.

3. 완료된 자바스크립트 코드
// 변수 지정
let inputBox = document.querySelectorAll('.input-box');

const inputId = document.getElementById('inputId'),
    inputPw = document.getElementById('inputPw'),
    loginBtn = document.getElementById('loginBtn');
const idLength = inputId.value.length;

//input text 입력 시 백그라운드 변경, 아이디와 pw 값 체크
(inputId.value.length > 0) ? inputId.parentNode.style.backgroundColor = '#fff': inputId.parentNode.style.backgroundColor = '#efefef';
loginBtn.disabled = true;

inputBox.forEach((item, index) => {
    let inputText = inputBox[index].firstElementChild;

    inputText.addEventListener('keyup', e => {
        const changeInputBgColor = () => {
            let inputBgColor = e.target.parentNode.style;

            if (e.target.value.length > 0) {
                inputBgColor.backgroundColor = "#fff";
                if (inputId.value.includes('@') && inputPw.value.length >= 8) {
                    loginBtn.disabled = false;
                }
            } else {
                inputBgColor.backgroundColor = '#efefef';
                loginBtn.disabled = true;
            }
        }
        changeInputBgColor();
    });
});


//login btn 작동
function goUrl() {
    let link = 'coffeelist.html';
    location.href = link;
}
loginBtn.addEventListener('click', goUrl);
document.onkeyup = function (e) {
    let keyCode = e.keyCode;
    if (keyCode === 13) goUrl();
}
물론 리펙토링은 필요하겠지만..일단은 구현했다는 점에 의의를 두려 합니다!
4. 가려운 곳 해결
4-1. 변수에 backgroundColor를 지정하면 배경색을 바꿀 수 있나?
let inputBgColor1 = e.target.parentNode.style;
let inputBgColor2 = e.target.parentNode.style.backgroundColor;
//backgroundColor까지 변수로 지정할경우 백그라운드 컬러를 잡아내지 못함
console.log(inputBgColor1);
console.log(inputBgColor2);
.
.
.
이렇게 div.input-box의 backgroundColor 속성을 자바스크립트가 읽어내지 못하는 문제가 있었습니다.이 부분에 대해서 멘토님들께 설명을 들었습니다!
콘솔로그 결과를 본다면,

이렇게 inputBgColor1는 객체 형태,inputBgColor2는 문자열 형태로 출력됩니다.
❌안돼요
let inputBgColor2 = e.target.parentNode.style.backgroundColor;
inputBgColor2 = '#000';
즉 이렇게 명령을 내려도, 바뀌는 것은 rgb(255,255,255)라는 문자열이 #000으로 변경되는 것일 뿐입니다.
⭕잘돼요
let inputBgColor1 = e.target.parentNode.style;
inputBgColor1.backgroundColor = '#000';
이 경우에는 해당 엘리먼트의 style 객체에서 backgroundColor 의 값을 가져와 해당 색상 코드로 변경하는 것이기 때문에 작동이 되는거였습니다!
🔸 내가 겪은 현상에 대한 stackoverflow 케이스
👩🏫 멘토님 코멘트 : "그런데 애초에
input을div로 감쌀 필요가 있었을까요?그러면 색 변경이 더 쉬웠을거에요."

그러게 말이에요..개수도 2개밖에 안되는데, 관리하기도 쉽게 이런 페이지는 바로 input을 넣어주는게 나을 것 같습니다.