HTML5 목록 태그
목록 태그(List)
리스트 만들기
- 리스트 종류
태그 순서 있는 리스트 (ordered list) ol…/ol순서 없는 리스트 (unordered list) ul…/ul정의 리스트 (definition list) dl…/dl - 리스트 아이템
li…/li/li는 생략 가능
순서 있는 리스트
<!DOCTYPE html>
<html lang="en">
    <head>
        <title>Document</title>
    </head>
    <body>
        <h3>라면을 끓이는 순서</h3>
        <hr />
        <!-- 타입 안 넣으면 숫자로 나옴 -->
        <ol type="A">
            <li>물을 끓인다.</li>
            <li>라면과 스프를 넣는다.</li>
            <li>파를 썰어 넣는다.</li>
            <li>5분 후 먹는다.</li>
        </ol>
    </body>
</html>
순서 없는 리스트
<!DOCTYPE html>
<html lang="en">
    <head>
        <title>Document</title>
    </head>
    <body>
        <h3>내가 좋아하는 음식</h3>
        <hr />
        <ul>
            <li>딸기우유</li>
            <li>떡볶이</li>
            <li>레몬사탕</li>
        </ul>
    </body>
</html>
정의 리스트
dl- 용어와 설명을 하나의 아이템으로 나열하는 리스트
- 용어는
dt, 설명은dd로 표현<dl> <dt>용어</dt> <dd>설명</dd> </dl> /dt,/dd생략 가능
리스트 꾸미기
리스트의 모양을 꾸미는 CSS3 프로퍼티
| 프로퍼티 | 설명 |
|---|---|
| list-style-type | 아이템 마커 타입 지정 |
| list-style-image | 아이템 마커 이미지 지정 |
| list-style-position | 아이템 마커 출력 위치 지정 |
| list-style | 단축 속성 |
내비게이션 바(navigation bar)
내비게이션 바
- 우리가 흔히 사용하는 웹 사이트의 메뉴를 의미
- 주로 HTML의 링크 태그(
a)를 사용하여 생성
내비게이션 바 종류
- 수직 메뉴
- 수평 메뉴
수직 메뉴
<!DOCTYPE html>
<html lang="en">
    <head>
        <title>Document</title>
        <style>
            ul {
                list-style-type: none;
                margin: 0;
                padding: 0;
            }
            li{
                background: pink;
                width: 150px;
            }
            a{
                text-decoration: none;
                color: black;
            }
        </style>
    </head>
    <body>
        <h1>링크를 사용한 수직 메뉴</h1>
        <hr />
        <ul>
            <li><a href="#">Home</a></li>
            <li><a href="#">HTML</a></li>
            <li><a href="#">CSS</a></li>
            <li><a href="#">자바스크립트</a></li>
        </ul>
    </body>
</html>
수평 메뉴 만드는 방법 두 가지
li태그의 display 속성 값을 inline으로 설정
li{
		display:inline;
}- float 속성을 이용
li{
		float:left; /* 모든 메뉴가 왼쪽 정렬*/
}
수평 메뉴 - inline 속성 값
<!DOCTYPE html>
<html lang="en">
    <head>
        <title>Document</title>
        <style>
            ul {
                list-style-type: none;
                margin: 0;
                padding: 0;
            }
            li {
                display: inline;
            }
        </style>
    </head>
    <body>
        <h1>링크를 사용한 수평 메뉴</h1>
        <hr />
        <ul>
            <li><a href="#">Home</a></li>
            <li><a href="#">HTML</a></li>
            <li><a href="#">CSS</a></li>
            <li><a href="#">자바스크립트</a></li>
        </ul>
    </body>
</html>
수평 메뉴 - float 속성(왼쪽 메뉴)
<!DOCTYPE html>
<html lang="en">
    <head>
        <title>Document</title>
        <style>
            ul {
                list-style-type: none;
                margin: 0;
                padding: 0;
                /* 배경색이 안 나오는 현상 */
                background: pink;
            }
            li {
                float: left;
                width: 100px;
                text-align: center;
            }
            li a {
                text-decoration: none;
                color: black;
            }
        </style>
    </head>
    <body>
        <h1>링크를 사용한 수평 메뉴</h1>
        <hr />
        <ul>
            <li><a href="#">Home</a></li>
            <li><a href="#">HTML</a></li>
            <li><a href="#">CSS</a></li>
            <li><a href="#">자바스크립트</a></li>
        </ul>
    </body>
</html>
수평 메뉴 - float 속성 사용 시 주의사항
li{
		float:left;
}- 원래
li태그는ul태그 영역 안에서 한 줄을 다 차지하는 블록 요소임 - float 속성을 적용한 후,
li태그는ul태그 영역에서 벗어남- 따라서
ul태그 영역이 제대로 인식되지 않음
- 따라서
- 해결 방법
ul{
		background: pink;
		overflow: hidden;
}ul태그의 영역을 확보하기 위해 overflow 속성 추가
<!DOCTYPE html>
<html lang="en">
    <head>
        <title>Document</title>
        <style>
            ul {
                list-style-type: none;
                margin: 0;
                padding: 0;
                overflow: hidden;
                background: pink;
            }
            li {
                float: left;
                width: 100px;
                text-align: center;
            }
            li a {
                text-decoration: none;
                color: black;
            }
        </style>
    </head>
    <body>
        <h1>링크를 사용한 수평 메뉴</h1>
        <hr />
        <ul>
            <li><a href="#">Home</a></li>
            <li><a href="#">HTML</a></li>
            <li><a href="#">CSS</a></li>
            <li><a href="#">자바스크립트</a></li>
        </ul>
    </body>
</html>
수평 메뉴 - float 속성(양쪽 메뉴)
<!DOCTYPE html>
<html lang="en">
    <head>
        <title>Document</title>
        <style>
            ul {
                list-style-type: none;
                margin: 0;
                padding: 0;
                overflow: hidden;
                background: pink;
            }
            li {
                float: left;
                width: 100px;
                text-align: center;
            }
            li a {
                text-decoration: none;
                color: black;
            }
            #second {
                float: right;
            }
        </style>
    </head>
    <body>
        <h1>링크를 사용한 수평 메뉴</h1>
        <hr />
        <ul>
            <li><a href="#">Home</a></li>
            <li><a href="#">HTML</a></li>
						<!-- 오른쪽에 두고 싶은 메뉴를 새 ul#second를 만들어서 그 안에 넣어둠 -->
            <ul id="second">
                <li><a href="#">CSS</a></li>
                <li><a href="#">자바스크립트</a></li>
            </ul>
        </ul>
    </body>
</html>
HTML5 폼 태그
폼 태그
웹 폼
- 웹 페이지에서 사용자의 입력을 받는 폼
- 로그인, 등록, 검색, 예약, 쇼핑 등
폼 요소
- 폼을 만드는 다양한 태그
input,textarea,select등
폼 작성
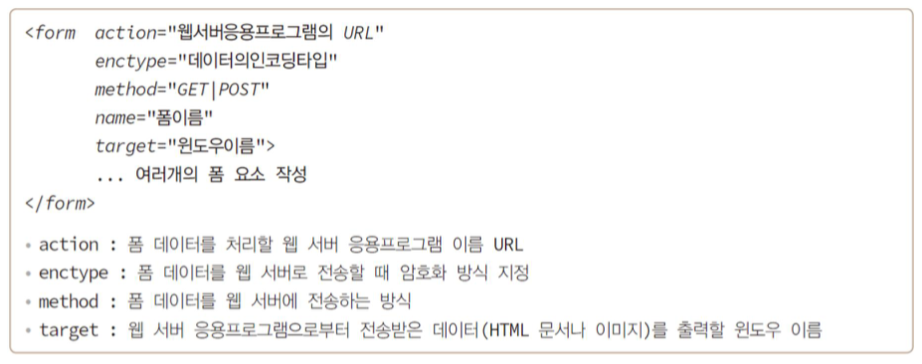
폼 태그 form 태그로 둘러싸는 모양
<form name="fo" action=“웹서버URL” method="get">
		...
</form>
name 속성
- 폼의 이름 지정
action 속성
- 폼 데이터를 처리할 웹 서버 응용프로그램의 이름
- 웹 서버의 URL
- submit 버튼이 눌리면 브라우저는 action에 지정된 웹 서버 응용프로그램 실행 요청
- 웹 서버 응용프로그램은 Java, JSP, PHP, C/C++ 등 다양한 언어로 작성
method 속성
- 폼 데이터를 웹 서버로 전송하는 형식
- 대표적인 전송 방식
-
GET: 주소창에 보내는 내용이 다 보임, 그러나 데이터 양이 길 때는 get으로 보낼 수 없음
-
POST: 주소창에 보내는 내용이 보이지 않음, 보안이 중요한 것을 보낼 때
-
네이버 검색 사례로 폼 전송 과정 이해
<form name="sform" action="https://search.naver.com/search.naver" method="get">
		<input type="text“ name="query“>
		<input type="submit“ value="검색">
</form>
<!DOCTYPE html>
<html lang="en">
<head>
<title>Document</title>
</head>
<body>
<!-- action에 네이버 검색 서버 주소 입력 -->
<!-- 검색어 -> 키워드(query)=검색어(css) 네이버에서 정한 이 방식을 반드시 따라야 함(query=css 형식) -->
<!-- method = get -> 주소창에 검색어가 보임 -->
<form name="naver" action="https://search.naver.com/search.naver" method="get">
검색어: <input type="text" name="query" />
<!-- 검색 버튼을 누르는 순간 input 박스의 name의 값을 찾아서 전송 -->
<input type="submit" value="검색"/>
</form>
</body>
</html>- 네이버 사이트에 접속
- 입력 창에 “Elvis” 입력 후, 검색 버튼을 클릭
- 브라우저는
form태그의 action 값을 참고- search.naver.com 서버에 접속하여 search.naver 응용프로그램의 실행을 요구
- query=Elvis를 전달
- 웹 서버에서 search.naver 응용프로그램을 실행
- 검색 결과를 브라우저에게 전송
- 브라우저는 검색 결과를 화면에 출력
폼 요소의 종류
| 폼 요소 | 설명 |
|---|---|
input type=”text” | 한 줄 텍스트 입력 창 |
input type=”password” | 암호 입력을 위한 한 줄 텍스트 입력 창 |
input type=”button” | 단순 버튼 |
input type=”submit” | 웹 서버로 폼 데이터를 전송시키는 버튼 |
input type=”reset” | 입력된 폼 데이터를 초기화시키는 버튼 |
input type=”image” | 이미지 버튼 |
input type=”checkbox\|radio” | 체크박스와 라디오버튼 |
select | 드롭다운 리스트를 가진 콤보박스 |
input type=”month\|week\|date\|time\|datetime-local” | 년, 월, 일, 시간 등의 시간 정보 입력 창 |
input type=”number\|range” | 스핀 버튼과 슬라이드바로 편리한 숫자 입력 창 |
input type=”color” | 색 입력을 쉽게 하는 컬러 다이얼로그 |
input type=”email\|url\|tel\|search” | 이메일, URL, 전화번호, 검색키워드 등 형식 검사 기능을 가진 텍스트 입력 창 |
input type=”file” | 로컬 컴퓨터의 파일을 선택하는 폼 요소 |
button type=”button\|reset\|submit” | 단순 버튼, reset, submit 버튼 |
textarea | 여러 줄의 텍스트 입력 창 |
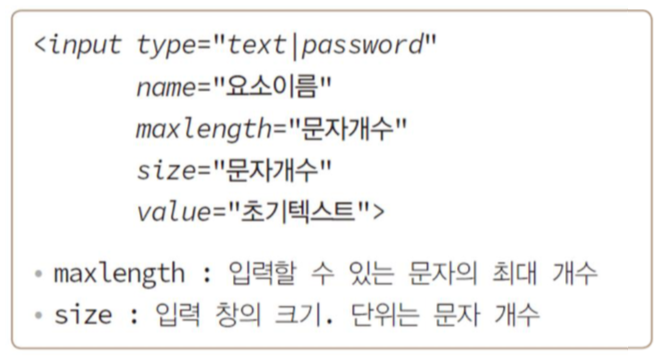
텍스트 입력
-
input type=”text”- 한 줄 입력창
-
input type=”password”-
암호 입력 창
-
사용자가 입력한 문자 대신 “*”를 출력
-
-
textarea-
여러 줄 입력 창

-
데이터 목록을 가진 텍스트 입력 창
datalist-
목록 리스트를 작성하는 태그
-
option태그로 항목 하나 표현 -
input type=”text”에 입력 가능한 데이터 목록<!DOCTYPE html> <html lang="en"> <head> <title>Document</title> </head> <body> <input type="text" list="countries"> <datalist id="countries"> <option value="가나"></option> <option value="스위스"></option> <option value="브라질"></option> </datalist> </body> </html>
input태그에 list 작성datalist안에option태그 넣고option태그 value에 드롭다운으로 나타낼 내용 작성input태그와datalist태그를 이어주기 위해 datalist id에 input list와 같은 내용 작성(둘이 반드시 일치해야 함)
-
텍스트/이미지 버튼 만들기
<input type=“button|reset|submit|image” value=“버튼_문자열”>
<button type=“button|reset|submit”>버튼_문자열</button>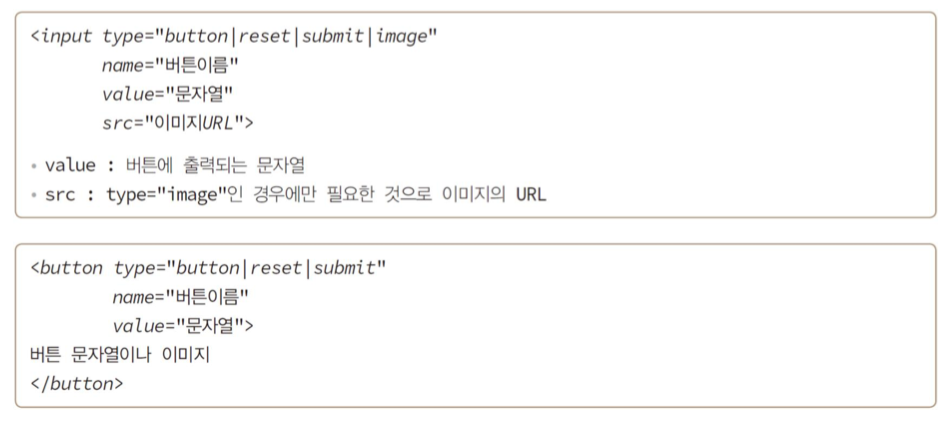
- 단순 버튼(type=”button”)
- 아무 기능이 없는 버튼
- submit 버튼(type=”submit”)
- 클릭하면 브라우저가 폼 데이터를 웹 서버로 전송
- reset 버튼(type=”reset”)
- 폼에 입력된 내용을 모두 지우고 초기화
- 이미지 버튼(type=”image”)
- 이미지 버튼 생성
- 기본적으로 submit 기능을 가짐
- 따라서 이미지 버튼을 만들 때는
button태그로 만드는 것이 적합
- 이미지 버튼 생성
선택형 입력: 체크박스와 라디오버튼
input type=”checkbox”- 체크박스 만들기
input type=”radio”- 라디오버튼 만들기
- name 속성 값이 같은 라디오버튼들이 하나의 그룹 형성

선택형 입력: 콤보 박스
select-
드롭다운 리스트에 목록 출력
-
목록을 선택하는 입력 방식
-
option태그로 항목 하나 표현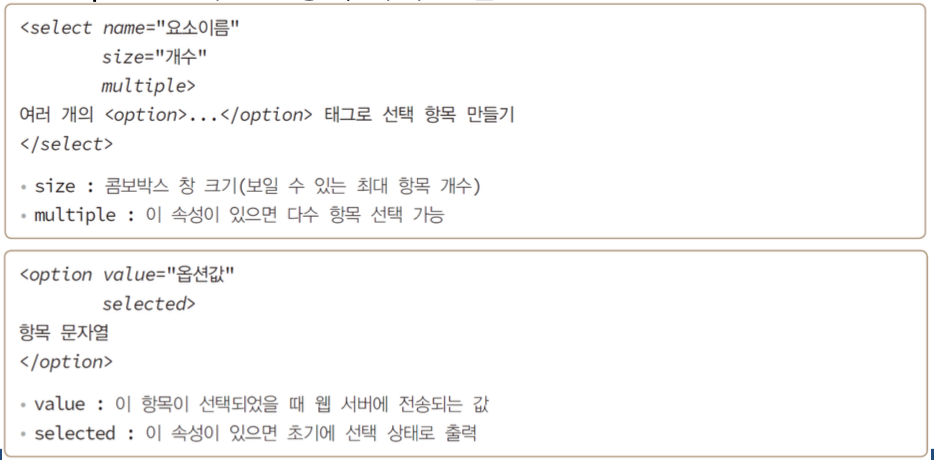
-
label로 폼 요소의 캡션 만들기
- 캡션이란?

label태그로 캡션과 폼 요소를 한 단위로 묶음-
캡션 텍스트를 명확하게 하는 장점

-
fieldset
<form>
		<fieldset>
			<legend>로그인 정보</legend>
		</fieldset>
</form>
폼 꾸미기
input[type=text]로 폼 요소의 글자색 지정
input[type=text]{
		color: red;
}
input[type=text]로 폼 요소의 테두리 만들기
input[type=text]{
		border: 2px solid skyblue;
		border-radius: 2px;
}
마우스 오버, :hover
input[type=text]{
		color: red;
}
input[type=text]:hover{
		background: aliceblue;
}
포커스를 받을 때, :focus
input[type=text]:focus{
		font-size: 120%;
}
새싹DT 기업연계형 프론트엔드 실무 프로젝트 과정 2주차 블로그 포스팅
