리버스 프록시
프록시서버란? 이 글에서 작성했던 것처럼 DMZ에 위치하여 웹 어플리케이션 서버(WAS), DBMS 서버를 보호하고 로드밸런싱을 통해 효율좋은 서버를 구축하기 위한 서버입니다.
Nginx
엔진엑스는 러시아 개발자가 개발한 동시 접속에 특화된 웹 서버 프로그램입니다. 경쟁자인 APACHE
설치하기
애플 실리콘(M1, M2)을 채용한 MacOS, Homebrew가 설치된 기준으로 설명하겠습니다.
brew install nginx
Updated 1 tap (homebrew/core).
You have 5 outdated formulae installed.
You can upgrade them with brew upgrade
or list them with brew outdated.
Warning: nginx 1.23.1 is already installed and up-to-date.
To reinstall 1.23.1, run:
brew reinstall nginx
elitebook@Elitebookui-MacBookAir ~ nodemailer brew reinstall nginx
==> Downloading https://ghcr.io/v2/homebrew/core/nginx/manifests/1.23.1
Already downloaded: /Users/elitebook/Library/Caches/Homebrew/downloads/8ebbb9b85eacf7b7f6ad7f5cb03850394e6c38cdc10fcf7af7523aab4668b7e8--nginx-1.23.1.bottle_manifest.json
==> Downloading https://ghcr.io/v2/homebrew/core/nginx/blobs/sha256:46b6d5a0650660c0cd25039b
Already downloaded: /Users/elitebook/Library/Caches/Homebrew/downloads/d891e07e365e3828f156e53abe62eb5816917df74df1c71625ffdf40382706bb--nginx--1.23.1.arm64_monterey.bottle.tar.gz
==> Reinstalling nginx
==> Pouring nginx--1.23.1.arm64_monterey.bottle.tar.gz
==> Caveats
Docroot is: /opt/homebrew/var/www
The default port has been set in /opt/homebrew/etc/nginx/nginx.conf to 8080 so that
nginx can run without sudo.
nginx will load all files in /opt/homebrew/etc/nginx/servers/.
To restart nginx after an upgrade:
brew services restart nginx
Or, if you don't want/need a background service you can just run:
/opt/homebrew/opt/nginx/bin/nginx -g daemon off;
==> Summary
🍺 /opt/homebrew/Cellar/nginx/1.23.1: 26 files, 2.2MB
==> Running `brew cleanup nginx`...
Disable this behaviour by setting HOMEBREW_NO_INSTALL_CLEANUP.
Hide these hints with HOMEBREW_NO_ENV_HINTS (see `man brew`).
nginx 1.23.1버전이 설치 되었습니다. install log를 천천히 읽어봅시다. 3가지 경로를 설명해줍니다.
-
DocRoot:
/opt/homebrew/var/www -
Nginx Config:
/opt/homebrew/etc/nginx/nginx.conf -
Load Files:
/opt/homebrew/etc/nginx/servers/.
M1 Mac에서는 /opt/homebrew/... 경로로 잡혀있습니다.
버전 확인
nginx -v
Nginx 시작하기
Nginx를 설치했으니 정상적으로 실행 되는지 확인해봅니다.
brew services start nginx
그리고 Nginx서버가 할당받은 포트를 확인해봅시다. 기본은 8080으로 잡혀있습니다.
lsof -i:8080
네 8080포트에 잡혀있는 것을 확인했습니다. 이제 이 코드 덩어리가 실행된 상태인지 확인하려면 프로세스에 등록되어있는지 알아봐야합니다.
ps -ax | grep nginx
18196번이네요. 맨 뒤에 Daemon이 있는데 직접 조작하지 않고도, 백그라운드에서 유지할 수 있는 즉 컴퓨터를 종료하기 전까진 24시간 실행되는 환경의 실행 유무입니다.
아무튼 정상적으로 실행되는 것을 확인했으니 localhost:8080에 접속해봅니다.
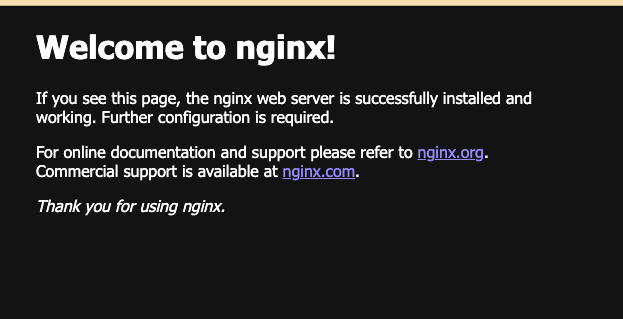
터미널에 아래 명령어를 입력해 html 소스를 가져올 수있습니다.
curl localhost:8080<!DOCTYPE html>
<html>
<head>
<title>Welcome to nginx!</title>
<style>
html { color-scheme: light dark; }
body { width: 35em; margin: 0 auto;
font-family: Tahoma, Verdana, Arial, sans-serif; }
</style>
</head>
<body>
<h1>Welcome to nginx!</h1>
<p>If you see this page, the nginx web server is successfully installed and
working. Further configuration is required.</p>
<p>For online documentation and support please refer to
<a href="http://nginx.org/">nginx.org</a>.<br/>
Commercial support is available at
<a href="http://nginx.com/">nginx.com</a>.</p>
<p><em>Thank you for using nginx.</em></p>
</body>
</html>
nginx.conf
nginx가 동작해야할 방식을 지정하는 파일입니다. 접근을 위해서 root계정의 암호를 알고있어야합니다. 보통 운영체제(Linux, Mac) 설치할 때 혹은 최초로 접속할 때 입력한 암호입니다.
터미널에 다음을 입력해줍니다.
code /opt/homebrew/etc/nginx/nginx.conf
vi에디터 대신 vsc로 실행해 편하게 작업해줍시다....
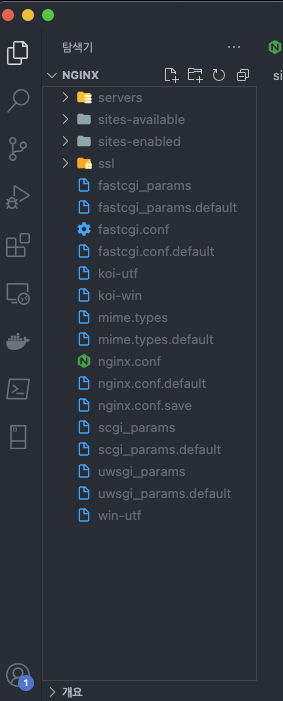
웹서버(리버시 프록시서버) 구축을 위한 설정을 할 곳 입니다. sites-enabled, sites-available같은 디렉토리는 없으므로 임의로 생성해주셔야합니다. 아무튼 nginx.conf를 열어보면 내부에 뭐가있는지 확인해봅니다.
#user nobody
worker_processes  2; # default: 1

#error_log  logs/error.log;
#error_log  logs/error.log  notice;
#error_log  logs/error.log  info;
error_log  .bottle/var/log/nginx/error.log warn;
pid        .bottle/var/log/nginx.pid;


events {
    worker_connections  1024;
}


http {
    include       mime.types;
    default_type  application/octet-stream;

    #log_format  main  '$remote_addr - $remote_user [$time_local] "$request" '
    #                  '$status $body_bytes_sent "$http_referer" '
    #                  '"$http_user_agent" "$http_x_forwarded_for"';

    #access_log  logs/access.log  main;

    sendfile        on;
    #tcp_nopush     on;

    #keepalive_timeout  0;
    keepalive_timeout  65;

    #gzip  on;

    server {
        listen      8080;
        server_name  localhost;

        #charset koi8-r;

        #access_log  logs/host.access.log  main;

        location / {
            root   html;
            index  index.html index.htm;
        }

        #error_page  404              /404.html;

        # redirect server error pages to the static page /50x.html
        #
        error_page   500 502 503 504  /50x.html;
        location = /50x.html {
            root   html;
        }

        # proxy the PHP scripts to Apache listening on 127.0.0.1:80
        #
        #location ~ \.php$ {
        #    proxy_pass   http://127.0.0.1;
        #}

        # pass the PHP scripts to FastCGI server listening on 127.0.0.1:9000
        #
        #location ~ \.php$ {
        #    root           html;
        #    fastcgi_pass   127.0.0.1:9000;
        #    fastcgi_index  index.php;
        #    fastcgi_param  SCRIPT_FILENAME  /scripts$fastcgi_script_name;
        #    include        fastcgi_params;
        #}

        # deny access to .htaccess files, if Apache's document root
        # concurs with nginx's one
        #
        #location ~ /\.ht {
        #    deny  all;
        #}
    }


    # another virtual host using mix of IP-, name-, and port-based configuration
    #
    #server {
    #    listen       8000;
    #    listen       somename:8080;
    #    server_name  somename  alias  another.alias;

    #    location / {
    #        root   html;
    #        index  index.html index.htm;
    #    }
    #}


    # HTTPS server
    #
    #server {
    #    listen       443 ssl;
    #    server_name  localhost;

    #    ssl_certificate      cert.pem;
    #    ssl_certificate_key  cert.key;

    #    ssl_session_cache    shared:SSL:1m;
    #    ssl_session_timeout  5m;

    #    ssl_ciphers  HIGH:!aNULL:!MD5;
    #    ssl_prefer_server_ciphers  on;

    #    location / {
    #        root   html;
    #        index  index.html index.htm;
    #    }
    #}
    include servers/*;
}
자세하게 알아봅시다. 이 코드들은 각각 모듈/블록단위로 구분지어서 파악해야합니다.Core 모듈, http 모듈, server 블록, location 블록, events 블록 등이 있습니다.
Core 모듈
user나 worker_processes와 같은 설정이 파일 최상단에 위치하였으며, nignx의 기본적인 동작 방식을 정의하는 곳입니다.
USER
작업자 프로세스가 어떤 User, Group으로 실행되는지 대한 설정입니다.
root는 파일 시스템의 모든 권한을 사용하게 되므로 보안상 위험하기때문에 사용하지 않는 방법입니다. 그래서 별도의 사용자 계정을 만들어서 관리하는 것을 강력권장합니다.
//Syntax, 단 [group] 부분은 생략 가능
user username [group];

//Default
user nobody nobody;
Worker_process
오고 가는 모든 요청들을 Work_Processes에서 처리하기 떄문에 작업자 프로세스 수를 정의합니다.
요새는 멀티코어 프로세서가 메인으로 이루어져있습니다. 즉 최소 4코어 8스레드 많게는 128코어 256스레드 혹은 그이상까지.., 그래서 CPU코어를 몇개 할당할 것인가에 대한 설정입니다. 잘 모르신다면 auto로 자동감지를 하도록 합니다.
//Syntax, 단 [group] 부분은 생략 가능
worker_processes number | auto;

//Default
worker_processes 1
Events 블록
네트워크의 동작방법과 관련된 설정값을 가진 블록입니다.
worker_connections
작업자 프로세스당 동시에 처리할 수 있는 커넥션의 수를 의미합니다.
worker_connections 512이고 worker_processes가 4개라면 4 x 512 = 2048, 2048개의 커넥션을 동시에 처리할 수 있습니다. (해당 커넥션은 클라이언트, 프록시 서버와의 연결등 모든것을 포함합니다.)
//Syntax
events {
    worker_connections  number;
}

//Default
events {
    worker_connections  512;
}
HTTP 블록
아래의 작은 블록 Server와 Location의 루트 블록입니다. 여러개의 http 블록을 생성할 수 있지만 관리상의 이슈로 한개의 HTTP 블록을 권장하고있습니다.
Http내부는 여러개의 지시어와 Server 블록과 Location블록을 선언할 수 있으며, 하위블록(Server, Location)에서 선언된 지시어는 상위블록(Http)의 지시어를 무시하고 적용됩니다.
각 지시어를 알아보겠습니다.
- include
include는 특정 파일을 포함하는 기능을 수행합니다. 즉 지시어가있는 해당 위치에 있는 특정 파일의 대한 내용이 삽입됩니다. 여러번의 include를 선언 가능하며, 순차적으로 실행됩니다.
- default_type
웹서버의 기본 Content-type를 설정합니다. octet-stream은 바이너리 형태의 타입을 의미합니다.
default_type application/octet-stream;- keepalive_timeout
클라이언트 접속 유지 시간을 의미합니다.
- log_format
로그 파일의 포맷을 설정합니다.
    #log_format  main  '$remote_addr - $remote_user [$time_local] "$request" '
    #                  '$status $body_bytes_sent "$http_referer" '
    #                  '"$http_user_agent" "$http_x_forwarded_for"';
앞에 보이는 $는 변수를 의미합니다.
Server 블록
Nginx에서는 서버블록(Server Block)이라고 불리우는 가상 호스트(virtual host)를 설정할 수 있습니다. 물론 http 블록 내부에서 이루어집니다. NGINX는 이 서버블록을 여러개 선언하여 하나의 서버에서 다양한 웹 어플리케이션 서버를 관리 할 수 있습니다.
기본적인 문법부터 알아봅시다.
//Default
  server {
        listen      8080;
        server_name  localhost;

        #charset koi8-r;

        #access_log  logs/host.access.log  main;

        location /  {
        	...
        }


    	location /  {
          ...
        }
}- listen: 가장 최우선적으로 적용됩니다. 옵션은 다음과 같습니다.
- ip주소(80포트만 처리)
- port
- ip주소:Port
- unix socket
- server_name: 호스트 명을 지정합니다. 정확한 이름, 와일드카드를 포함한 이름, 정규식을 사용하여 정의할 수 있습니다.
- 정확한 이름:
localhost,www.example.com example.com - 와일드카드:
*.example.com - 앞부분과 일치하는 긴 주소:
mail.* - 정규식:
~^(?<USER>.+)\.example\.net$;
Location 블록
Server블록 내부에서 정의하는 블록입니다. 트래픽을 다른 프록시로 보내거나, 요청한 URI를 기반으로 라우팅하는 블록입니다. 즉, 클라이언트가 접근한 경로(path)를 보고 적합한 location의 블럭으로 요청을 보내 WAS로 이어주거나 리소스를 받아옵니다.
문법은 다음과 같습니다.
location [modifier] [URI] {
  	...
  	...
}


 //reverse proxy
location / {
    proxy_pass http://127.0.0.1:8080;
}


 // Default
 location / {
    root   html;
    index  index.html index.htm;
 }
Modifier
Location 블록은 URI 구문 앞에 적절한 MODIFIER을 작성하여 URL을 다르게 처리할 수 있습니다. 정말 다양하지만 몇가지만 설명하면 다음과 같습니다.
=: 문자열 완전 일치
 location = /asd {
 	return 200 "나 asd인데, 연결됐음.";
} ^~: 문자열 시작부분과 일치
 location ^~ /asd {
 	return 200 "나 asdadsfdsfds인데, 연결됐음.";
} ~: 대소문자 구분 정규표현식
 location ~ /AbC {
 	return 200 "나 대소문자 구분 정규식, 연결됐음.";
} ~*: 대소문자 무시 정규표현식
 location ~* ^/reGex$ {
 	return 200 "나 대소문자 무시 정규식, 연결됐음.";
} - 일반선언
 location / {
 	return 200 '나 prifix, 드디어 연결됐음';
 }
Location 블록을 여러개 중첩하여 사용이 가능합니다.
Location의 우선 순위
nginx의 location은 우선 순위가 높은 순으로 매칭합니다. 블럭을 정의한 순서와는 관계가 없습니다.
- 순서
- 모든 접두사 문자열에 대해 URI 테스트합니다.
=수정자가 있는 Location과 URI를 비교하여 일치할 경우 검색이 중단됩니다.^-수정자가 정규식보다 우선순위로 검색이되며, 일치하는지 검색합니다.- 일치하는 Location중 가장 긴 주소를 저장합니다.
- 정규식에 대해 URI를 테스트합니다.
- 정규식(
~ or ~*)수정자가 있는 Location과 URI가 일치하면 검색이 중단됩니다. - 정규식마저 일치하지 않으면 맨앞
/으로 시작하는 부분과 일치하는 Location을 사용합니다.
이제 location에선 root와 alias가 뭔지 알아보겠습니다.
root
alias
이제 기본적인것을 알아봤으니 리버스 프록시서버를 어떻게 구축하는지 본격적으로 알아보겠습니다.
ref: 미니밀랍,docs.nignx, 빅숲위키, nginxOrg