Spring Security 6 튜토리얼 (3)
🍃 스프링 시큐리티 API 테스트
SecurityConfig.java 수정
🟢 csrf (사이트간 요청 위조) 비활성화
csrf 활성화 -> crsf 토큰 필요 (기본)
csrf 비활성화 -> crsf 토큰 불필요 (옵션)
** 더 자세한 설명은 여기서
https://junhyunny.github.io/information/security/spring-boot/spring-security/cross-site-reqeust-forgery/
🟣 코드
crsf 비활성화, /register 추가 등록
package com.example.springsecurity62.config;

import org.springframework.context.annotation.Bean;
import org.springframework.context.annotation.Configuration;
import org.springframework.security.config.Customizer;
import org.springframework.security.config.annotation.web.builders.HttpSecurity;
import org.springframework.security.crypto.password.NoOpPasswordEncoder;
import org.springframework.security.crypto.password.PasswordEncoder;
import org.springframework.security.web.SecurityFilterChain;

@Configuration
public class ProjectSecurityConfig {

	@Bean
	SecurityFilterChain defaultSecurityFilterChain(HttpSecurity http) throws Exception {

		// csrf 비활성화 (사이트 요청 위조) ---> csrf 토큰이 없어도 서버는 응답
		// 스프링에서는 csrf 기본은 활성화 (보안 목적) ---> csrf 토큰을 url에 포함해야 서버는 응답
		http.csrf((csrf) -> csrf.disable())
                .authorizeHttpRequests((requests)->requests
                        .requestMatchers("/myAccount","/myBalance","/myLoans","/myCards").authenticated()
                        .requestMatchers("/notices","/contact","/register").permitAll())
                .formLogin(Customizer.withDefaults())
                .httpBasic(Customizer.withDefaults());
        return http.build();
    }

	 /**
     * NoOpPasswordEncoder is not recommended for production usage.
     * Use only for non-prod.
     *
     * @return PasswordEncoder
     */
    @Bean
    public PasswordEncoder passwordEncoder() {
        return NoOpPasswordEncoder.getInstance();
    }

	/*
	 * @Bean public UserDetailsService userDetailsService(DataSource dataSource) {
	 * return new JdbcUserDetailsManager(dataSource); }
	 */

}
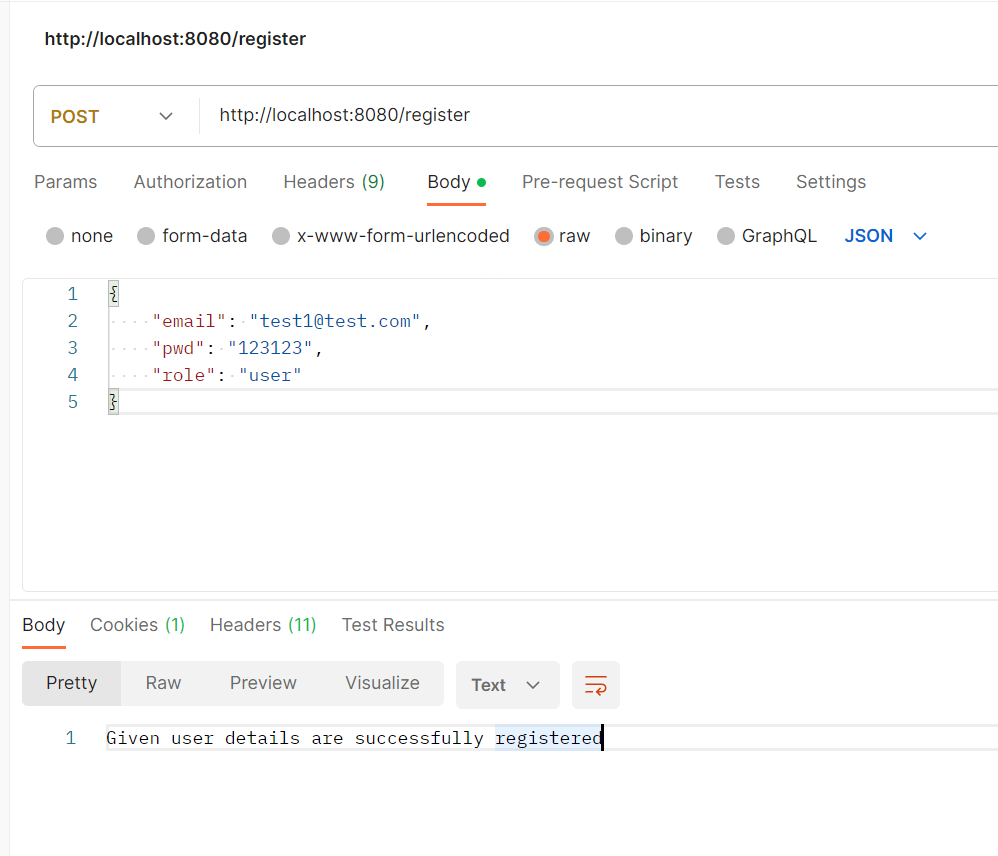
로그인 컨트롤러 만들기 (사용자 등록)
import org.springframework.beans.factory.annotation.Autowired;
import org.springframework.http.HttpStatus;
import org.springframework.http.ResponseEntity;
import org.springframework.web.bind.annotation.PostMapping;
import org.springframework.web.bind.annotation.RequestBody;
import org.springframework.web.bind.annotation.RestController;

import com.example.springsecurity62.model.Customer;
import com.example.springsecurity62.repository.CustomerRepository;

@RestController
public class LoginController {

    @Autowired
    private CustomerRepository customerRepository;

    @PostMapping("/register")
    public ResponseEntity<String> registerUser(@RequestBody Customer customer) {
        System.out.println("sssss");
    	Customer savedCustomer = null;
        ResponseEntity response = null;
        try {
            savedCustomer = customerRepository.save(customer);
            if (savedCustomer.getId() > 0) {
                response = ResponseEntity
                        .status(HttpStatus.CREATED)
                        .body("Given user details are successfully registered");
            }
        } catch (Exception ex) {
            response = ResponseEntity
                    .status(HttpStatus.INTERNAL_SERVER_ERROR)
                    .body("An exception occured due to " + ex.getMessage());
        }
        return response;
    }

}
🟢 구조

🟢 테스트

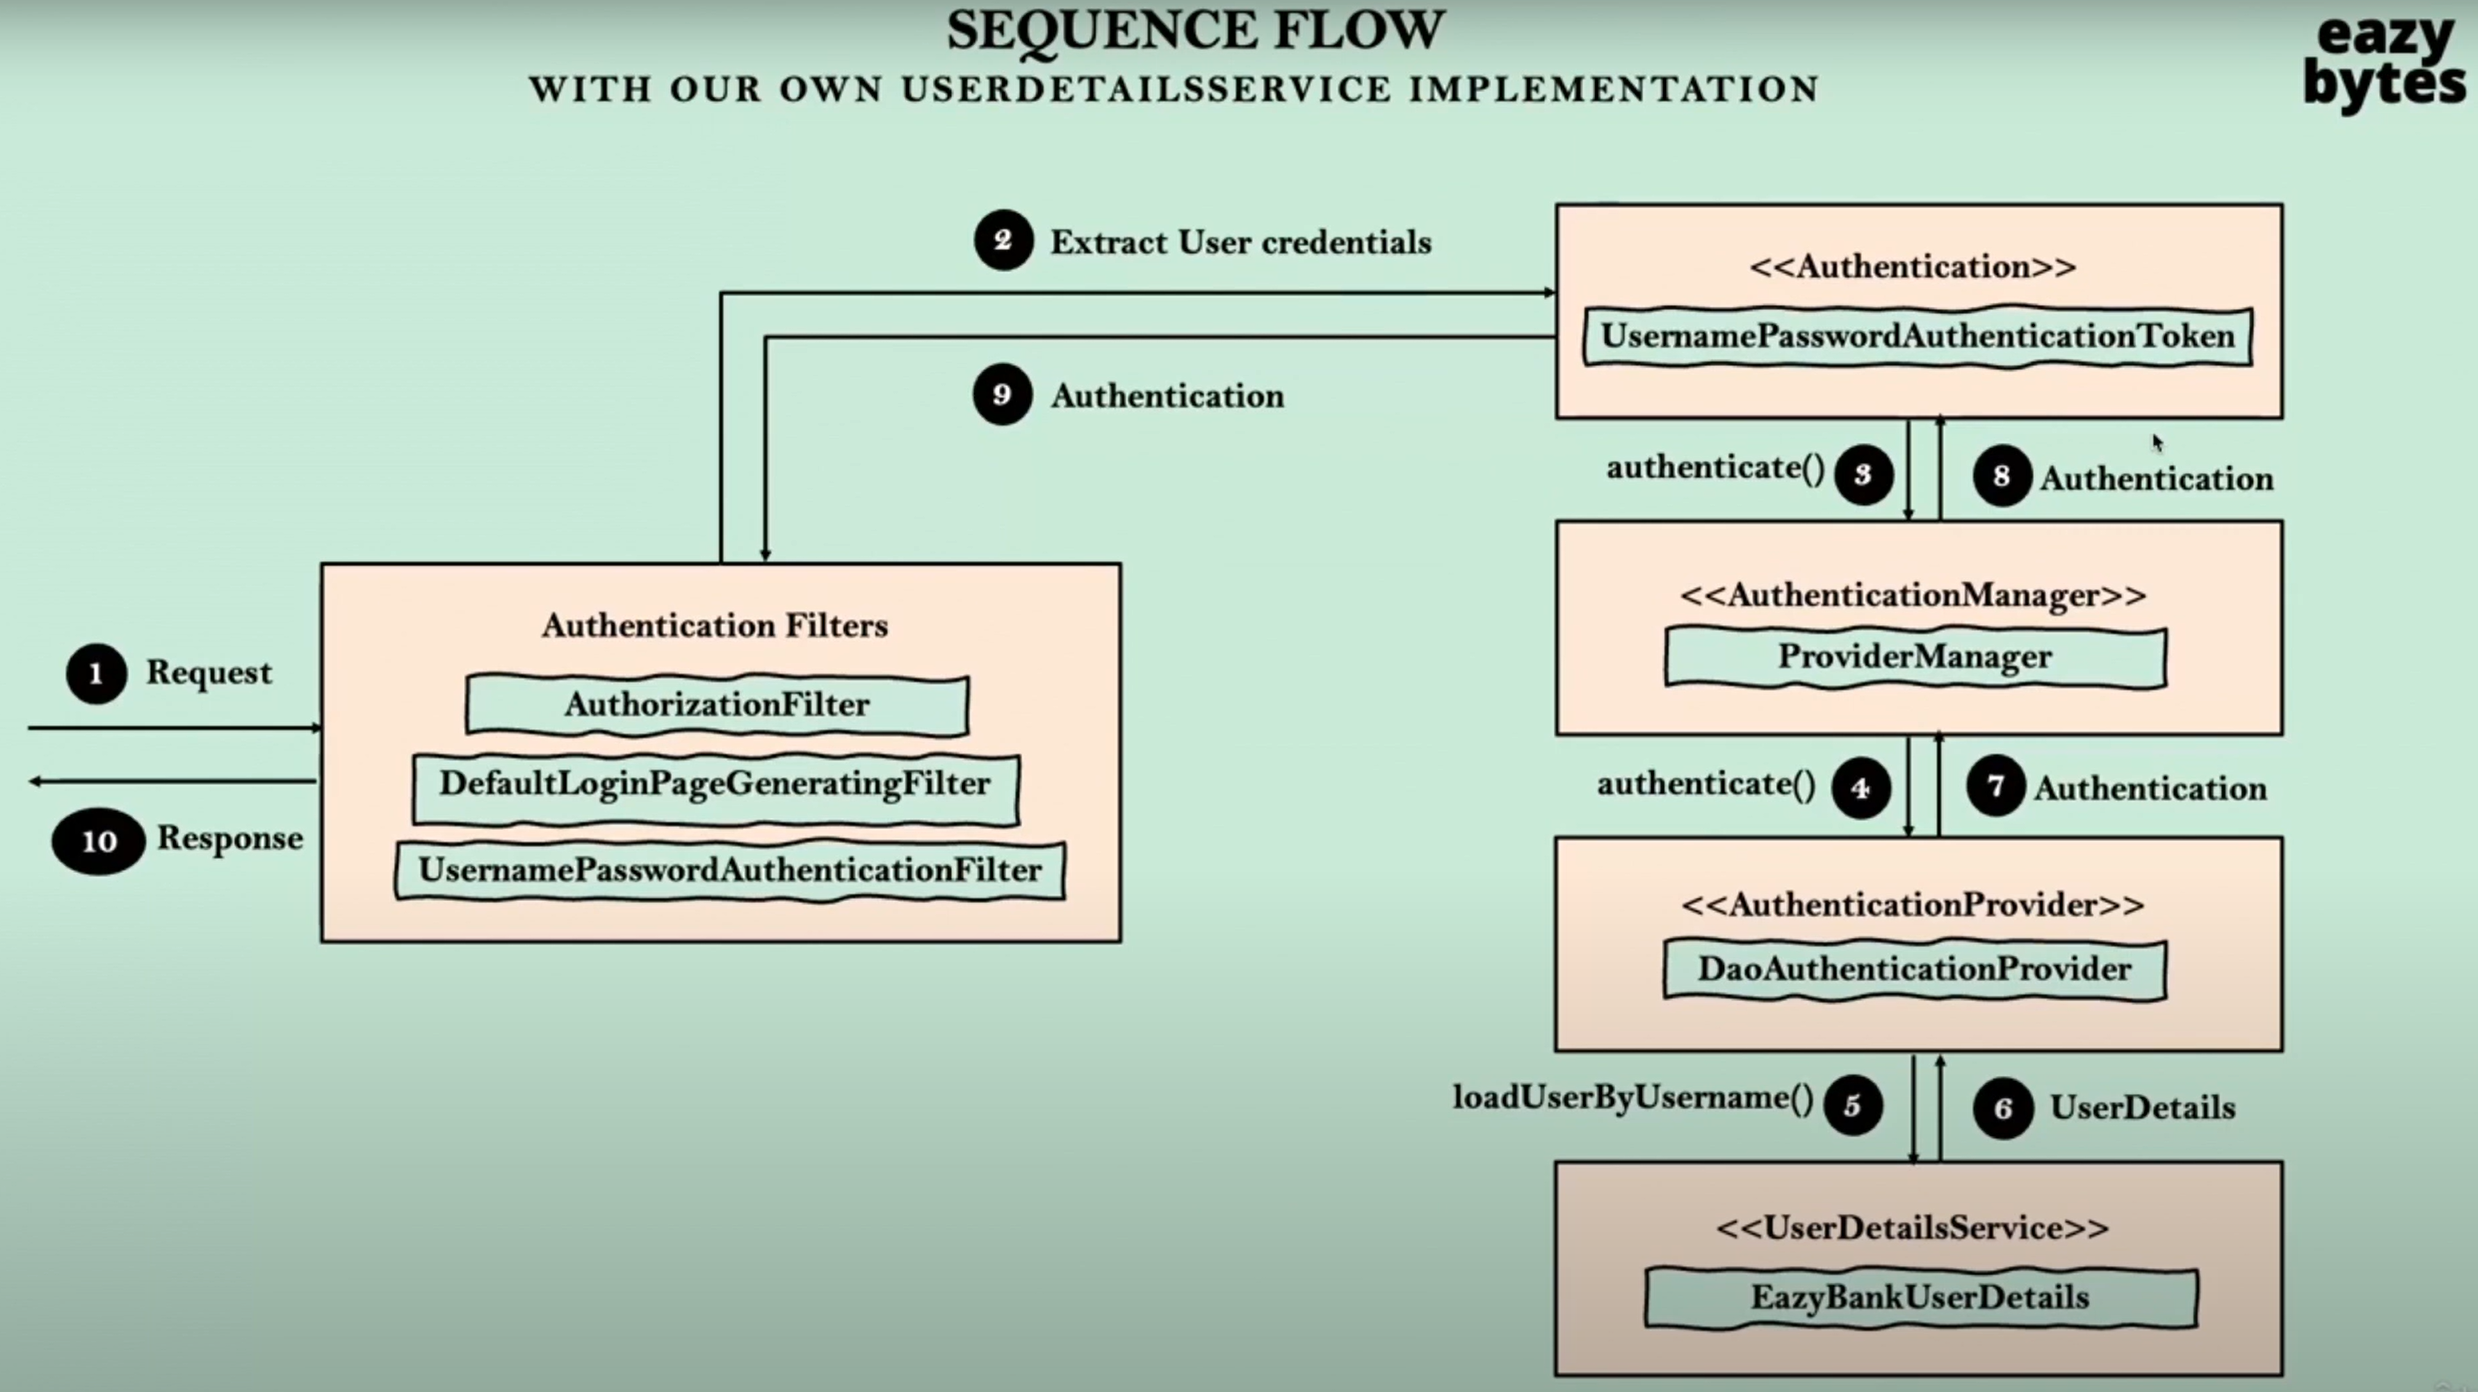
플로우

해석
-
사용자가 처음으로 보안 페이지에 액세스를 시도합니다.
사용자가 처음으로 보안된 페이지에 접근을 시도하면, 내부적으로 몇 가지 필터가 작동합니다. -
AuthorizationFilter, DefaultLoginPageGeneratingFilter 등의 필터가 사용자가 로그인하지 않았음을 감지하고 로그인 페이지로 리다이렉트합니다.
이러한 필터들은 사용자가 로그인하지 않았다는 것을 확인하고 로그인 페이지로 사용자를 리다이렉트합니다. -
사용자가 자신의 자격 증명을 입력하고, 요청이 필터에 의해 가로채집니다.
사용자가 로그인 정보를 입력하면, 이 요청은 Spring Security 필터에 의해 처리됩니다. -
UsernamePasswordAuthenticationFilter와 같은 필터는 요청에서 사용자 이름과 비밀번호를 추출하고, Authentication 인터페이스의 구현체인 UsernamePasswordAuthenticationToken 객체를 생성합니다. 그리고 ProviderManager의 authenticate() 메서드를 호출합니다.
해당 필터는 로그인 정보를 추출하고 인증을 위한 객체를 생성하여 인증 과정을 시작합니다. -
ProviderManager는 AuthenticationManager의 구현체로, 주어진 인증 객체 스타일을 지원하는 사용 가능한 AuthenticationProvider 목록을 식별합니다. 기본적으로 ProviderManager가 DaoAuthenticationProvider의 authenticate() 메서드를 호출합니다.
이 단계에서는 적절한 인증 제공자를 선택하여 인증 과정을 계속 진행합니다. -
DaoAuthenticationProvider는 EazyBankUserDetails의 loadUserByUsername() 메서드를 호출하여 사용자 세부 정보를 로드합니다. 사용자 세부 정보가 로드되면 기본 비밀번호 인코더 구현을 사용하여 비밀번호를 비교하고 사용자가 정통한지 여부를 검증합니다.
이 단계에서는 사용자의 세부 정보를 로드하고 비밀번호를 검증하여 인증 과정을 완료합니다. -
마지막으로 인증 성공 여부와 관련된 Authentication 객체를 ProviderManager에 반환합니다.
-
ProviderManager는 인증이 성공했는지 확인합니다. 그렇지 않으면 다른 사용 가능한 AuthenticationProvider로 시도합니다. 그렇지 않으면 필터에 인증 세부 정보를 반환합니다.
인증의 성공 여부를 확인하고 처리합니다. -
인증 객체는 필터에 의해 SecurityContext 객체에 저장되어 향후 사용되고, 응답이 최종 사용자에게 반환됩니다.
인증 정보는 나중에 사용할 수 있도록 저장되며, 응답이 사용자에게 전달됩니다.
플로우

비밀번호 일치 확인
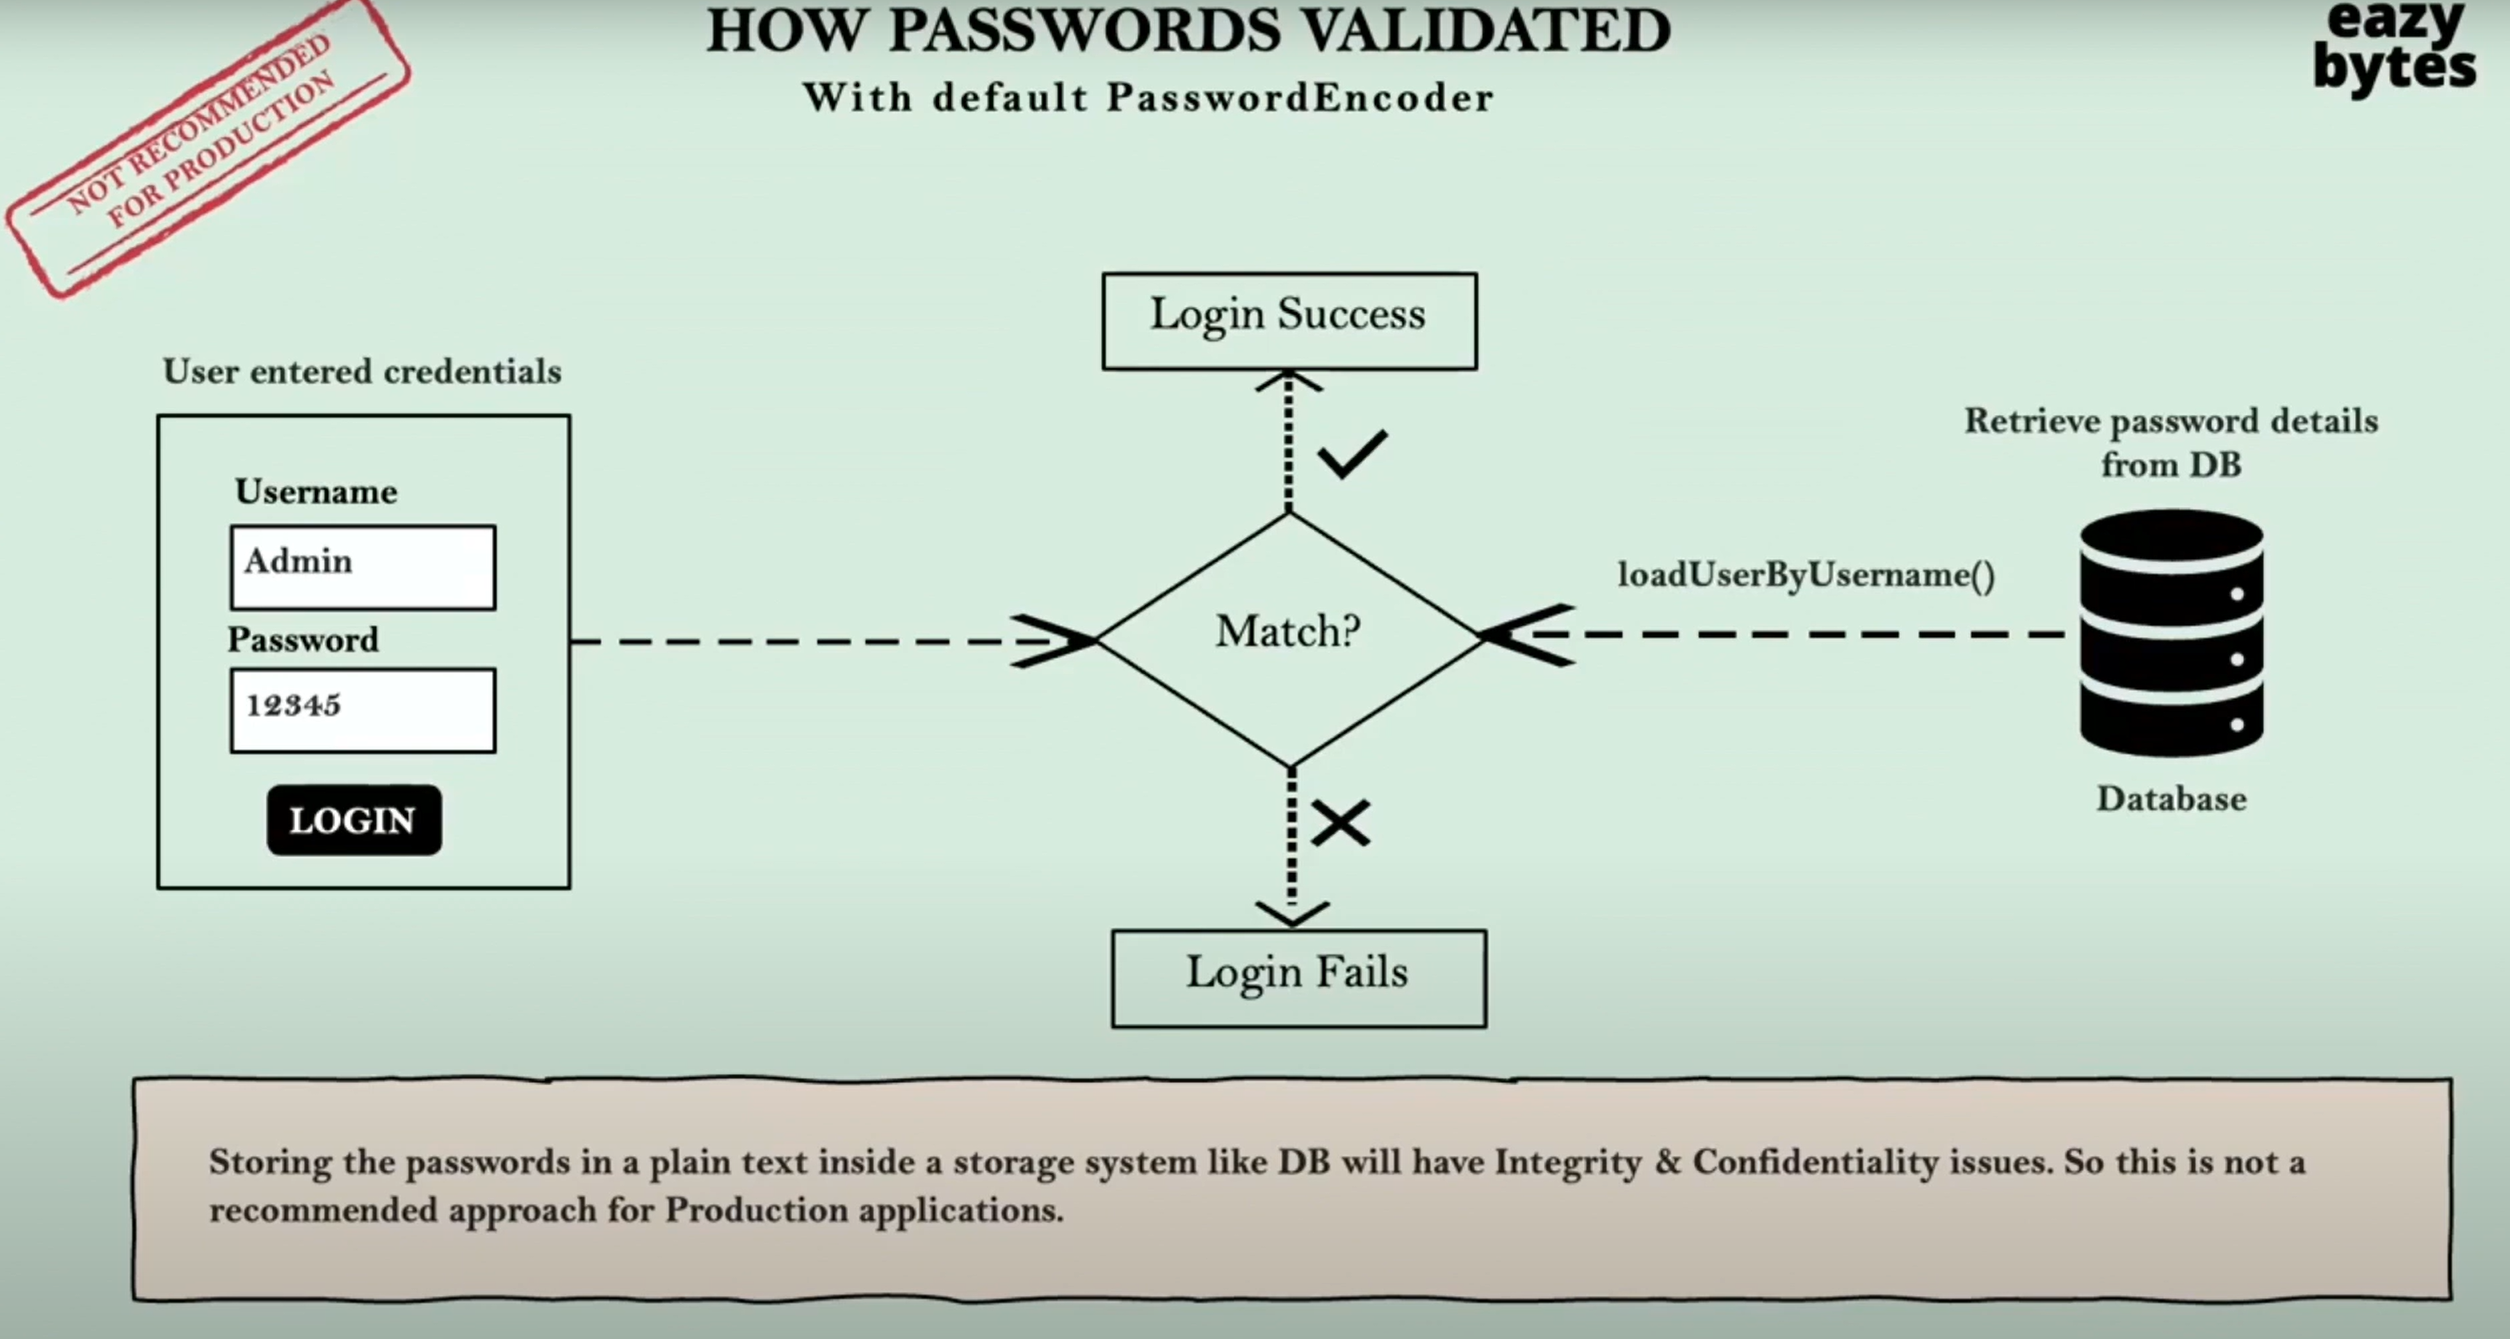
현재는 plain text 으로 비밀번호가 저장.
다음에는 암호화 해서 저장하고 비밀번호가 일치하는지 확인하는 프로세스를 추가 해보자.