
Kubernetes Basic
Namespace
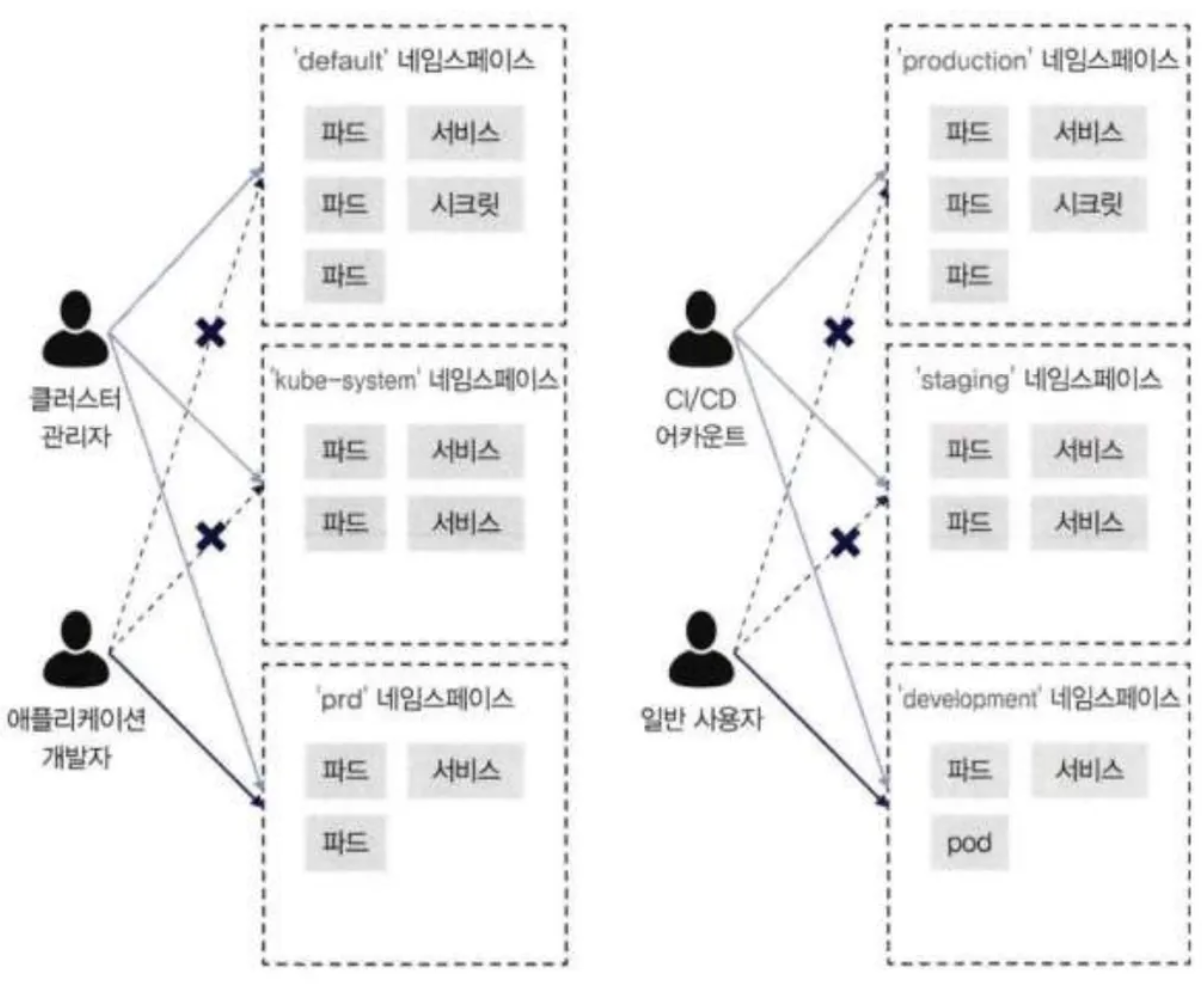
분리성 확보
namespace
-
가상적인 쿠버네티스 클러스터 분리 기능
-
완전한 분리 개념이 아니기 때문에 용도는 제한되지만, 하나의 쿠버네티스 클러스터를 여러팀에서 사용하거나 서비스 환경/스테이징 환경/개발 환경으로 구분하는 경우 사용 가능
-
기본 설정에서 제공하는 Namespace
kube-system- 쿠버네티스 클러스터 구성 요소와 애드온이 배포될 네임스페이스
kube-public- 모든 사용자가 사용할 수 있는 ConfigMap 등을 배치하는 네임스페이스
kube-node-lease- 노드의 하트비트 정보를 저장하기 위한 Lease 리소스가 저장되는 네임스페이스
default- 기본 네임스페이스
-
관리형 서비스나 구축 도구로 구축된 경우 대부분의 쿠버네티스 클러스터는 RBAC이 기본값으로 활성화되어 있으며 일부 환경에서는 네트워크 정책을 사용할 수 있음
-
RBAC은 클러스터 조작에 대한 권한을 네임스페이스별로 구분할 수 있고 네트워크 정책과 함께 사용하여 네임스페이스 간의 통신을 제어할 수 있는 구조
-
네임스페이스만으로는 높은 분리성을 확보하기 어렵지만 RBAC 이나 네트워크 정책을 사용하면 분리성을 높일 수 있음
kubectl
kubectl
- 쿠버네티스에서 클러스터 조작은 모든 쿠버네티스 마스터의 API를 통해 수행
- 직접 API에 요청을 보내거나 클라이언트 라이브러리를 사용하여 클러스터를 조작할 수도 있지만, 수동으로 조작하는 경우에는 CLI 도구인 kubectl 을 사용하는 것이 일반적
인증 정보와 컨텍스트
인증 정보
- kubectl 이 쿠버네티스 마스터와 통신할 때는 접속 대상의 서버 정보, 인증 정보 등이 필요
- kubectl 은
kubeconfig(기본 위치는 ~/.kube/config)에 쓰여 있는 정보를 사용하여 접속 - kubeconfig 도 매니페스트와 동일한 형식으로 작성
kubeconfig 파일
apiVersion: v1
kind: Config
preferences: {}
clusters:                  # 1. 클러스터 목록 시작
- name: sample-cluster     # 리스트 아이템(-) 뒤에 한 칸 공백
  cluster:                 # name과 같은 레벨
    server: https://localhost:6443 # 부모(cluster)보다 2칸 더 들여쓰기
users:                     # 2. 유저 정보 시작
- name: sample-user
  user:
    client-certificate-data: LS0tLs1CRUd3Ti...
    client-key-data: l_S0tl_S1CRUdJTi...
contexts:                  # 3. 컨텍스트(조합) 시작
- name: sample-context
  context:
    cluster: sample-cluster
    namespace: default
    user: sample-user
current-context: sample-context # 현재 활성화된 컨텍스트 이름- kubeconfig 에서 구체적으로 설정이 이루어지는 부분은
cluster/users/contexts세 가지 - 세 가지 설정 항목은 모두 배열로 되어 있어 여러 대상을 등록할 수 있음
cluster에는 접속 대상 클러스터 정보를 정의users에는 인증 정보를 정의- 사용자 인증에는
X.509클라이언트인증서/토큰/패스워드/웹훅등 다양한 방식을 사용할 수 있음
- 사용자 인증에는
contexts에는 cluster 와 user 그리고 네임스페이스를 지정한 것을 정의
kubeconfig 설정 변경
- 파일을 직접 수정
- 명령어 이용
# 클러스터(prd-cluster) 정의를 추가, 변경
kubectl config set-cluster prd-cluster --server=https://localhost:6443

# 인증 정보 정의를 추가, 변경
kubectl config set-credentials admin-user --client-certificate=./sample.crt --
client-key=./sample.key --embed-certs=true

# 컨텍스트 정의(클러스터/인증 정보/네임스페이스 정의)를 추가 및 변경
kubectl config set-context prd-admin --cluster=prd-cluster --user=admin-user
--namespace=default

# 현재 컨텍스트 확인
kubectl config current-context

# 명령어를 실행할 때 컨텍스트 지정
kubectl get pods --context
리소스 생성/삭제/갱신
리소스 생성 - kubectl run
- 가장 간단하게 pod를 만드는 방식 중 하나
- run 명령어는 실행 커맨드에 각종 정보를 입력해서 생성
- 간편하지만 실행 시 입력한 정보가 남지 않기 때문에 재실행하기가 어렵고 문제가 발생했을 때 원인을 찾거나 해결 방법을 공유하는 등이 불편
- 테스트나 간단한 파드를 생성할 때는 유용하지만 많은 configuration 을 활용한다면 불편
- nginx 파드 생성
kubectl run nginx --image=nginx

# 확인
kubectl get pods- 명령어로 만들 때는 종류를 지정해서 생성해야 함
kubectl create deployment 디플로이먼트이름 --image=이미지이름
kubectl create deployment dpy-nginx --image=nginx

# 확인
kubectl get pods
리소스 생성 - kubectl create
- 리소스가 존재하는 경우 에러
kubectl create -f 리소스파일경로- nginx 파드 생성
# 리소스 파일 작성(sample-pod.yaml)
apiVersion: v1
kind: Pod
metadata:
 name: sample-pod
spec:
 containers:
 - name: nginx-container
 image: nginx:1.16

 # 리소스 생성
 kubectl create -f sample-pod.yaml

	 # 존재하지 않는 경우
	 pod/sample-pod created

	 # 존재하는 경우
	 Error from server (AlreadyExists): error when creating "sample-pod.yaml": pods
"sample-pod" already exists
리소스 삭제 - kubectl delete
- 리소스 파일로 만든 리소스 삭제
kubectl delete -f 리소스파일
kubectl delete -f sample-pod.yaml

# 리소스가 존재하는 경우
pod "sample-pod" deleted

# 리소스가 존재하지 않는 경우
Error from server (NotFound): error when deleting "sample-pod.yaml": pods
"sample-pod" not found-
리소스 종류와 이름을 이용하여 삭제
kubectl delete 리소스종류 [리소스이름]- 리소스 이름 대신에
--all을 사용하면 모든 리소스 삭제
- 리소스 이름 대신에
-
kubectl 명령어 실행은 바로 완료되지만 쿠버네티스에 의한 실제 리소스 처리는 비동기로 실행되어 처리가 바로 완료되지 않음
-
--wait옵션을 사용하면 리소스의 삭제 완료를 기다렸다가 명령어 실행을 종료할 수 있는데 모든Finalizer(삭제 표시된 리소스를 완전히 삭제하기 전에 특정 조건이 충족될 때까지 기다리도록 쿠버네티스에 지시하는 네임스페이스 키) 실행이 완료될 때까지 대기 -
리소스를 강제로 즉시 삭제하려면 정지까지 유예 기간을 0으로 하는
--grace-period -0옵션과 강제로 삭제하는--force옵션을 사용- 쿠버네티스 1.8 이후부터는
--force옵션 지정만으로--grace-period 0옵션도 자동으로 부여
- 쿠버네티스 1.8 이후부터는
-
비슷한 옵션으로
--now가 있지만 이 옵션은--grace-period 1과 동일하여 바로 삭제가 안 되는 경우가 있으니 주의 -
리소스 삭제: 삭제 완료 대기
kubectl delete -f sample-pod.yaml --wait
-
리소스 삭제: 즉시 강제 삭제
kubectl delete -f sample-pod.yaml --grace-period 0 --force
리소스 업데이트 - kubectl apply
- 변경 부분이 있으면 적용하고 없으면 적용하지 않으며 리소스가 없을 때는 kubectl create 명령어와 동일하게 신규로 리소스를 생성
- 쿠버네티스는 생성한 리소스 상태를 내부에 기록하는데 한 번 기록된 리소스의 필드(내부 상태의 설정 항목) 대부분은 리소스 업데이트에 따라 변경할 수 있지만 리소스에 따라서는 생성 후에 변경할 수 없는 필드도 존재
# 없으면 생성
kubectl apply -f sample-pod.yaml
	# >> pod/sample-pod created

# 변경 내용이 없으면 적용하지 않음
kubectl apply -f sample-pod.yaml
# >> pod/sample-pod unchanged- 가동 중인 파드 이미지는
kubectl get pods명령어에 옵션을 사용하여 확인할 수 있음kubectl get pods -ㅐ jsonpath='{.items[*].spec.containers[*].image}'
리소스 생성에도 kubectl apply 를 사용해야 하는 이유
- 생성에는 kubectl create 를 사용하고 업데이트 때는 kubectl apply 를 사용해야 한다는 구분이 불필요하기 때문인데 스크립트나 CI/CD 등에 포함될 것을 생각하면 조건 분기는 하지 않는 것이 좋음
- kubectl create 와 kubectl apply 를 섞어서 사용하면 kubectl apply 를 실행할 때 변경 사항을 검출하지 못할 경우가 있기 때문
kubectl apply로 적용된 변경 사항은이전에 적용한 매니페스트,현재 클러스터에 등록된 리소스 상태,이번에 적용할 매니페스트, 이렇게 세 종류에서 산출- 이번에 추가되거나 변경될 필드는
현재 리소스 상태와이번에 적용할 매니페스트를 비교하여 산출 - 삭제된 필드는
이전에 적용한 매니페스트와이번에 적용할 매니페스트를 기준으로 산출 --save-config옵션 없이 kubectl create를 사용하여 리소스를 생성한 경우에는 이전 상태가 저장되지 않기 때문에 이번에 적용할 매니페스트에서 특정 필드를 삭제하고 싶은 경우에 변경 사항을 산출하지 못하고 의도한 대로 반영되지 않는 필드가 생성될 수 있음
- 이전에 적용한 매니페스트가 저장되지 않는 경우는 kubectl apply 를 실행할 때 다음과 같은 경고가 출력됨
Warning: kubectl apply should be used on resource created by either
kubectl create --save-config or kubectl apply pod/sample-pod configured
Server-side Apply
리소스 필드 수정
- 쿠버네티스에서는 사용자가 사용하는 kubectl 외에 다양한 시스템 구성 요소가 리소스 필드를 자동으로 수정할 수 있음
- 현재 변경 사항의 산출은 클라이언트 측(kubectl)에서 계산하여 패치 요청을 보내기 때문에(
Client-side apply) 여러 사용자나 구성 요소가 동시에 같은 필드를 변경하는 경우 경합 현상이 발생할 수 있는데 이 문제를 해결하기 위해 필드를 변경한 구성 요소(kubectl 이나 구성 요소의 이름)를 기록하는 기능과 서버 측에서 변경 사항을 계산하는 기능이 도입됨 kubectl set image명령어에서는 매니페스트 파일을 사용하지 않고 서버 측 정보를 직접 수정하여 컨테이너 이미지를 변경할 수 있는데 이 명령어는 매니페스트를 수정하지 않기 때문에 kubectl apply 명령어로 매니페스트를 다시 적용하면 컨테이너 이미지가 원래대로 돌아가버리는 예상치 못한 변경이 발생- 그 외에 사용자가 존재하는 필드를 수정하여 매니페스트를 재적용하는 순간에 지금까지 운영 중인 시스템 구성 요소로 수행되던 다른 필드에 대한 변경을 예기치 않게 덮어 씌워 매니페스트 내용으로 되돌려 버리는 경우 등이 있을 수 있음
서버 사이드의 정보를 이용해서 적용
- Server-side apply 를 사용하면 이러한 충돌을 감지할 수 있음
- Server-side apply 는 충돌 감지만 하기 때문에 실제 충돌이 발생할 때는 별도로 충돌 내용을 해결해야 함
- 서버 측은 쿠버네티스 1.18 이후 기본값으로 활성화 되어 있지만, 클라이언트 측은 기본값으로 활성화 되어 있지 않음
- 클라이언트 측에서 Server-side apply 를 활성화 하려면
--server-side옵션을 사용
# sample-pod.yaml 파일 수정
apiVersion: v1
kind: Pod
metadata:
 name: sample-pod
spec:
 containers:
 - name: nginx-container
 image: nginx:1.16

# 리소스 배포
kubectl apply -f sample-pod.yaml
	# >> pod/sample-pod created

# 이미지 확인
kubectl get pods -o jsonpath='{.items[*].spec.containers[*].image}'
	# >> nginx:1.16
# 이미지 수정
kubectl set image pod sample-pod nginx-container=nginx:1.17
# >> pod/sample-pod image updated
# 이미지 확인
kubectl get pods -o jsonpath='{.items[*].spec.containers[*].image}'
# >> nginx:1.17
# 리소스 배포
kubectl apply -f sample-pod.yaml
# pod/sample-pod created
# 이미지 확인
kubectl get pods -o jsonpath='{.items[*].spec.containers[*].image}'
# >> nginx:1.16 📌 명령형(Imperative) vs 선언적(Declarative)
kubectl set image(명령형 방식)
- 클러스터의 실행 중인 객체(Live Object)는 즉시 변경되지만, 로컬에 있는 YAML 파일은 수정되지 않음
kubectl apply -f(선언적 방식)
- 쿠버네티스는 파일의 내용과 현재 실행 중인 상태(1.17)를 비교하고, 파일에 적힌대로 다시 1.16으로 되돌려버림.
- 실습
# 모든 파드 삭제
kubectl delete pod --all

# 리소스 배포
kubectl apply -f sample-pod.yaml --server-side

# 이미지 확인
kubectl get pods -o jsonpath='{.items[*].spec.containers[*].image}'

# 이미지 수정
kubectl set image pod sample-pod nginx-container=nginx:1.17

# 이미지 확인
kubectl get pods -o jsonpath='{.items[*].spec.containers[*].image}'

# 리소스 배포
kubectl apply -f sample-pod.yaml
	# >> error: Apply failed with 1 conflict: conflict with "kubectl-set" using v1:
	# >> .spec.containers[name="nginx-container"].image
	# >> Please review the fields above--they currently have other managers. Here
	# >> are the ways you can resolve this warning:

# 충돌을 무시하고 적용
kubectl apply -f sample-pod.yaml --server-side --force-conflicts
	# >> pod/sample-pod serverside-applied
파드 재시작
개요
- Deployment 등의 리소스와 연결되어 있는 모든 파드를 재가동
-rollout restart
- 파드 기동 시 처리를 재실행하고 싶을 때나 시크릿 리소스에서 참조되는 환경 변수를 변경하고 싶을 때 사용
- 리소스와 연결되어 있지 않은 단독 파드에는 사용할 수 없음
# sample-deployment.yaml 파일을 생성하고 작성
apiVersion: apps/v1
kind: Deployment
metadata:
	name: sample-deployment
spec:
	replicas: 3
	selector:
		matchLabels:
			app: sample-app
	template:
		metadata:
			labels:
				app: sample-app
		spec:
			containers:
			- name: nginx-container
				image: nginx
# 리소스 생성
kubectl apply -f sample-pod.yaml
# >> pod/sample-pod created
kubectl apply -f sample-deployment.yaml
# >> deployment.apps/sample-deployment created
# 파드 재시작
kubectl rollout restart deployment sample-deployment
# >> deployment.apps/sample-deployment restarted
kubectl rollout restart pod sample-pod
# >> error: pods "sample-pod" restarting is not supportedgenerateName
개요
- 기본적으로 kubectl apply 명령어를 사용하는 것이 바람직하지만 kubectl create 를 사용하여 난수가 있는 이름의 리소스를 생성할 수 있음
metadata.name대신metadata.generateName을 지정하고 리소스를 생성하면 그 이름에 접두사(prefix)를 붙여 이름이 자동으로 생성- 실습
# sample-generatename.yaml 파일을 생성하고 작성
apiVersion: v1
kind: Pod
metadata:
 generateName: sample-generatename
spec:
	containers:
	 - name: nginx-container
		 image: nginx
# 리소스 생성
kubectl create -f sample-generatename.yaml
# >> pod/sample-generatename-mdlxg created
kubectl create -f sample-generatename.yaml
# >> pod/sample-generatename-7gtmr created
kubectl create -f sample-generatename.yaml
# >> pod/sample-generatename-bjwv9 created
# 리소스 확인
kubectl get pods
# 모든 리소스 삭제
kubectl delete all --all
kubectl get all
# >> No resources found in default namespace.리소스 상태 체크와 대기
개요
- kubectl 명령어를 연속적으로 실행하여 리소스를 조작할 때는 다음 명령어를 실행하기 전에 그때까지 작업한 리소스가 의도한 상태가 된 후 다음 명령어를 실행해야 하는 경우가 있음
- 이때 사용할 수 있는 것이
kubectl wait명령어인데, 실행하면--for옵션에 지정한 상태가 되기까지 kubectl 명령어가 최대--timeout옵션에 지정하는 시간(기본값은 30초)까지 종료하지 않고 대기 - 실습
# 파드 3개 생성
kubectl create -f sample-pod.yaml
	# >> pod/sample-pod created

kubectl create -f sample-generatename.yaml
	# >> pod/sample-generatename-h6qpz created

kubectl create -f sample-generatename.yaml
	# >> pod/sample-generatename-kppck created

# sample-pod 가 정상적으로 기동할 때(Ready 상태가 될 때)까지 대기
kubectl wait --for=condition=Ready pod/sample-pod
	# >> pod/sample-pod condition met

# 모든 파드가 삭제될 때까지 파드마다 5초씩 대기하는데 아직 파드를 삭제하지 않았으므로 타임아웃
kubectl wait --for=delete pod --all --timeout=5s
	# >> timed out waiting for the condition on pods/sample-generatename-h6qpz
	# >> client rate limiter Wait returned an error: context deadline exceeded
	# >> client rate limiter Wait returned an error: context deadline exceeded

# 모든 파드를 삭제한 후 곧바로 kubectl wait를 실행
kubectl delete pod --all --wait=false
	# >> pod "sample-generatename-h6qpz" deleted
	# >> pod "sample-generatename-kppck" deleted
	# >> pod "sample-pod" deleted

# 모든 파드가 삭제될 때까지 대기
kubectl wait --for=delete pod --all

# 리소스에 매니패스트 파일 사용 가능
kubectl apply -f sample-pod.yaml
	# >> pod/sample-pod created

kubectl wait --for=condition=Ready -f sample-pod.yaml
	# >> pod/sample-pod condition met
Manifest 파일 설계
하나의 매니페스트 파일에 여러 리소스를 정의
- 매니패스트 파일은 여러 리소스를 한 개의 매니페스트 파일에 정의할 수 있기 때문에 어떤 서비스에서 사용할 여러 종류의 리소스를 한 개의 매니페스트 파일로 통합 가능
- 일반적인 사용 사례로는 파드를 기동하는 워크로드 API 카테고리의 리소스와 외부에 공개하는 서비스 API 카테고리의 리소스를 매니페스트에 통합하여 작성하는 방법을 생각해볼 수 있는데 이 경우 그 한 개의 매니페스트 파일을 적용하는 것만으로 서비스를 외부에 공개할 수 있게 됨
- 실행 순서를 정확하게 지켜야 하거나 리소스 간의 결합도를 높이고 싶다면 한 개의 매니페스트를 사용하는 것이 좋지만 공통으로 사용하는 설정 파일(configmap 리소스)이나 패스워드(시크릿 리소스) 등은 여러 리소스에서 사용되는 경우가 있기 때문에 공통으로 사용되는 리소스는 별도 매니페스트로 분리하는 것이 좋음
- 실습
# 매니페스트 적용
kubectl apply -f sample-multi-resource-manifest.yaml
	# >> deployment.apps/order1-deployment created
# >> service/order2-service created- 매니페스트 파일 내의 일부 리소스 정의 부분에 문법 에러 등으로 문제가 발생한 경우 이후에 정의된 리소스는 적용되지 않는다는 점에 주의해야 함
여러 매니페스트 파일을 동시에 적용
- 여러 매니페스트 파일을 동시에 적용하려면 디렉터리 안에 적용하고 싶은 여러 매니페스트 파일을 배치해두고 kubectl apply 명령어를 실행할 때 그 디렉터리를 지정
- 파일명순으로 매니페스트 파일이 적용되기 때문에 순서를 제어하고 싶을 때는 파일명 앞에 연번의 인덱스 번호 등을 지정하여 사용
kubectl apply -f ./ -R과 같이-R옵션을 사용하면 재귀적으로 디렉터리 안에 존재하는 매니페스트 파일을 적용할 수도 있음
매니페스트 설계 방침
- 아주 규모가 크지 않을 경우에는 시스템 전체를 구성하기 위한 모든 마이크로서비스의 매니페스트 파일으르 하나의 디렉토리로 통합하여 사용
- 한 개의 디렉토리에 파일 통합이 어려울 정도로 거대한 시스템인 경우 분리가 가능하다면 서브 시스템이나 부서별로 디렉터리를 나누어서 사용
- 마이크로서비스마다 디렉터리로 구분하여 리소스 종류별로 파일을 생성할 수도 있는데 가독성이 높아진다는 장점이 있지만, 적용 순서 제어가 어렵다는 단점도 있음
어노테이션과 레이블
- 쿠버네티스에는 각 리소스에 대해 어노테이션과 레이블이라는 메타데이터를 부여할 수 있는데, 둘 다 쿠버네티스가 리소스를 관리할 때 사용한다는 점에서 비슷하지만 용도가 다름
Label: 리소스를 분류/검색하는 태그Annotation: 추가적인 긴 설명/메타데이터 저장소
| 구분 | Label | Annotation |
|---|---|---|
| 주요 목적 | 리소스 분류, 선택, 검색에 사용 | 리소스에 추가 설명/메타데이터 |
| 저장(Storage) | etcd (인덱싱됨) | etcd (비인덱싱됨) |
| 검색/Selector 지원 | 지원 (Label Selector로 매칭) | 지원 안 함 (Selector 불가) |
| Key 형식 | prefix/name (DNS prefix 허용) | 동일 |
| Key 길이 제한 | 253자 이하 | 253자 이하 |
| Value 길이 제한 | 63자 이하 | 262,144자(256KB) 이하 |
| Value 용도 | 간단한 구분자 | 설명, 설정, 빌드 정보 등 |
어노테이션
- 어노테이션은
metadata.annotations로 설정할 수 있는 메타데이터 - 어노테이션은 리소스에 대한 메모 같은 것으로 어노테이션 자체는 단순한 Key-Value 값이기 때문에 어노테이션 값으로 어떤 처리를 하는 시스탬 구성 요소가 없을 경우에는 아무 일도 일어나지 않음
- 리소스에 의미를 가지지 않는 메모를 하고 싶을 경우에도 사용할 수 있고, 값에 수치를 사용하는 경우는 큰따옴표로 묶어야 함
- 매니페스트에 작성할 수도 있지만 kubectl 에서 직접 부여하는 것도 가능
- 실습
# sample-annotations.yaml 파일 생성 및 작성
apiVersion: v1
kind: Pod
metadata:
 name: sample-annotations
 annotations:
	 annotation1: val1
	 annotation2: "200"
spec:
 containers:
 - name: nginx-container
	 image: nginx:1.16
# 리소스 생성
kubectl apply -f sample-annotations.yaml
# >> pod/sample-annotations created
# 리소스 생성 후 어노테이션 부여
kubectl annotate pods sample-annotations annotations3=val3
# >> pod/sample-annotations annotated
# 어노테이션 덮어쓰기
kubectl annotate pods sample-annotations annotations3=val3-new --overwrite
# >> pod/sample-annotations annotated
# 어노테이션 확인
kubectl describe pod sample-annotations
# 어노테이션 삭제
kubectl annotate pods sample-annotations annotations3-- 용도
- 시스템 구성 요소를 위한 데이터 저장
- 시스템 구성 요소가 리소스를 업데이트할 때 사용하기 위해서 자동으로 부여
- 모든 환경에서 사용할 수 없는 설정
- 정식으로 통합되기 전의 기능을 설정
- 시스템 구성 요소를 위한 데이터 저장
레이블
- metadata.lables 에 설정할 수 있는 메타 데이터로 리소스를 구분하기 위한 정보 같은 것
- sample-label.yaml 파일 생성 및 작성
apiVersion: v1
kind: Pod
metadata:
 name: sample-label
 labels:
	 label1: val1
	 label2: val2
spec:
 containers:
 - name: nginx-container
	 image: nginx:1.16
# 리소스 생성
kubectl apply -f sample-label.yaml
# >> pod/sample-label created
# 리소스 생성 후 부여
kubectl label pods sample-label label3=val3
# >> pod/sample-label labeled
# 어노테이션 덮어쓰기
kubectl label pods sample-label label3=val3-new --overwrite
# >> pod/sample-label labeled
# 레이블 확인
kubectl describe pod sample-label
# 레이블 삭제
kubectl label pods sample-label label3-
# >> pod/sample-label labeled- 개발자가 사용하는 레이블
- 개발자가 많은 리소스를 효율적으로 관리하는 데 레이블을 유용하게 사용
- 리소스에 부여된 레이블을 사용하여 대상 리소스를 필터링함으로써 운영
# label1=val1 과 label2 레이블을 가진 파드를 표시
kubectl get pods -l label1=val1,label2

# 모든 레이블을 표시하고 파드 목록을 출력
kubectl get pods --show-labels-
시스템이 사용하는 레이블
- 파드 수를 유지하는 리소스(ReplicaSet)에서는 레이블에 부여된 파드 수를 계산하여 레플리카 수를 관리
- 대상 파드 수가 레플리카 수의 설정보다 많은 경우에는 파드 중 하나를 삭제하고 반대로 부족한 경우에는 새로운 파드를 생성하는데 조건에 일치하는 파드를 별도로 생성
- 외부의 요청을 로드 밸런서로 받은 후에 파드로 전송하는 서비스 리소스(Load Balancer)에서는 이 레이블을 기준으로 목적지 파드를 결정하는데 리소스에 대해 레이블을 여러 개 지정할 수 있기 때문에 유연하게 조건을 설정할 수 있음
-
권장되는 레이블 키 이름: 쿠버네티스의 에코시스템을 구성하는 OSS에서도 사용
app.kubernetes.io/name: 애플리케이션 이름app.kubernetes.io/version: 애플리케이션 버전app.kubernetes.io/component: 애플리케이션 내 구성 요소app.kubernetes.io/part-of: 애플리케이션이 전체적으로 구성하는 시스템 이름app.kubernetes.io/instance: 애플리케이션이나 시스템을 식별하는 인스턴스명app.kubernetes.io/managed-by: 이 애플리케이션을 관리하는 데 사용되는 도구
Prune 을 사용한 리소스 삭제
매니페스트 관리와 자동 적용
- 매니페스트를 깃 저장소에서 관리하고 변경이 있을 때만 kubectl apply 명령어를 사용하여 자동으로 매니페스트를 적용시키는 방법 등을 사용
- 매니페스트에서 삭제된 리소스를 삭제하는데 필요한 kubectl delete 명령어를 자동으로 실행하려면 매니페스트에서 삭제된 리소스를 감지할 수 있는 구조를 만들어야 함
- 여기서 필요한 것이 kubectl apply 명령어에서 사용 가능한
--prune옵션 - kubectl apply 명령어를 실행할 때 매니페스트에서 삭제된 리소스를 감지하여 자동으로 삭제하는 기능을 구현할 수 있음
- CI/CD 에서는 업데이트된 매니페스트에 대해
kubectl apply --prune명령어를 계속 실행하는 것만으로 매니페스트에서 삭제된 리소스도 자동으로 삭제할 수 있음
# 리소스 생성
kubectl apply -f ./prune
	# >> pod/sample-pod1 created
	# >> pod/sample-pod2 created

# sample-pod2.yaml 파일을 삭제
# 리소스 수정
kubectl apply -f ./prune
	# >> pod/sample-pod1 unchanged

# 리소스 확인
kubectl get pods
리소스 일부 정보 업데이트
kubectl set 변경할정보 리소스종류 리소스이름 실제값- 변경 가능한 설정값
- env
- image
- resources
- selector
- serviceaccount
- subject
# 파드 생성
kubectl apply -f sample-pod.yaml
	# >> pod/sample-pod created

# 파드의 이미지 변경
kubectl set image pod sample-pod nginx-container=1.17
	# >> pod/sample-pod image updated
로컬 매니페스트와 쿠버네티스 등록 정보 비교 출력
# diff 명령 이용해서 확인
kubectl diff -f sample-pod.yaml
사용 가능한 리소스 종류의 목록 가져오기
# 모든 리소스 종류 표시
kubectl api-resources

# 네임스페이스 수준의 리소스
kubectl api-resources --namespaced=true

# 클러스터 수준의 리소스
kubectl api-resources --namespaced=false
리소스 정보 가져오기
기본 정보 확인
# 리소스 전체 가져오기
kubectl get all

# 리소스를 지정해서 목록에 해당하는 리소스 전체 가져오기(여러 개를 가져오고자 하는 경우는 리소스 종류 나열)
kubectl get 리소스종류

# 리소스 중 특정한 이름을 가진 리소스 정보 가져오기
kubectl get 리소스종류 리소스이름

# 특정 레이블을 가진 리소스 가져오기
kubectl get 리소스종류 label이름=레이블값

# 노드 목록 표시
kubectl get nodes
—-output(-o) 옵션을 사용
- JSON/YAML/Custom Columns/JSON Path/Go Template 등과
같은 다양한 형식으로 출력
# 자세히 표시
kubectl get pods -o wide

# yaml로 표시
kubectl get pods -o yaml
kubectl get pods -o yaml sample-pod

# Custom-columns 사용해서 컬럼 이름 수정
kubectl get pods -o custom-columns="NAME:{.metadata.name},NodeIP:{.status.hostIP}"

# JSON Path 형식의 출력은 특정 항목을 표시하며 셸 스크립트 등으로
# 변수에 특정 값을 지정하는 등 특정 값을 조사할 때 자주 사용
kubectl get pods sample-pod -o jsonpath="{.metadata.name}"
Metric Server가 있어야 아래 명령은 수행 가능
# YAML 적용
kubectl apply -f https://github.com/kubernetes-sigs/metricsserver/releases/latest/download/components.yaml

# Metrics Server Pod 확인
kubectl -n kube-system get pods | grep metrics-server

# 로컬 쿠버네티스인 경우는 매니페스트 수정
kubectl edit deploy metrics-server -n kube-system

	# 아래 내용 추가
	containers:
	- name: metrics-server
	 image: k8s.gcr.io/metrics-server/metrics-server:v0.7.1
	 args:
		- --kubelet-insecure-tls
		- --kubelet-preferred-address-types=InternalIP,ExternalIP,Hostname

# 적용
kubectl rollout restart deploy metrics-server -n kube-system

# 노드의 리소스 사용량 확인
kubectl top node

# 파드의 리소스 사용량 확인
kubectl -n kube-system top pod

# 컨테이너의 리소스 사용량 확인
kubectl -n kube-system top pod --containers- 컨테이너에서 명령어 실행
kubectl apply -f sample-pod.yaml
kubectl exec -it sample-pod -- /bin/ls
	# >> bin docker-entrypoint.d home mnt root srv usr
	# >> boot docker-entrypoint.sh lib opt run sys var
	# >> dev etc media proc sbin tmp

kubectl exec -it sample-pod -c nginx-container -- /bin/ls
	# >> bin docker-entrypoint.d home mnt root srv usr
	# >> boot docker-entrypoint.sh lib opt run sys var
	# >> dev etc media proc sbin tmp

# bash 셸에 접속
kubectl exec -it sample-pod -- /bin/bash

# 인수를 전달해서 실행
kubectl exec -it sample-pod -- /bin/bash -c "ls -all --classify | grep lib"
	# >> lrwxrwxrwx 1 root root 7 Dec 2 00:00 lib -> usr/lib/
포트 포워딩
kubectl port-forward 리소스 외부포트:내부포트
- 리소스에 파드를 설정하면 파드에 포워딩
- 리소스에 레플리카 나 디플로이먼트를 설정하면 파드 중 하나로 포워딩
- 서비스를 포트포워딩 하면 서비스에 연결된 파드 중 하나로 포트 포워딩
로그 확인
- 파드의 로그 확인
kubectl logs 파드이름
- 파드의 특정 컨테이너 로그 확인
kubectl logs 파드이름 -c 컨테이너이름
- 실시간 로그 출력
-f옵션
- 최근 1시간 이내 10건의 로그를 타임 스탬프와 함께 출력
kubectl logs --since=1h --tail=10 --timestamps=true 파드이름
- 특정 레이블을 가진 모든 파드의 로그 출력
kubectl logs --selector 테이블
컨테이너와 파일 복사
kubectl cp 소스 타겟
kubectl apply -f sample-pod.yaml
	# >> pod/sample-pod created

kubectl cp sample-pod:etc/hostname ./hostname
cat hostname
	# >> sample-pod

kubectl cp hostname sample-pod:/tmp/newfile
kubectl exec -it sample-pod -- ls /tmp
	# >> newfile
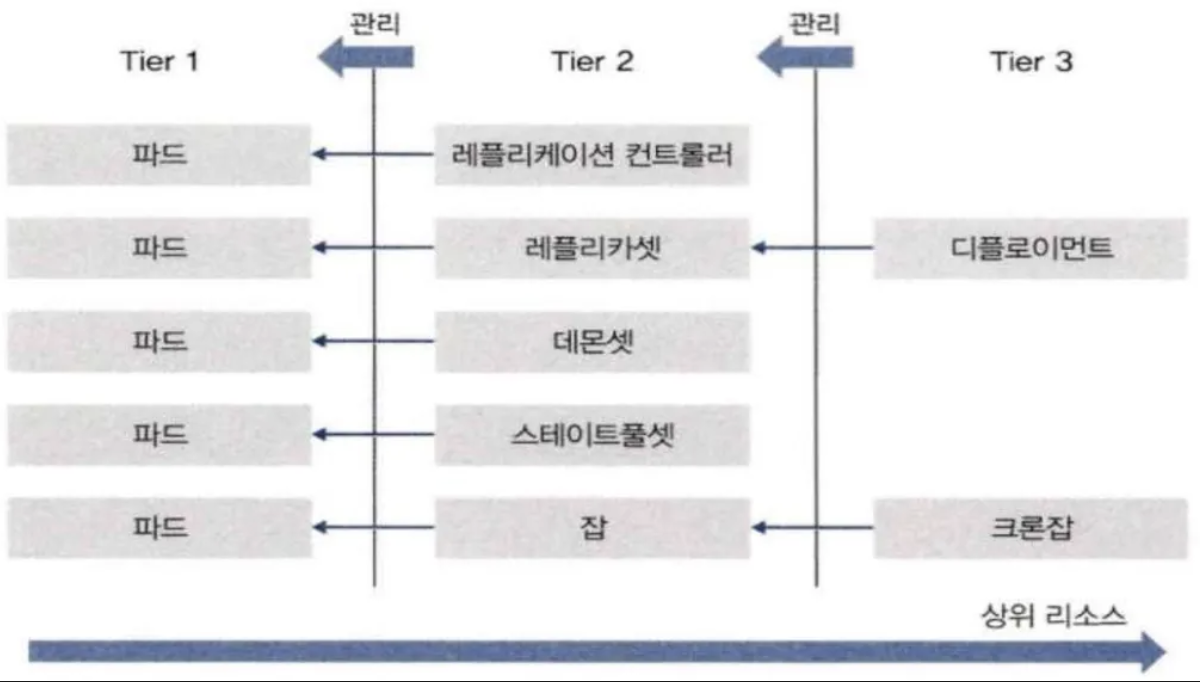
Workload API
WORKLOAD API
- 클러스터에 컨테이너를 기동시키기 위해 사용되는 리소스
- 종류
- Pod
- ReplicaController
- ReplicaSet
- Deployment
- DaemonSet
- StatefulSet
- Job
- CronJob
리소스 간의 관계
Pod
Pod
개요
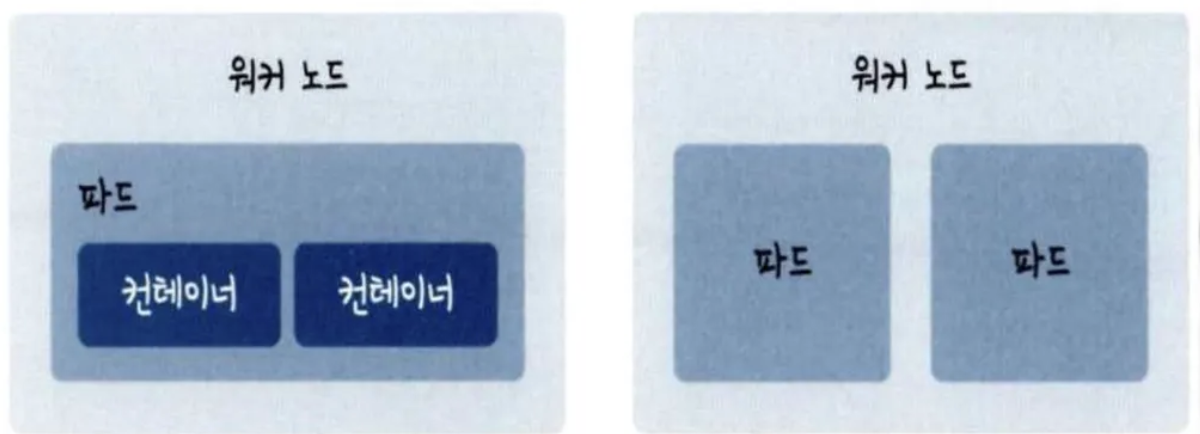
- 파드는 쿠버네티스의 기본 배포(최소) 단위로 다수의 컨테이너가 모인 집합체
- 하나의 파드는 한 개 이상의 컨테이너로 구성되며 하나의 파드에 여러 개의 컨테이너를 포함시킬 수 있는데 이러한 구조를 사이드카 패턴이라고 함
- 쿠버네티스에서는 결합이 강한 컨테이너를 파드로 묶어 일괄 배포
- 같은 파드에 포함된 컨테이너끼리는 네트워크적으로 격리되어 있지 않고 IP 주소를 공유
- 컨테이너가 두 개 들어 있는 파드를 생성한 경우 이 두 컨테이너는 같은 IP 주소를 가지며 이로 인해 파드 내부의 컨테이너는 서로
localhost로 통신할 수 있음
파드 디자인 패턴
- 대부분의 경우 하나의 파드에 하나의 컨테이너를 가지지만 메인 컨테이너 이외에 메인 컨테이너를 지원하는 서브 컨테이너도 포함하듯이 하나의 파드에 여러 컨테이너를 가질 수도 있음
- 서브 컨테이너라고 하면 프록시 역할을 하는 컨테이너, 설정 값을 동적으로 변경시키는 컨테이너, 로컬 캐시용 컨테이너, SSL용 컨테이너 등을 예로 들 수 있음
- 종류
- Sidecar pattern
- Ambassador pattern
- Adapter pattern
Sidecar Pattern
- 사이드카 패턴은 메인 컨테이너 외에 보조적인 기능을 추가하는 서브 컨테이너를 포함하는 패턴
- 예를 들어 특정 변경 사항을 감지하여 동적으로 설정을 변경하는 컨테이너 그리고 깃 저장소와 로컬 스토리지를 동기화 하는 컨테이너와 애플리케이션의 로그 파일을 오브젝트 스토리지로 전송하는 컨테이너라는 구성이 자주 사용됨
- 파드는 데이터 영역을 공유하고 가지고 있을 수 있기 때문에 대부분 데이터와 설정에 관련된 패턴이라 할 수 있음
Ambassador pattern
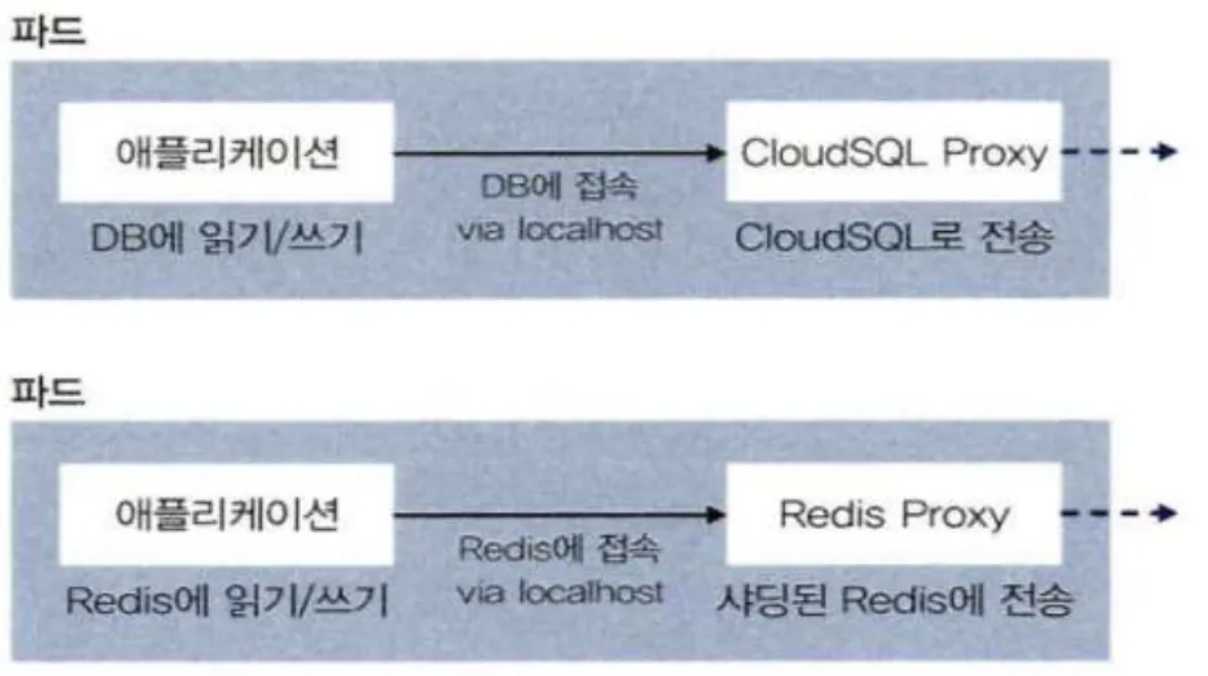
- 앰배서더 패턴은 메인 컨테이너가 외부 시스템과 접속할 때 대리로 중계해주는 서브 컨테이너(앰배서더 컨테이너)를 포함한 패턴
- 파드에 두 개의 컨테이너가 있어 메인 컨테이너에서 목적지에 localhost 를 지정하여 앰배서더 컨테이너로 접속할 수 있음
- 앰배서더 컨테이너를 사용하지 않고 메인 컨테이너에서 동작 중인 애플리케이션이 sharding 된 데이터베이스 하나를 선택하여 접속하게 된다면 메인 컨테이너는 데이터베이스와의 결합도가 강해짐
- 앰배서더 컨테이너를 사용함으로써 메인 컨테이너에서는 항상 localhost 를 지정하여 앰배서더 컨테이너로만 접속하고 앰배서더 컨테이너가 여러 목적지에 중계하여 연결하도록 구성하면 느슨한 결합을 유지할 수 있게 하는데 앰배서더 컨테이너를 경유하면 단일 데이터베이스를 사용히는 개발 환경이나 분산된 데이터베이스를 사용하는 서비스 환경 모두에서 특별한 변경 사항 없이 애플리케이션을 사용할 수 있음
Adapter pattern
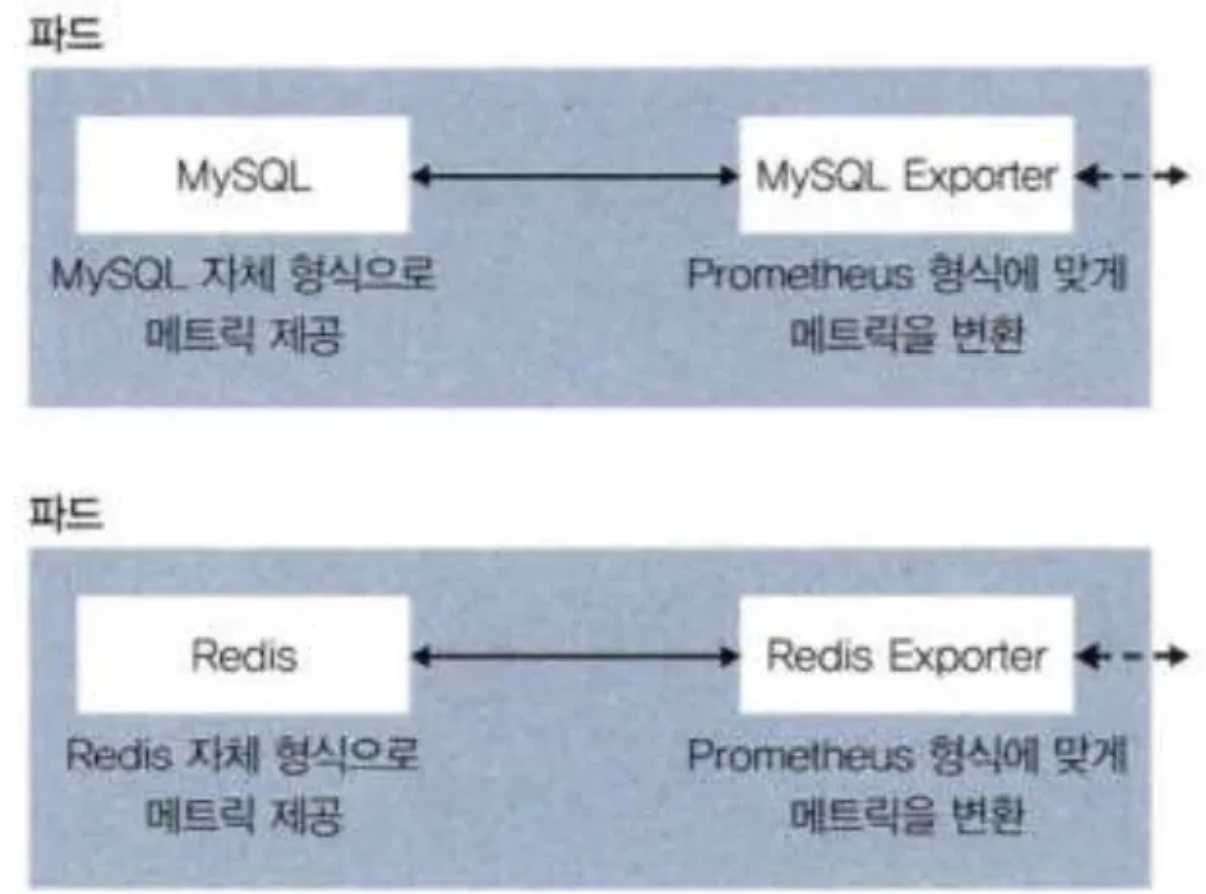
- 어댑터 패턴은 서로 다른 데이터 형식을 변화해주는 컨테이너(어댑터 컨테이너)를 포함하는 패턴
- 프로메테우스 등의 모니터링 소프트웨어에서는 정의된 형식으로 메트릭을 수집해야 하는데, 대부분의 미들웨어가 제공하는 메트릭 출력 형식은 프로메테우스 메트릭 형식을 지원하지 않기 때문에 어댑터 컨테이너를 사용해서 외부 요청에 맞게 데이터 형식으로 변환하고 데이터를 반환해서 사용
- 어댑터 패턴의 경우도 메인 컨테이너와 어댑터 컨테이너 간에는 localhost 를 통해 접속
파드 생성
# sample-pod.yaml 파일 생성 및 작성
apiVersion: v1
kind: Pod
metadata:
 name: sample-pod
spec:
 containers:
 - name: nginx-container
	 image: nginx

# 리소스 파일 적용
kubectl apply -f sample-pod.yaml
	# >> pod/sample-pod created
컨테이너 실행과 관리
- 쿠버네티스가 직접 컨테이너를 실행하지는 않음
- 컨테이너를 생성할 책임을 해당 노드에 설치된 컨테이너 런타임에 맡기는 형태
- 컨테이너 런타임은 containerd 나 docker 가 될 수 있음
- 파드는 쿠버네티스가 관리하는 리소스고 컨테이너는 쿠버네티스 외부에서 관리
Stateless & Stateful
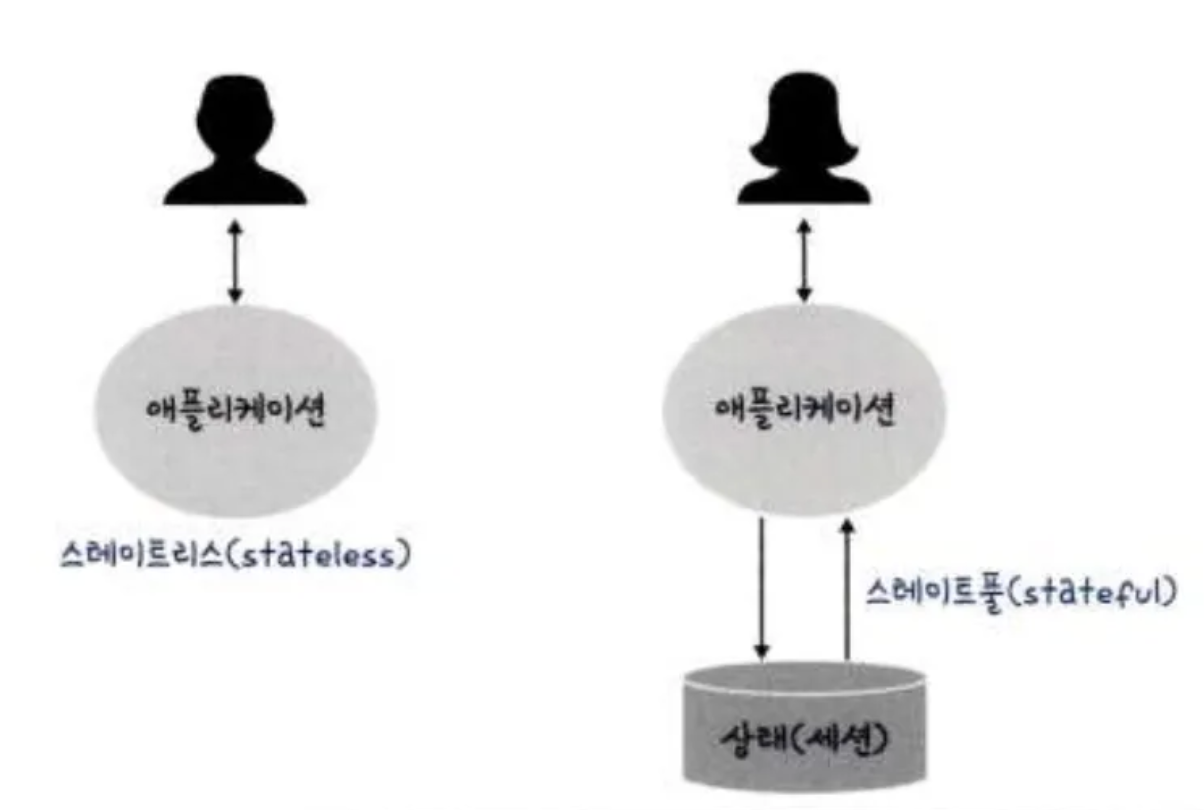
- Stateless(상태가 없는) 는 사용자가 애플리케이션을 사용할 때 상태나 세션을 저장해 둘 필요가 없는 애플리케이션에서 사용
- Stateful은 사용자가 애플리케이션을 사용할 때 상태나 세션을 별도의 데이터베이스에 저장해야 하는 애플리케이션에서 사용
- 상태나 세션을 저장해야 하는 애플리케이션으로는 쇼핑몰, 금융 거래 사이트 등이 있음
파드 정보 확인
# 정상적으로 생성되었는지 확인
kubectl get pods

# 추가적인 정보를 얻으려면 -o wide 옵션 사용
kubectl get deployment -o wide
두 개의 컨테이너를 포함한 파드 생성
# sample-2pod.yaml 파일을 생성하고 작성
apiVersion: v1
kind: Pod
metadata:
 name: sample-2pod
spec:
 containers:
 - name: nginx-container
	 image: nginx:1.16
 - name: redis-container
	 image: redis:3.2
# 파드 생성
kubectl apply -f sample-2pod.yaml
# 파드 확인
kubectl get pods# sample-2pod-fail.yaml 파일을 생성하고 작성
apiVersion: v1
kind: Pod
metadata:
name: sample-2pod-fail
spec:
containers:
- name: nginx-container-112
image: nginx:1.16
- name: nginx-container-113
image: nginx:1.17# 파드 생성
kubectl apply -f sample-2pod-fail.yaml
# 파드 확인 - 동일한 포트를 사용하므로 첫번째만 컨테이너로 기동되고
# 두번째 컨테이너는 기동 안 됨
kubectl get pods
# 로그 확인
kubectl logs sample-2pod-fail -c nginx-container-113