
⭐️ Comment Create Page
게시글을 작성하고 등록까지 구현하였으니, 이제 댓글 기능을 구현해보자!
✔️ Post Comment UI 작성
authenticated: 로그인 시에만 댓글 작성이 가능하는 조건.
//
const PostPage = () => {
    const { authenticated, user } = useAuthState();

		...
           <div>
                {authenticated ? (
                  <div>
                    <p>
                      <Link href={`/u/${user?.username}`}>
                       {user?.username}
                      </Link>으로 댓글 작성
                    </p>
                    <form onSubmit={handleSubmit}>
                      <textarea
                        onChange={e =>setNewComment(e.target.value)}
                        value={newComment}
                      ></textarea>
                      <div>
                        <button disabled={newComment.trim() === ''}>
                          댓글 작성
                        </button>
                      </div>
                    </form>
                  </div>
                ) : (
                  <div>
                    <p>댓글 작성을 위해서 로그인 해주세요.</p>
                    <div>
                      <Link href={`/login`}> 로그인 </Link>
                    </div>
                  </div>
                )}
              </div>

}
✔️ Comment 기능 생성
👉 api 요청 (client)
✅ handleSubmit 생성
1️⃣ 댓글을 입력하지 않았다면 return하여 종료. (newComment가 빈값이면 submit X)
2️⃣ 입력한 댓글이 담긴 newComment가 body로 post 요청.
3️⃣ newComment 빈값으로 초기화
  const [newComment, setNewComment] = useState('');
	...
  const handleSubmit = async (e: FormEvent) => {
    e.preventDefault();
    if (newComment.trim() === '') { // 1️⃣ 번
      return;
    }

    try {
      await Axios.post(`/posts/${post?.identifier}/${post?.slug}/comments`,{// 2️⃣ 번
        body: newComment,
      });
      setNewComment(''); // 3️⃣ 번
    } catch (error) {
      console.log(error);
    }
  };
👉 api 생성 (server)
1️⃣ params(매개변수)로 identifier, slug 받아온다
2️⃣client의 request으로 comment 값을 받았다.
3️⃣ comment객체에 댓글 데이터 삽입 및 저장.
const createPostComment = async (req: Request, res: Response) => {
  const { identifier, slug } = req.params; // 1️⃣ 번
  const body = req.body.body; // 2️⃣ 번
  try {
    const post = await Post.findOneByOrFail({ identifier, slug });
    const comment = new Comment(); // 3️⃣ 번
    comment.body = body;
    comment.user = res.locals.user;
    comment.post = post;

    await comment.save();
    return res.json(comment);
  } catch (error) {
    console.log(error);
    return res.status(404).json({ error: "게시물을 찾을 수 없습니다." });
  }
};

router.post('/:identifier/:slug/comments', userMiddleware, createPostComment);
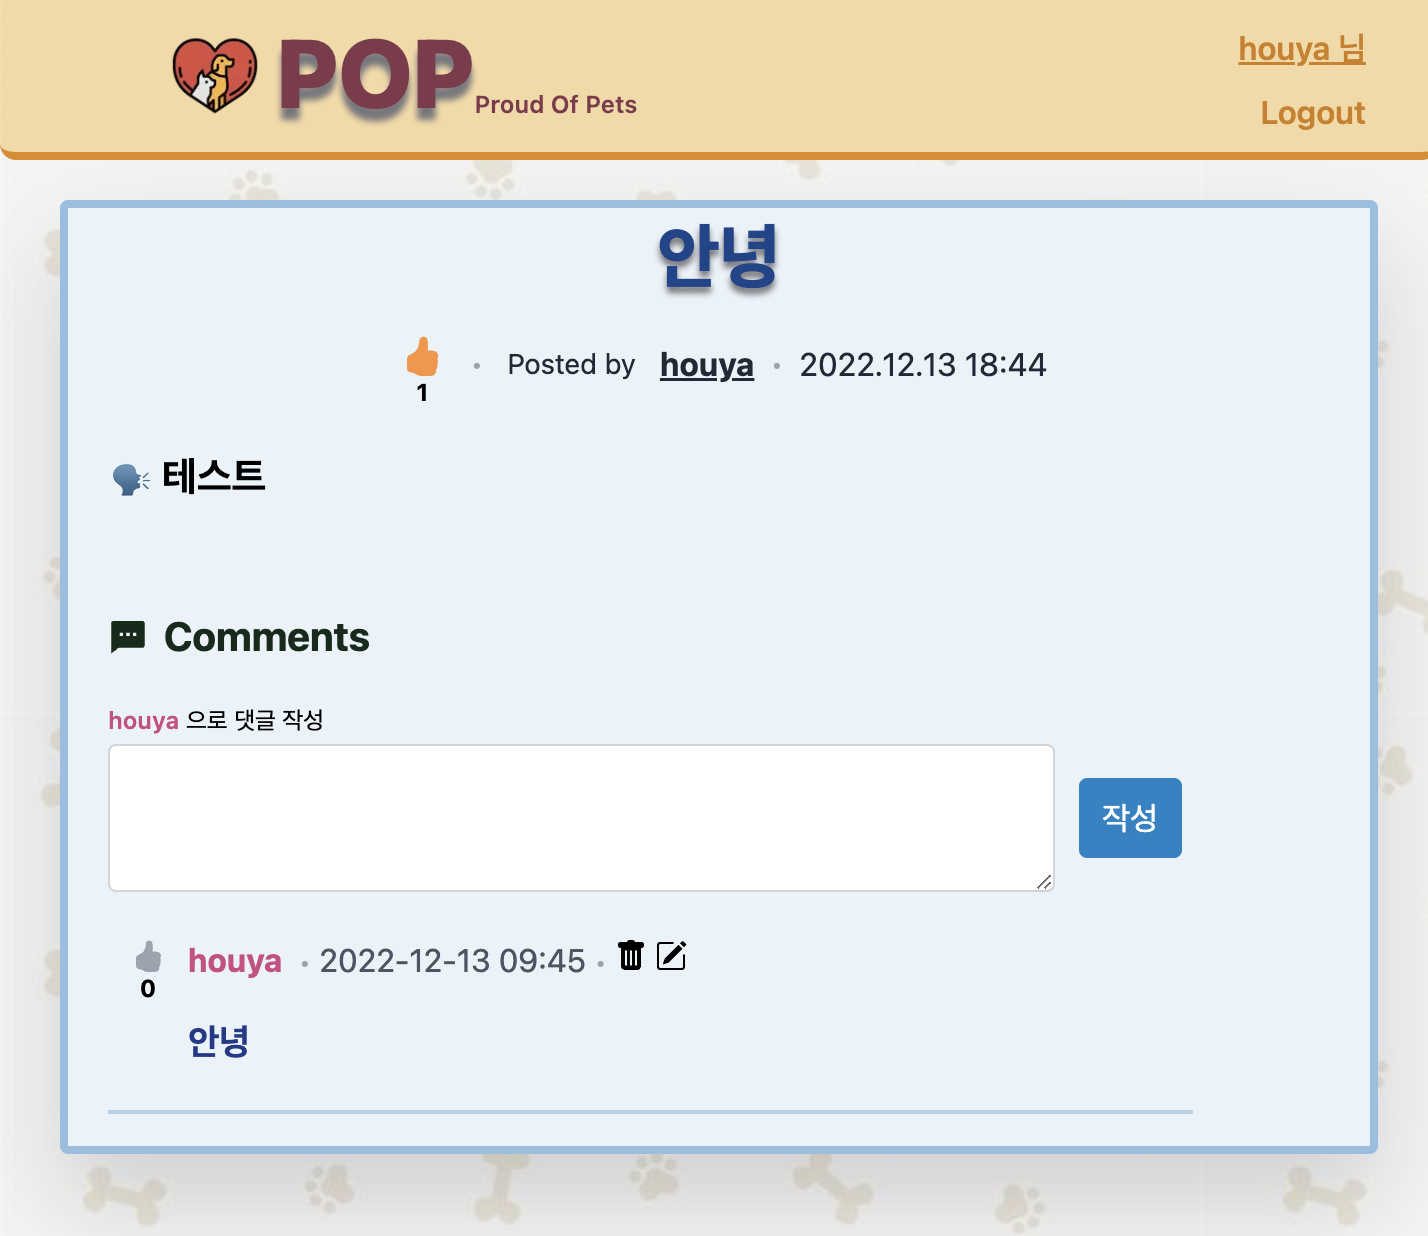
⭐️ Comment Page
이제 실제로 화면에 댓글창이 보이도록 해보자.
✔️ Comment Page UI 작성
1️⃣ comments(댓글)이 존재할 경우에만 댓글 리스트 출력
2️⃣ 댓글 작성자 클릭시 해당 유저 정보로 이동
3️⃣ 댓글 작성 시간 출력
{comments?.map(comment => ( // 1️⃣ 번
       <div key={comment.identifier}>
          <div>
             <p>
          		<Link href={`/u/${comment.username}`}> // 2️⃣ 번
					{comment.username}
                </Link>
                <span>  // 3️⃣ 번
					{`${comment.voteScore}posts
                	  ${dayjs(comment.createdAt)
                           .format('YYYY-MM-DD HH:mm')}`}
                </span>
             </p>
             <p>{comment.body}</p>
          </div>
       </div>
              ))}
✔️ Comment Page 기능 생성
👉 api 요청 (client)
const { data: comments} = useSWR<Comment[]>(
    identifier && slug ? `/posts/${identifier}/${slug}/comments` : null
  );
👉 api 생성 (server)
const getPostComments = async (req: Request, res: Response) => {
  const { identifier, slug } = req.params;
  try {
    const post = await Post.findOneByOrFail({ identifier, slug });
    const comments = await Comment.find({
      where: { postId: post.id },
      order: { createdAt: 'DESC' },
      relations: ['votes'],
    });

    return res.json(comments);
  } catch (error) {
    console.log(error);
    return res.status(500).json({ error: '문제가 발생했습니다.' });
  }
};

router.get('/:identifier/:slug/comments', userMiddleware, getPostComments);
💡 댓글 생성시 즉시 미출력 문제 해결
지금까지 댓글을 생성하는 것을 구현하고 댓글 데이터를 가져와 출력하는 것까지 구현하였다. 하지만, 댓글이 새로고침되어야 출력되는 에러가 발생한다. 따라서, 댓글 작성시 즉시 댓글이 출력되도록 해보자.
✅ useSWR mutate 사용
useSWR의 반환값 중mutate라는 함수가 있다. (👉 자세히)
mutate는 캐시 된 데이터를 갱신하기 위한 함수로,mutate(key)를 호출하여 동일한 키를 사용하는 다른SWR hook에게 갱신 메시지를 전역으로 브로드캐스팅할 수 있다.즉,
mutate는 언제 데이터를 최신화 할 것인지를 컨트롤 할 수 있게 해주는 역할
useSWR은 한번fetch한 데이터를 내부적으로 캐시하고, 이전에 캐시했던 상태를 그대로 반환한다.새롭게 작성한 댓글을
Post하지만,useSWR은 새로운 댓글을 반환하지 않고 기존의 캐시된 데이터만을 가져온다.
mutate을 사용해서 한번 더 요청을 하여 새로운 데이터를 가져온다.const { data: comments, mutate: commentMutate } = useSWR<Comment[]>( identifier && slug ? `/posts/${identifier}/${slug}/comments` : null ); ... const handleSubmit = async (e: FormEvent) => { ... try { ... commentMutate(); } };
⭐️ Vote in Post,Comment
이제 게시글과 댓글에 좋아요 기능을 생성해보자.
✔️ Vote UI 작성
✅ 게시글 좋아요, 싫어요
<div>
    {/* 좋아요 */}
    <div onClick={() => vote(1)}>
         {post.userVote === 1 ? (<FaArrowUp/>) : (<FaArrowUp />)}
    </div>

    <p>{post.voteScore}</p>

    {/* 싫어요 */}
    <div onClick={() => vote(-1)}>
        {post.userVote === -1 ? (<FaArrowDown/>) : (<FaArrowDown />)}
    </div>
✅ 댓글 좋아요, 싫어요
<div>
    {/* 좋아요 */}
    <div onClick={() => vote(1,comment)}>
         {comment.userVote === 1 ? (<FaArrowUp/>) : (<FaArrowUp />)}
    </div>

    <p>{comment.voteScore}</p>

    {/* 싫어요 */}
    <div onClick={() => vote(-1, comment)}>
        {comment.userVote === -1 ? (<FaArrowDown/>) : (<FaArrowDown />)}
    </div>
✔️ Vote 기능 생성
👉 api 요청 (client)
1️⃣ 로그인이 되어있지 않다면 로그인페이지로 이동
2️⃣ 이미 클릭 한 vote 버튼을 눌렀을 시에는 reset
3️⃣ identifier, slug, commentIdentifier, value를 Post
4️⃣ 게시글, 댓글에 좋아요,싫어요 투표시 mutate을 사용하여 새로운 값 갱신
const { data: post, mutate: postMutate } = useSWR<Post>(
  identifier && slug ? `/posts/${identifier}/${slug}` : null);

const { data: comments, mutate: commentMutate } = useSWR<Comment[]>(
    identifier && slug ? `/posts/${identifier}/${slug}/comments` : null);

const vote = async (value: number, comment?: Comment) => {
    if (!authenticated) router.push('/login'); // 1️⃣ 번


    if ( // 2️⃣ 번
      (!comment && value === post?.userVote) ||
      (comment && comment.userVote === value)
    ) {
      value = 0;
    }

    try {
      await Axios.post('/votes', { // 3️⃣  번
        identifier,
        slug,
        commentIdentifier: comment?.identifier,
        value,
      });
      postMutate(); //  4️⃣ 번
      commentMutate(); //  4️⃣ 번
    } catch (error) {
      console.log(error);
    }
  };
👉 api 생성 (server)
✅ 파일 생성
✅ route 경로 설정
// server.ts
...
app.use('/api/votes', voteRoutes);
✅ vote 핸들러 작성
1️⃣ Post된 identifier, slug, commentIdentifier, value를 받는다.
2️⃣ -1, 0, 1의 value 만 오는지 체크하고 그렇지 않을 경우 에러 반환. 좋아요, 싫어요, 누르지 않았을 경우를 세개의 숫자로 나타낸다.
3️⃣ 각각 Entity 값들을 가져온다.
post의 경우 요청받은identifier,slug에 해당하는 데이터를 받아온다.
댓글 식별자가 있는 경우 댓글로 vote 찾기
4️⃣ comment(댓글)에 대해 투표가 발생한 경우 댓글로 vote 찾기
commentIdentifier(댓글 식별자)를 이용하여 투표한 해당 댓글을 찾아준다.username,comment.id를 이용하여 투표 값을 찾아준다.
5️⃣ post(게시글)에 대해 투표가 발생한 경우 username, post.id를 이용하여 투표 값을 찾아준다.
6️⃣ vote이 없고 value가 0인 경우 오류 반환
7️⃣ vote이 없는 경우 vote 객체 생성하고 댓글 또는 게시글에 vote 저장.
- 즉, 아무런 투표가 되있지 않은 상태여서, 새롭게 투표하여
vote이 생성되어야 하는 상황
8️⃣ 아무런 투표가 이루어지지 않은 상태(value = 0)가 되면 기존의 vote은 삭제
9️⃣ 기존의 vote값과 새로운 vote값이 다르다면(vote.value !== value), 기존의 값에 새로운 값을 저장.
- 예를 들어,
좋아요(value=1)이 었다가싫어요(value=-1)가 될 경우
🔟 forEach를 통해 Comments배열의 각각의 투표에 대한 값 출력.
// votes.ts
const vote = async (req:Request, res:Response) => {
    const { identifier, slug, commentIdentifier, value } = req.body; // 1️⃣ 번
    if(![-1, 0 ,1].includes(value)) { // 2️⃣ 번
        return res.status(400).json({ value: "-1, 0, 1의 value만 올 수 있습니다."});
    }

    try {
      	// 3️⃣ 번
        const user: User = res.locals.user;
        let post: Post = await Post.findOneByOrFail({ identifier, slug});
        let vote: Vote | undefined;
        let comment: Comment;

            if(commentIdentifier) { // 4️⃣ 번
                comment = await Comment.findOneByOrFail({ identifier: commentIdentifier});
                vote = await Vote.findOneBy({ username: user.username, commentId: comment.id});
            } else { //  5️⃣ 번
                vote = await Vote.findOneBy({ username: user.username, postId: post.id});
            }

            if(!vote && value === 0 ) { // 6️⃣ 번
                return res.status(404).json({ error: "Vote을 찾을 수 없습니다."});
            }
      		else if(!vote) { // 7️⃣ 번
                vote = new Vote();
                vote.user = user;
                vote.value = value;

                if(comment) vote.comment = comment
                else vote.post = post;
                await vote.save();
            }
      		else if(value === 0) { // 8️⃣ 번
                vote.remove();
            }
      		else if ( vote.value !== value) { // 9️⃣ 번
                vote.value = value;
                await vote.save();
            }

            post = await Post.findOneOrFail({
                where: {
                    identifier, slug
                },
                relations: ["comments", "comments.votes", "sub", "votes"]
            })

            post.setUserVote(user);
            post.comments.forEach(c => c.setUserVote(user)); // 🔟 번

            return res.json(post);
    } catch (error) {
        console.log(error);
        return res.status(500).json({ error: "문제가 발생했습니다."})
    }
}

const router = Router();
router.post("/", userMiddleware, authMiddleware, vote);
⭐️ Post List in Community
이제 게시글을 작성하고, 출력되는 것을 확인할 수 있다. 하지만, 해당 게시글을 보기 위해서는 url을 직접 입력하여 확인한 것이고 이제는 커뮤니티 상세페이지에 게시글 리스트가 출력되도록 설정해보자.
✅ Community 상세페이지인 SubPage에서 등록된 게시글들을 화면에 리스트로 출력하면 된다.
1️⃣ 커뮤니티(sub)가 존재하지 않는다면 로딩중이라는 문자 출력
2️⃣ 커뮤니티는 존재하지만 아무런 게시글이 존재하지 않으면 아직 작성된 포스트가 없습니다. 문자 출력
3️⃣ 커뮤니티가 존재하고 게시글도 존재한다면, PostCard 컴포넌트 출력.
- PostCard는 게시글 하나의 레이아웃 카드.
- props로 post(게시글 데이터)와 mutate를 전달.
const SubPage = () => {

  let renderPosts;
  if (!sub) {
    renderPosts = <p>로딩중...</p>;
  } else if (sub.posts.length === 0) {
    renderPosts = (
      <p >아직 작성된 게시글가 없습니다.</p>
    );
  } else {
    renderPosts = sub.posts.map((post: Post) => (
      <PostCard key={post.identifier} post={post} subMutate={mutate} />
    ));
  }

  return(
  	...
      <div> {renderPosts} </div>
    ...

  )
}
✔️ PostCard
✅ 기능 생성
-
PostCard는 재사용성이 가능한 컴포넌트로 메인페이지에서도 해당 컴포넌트를 출력할 수 있다. 따라서, 메인페이지와 커뮤니티 상세페이지에서 보여야하는
PostCard내용이 다르므로isInSubPage의boolean값에 따라 컴포넌트가 다르게 출력되게 한다. -
로그인해야 투표 가능
 const router = useRouter();
  //
  const isInSubPage = router.pathname === '/r/[sub]';

  const { authenticated } = useAuthState();

  const vote = async (value: number) => {
    if (!authenticated) router.push('/login');

    if (value === userVote) value = 0;

    try {
      await axios.post('/votes', { identifier, slug, value });
      if (mutate) mutate();
      if (subMutate) subMutate();
    } catch (error) {
      console.log(error);
    }
  };
✅ UI 작성
- 전달받은 props에 대한 type 설정
- isInSubPage의 true, false 에 대한 다른 컴포넌트 출력
interface PostCardProps {
  post: Post;
  subMutate?: () => void;
  mutate?: () => void;
}

const PostCard = ({
  post: { identifier,slug,title,body,subName,createdAt,voteScore,
    	  userVote,commentCount,url,username,sub,},
  mutate, subMutate }: PostCardProps) => {


  return (
    <div id={identifier}>
      {/* 좋아요 싫어요 기능*/}
      <div>
        {/* 좋아요 */}
        <div onClick={() => vote(1)}>
             {post.userVote === 1 ? (<FaArrowUp/>) : (<FaArrowUp />)}
        </div>

        <p>{post.voteScore}</p>

        {/* 싫어요 */}
        <div onClick={() => vote(-1)}>
            {post.userVote === -1 ? (<FaArrowDown/>) : (<FaArrowDown />)}
    	</div>
      </div>
      {/* 게시글 데이터 부분 */}
      <div>
        <div>
          {!isInSubPage && (
            <div>
              <Link href={`/r/${subName}`}>
                <Image
                  src={sub!.imageUrl}
                  alt="sub"
                  width={12}
                  height={12}
                />
              </Link>
              <Link
                href={`/r/${subName}`}

              >
                /r/{subName}
              </Link>
              <span>•</span>
            </div>
          )}

          <p>
            Posted by
            <Link href={`/u/${username}`}>
              /u/{username}
            </Link>
            <Link href={url}>
              {dayjs(createdAt).format('YYYY-MM-DD HH:mm')}
            </Link>
          </p>
        </div>

        <Link href={url}>
          {title}
        </Link>
        {body && <p>{body}</p>}
        <div className="flex">
          <Link href={url}>
            <i className="mr-1 fas fa-comment-alt fa-xs"></i>
            <span>{commentCount}</span>
          </Link>
        </div>
      </div>
    </div>
  );
};

export default PostCard;
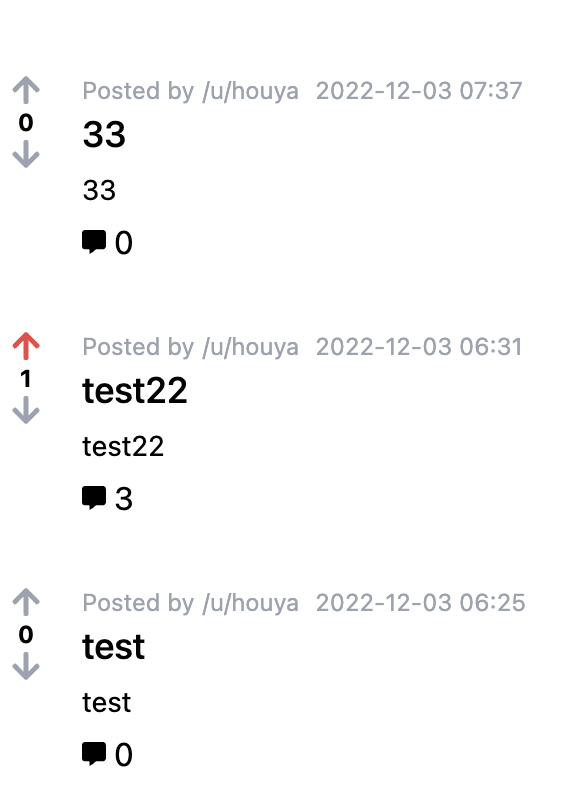
💡 이제 posts에 존재했던 세개의 게시글이 화면에 리스트로 출력된다.
📷 Photos

This site is very retro bowl college interesting, I can make it my own