🚀 Start
지뢰를 피하여 땅따먹기 하는 게임이다. 추가적으로 원하는대로 맵 생성, 성공까지 타이머, 지뢰 랜덤 배정, 지뢰 위치 예상, 모달창 구현을 하였다. 목업 툴을 통해 대략적으로 구상해본 화면이다.

✔️ 맵 설정
유저가 가로,세로 길이를 지정하여 맵을 생성 가능.
1️⃣ option : 맵 생성 Form이 맵이 생성되고 나서는 사라지게
// MineSearch.tsx
{option && <Form setOption={setOption} />}
2️⃣ 가로,세로 길이와 지뢰 갯수 기본 설정
3️⃣ input에 유저가 입력한 값으로 설정 변경.
4️⃣ 시작 버튼 클릭시 설정한 row, cell, mine값을 가지고 startGame이라는 액션을 dispatch.
// Form.tsx

const Form = ({setOption}: {setOption: React.Dispatch<React.SetStateAction<boolean>>}) => {
  // 2️⃣ 번
  const [row, setRow] = useState(10);
  const [cell, setCell] = useState(10);
  const [mine, setMine] = useState(20);
  const { dispatch } = useContext(TableContext);

  // 3️⃣ 번
  const onChangeRow = useCallback((e: React.ChangeEvent<HTMLInputElement>) => {
    setRow(Number(e.target.value));
  }, []);

  const onChangeCell = useCallback((e: React.ChangeEvent<HTMLInputElement>) => {
    setCell(Number(e.target.value));
  }, []);

  const onChangeMine = useCallback((e: React.ChangeEvent<HTMLInputElement>) => {
    setMine(Number(e.target.value));
  }, []);

  const onClickBtn = useCallback(() => { // 4️⃣ 번
    setOption(false);
    dispatch(startGame(row, cell, mine));
  }, [row, cell, mine]);

  return (
          <div>가로</div>
          <input
            type="number"
            placeholder="가로"
            value={cell}
            onChange={onChangeCell}
          />
      	  <div>세로</div>
          <input
            type="number"
            placeholder="세로"
            value={cell}
            onChange={onChangeRow}

          <div>지뢰</div>
          <input
            type="number"
            placeholder="지뢰"
            value={mine}
            onChange={onChangeMine}
          />
    	 ...
        <button onClick={onClickBtn}> 시작 </button>

  );
};
✔️ 맵 생성
1️⃣ 전달 받은 row, cell, mine 값 저장.
2️⃣ plantMine함수에 row, cell, mine 값 전달.
plantMine: 지뢰를 맵에 심기위한 메서드
// MineSearch.tsx
const reducer = (
  state = initialState,
  action: ReducerActions
): ReducerState => {
  switch (action.type) {
    case START_GAME:
      return {
        ...state,
        data: { // 1️⃣ 번
          row: action.row,
          cell: action.cell,
          mine: action.mine,
        },
        openedCount: 0,
        tableData: plantMine(action.row, action.cell, action.mine), // 2️⃣ 번
        halted: false,
        timer: 0,
      };
    ...
// Action.tsx export const START_GAME = 'START_GAME' as const; interface StartGameAction { type: typeof START_GAME; row: number; cell: number; mine: number; } export const startGame = ( row: number, cell: number, mine: number ): StartGameAction => { return { type: START_GAME, row, cell, mine, }; };
✔️ 지뢰 생성
1️⃣ 가로 x 세로 만큼 2차원 배열 생성
2️⃣ shuffle 배열에 랜덤값들을 저장.
3️⃣ 실제로 테이블로 생성할 2차원 배열을 이중 for문을 통해 정상적인 칸(CODE.NORMAL)으로 생성.
4️⃣ 생성한 정상칸 들 중간중간에 shuffle값들(CODE.MINE)을 저장.
const plantMine = (row: number, cell: number, mine: number): Codes[][] => {
  const candidate = Array(row * cell) // 1️⃣ 번
    .fill(undefined)
    .map((arr, i) => {
      return i;
    });
  const shuffle = [];
  while (candidate.length > row * cell - mine) { // 2️⃣ 번
    const chosen = candidate.splice(
      Math.floor(Math.random() * candidate.length),1)[0];
    shuffle.push(chosen);
  }
  const data: Codes[][] = []; // 3️⃣ 번
  for (let i = 0; i < row; i++) {
    const rowData: Codes[] = [];
    data.push(rowData);
    for (let j = 0; j < cell; j++) {
      rowData.push(CODE.NORMAL);
    }
  }

  for (let k = 0; k < shuffle.length; k++) { // 4️⃣ 번
    const ver = Math.floor(shuffle[k] / cell);
    const hor = shuffle[k] % cell;
    data[ver][hor] = CODE.MINE;
  }

  console.log(data);
  return data;
};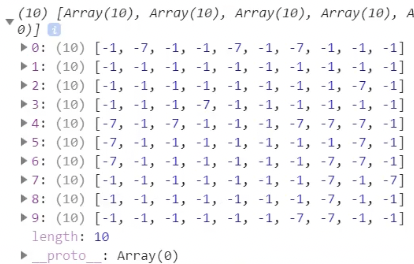
export const CODE = {
  MINE: -7,
  NORMAL: -1,
  QUESTION: -2,
  FLAG: -3,
  QUESTION_MINE: -4,
  FLAG_MINE: -5,
  CLICKED_MINE: -6,
  OPENED: 0,
} as const;
✔️ Table 생성
앞서 생성한 2차원 배열들을 실제 테이블로 화면에 출력해보자.
1️⃣ 생성한 2차원 배열을 tableData에 저장하여, 다른 컴포넌트에서도 재사용가능하게 createContext
//MineSearch.tsx

interface Context {
  tableData: Codes[][];
    ...
}

export const TableContext = createContext<Context>({
  tableData: [],
  	...
});
<TableContext.Provider value={value}>
   ...
     <Table />
   ...
</TableContext.Provider>
2️⃣ useContext로 tableData 불러와 테이블로 생성.
// Table.tsx
const Table = () => {
  const { tableData } = useContext(TableContext);
  return (
    <table>
      <tbody>
        {Array(tableData.length)
          .fill(null)
          .map((tr, i) => (
            <Tr key={i} rowIndex={i} />
          ))}
      </tbody>
    </table>
  );
};

export default Table;
3️⃣ 테이블 가로길이 생성.
// Tr.tsx
const Tr = memo(({ rowIndex }: Props) => {
  const { tableData } = useContext(TableContext);

  return (
    <tr>
      {tableData[0] &&
        Array(tableData[0].length)
          .fill(null)
          .map((td, i) => <Td key={i} rowIndex={rowIndex} cellIndex={i} />)}
    </tr>
  );
});

export default Tr;
4️⃣ 테이블 세로길이 생성.
// Td.tsx
const Td = ({ rowIndex, cellIndex }: Props) => {
  const { tableData, dispatch, halted } = useContext(TableContext);

   return (
    <RealTd
      onClickTd={onClickTd}
      onRightClickTd={onRightClickTd}
      data={tableData[rowIndex][cellIndex]}
    />
  );
});
✔️ 이미지 & 스타일 입히기
const RealTd = memo(({ onClickTd, onRightClickTd, data }: RealTdProps) => {
  return (
    <td
      style={getTdStyle(data)} // 각 칸마다 값에 따라 스타일 입히기
      onClick={onClickTd}
      onContextMenu={onRightClickTd}
    >
      {getTdText(data)} // 각 칸마다 값에 따른 이미지 출력하기
    </td>
  );
});
const getTdText = (code: Codes) => { // console.log('getTdtext'); switch (code) { case CODE.NORMAL: return ''; case CODE.MINE: return 'x'; case CODE.CLICKED_MINE: return '💣'; case CODE.FLAG_MINE: case CODE.FLAG: return '!'; case CODE.QUESTION_MINE: case CODE.QUESTION: return '?'; default: return code || ''; } }; const getTdStyle = (code: Codes) => { switch (code) { case CODE.NORMAL: case CODE.MINE: return { background: '#77767c', }; case CODE.CLICKED_MINE: case CODE.OPENED: return { background: '#fffbf4', }; case CODE.QUESTION_MINE: case CODE.QUESTION: return { background: '#eac843', }; case CODE.FLAG_MINE: case CODE.FLAG: return { background: '#ea5e4e', }; default: return { background: '#fffbf4', }; } };
✔️ 테이블 칸 클릭
  ...
    <td  onClick={onClickTd} > ... </td>
1️⃣ 정상적인 칸을 밟았을 경우 openCell action이 dispatch.
openCell(rowIndex, cellIndex): 주위의 칸이 오픈되는 액션
2️⃣ 지뢰를 밟을 경우 clickMine action이 dispatch.
clickMine(rowIndex, cellIndex): halt값이 true가 되며 게임 종료
  const onClickTd = useCallback(() => {
    if (halted) {
      return;
    }
    switch (tableData[rowIndex][cellIndex]) {
      ...
      case CODE.NORMAL:
        dispatch(openCell(rowIndex, cellIndex));
        return;
      case CODE.MINE:
        dispatch(clickMine(rowIndex, cellIndex));
        return;
      default:
        return;
    }
  }, [tableData[rowIndex][cellIndex], halted]);
✔️ 타이머
지뢰를 밟는 순간 또는 모두 피해 땅따먹기를 하면 타이머는 멈추고 타임이 기록.
 INCREMENT_TIMER: {
      return {
        ...state,
        timer: state.timer + 1,
      };
    }
 ...

  const { tableData, halted, timer, result } = state;

  useEffect(() => {
    let timer: number;
    if (halted === false) {
      timer = window.setInterval(() => {
        dispatch({ type: INCREMENT_TIMER });
      }, 1000);
    }
    return () => {
      clearInterval(timer);
    };
  }, [halted]); // halted값의 변화에 따라 타이머 실행여부 판별.

   <div> ⏱ : {timer} sec </div>
💡 모달창
: 모달창 하나를 재사용하기 위하여 게임마다 보여줘야할 결과를 props로 Modal컴포넌트에 전달한다.
자세히 👉 모달창 기능 구현
🖥 실제 구현 화면