
🚀 Start
배포까지 고려했을 때, JSON 데이터를 제대로 된 데이터베이스에서 관리해야할 것 같다.
항상 고민이었던게, 프론트엔드 개발을 하며 항상 프로젝트를 진행하다보면 Server, DB에 시간이 더 할애되는 느낌이 들고, 시간이 더 소요되는 것 같았다. 🤣
그래서 이번엔 NoSQL 기반의 파이어베이스를 사용해보았다.
파이어베이스는 MySQL 같은 관계형 데이터베이스 대신 Document 형식의 빠르고 간편한 데이터베이스이다. 또한 RTSP 방식의 데이터베이스를 지원한다.
RTSP는 Real Time Stream Protocol로, 실시간으로 데이터들을 전송해주는 방식이다. 이 방식을 통해 소켓 기반 서버를 만들어서 통신하는 것보다 코드 양이 줄고 적은 코드로도 원하는 구성을 만들 수 있다.
특히 서버리스로 서바스라는 부분이 큰 장점인 것 같다.
서버의 응답속도가 느려지는 문제점도 있다고 하는데, 내가 진행하는 프로젝트는 방대한 데이터를 관리할 것은 아니기 때문에 프론트엔드 개발에 더 집중할 수 있게 해줄 것 같다.
그리고 실제로 데이터를 추가하고 관리하는 것도 굉장히 편했다. 하지만, 쿼리문 같은 것들이 너무 익숙하지 않아서 많이 헤맸다는 점 ㅎㅎ
💡 참고하자!
👉 파이어베이스란?
👉 firebase.database.Query
👉 Firebase 쓰는 이유 (약팔이 영상)
⚙️ Setting
✅ 시작하기
✅ 프로젝트 만들기
- 프로젝트 이름 설정 (ex. pjh shoppingmall)
✅ Firestor Database / 데이터베이스 만들기
- Cloud Firestore의 보안 규칙 :
테스트 모드 시작 - Cloud Firestore 위치 설정 :
asia-northeast3 (Seoul)
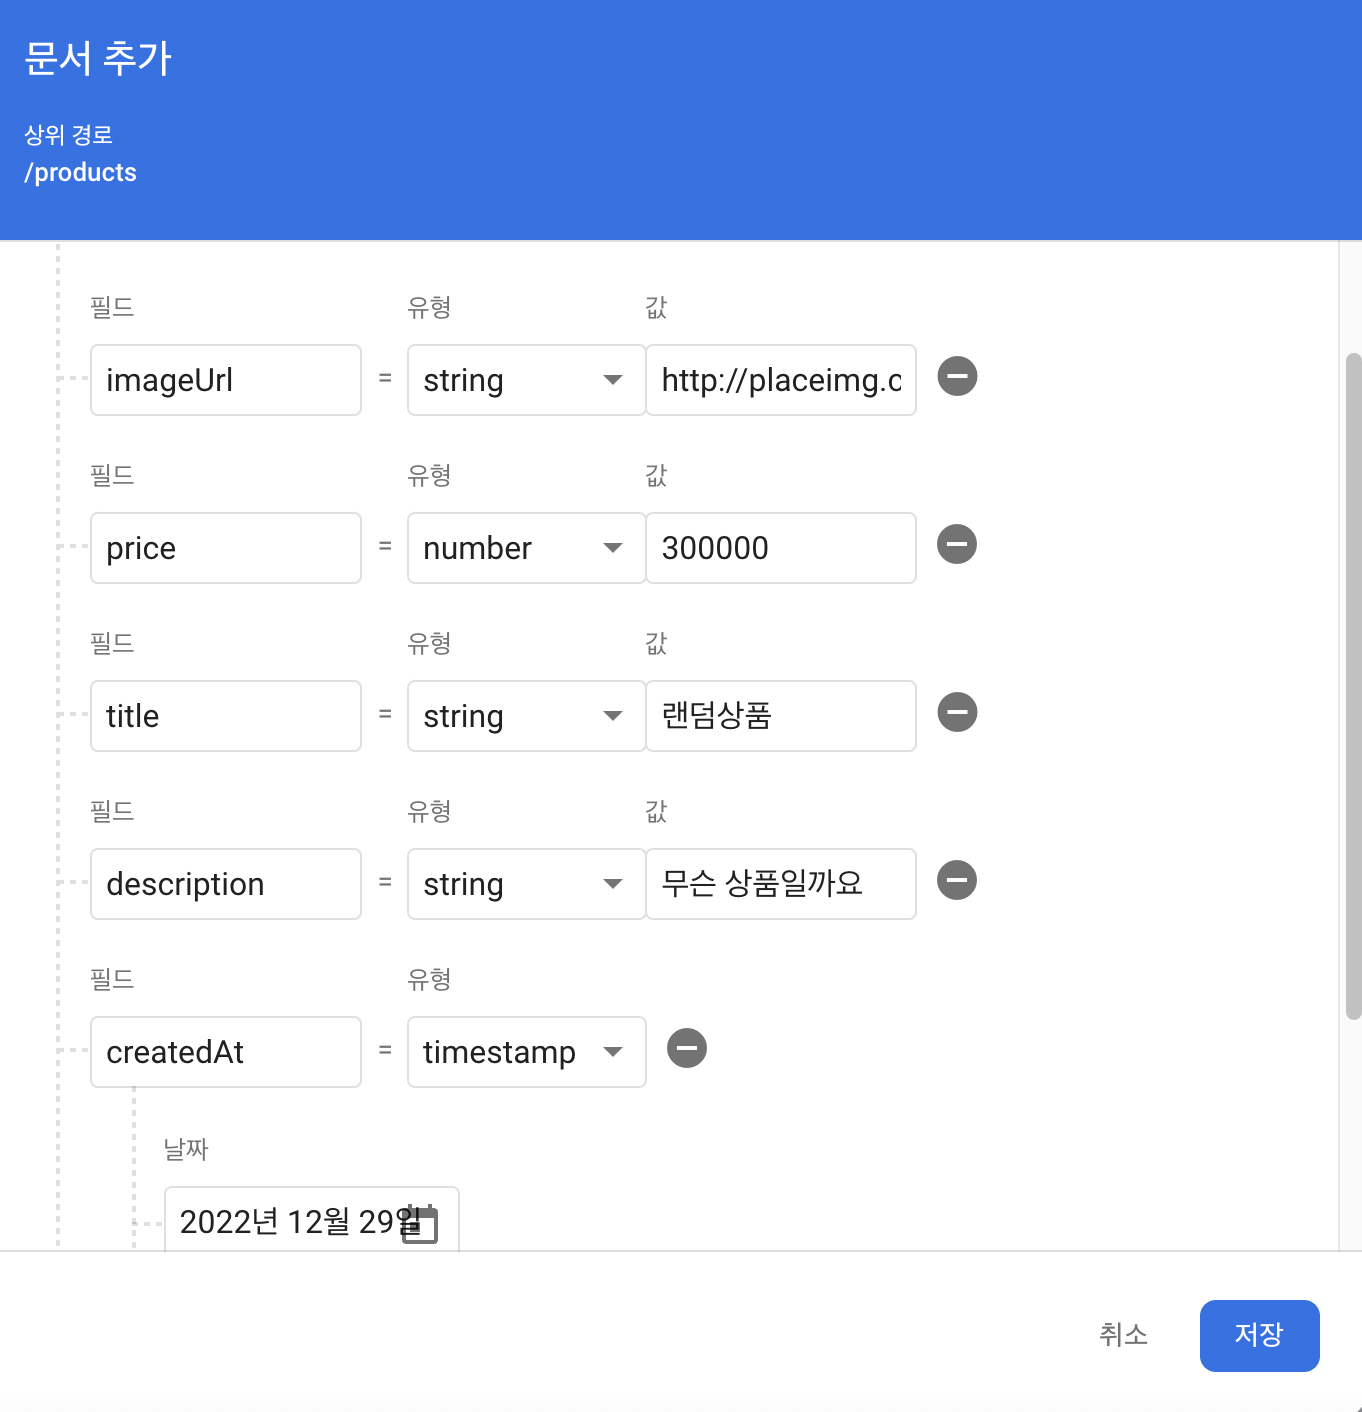
✅ 컬랙션 만들기
- 앞서 만든 JSON DB의 데이터들을 firebase 컬랙션으로 생성해보자.
✏️ Product
✏️ Cart

✅ 프로젝트 설정 / 플랫폼 선택
✏️ 앱 등록 후 Firebase SDK 추가
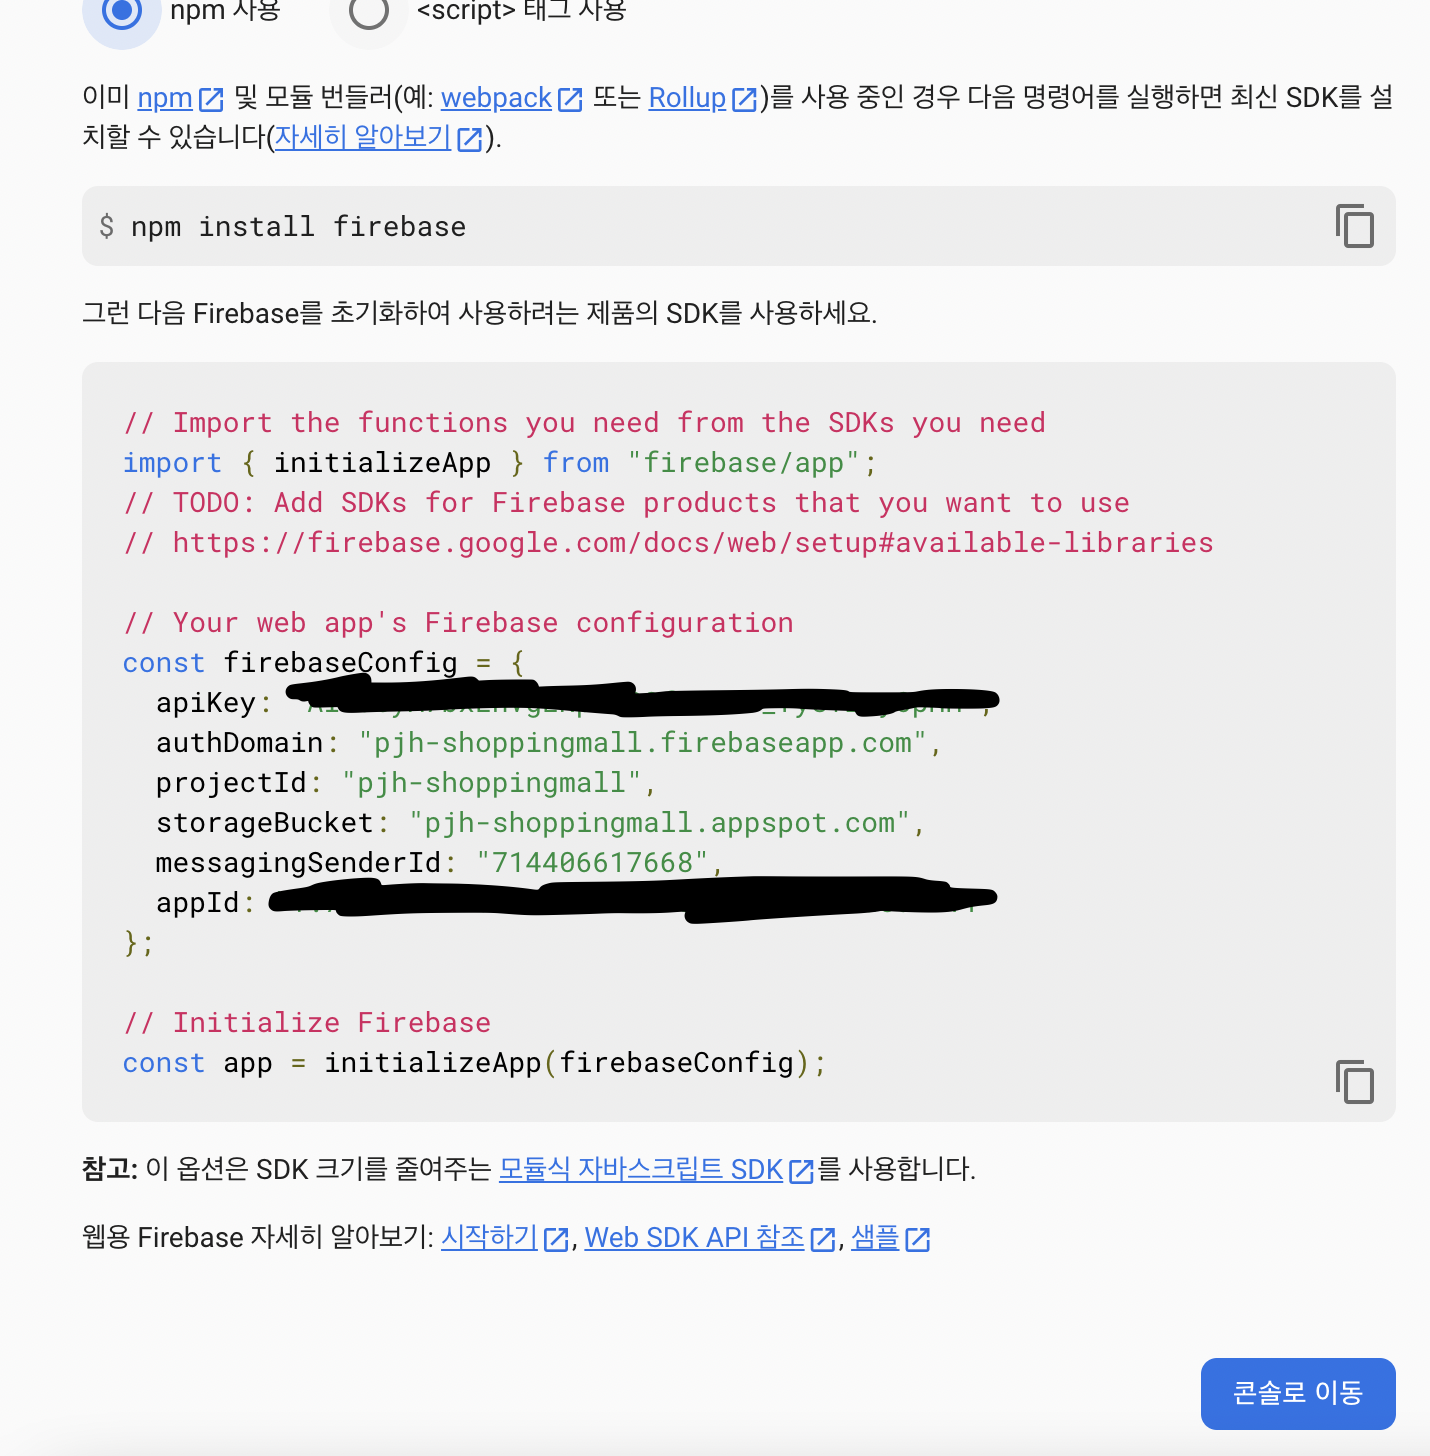
✅ firbase 설치
// server
yarn add firebase
✅ SDK 작성 (env파일 생성)
// server/src/firbase.js
import { initializeApp } from "firebase/app";
import { getFirestore } from "firebase/firestore";
import "dotenv/config";

const firebaseConfig = {
  apiKey: process.env.fb_apiKey,
  authDomain: process.env.fb_authDomain,
  projectId: process.env.fb_storageBucket,
  messagingSenderId: process.env.fb_messagingSenderId,
  appId: process.env.fb_appId,
};

// Initialize Firebase
const app = initializeApp(firebaseConfig);

export default app;

export const db = getFirestore(app);
👕 Product
✔️ Query
1️⃣ collection: firebase에서 만든 컬랙션 중 products 컬랙션을 가져온다.(참고)
// firebase.js
export const db = getFirestore(app); // getFirestore() → Firestore 데이터베이스
2️⃣ doc(), getDoc()(참고)
-
doc(): 데이터베이스를 참조하며, 컬렉션 이름, 문서 ID 를 인수로 사용한다.- 따라서, cursor(페이지 끝 상품 ID)과 전달.
-
getDoc(): doc() 메서드 에서 언급한 컬렉션 기반 참조 에서 특정 문서 의 데이터 를 가져온다.- getDoc() 메서드는 promise 를 반환하고 그 앞에 await 키워드를 추가 합니다.
3️⃣ startAfter : 시작점을 제외한 데이터들을 반환.(참고)
- 예를들어, 한 페이지에 0을 제외한 1~15까지의 데이터들이 반환.(배열에 push)
4️⃣ 만약 삭제된상품(!showDeleted)이라면 배열에서 where문 조건에 만족하는 데이터를 unshift.
where("createdAt", "!=", null): createdAt이 없는 데이터.
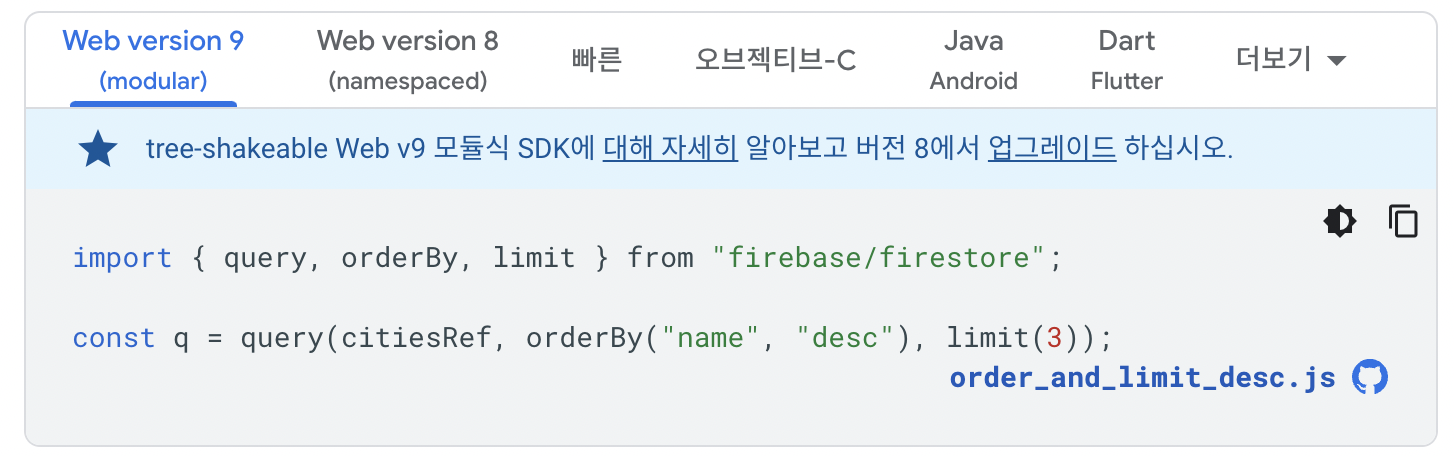
5️⃣ query: 쿼리는 문서 ID를 기준으로 오름차순으로 쿼리를 충족하는 모든 문서를 검색.
-
orderBy()를 사용하여 데이터의 정렬 순서를 지정할 수 있다. -
limit()을 사용하여 검색되는 문서의 수를 제한할 수 있다.
6️⃣ snapshot.forEach : 데이터 각각의 id와 값을 data 배열에 최종적으로 저장.
// src/resolvers/product.ts
Query: {
products: async (parent, { cursor = "", showDeleted = false }) => {
const products = collection(db, "products"); // 1️⃣ 번
const queryOptions = []; // orderby Error with startAfter, where
if (cursor) {
const snapshot = await getDoc(doc(db, "products", cursor)); // 2️⃣ 번
queryOptions.push(startAfter(snapshot)); // 3️⃣ 번
}
if (!showDeleted) queryOptions.unshift(where("createdAt", "!=", null));// 4️⃣ 번
const q = query(products, ...queryOptions, limit(PAGE_SIZE)); // 5️⃣ 번
const snapshot = await getDocs(q);
const data: DocumentData[] = [];
console.log(snapshot);
snapshot.forEach((doc) => // 6️⃣ 번
data.push({
id: doc.id,
...doc.data(),
})
);
console.log(data);
return data;
},
...
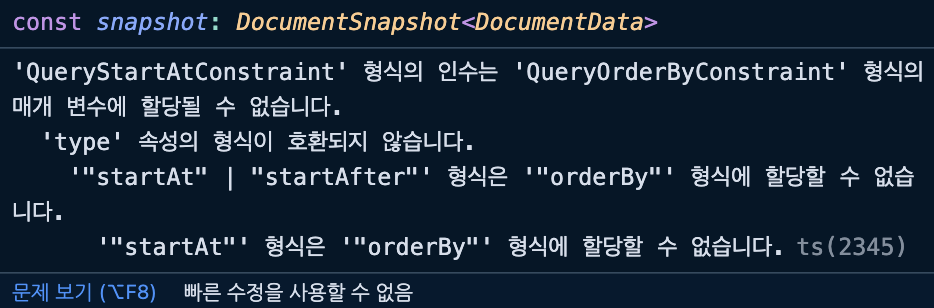
},💡 ERROR : orderby Error with startAfter, where
위의 queryOptions에 대해서 orderBy를 사용하여 데이터를 정렬시키고 싶은데 자꾸 startAfter, where 절이 에러가 난다.
: 대충 짐작하면 queryOptions에 영향을 주는 절들인데 함께 사용이 불가능한 것 같다.
데이터 정렬은 크게 프로젝트에 영향이 가는건 아니라서 일단 빈배열로 남겨놨는데;;
다시 한번 해결해봐야할 부분이다.
시도해보자!
// src/resolvers/product.ts
  Query: {
  	...
    product: async (parent, { id }) => {
      const snapshot = await getDoc(doc(db, "products", id));
      return {
        ...snapshot.data(),
        id: snapshot.id,
      };
    },
  },
✔️ Mutation
👉 addProduct
1️⃣ 클라이언트에서 보내온 데이터 정보들을 newProduct 객체에 저장.
2️⃣ addDoc : Create기능은 addDoc 메서드를 사용하면 된다.
addDoc("키를 통해 가져온 db", "payload");

// Example
products 컬랙션에 newProduct 데이터를 추가
addDoc(collection(db, "products"), newProduct);
// src/resolvers/product.ts
Mutation: {
addProduct: async (parent, { imageUrl, price, title, description }) => {
const newProduct = { // 1️⃣ 번
imageUrl,
price,
title,
description,
createdAt: serverTimestamp(),
};
const result = await addDoc(collection(db, "products"), newProduct); // 2️⃣ 번
const snapshot = await getDoc(result);
return {
...snapshot.data(),
id: snapshot.id,
};
},
...
}👉 udpateProduct
1️⃣ doc : 업데이트할 데이터를 doc 메서드를 통해 가져온다.
2️⃣ 만약 업데이트할 데이터가 존재하지 않는다면 에러 반환
3️⃣ updateDoc: 두번째 값으로 기존에 있는 key값을 넣고 value를 넣으면 기존 값이 대체되고, 없는 key와 value를 넣으면 key, value가 추가.
- data: 클라이언트에서 보낸 변경된 데이터 정보.
// src/resolvers/product.ts
Mutation: {
    updateProduct: async (parent, { id, ...data }) => {
      const productRef = doc(db, "products", id); // 1️⃣ 번
      if (!productRef) throw new Error("상품이 없습니다."); // 2️⃣ 번
      await updateDoc(productRef, { // 3️⃣ 번
        ...data,
        createdAt: serverTimestamp(),
      });
      const snap = await getDoc(productRef);
      return {
        ...snap.data(),
        id: snap.id,
      };
    },
    ...
}
👉 deleteProduct
1️⃣ 나는 상품을 영구삭제 하는 것이 아니라, 삭제된 상품이라는 표시만 해주길 원했으므로, updateDoc을 통해 createdAt 값만 삭제시켜서 일반 상품과 삭제 상품을 구분짓게 했다.
// src/resolvers/product.ts
Mutation: {
    deleteProduct: async (parent, { id }) => {
      const productRef = doc(db, "products", id);
      if (!productRef) throw new Error("상품이 없습니다.");
      await updateDoc(productRef, { createdAt: null }); // 1️⃣ 번
      return id;
    },
    ...
}
🛒 Cart
✔️ Query
- Product 데이터 조회 방법과 유사
// src/resolvers/cart.ts
  Query: {
    cart: async (parent, args) => {
      const cart = collection(db, "cart");
      const cartSnap = await getDocs(cart);
      const data: DocumentData[] = [];
      cartSnap.forEach((doc) => {
        const d = doc.data();
        data.push({
          id: doc.id,
          ...d,
        });
      });
      console.log(data);
      return data;
    },
  },
✔️ Mutation
👉 addCart
1️⃣ 장바구니에 추가할 상품데이터를 불러온다.
2️⃣ cart 컬랙션에 추가한 상품데이터와 값이 같은 것이 있는지 판별
3️⃣ 만약 같은 상품이 있다면?
amount: increment(1): 수량 1씩 증가 (참고)
4️⃣ 만약 같은 상품이 없다면?
- 수량 1로 저장, 해당 데이터 저장.
// src/resolvers/cart.ts
Mutation: {
    addCart: async (parent, { productId }) => {
      if (!productId) throw Error("상품id가 없다!");
      const productRef = doc(db, "products", productId); // 1️⃣ 번
      const cartCollection = collection(db, "cart");
      const exist = (
        await getDocs(query(cartCollection, where("product", "==", productRef)))
      ).docs[0]; // 2️⃣ 번

      let cartRef;
      if (exist) { // 3️⃣ 번
        cartRef = doc(db, "cart", exist.id);
        await updateDoc(cartRef, {
          amount: increment(1),
        });
      } else { // 4️⃣ 번
        cartRef = await addDoc(cartCollection, {
          amount: 1,
          product: productRef,
        });
      }
      const cartSnapshot = await getDoc(cartRef);
      return {
        ...cartSnapshot.data(),
        product: productRef,
        id: cartSnapshot.id,
      };
    },
    ...
}
👉 udpateCart
- 클라이언트에서 변경된 amount값을 저장하면 끝
// src/resolvers/cart.ts
Mutation: {
   updateCart: async (parent, { cartId, amount }) => {
      if (amount < 1) throw Error("1 이하로 바꿀 수 없습니다.");
      const cartRef = doc(db, "cart", cartId);
      if (!cartRef) throw Error("장바구니 정보가 없다");
      await updateDoc(cartRef, {
        amount,
      });
      const cartSnapshot = await getDoc(cartRef);
      return {
        ...cartSnapshot.data(),
        id: cartSnapshot.id,
      };
    },
    ...
}
👉 deleteCart
- deleteDoc에 컬랙션과 해당 데이터 ID를 넣으면 끝. (참고)
// src/resolvers/cart.ts
Mutation: {
    deleteCart: async (parent, { cartId }) => {
      const cartRef = doc(db, "cart", cartId);
      if (!cartRef) throw Error("장바구니 정보가 없다");
      await deleteDoc(cartRef);
      return cartId;
    },
    ...
}
👉 executePay
// src/resolvers/cart.ts
Mutation: {
    executePay: async (parent, { ids }) => {
      const deleted = [];
      for await (const id of ids) {
        const cartRef = doc(db, "cart", id);
        const cartSnapshot = await getDoc(cartRef);
        const cartData = cartSnapshot.data();
        const productRef = cartData?.product;
        if (!productRef) throw Error("상품정보가 없다.");
        const product = (await getDoc(productRef)).data() as Product;
        if (product.createdAt) {
          await deleteDoc(cartRef);
          deleted.push(id);
        } else {
        }
      }
      return deleted;
    },
    ...

}