🚀 Start
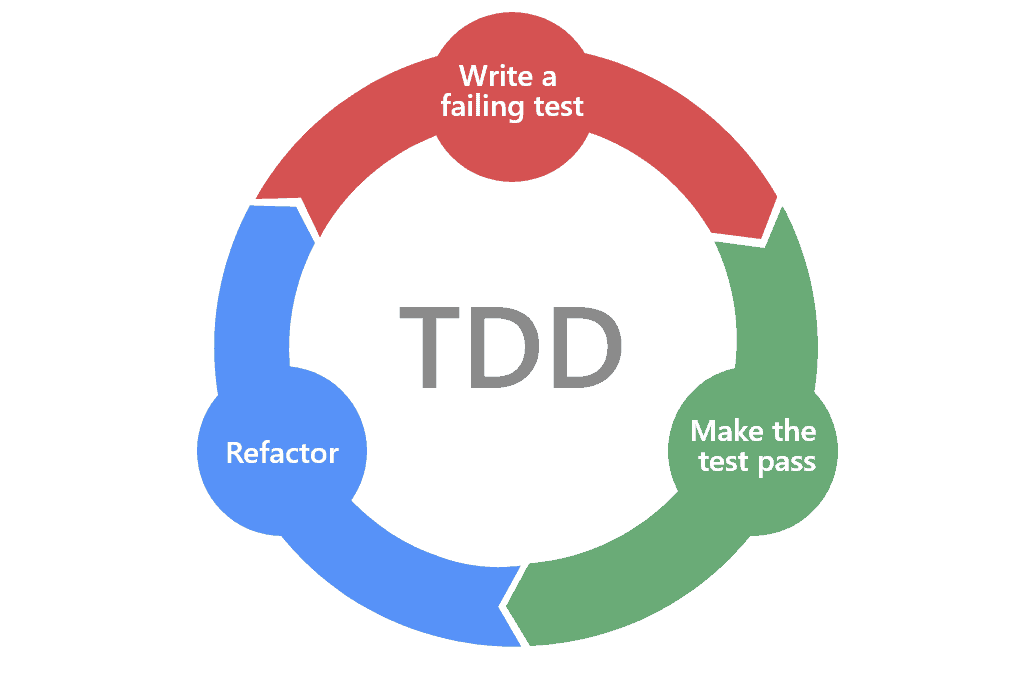
- 지금까지 학습한 TDD를 바탕으로, RTL을 사용하여 프로젝트를 진행해볼 예정이다.
TDD의 절차에 따라 테스트케이스를 작성하고 그에 맞게 성공하는 코드를 작성하고 리펙토링을 진행하면서 여행 품목 판매 앱을 만들어보자.
📃 프로젝트 전체 구조
👉 Client
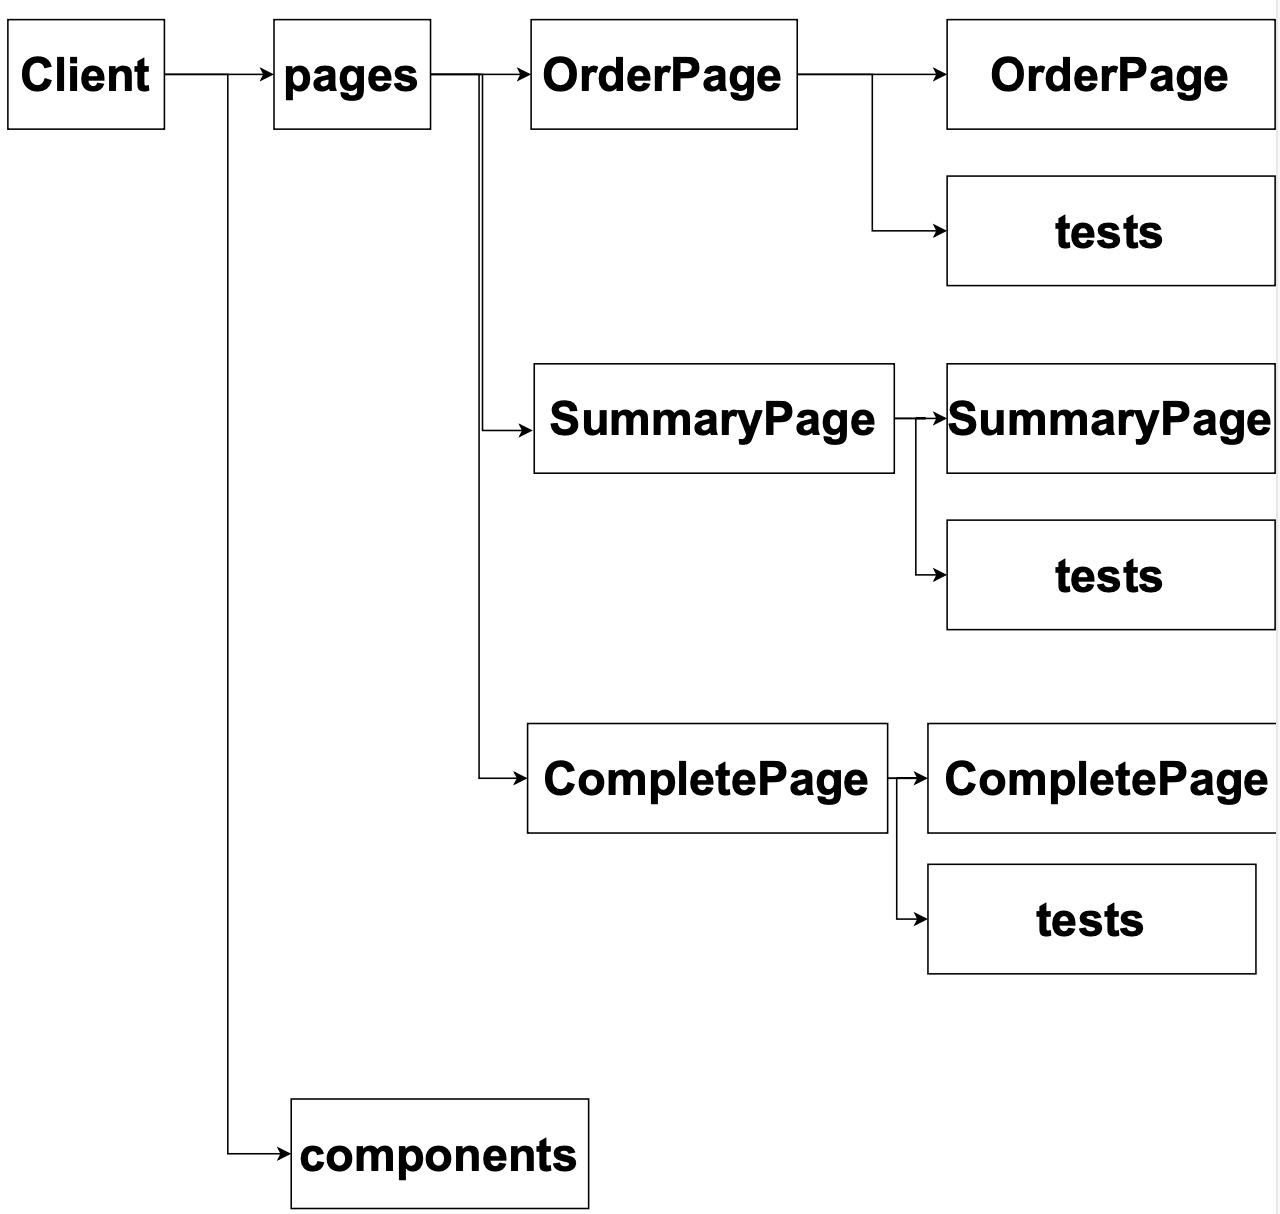
👉 Server
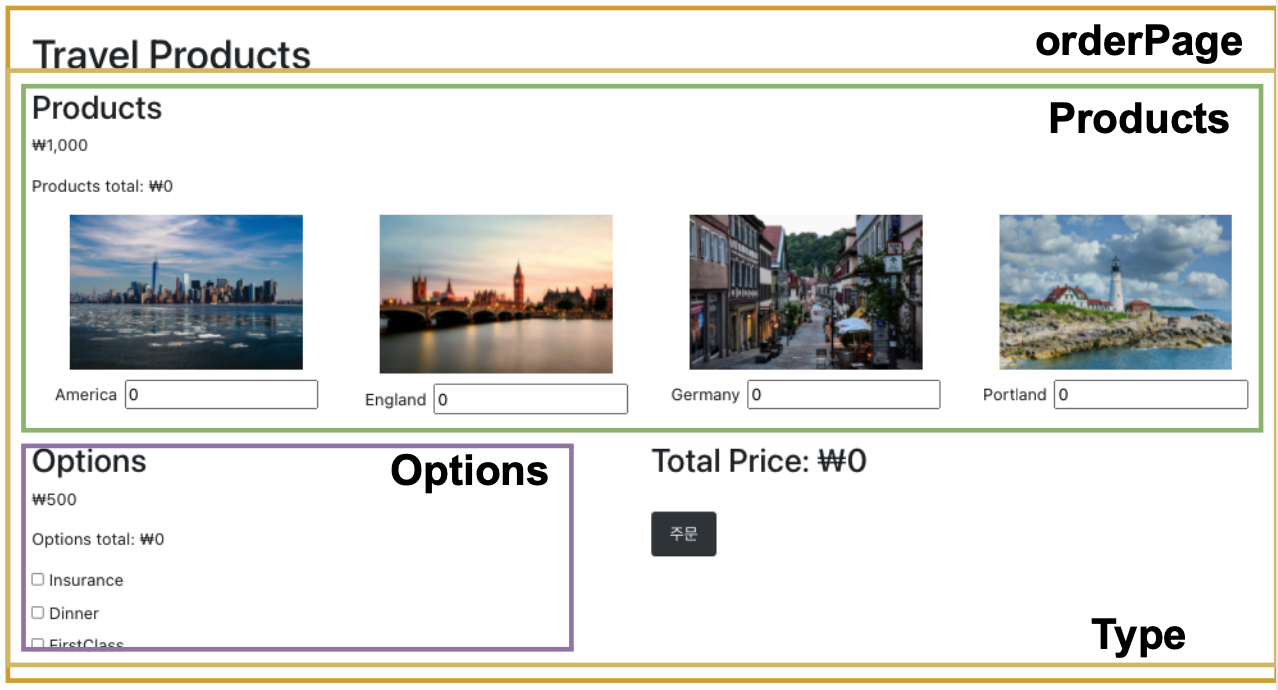
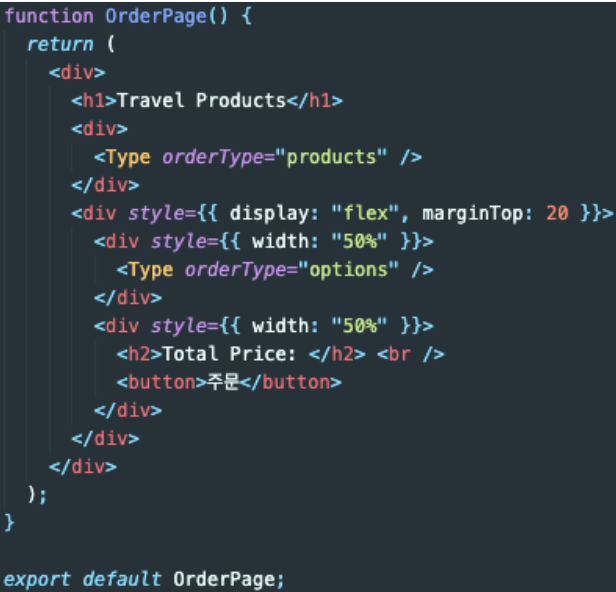
⭐️ OrderPage
- 이 페이지에서 구현할 UI는 다음과 같다.
- 한 페이지 안에 총 네 개의 컴포넌트가 존재한다.
(라우팅 되는 메인페이지는 orderPage이고, Type컴포넌트에서 Product와 Options 컴포넌트의 분할을 책임진다.)
1️⃣ Page Rendering
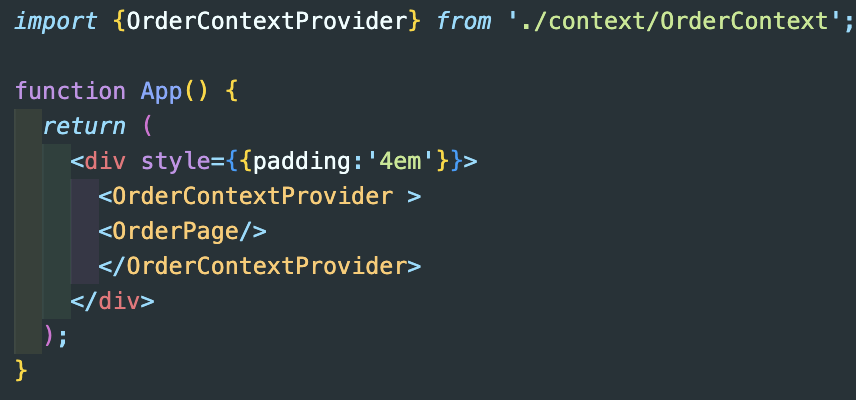
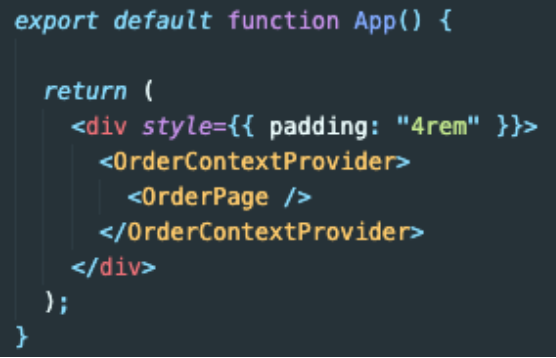
- OrderPage를 화면에 띄우기 위해서는 App컴포넌트에 컴포넌트를 입력한다.
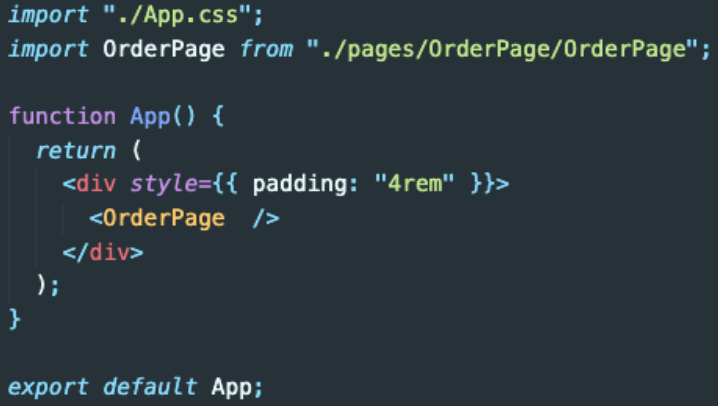
<OrderPage.js>
- 코드에 대한 설명은 뒤에서 계속해서 설명.
2️⃣ Mock Service Worker
이 페이지의 Products (여행 상품) Options (여행 옵션)들은 백엔드 서버에서 가져온다. 그렇다면 이러한 부분은 어떠게 테스팅을 해줘야 할까?
- 백엔드에서 데이터를 가져오는 부분을 테스트하기 위해서는 실제로 서버에 호출하는 end-to-end 테스트를 할 수 있지만, 서버에 요청을 보낼 때 그 요청을 가로채서 Mock Service Worker로 그 요청을 처리하고 모의(mocked) 응답을 보내보자!
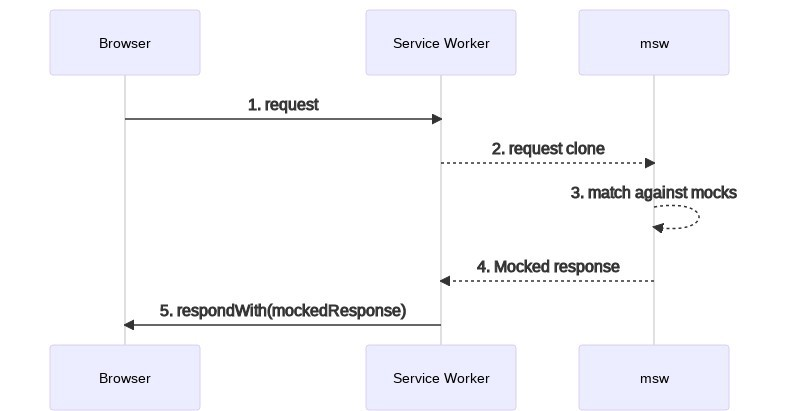
👉 작동방식
- 브라우저에 서비스 워커를 등록하여 외부로 나가는 네트워크 리퀘스트를 감지.
- 그 요청을 실제 서버로 갈 때 중간에 가로채서 (intercept) MSW 클라이언트 사이드 라이브러리로 보냄
- 그 후 등록 된 핸들러에서 요청을 처리한 후 모의 응답을 브라우저로 보냄.
👉 사용방식
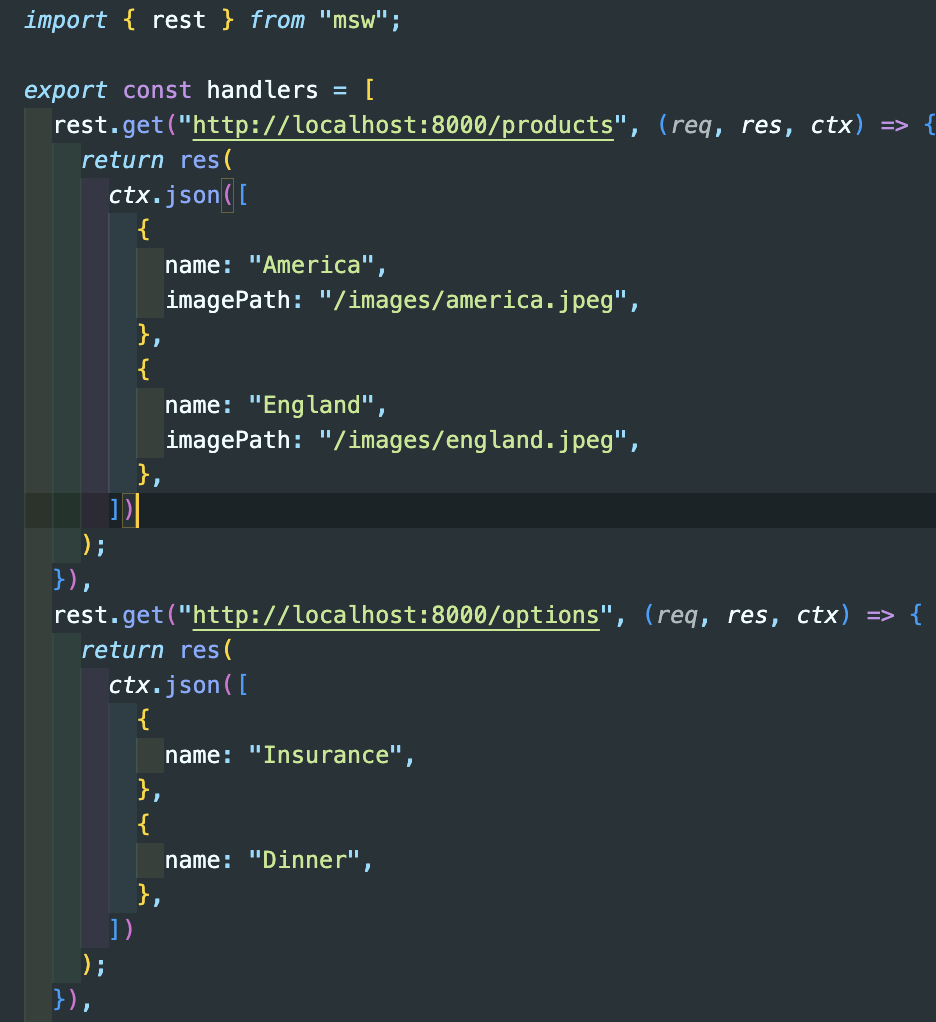
1. msw 설치
npm install msw2. 핸들러 생성
- req: 매칭 요청에 대한 정보
- res: 모의 응답을 생성하는 기능적 유틸리티
- ctx: 모의 응답의 상태 코드, 헤더, 본문 등을 설정하는 데 도움이 되는 함수 그룹
<src/mocks/handlers.js>
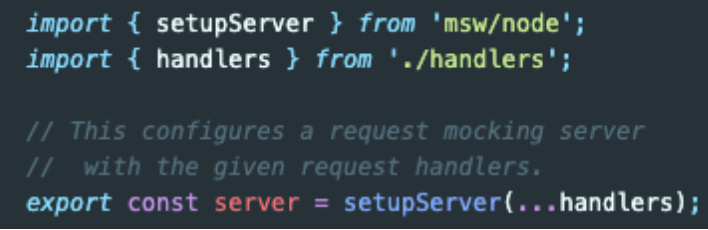
👉 서버 생성
<src/mocks/server.js>
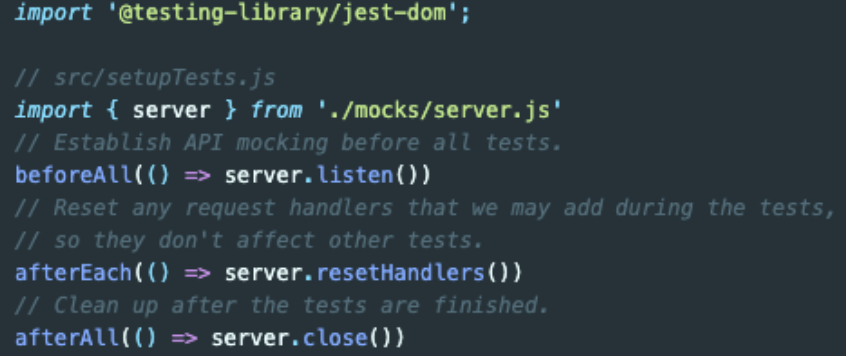
👉 API mocking 설정
<src/setupTest.js>
💡 참고하기 좋은 자료
3️⃣ Type & Products
❌ Write a failing test
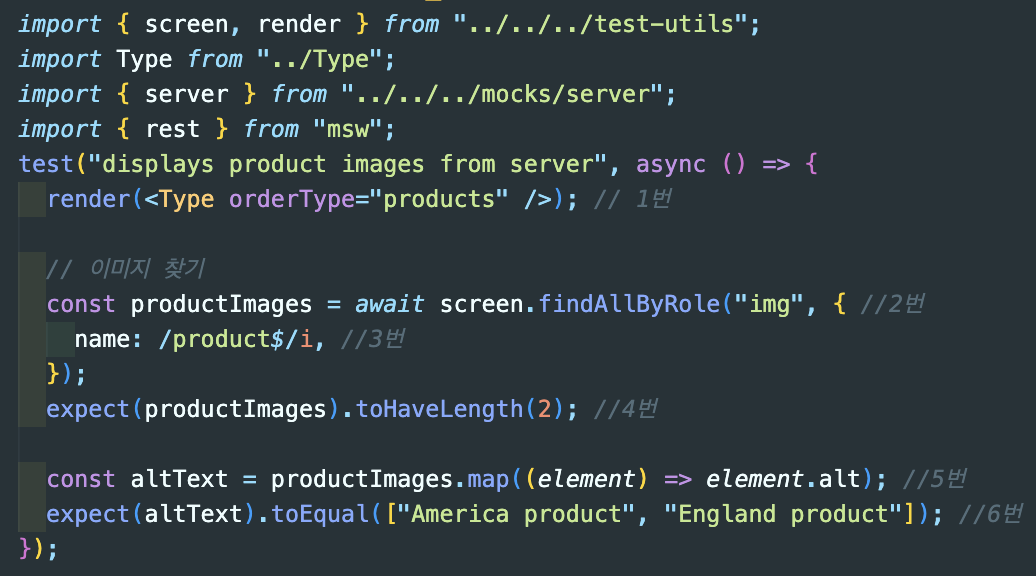
mock service worker를 이용해서 products를 테스트해보자.
- DOM에 렌더링할 컴포넌트를 render함수에 넣는다.(Type컴포넌트 속 컴포넌트 중 products 컴포넌트)
- findAllByRole을 이용하여 img태그를 선택한다. 사진을 비동기로 가져오는 것에 시간이 지연됨으로 findBy를 사용(promise 반환)하고 사진이 여러장이기 때문에 All을 붙여준다. (await, async 사용)
- product$/i 로 끝나는 텍스트를 가진 이미지를 불러온다는 의미.
- 이미지가의 갯수가 2개인지 유효성 검증한다.
- 서버의 이미지들의 alt값을 저장.
- alt값들의 값이름이 다음과 같은지 유효성 검증한다.
<Type.test.js>
✏️ Make the test Pass
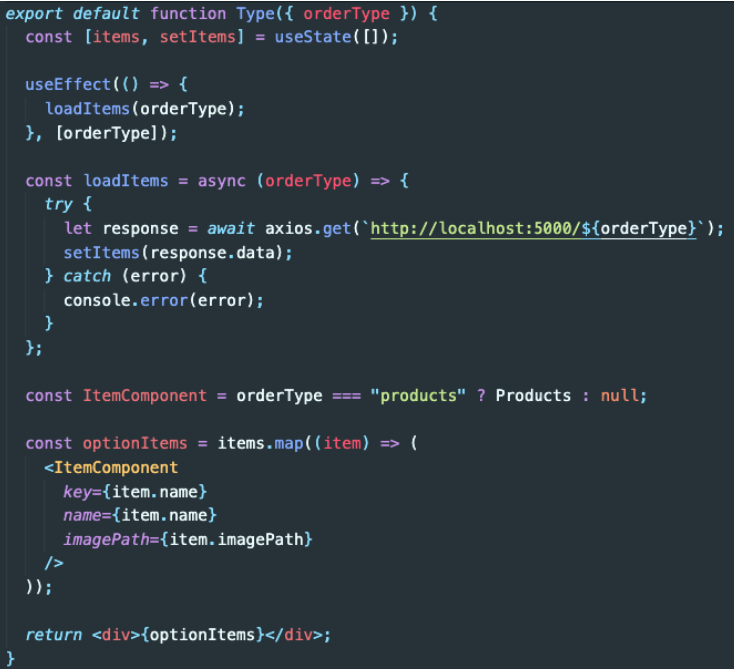
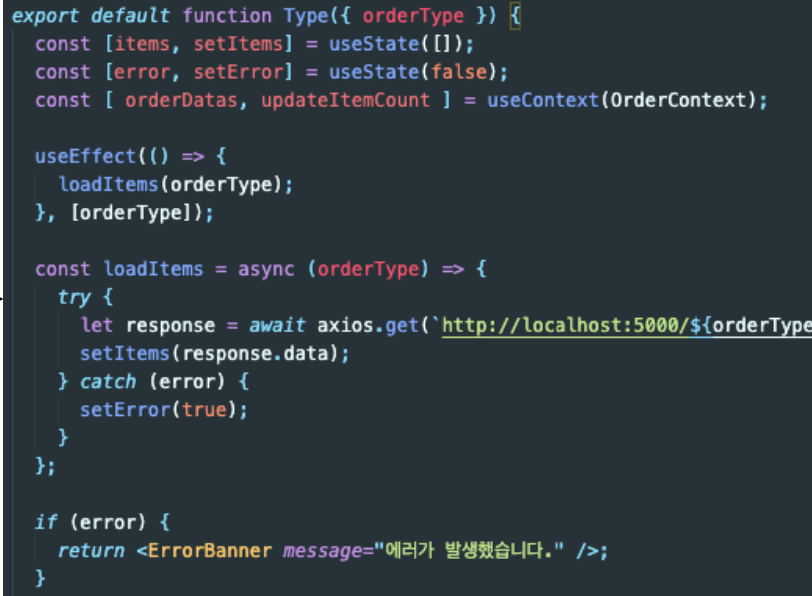
- useEffect로 컴포넌트 업데이트 시 loadItems 함수가 실행된다. (orderType은 상위 컴포넌트인 OrderPage 컴포넌트에서 orderType을 products 또는 option으로 보내온다.)
- (orderType이 products 일 경우)loadItems함수 안에서는 produc에 대한 데이터를 요청하고 그 요청 값을 Items에 저장한다.
- (orderType이 products 일 경우) ItemComponent는 products를 나타내는 컴포넌트가 되고, image Path를 props로 전달 받는다.
- 서버로부터 받는 데이터가 여러개이므로 map을 통해 데이터에 대한 반복 구현을 실행한다.
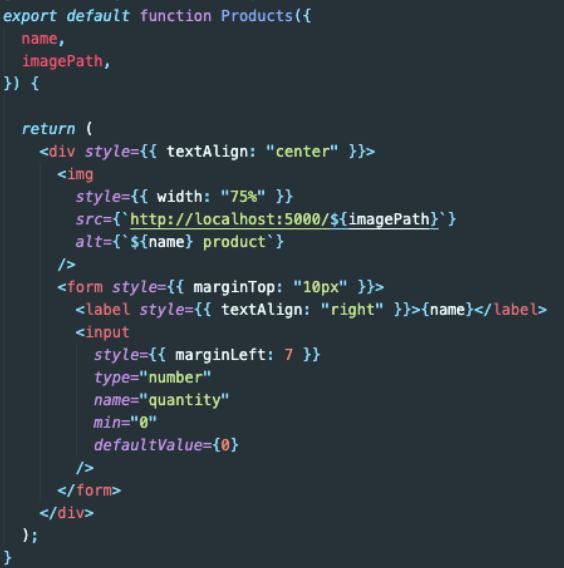
<Type.js>
<Product.js>
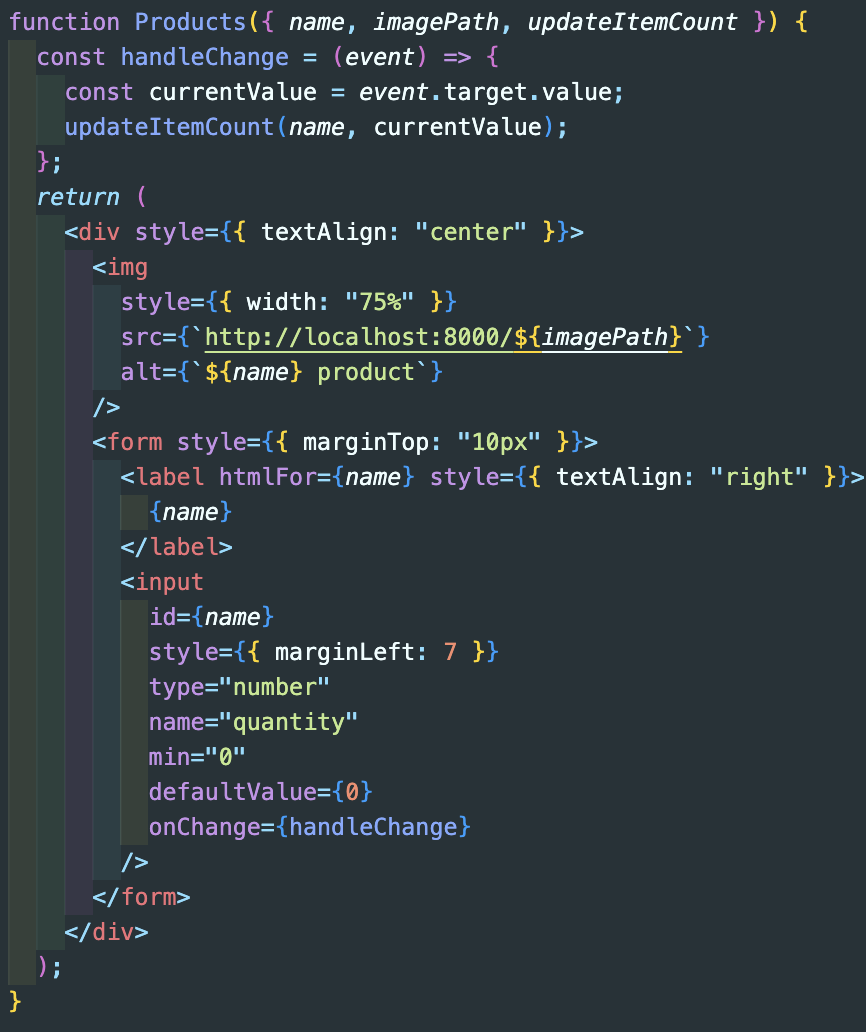
1. 전달 받은 imagePath를 img의 경로로 주어 이미지를 불러오게 된다.
2. 해당 이미지의 이름과 상품 갯수를 측정하는 input을 작성해준다.
4️⃣ Print Error
서버에서 데이터를 가져올 때 에러가 발생하면 에러창을 표시하자.
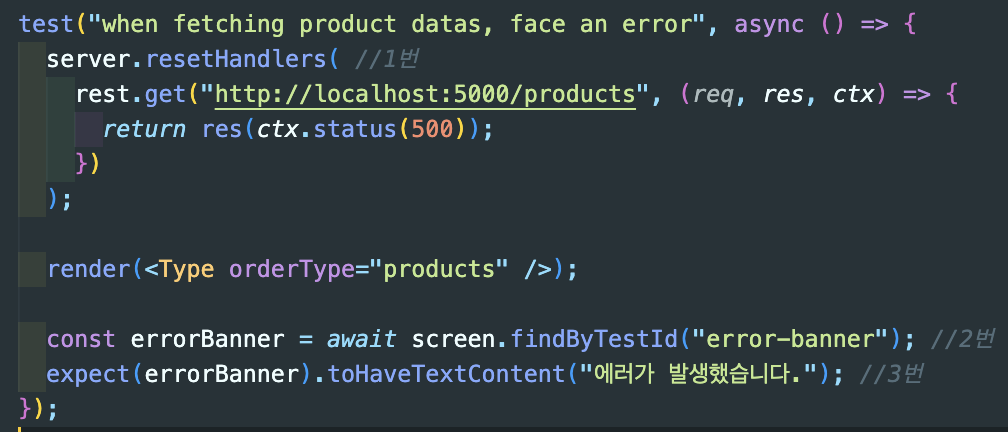
❌ Write a failing test
- 지금 작성해야할 테스트 케이스는 데이터 통신에 에러가 발생하였을 때의 케이스를 작성하는 것이다.
따라서, resetHandlers을 이용하여 handler을 초기화해주고, 데이터 요청 시 HTTP코드가 500 즉, 통신 에러를 출력하게 한다. - findByTestId를 이용하여 'error-banner'라는 Id 값을 가진 앨리먼트를 선택한다. 이때 비동기 반환을 위하여 findBy를 사용하고 역시 await, async를 사용한다.
- 찾은 앨리먼트에 작성된 텍스트가 "에러가 발생했습니다"가 맞는지 유효성 검증한다.
<Type.test.js>
✏️ Make the test Pass
<components/errorBanner.js>

<Type.js>
- loadItems에서 데이터통신에 실패하여 catch문이 실행될 때, error의 값이 true가 되어 ErrorBanner 컴포넌트가 실행되게 된다.
5️⃣ Type & Options
❌ Write a failing test
mock service worker를 이용해서 products를 테스트해보자.
- 옵션정보에 대한 값들 또한 서버에서 가져오는 것이므로 비동기 요청을 하고, findAllByRole을 통해 checkbox라는 앨리먼트를 선택한다.
- 그리고 그 갯수(길이)가 2인지 유효성 검증한다.
<Type.test.js>
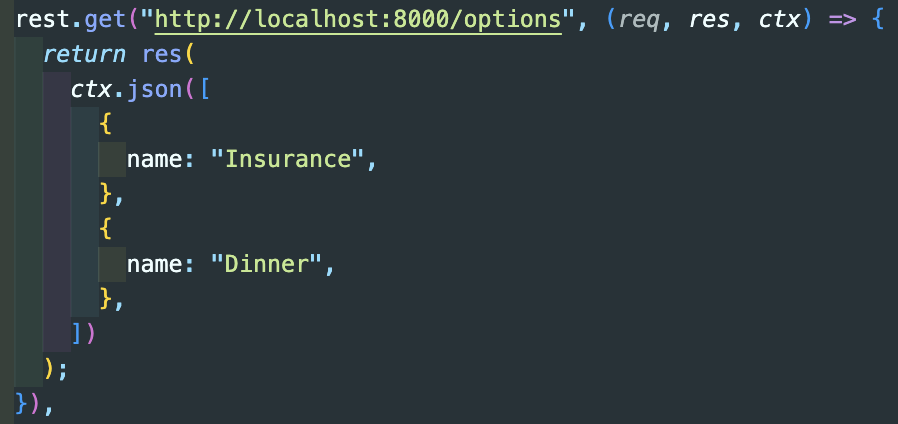
💡 잠깐) 앞서 products의 갯수와 옵션의 갯수가 2개인지를 확인하기 위한 테스트 케이스를 작성하였다. 실제로 서버에 담긴 Products는 4개이며, Options는 3개이다. 그렇다면 테스트케이스에서 작성한 2개는 무엇일까? 바로 우리가 앞서 작성해놓은 MSW Handler에 작성된 코드이다. 앞서 말했듯이 Hanlder로 요청을 조작하여 모의응답을 준 것이다. 다음과 같이 Handler에 작성된 갯수는 각각 2개씩이다.
✏️ Make the test Pass
- ItemComponent가 삼항연산자에 의해 orderType이 Products 일지 Options 일지에 대한 코드가 완성되었다.
- 주문종류, 가격, 총 가격이 작성되었고, 상품이 나타나는 레이아웃에 대한 style이 적용되었다.
💡 총 가격에 대한 구현은 OrderContext를 확인하자!
<Type.js>

💡 잠깐) 공톤된 로직의 중복을 제거한, 삼항연산자 컴포넌트
앞서 보았듯이 OrderPage안에는 세개의 컴포넌트가 존재한다. 일반적으로 작성했으면 두개의 컴포넌트가 존재했을 것이다. 바로 Proucts와 Options 컴포넌트인데,Why? Type컴포넌트의 역할은 무엇일까?
곰곰히 생각해보니 Products와 Options는 서버에서 데이터를 받아와서 출력하게 된다. 또한 각각 갯수에 맞는 total price를 구현하게 될 것인데 이때 각각 컴포넌트의 값들을 context API를 통해 전달하게 된다.So, 코드의 중복이 발생한다. 데이터 통신에 대한 함수와 context를 받아오는 코드 등 많은 로직 부분들을 Products 컴포넌트에 한번, Options 컴포넌트에 한번 따로따로 작성하게 된다.
Finally, type 컴포넌트의 역할은 상위 컴포넌트인 OrderPage에서 전달하는 orderType에 따라서 컴포넌트를 띄워주는 형식이고, Type 컴포넌트 안에 앞서 말했던 로직들을 한번만 작성하면 되는 것이다.
🧐 이 것이 HOC(고차 컴포넌트)와 관련된 작성법인가 공부해야겠다.
중복 O
<OrderPage>
  <Products /> // 각자 따로 데이터 통신 & contextAPI &  props 전달
  <Options /> // 각자 따로 데이터 통신 & contextAPI &  props 전달
</OrderPage>
중복 X
<OrderPage>
  <Type orderType="Products" />
  <Type orderType="Products" />
</OrderPage>
<Type> //  한번에 데이터 통신 & contextAPI &  props 전달
const ItemComponents = orderType === "products" ? Products : Options;
</Type>
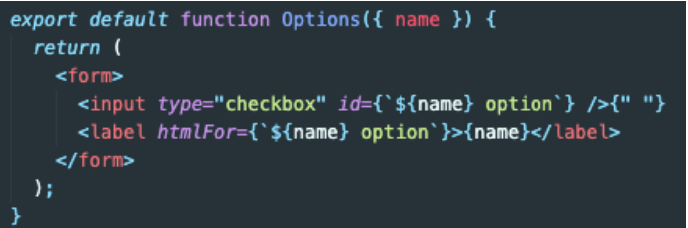
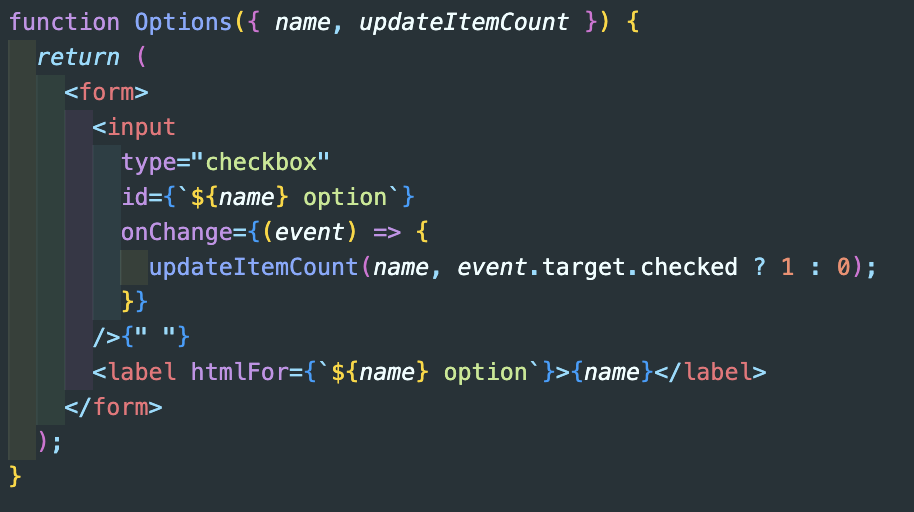
<Option.js>
- type컴포넌트의 ItemComponent에 props로 전달된 name은 바로 서버에서 넘어온 데이터의 name이다. 따라서 option 칸에 그에 맞는 name 데이터가 출력된다.
6️⃣ OrderContext
이제 상품 가격을 구현해보자.products 하나씩에 대해 수량을 선택할 수 있고, 각자 수량에 대한 금액을 출력해보자. 또한 Options의 체크 항목에 따라서도 금액이 출력되게 구현해 보고 Products와 Options의 총 금액을 구해보자.
그렇다면 각각 컴포넌트에서 금액은 어떻게 구할 것이며, 각각의 값들을 어떻게 더하여 총 금액을 출력할까?
👉 React Context
✏️ Context를 사용해서 할 일
- 어떠한 컴포넌트에서 총 가격을 Update해주는 것
- 어떠한 컴포넌트에서 총 가격을 보여주는 것
✏️ Context 사용 방법
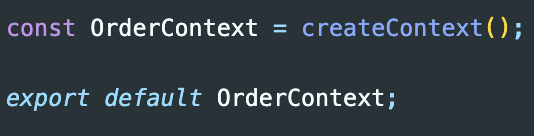
1. Context 생성
2. Context의 값을 공유해줄 Provider 생성(Context는 Provider안에서 사용가능)
- Provider로 감싸준 컴포넌트만이 Context 값을 공유 가능.
3. Provider를 return 해주는 OrderContextProvider를 생성.
- Provider에 Context의 여러 구현사항들을 담아야하기 때문
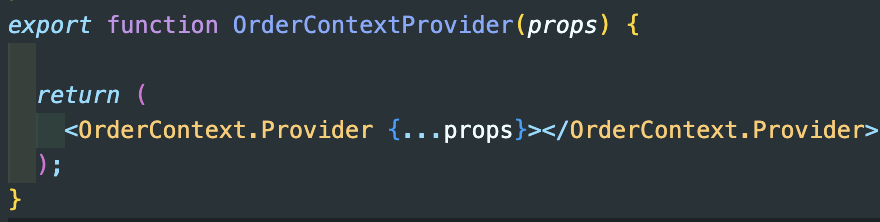
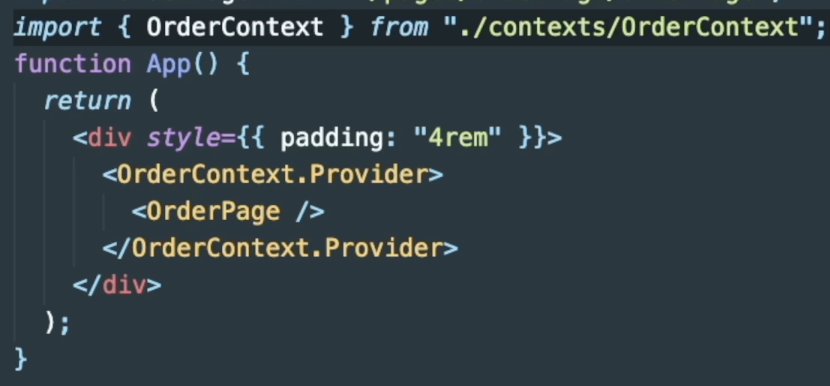
- OrderPage를 둘러싸는 Provider를 OrderContextProvider로 변경
4. value로 넣어줄 데이터를 만들기
- Provider의 value에 들어가는 값이 바로 공유되어지는 값이다.
필요 데이터 양식: orderCounts의 products, options에는 수량을 증가시킨 상품 또는 체크한 옵션들이 Map()을 통해 각각 배열에 담기게 된다.
(Map(): 간단한 키와 값을 서로 매핑시켜 저장하며 저장된 순서대로 각 요소들을 반복적으로 접근)
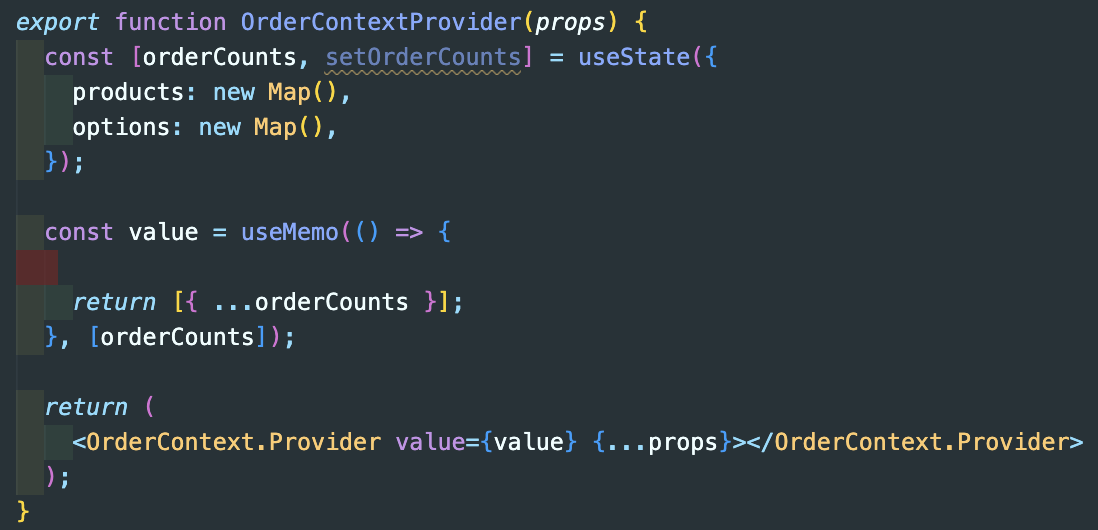
데이터 업데이트: 그리고 그 갯수에 따라서 각각의 가격과 총 가격을 구할 수 있다.
-
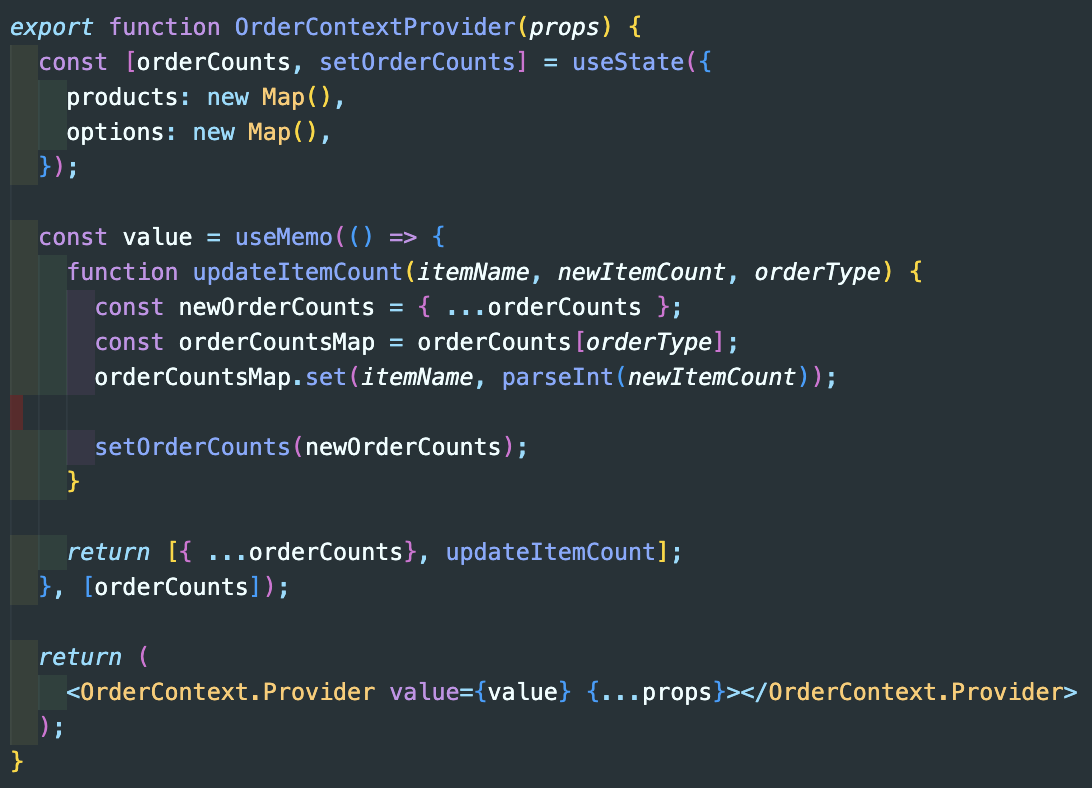
updateItemCount는 총 세개의 매개변수(parameter)를 받는다.(전달될 인자값은 이 함수를 공유할 컴포넌트들로부터 온다.)
itemName: 상품 또는 옵션 중 어떤 이름은 가진 아이템인지를 구분하기 위해 인자값(argument)을 받는다.
newItemCount: 그 아이템의 갯수가 몇개인지 인자값을 받는다.
orderType: 그 아이템이 products인지 options인지 인자값을 받는다. -
orderCounts를 spread연산자를 통해 복사하여 newOrderCounts에 저장한다. 즉, newOrderCounts의 값이 변함에 따라 orderCounts 값을 변경시킨다.
const newOrderCounts = { ...orderCounts };- orderCounts에 저장된 것 중에 어떤 것이 들어온 것인지를 판단해준다.
(ex. orderType으로 'products'가 들어오면 orderCounts의 products가 선택되는 것)
const orderCountsMap = orderCounts[orderType];- 선택된 orderType의 Map()에 set()을 사용하여 아이템의 이름과 정수형의 아이템 갯수를 넣는다.
orderCountsMap.set(itemName, parseInt(newItemCount));- setter를 이용하여 새로 들어온 아이템 갯수가 orderCounts에 들어가서 업데이트 된다.
(ex. 0개에서 4개가 더해지면 4를 유지한 상태로 업데이트)
setOrderCounts(newOrderCounts);- value의 return 값으로 updateItemCount함수를 넣어준다. 이제 Provider를 통해 value값을 공유받은 컴포넌트들은 updateItemCount에 인자값을 전달할 수 있다. (즉, products, options에서 선택한 아이템, 갯수 등을 전달하면 updateItemCount가 그 값을 처리하게 된다.)
return [{ ...orderCounts}, updateItemCount];
💡 중요 ! value를 useMemo로 감싸준 이유?
value 값을 공유하는 컴포넌트들이 렌더링할때 마다 값을 공유하는 모든 컴포넌트들이 같이 렌더링 되어진다. 따라서, useMemo의 deps로 orderCounts를 준다. 그러면 orderCounts의 변경에만 렌더링되어진다.
✏️ 5. 상품 count에 따른 가격 계산
- 각각의 총 가격과 총합가격을 저장하는 useState 생성.
const [totals, setTotals] = useState({
                products: 0,
                options: 0,
                total: 0
})- 마운트시 orderType과 orderCounts 값을 받는 calculatesSubtotal함수가 실행된다. 그리고 return 값이 productsTotal과 optionsTotal에 각각 저장된다. 그리고 그 값들을 더한 값이 total이고 setTotals를 통해 0으로 저장되어 있는 products, options, total 값을 변화시킨다.
 useEffect(()=>{
      const productsTotal = calculatesSubtotal('products', orderCounts);
      const optionsTotal = calculatesSubtotal('options', orderCounts);
      const total = productsTotal + optionsTotal;
      setTotals({
                products: productsTotal,
                options: optionsTotal,
                total: total
      })

},[orderCounts])- orderType으로 'products'가 온 경우, for of문을 통해 orderCounts의 products에 저장된 아이템 갯수를 카운트하여 optionCount에 저장한다. optionCount는 pricePerItem의 products 값과 곱해진다. (갯수 X 하나당 가격)
const pricePerItem = {
                products: 1000,
                options: 500
}

function calculatesSubtotal(orderType, orderCounts){
                let optionCount = 0;
                for( const count of orderCounts[orderType].values()){
                                optionCount += count;

                }
                return optionCount * pricePerItem[orderType];
}- 따라서, totals 값 역시 OrderContextProvider의 return으로 반환된다.
return [{ ...orderCounts, totals }, updateItemCount];
7️⃣ Product count & Option count
👉 Provide Context
- 이제 OrderContextProvider를 통해 공유되는 값들을 전달해보자.
✏️ 1. Type.js에 Ordercontext 가져오기
products 와 options 컴포넌트에 공유되는 공통된 로직을 가진 Type.js에 useContext을 이용하여 OrderContext를 받아온다. 즉, OrderContextProvider를 통해 공유되는 값들을 가져온다.
- OrderContextProvider에서 return 했던 값
<OrderContext.js>

return [{ ...orderCounts, totals }, updateItemCount];- 그 값을 다음과 같이 받는다.
<Type.js>
import OrderContext from "../../context/OrderContext";
const [orderDatas, updateItemCount] = useContext(OrderContext)
✏️ 2. updateItemCount를 props로 전달
- 이 함수를 props로 전달받는 컴포넌트는 products와 options 컴포넌트이다. 각각 컴포넌트에서는 itemName과 newItemCount를 인자값으로 전달한다.
- 그리고 전달되어진 값과 Type.js에서 props로 전달받은 orderType까지 총 3개의 인자값이 전달된다.(그래서, updateItemCount에서 파라미터가 세개 존재했던 것.)
  const optionItems = items && items.map((item) => (
                <ItemComponents
                  key={item.name}
                  name={item.name}
                  imagePath={item.imagePath}
                  updateItemCount={(itemName, newItemCount) =>
                    updateItemCount(itemName, newItemCount, orderType)
                  }
                />
              ));
✏️ 3. subTotal 값 전달받기
- orderDatas는 { ...orderCounts, totals }와도 같다.
<p> 총 가격:{orderDatas.totals[orderType]}</p>- totals 값은 OrderContext에서 각각의 값과 총합이 저장되어있는 state이다.
  const [totals, setTotals] = useState({
                products: 0,
                options: 0,
                total: 0
  })
ex) Type.js에서 OrderPage로 부터 'products'인 orderType을 props로 받았다. 따라서 totals['products']가 되어, products의 총 가격을 받게 된다.
✏️ 4. Total Price 값 전달받기
- products와 options의 총합을 받는 값은 totals의 total에 저장되어 있다. 따라서, OrderPage.js에서 그 값을 공유받으면 된다.
function OrderPage({ setStep }) {
  const [orderDatas] = useContext(OrderContext);

  return (
    <div>
      <h1>Travel Products</h1>
      <div>
        <Type orderType="products" />
      </div>
      <div style={{ display: "flex", marginTop: 20 }}>
        <div style={{ width: "50%" }}>
          <Type orderType="options" />
        </div>
        <div>
          <h2>Total Price: {orderDatas.totals.total} </h2>
          <br />
          <button onClick={() => setStep(1)}>주문하기</button>
        </div>
      </div>
    </div>
  );
}
👉 context wrapper
- 현재까지 한 부분을 테스트해보면 다음과 같은 에러가 발생한다.
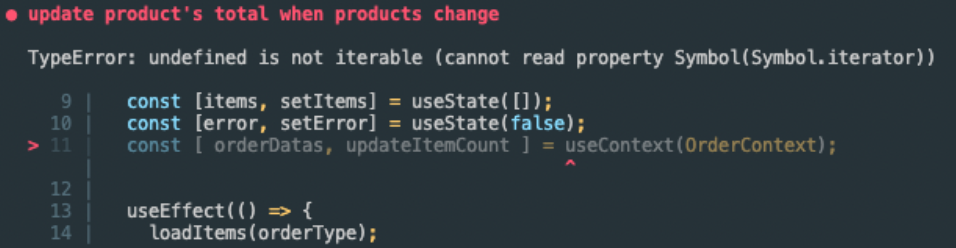
✏️ 에러 발생 이유
- 현재 실제 코드는 OrderContextProvider로 감싸주고 있지만, 테스트부분에는 감싸주지 않기 때문에 Context를 사용할 때 에러가 발생!
<실제 코드>
<테스트 코드>

✏️ 에러 해결 방법
- 실제 코드 부분에서 Provider로 감싸주었듯이 테스트 부분도 wrapper로 감싸주면 된다.

1. 모든 테스트 케이스 wrapper
- 다른 컴포넌트들에 대한 테스트케이스들도 역시 context가 필요하므로 에러가 발생한다. 따라서 앞서 했던 방법과 같이 wrapper로 감싸주면 될 것이다.
But, wrapper로 모든 테스트 케이스마다 감싸주는 것이 비효율적이므로 Custom Render를 만들어서 사용해보자!
2. Custom Render
- 지금까지 테스트케이스 작성 시 DOM에 렌더링하고자 하는 컴포넌트를 render()함수에 넣어주었다.
So, Custom render를 만들어줘서 그 안에서 wrapper를 처리하고, 일반적인 render()함수처럼 사용하면 되는 것이다!
<test-util.js>
- ui: 렌더하고자 하는 jsx
- options: wrapper 옵션이외에 우리가 주고자 하는 다른 옵션들
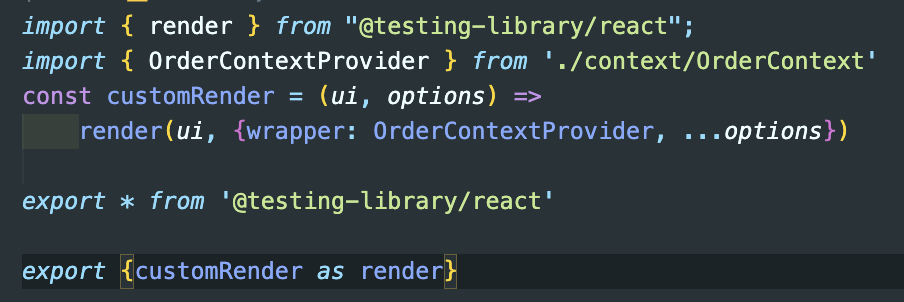
3. import Custom Render
wrapper로 감싸줄 필요가 있는 테스트에는 TRL의 render 말고, Custom Render의 render를 import 하면 된다.
<TRL의 render>

<Custom Render의 render>

❌ Write a failing test
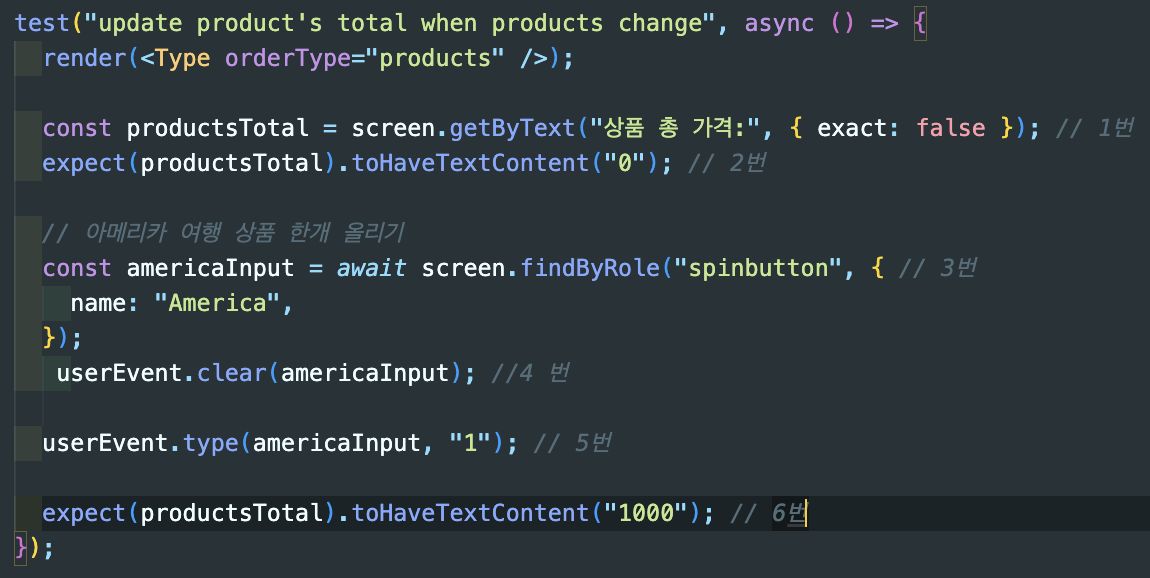
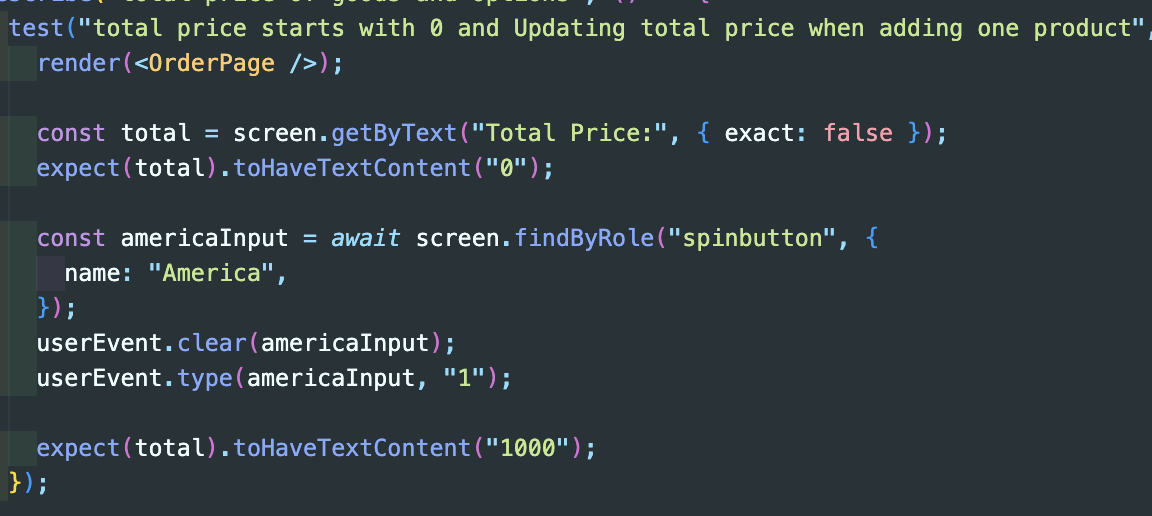
👉 우선, 여행 상품과 옵션의 개수에 따라 계산하는 테스트 케이스를 작성
1. getByText를 통해서 '상품 총 가격'이라는 텍스트를 가지고, exact가 false(정확한 값을 모르는)인 앨리맨트를 선택. (가격은 선택에 따른 가변적인 값)
2. 총 가격이 0을 갖는지 유효성 검증한다.(총 가격의 기본값(시작값)은 0부터니까.)
3. findbyRole을 통해 name이 America이고 spinbutton인 앨리먼트를 선택한다.
4. userEvent.clear()을 통해 americaInput에 대한 값을 초기화한다.(만약 그 전에 값이 존재했을 경우)
5. userEvent.type() 함수에는 target.value의 중첩 구조의 이벤트 객체를 넘길 필요가 없이, 실제 입력 텍스트만 넘기면 된다. 따라서, americaInput의 값이 1이 되게 해본다.
6. 그렇다면 productsTotal의 값은 1000이 되는지 유효성 검증한다. (1개 당 1000원)
<calculate.test.js>
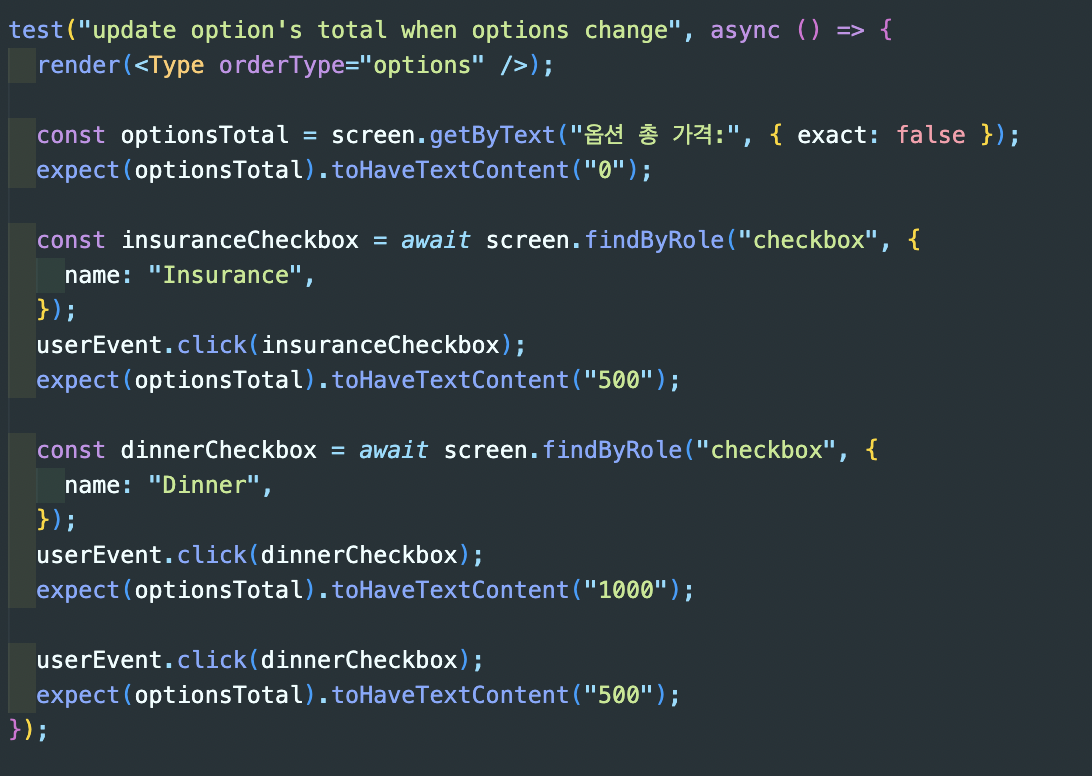
- options의 가격 변화 테스트 케이스도 products와 동일
참조: userEvent
-https://www.daleseo.com/testing-library-user-agent/
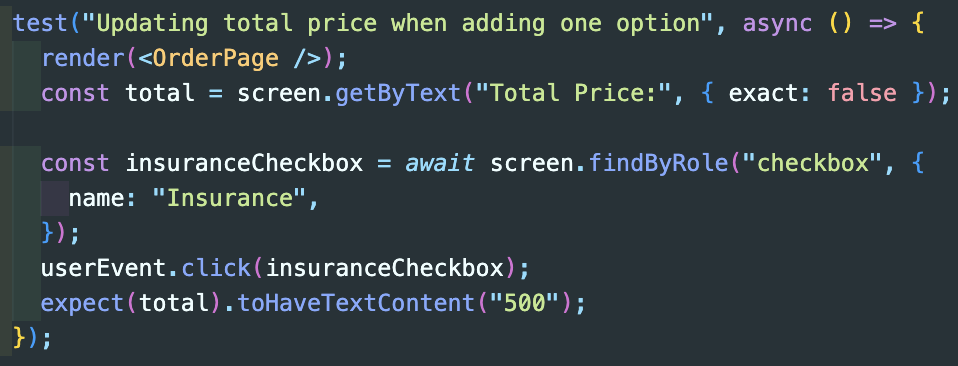
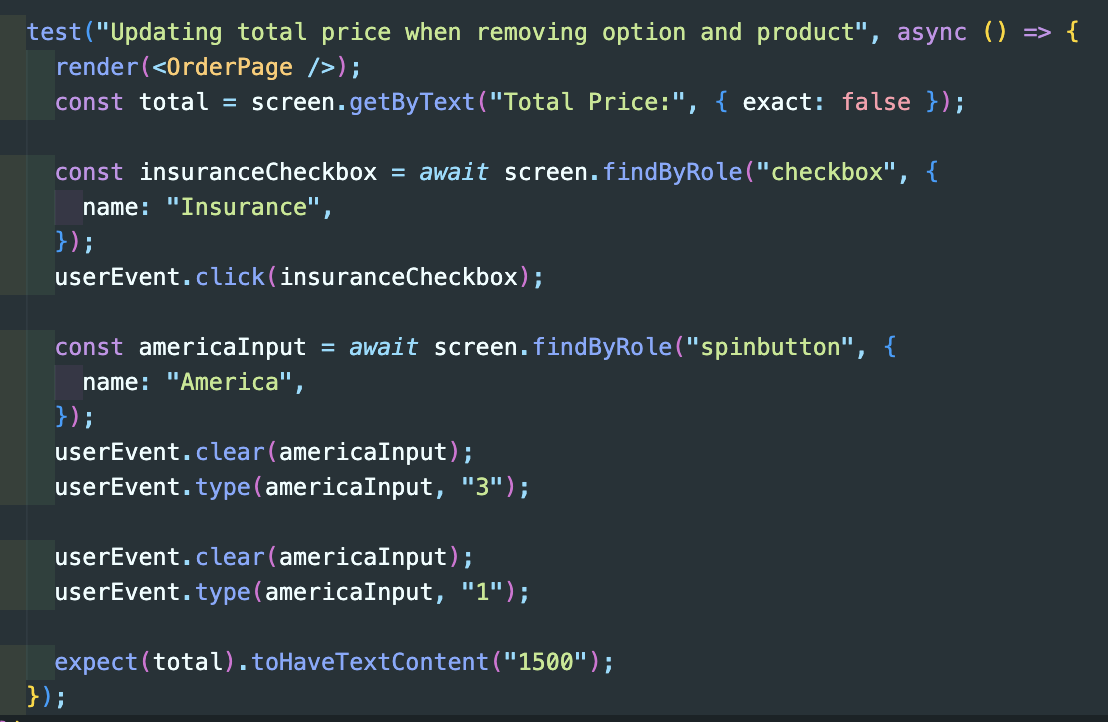
👉 총 total 값의 변화에 따른 테스트 케이스 작성
products의 증가에 따른 total 값
options의 체크에 따른 total 값
products와 options의 감소에 따른 total 값
✏️ Make the test Pass
<Products.js>
- 갯수의 변화를 onChange가 감지하고, 변화한 수와 변화한 product의 이름을 updateItemCount로 전달.
<Options.js>
- 체크의 유무를 onChnage가 감지하고, 체크된 개수와 체크된 options의 이름을 updateItemCount로 전달.

Great post! React TDD is a solid approach for building a reliable travel app. If you're looking for more insights on travel app development, you might find this article helpful: https://www.cleveroad.com/blog/travel-app-development/ It covers key features and best practices. Keep up the great work!