FireFox & Java Selenium을 이용한 네이버 뉴스 헤드라인 크롤링
기존에 Chrome 버전으로 크롤링을 진행하였으나... chromedriver가 linux aarch64 버전을 지원해주지 않아서... firefox로 재시도.. 하여 성공한 것을 기록!
뉴스 크롤링 with Chrome 실패기 : https://profuse-aftershave-ac6.notion.site/d4e5bc7d109d42bc9d09362c7fb826ae?pvs=4
크롤링이란?
- 웹-크롤링 Web-Crawling은 웹 사이트에 있는 데이터를 추출해서 사용하기 위한 목적으로 홈페이지 내용을 수집하고, 추출하는 것을 의미
- 특정한 규칙에 맞춰서 웹 페이지에 방문해서 내용에 포함된 데이터를 가져오는 것을 뜻함
- 읽어볼 만한 링크 : https://www.cloudflare.com/ko-kr/learning/bots/what-is-a-web-crawler/
크롤링 주의 사항
- 항상 크롤링 하려는 사이트의 크롤러 액세스 권한을 확인하자
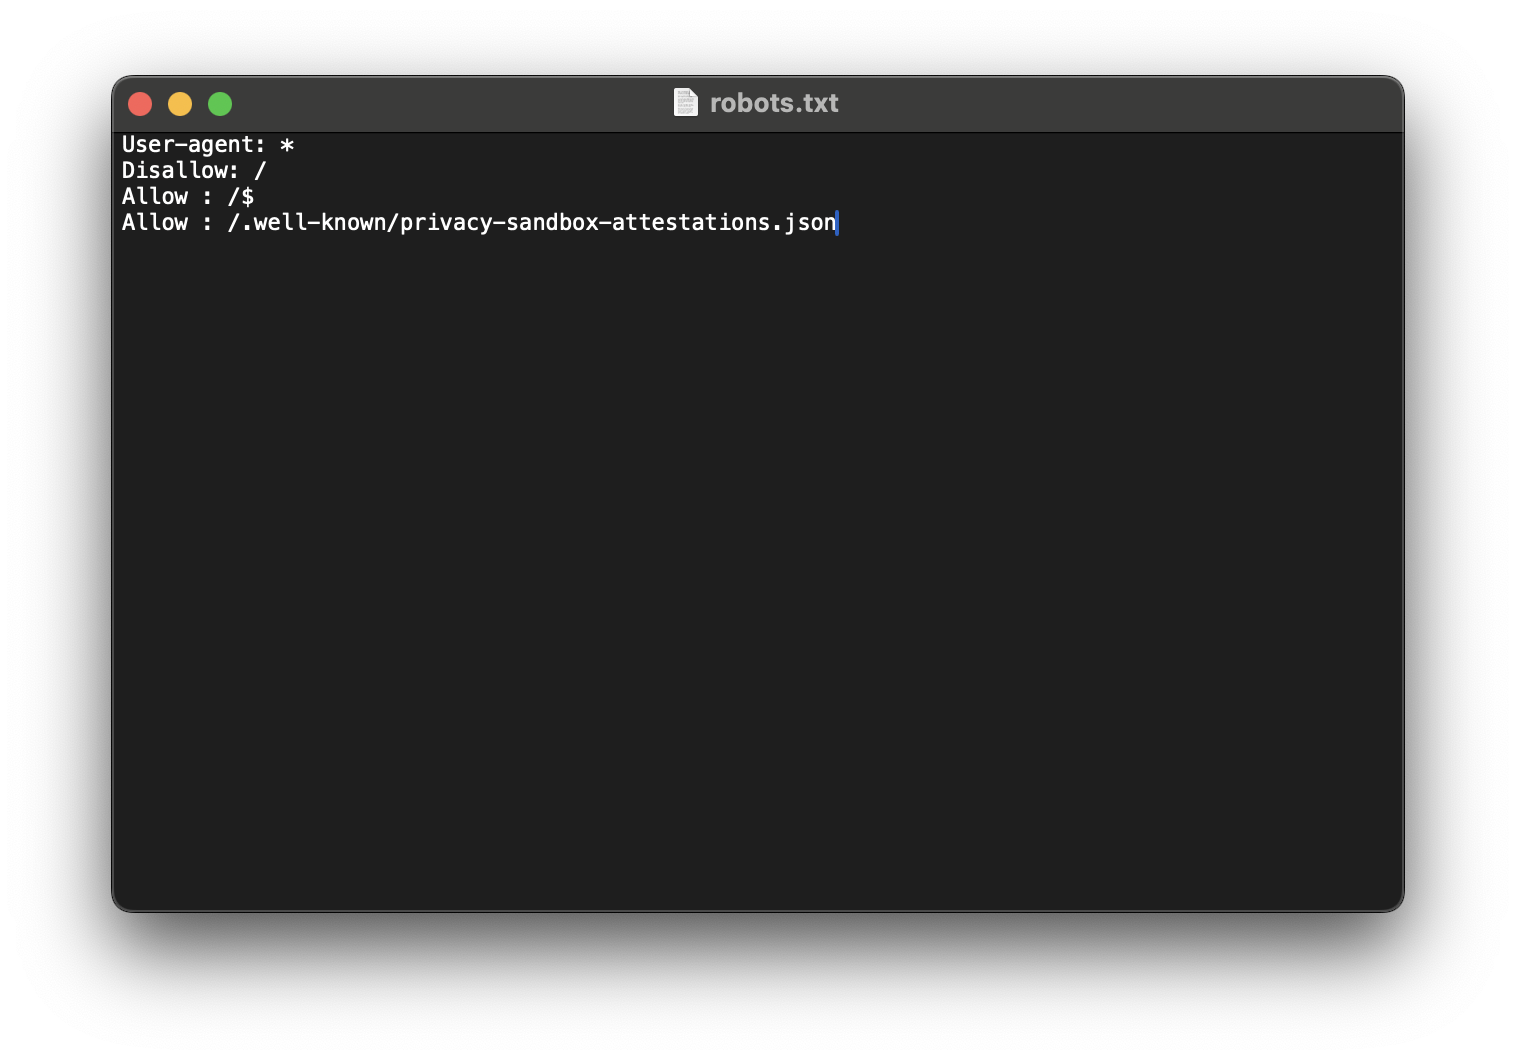
크롤링하려는 사이트/robots.txt- 네이버를 예로 들면
https://www.naver.com/robots.txt
항상 권한을 확인하고 사용하자!!
Java 기반 크롤링 라이브러리
Jsoup
정적인 웹 페이지를 크롤링 할 떄 주로 사용Java Selenium
동적인 웹 페이지를 크롤링 할 떄 주고 사용
구현 방식
1) Local
Mac OS에서 먼저FireFox를 통한 크롤링 기능 구현
2).jar파일로 만들어,Ubuntu arm64환경에서 동작
3) 결과물로Ubuntu에 JSON 파일생성
Java Selenium 구현
1) 필요한 의존성 주입 [build.gradle]
구현에 필요한 의존성은 2개
1) java-selenium
- 웹 크롤링을 위한 라이브러리
java-selenium maven repository : https://mvnrepository.com/artifact/org.seleniumhq.selenium/selenium-java
implementation group: 'org.seleniumhq.selenium', name: 'selenium-java', version: '4.22.0'2) jackson-databind
- json read/write를 위한 라이브러리
jackson-databind를 선택한 이유1)
jackson-core: 저수준 api 제공
2)jackson-databind: 고수준 api 제공→ 객체 지향적으로
json을read/write해보고 싶어jackson-databind선택!
jackson-databind maven repository : https://mvnrepository.com/artifact/com.fasterxml.jackson.core/jackson-databind
implementation group: 'com.fasterxml.jackson.core', name: 'jackson-databind', version: '2.17.2'2) FireFox Browser, geckodriver 설치 [On Mac]
먼저 local 환경에서 동작하는 지 확인하기 위해, 설치를 진행하였다.
FireFox 크롤링을 위해 필요한 것
1)
FireFox Browser
2)geckodriver: chromedriver처럼 웹 드라이버이다.
1) FireFox Browser 설치
FireFox for Mac : https://www.mozilla.org/en-US/firefox/mac/
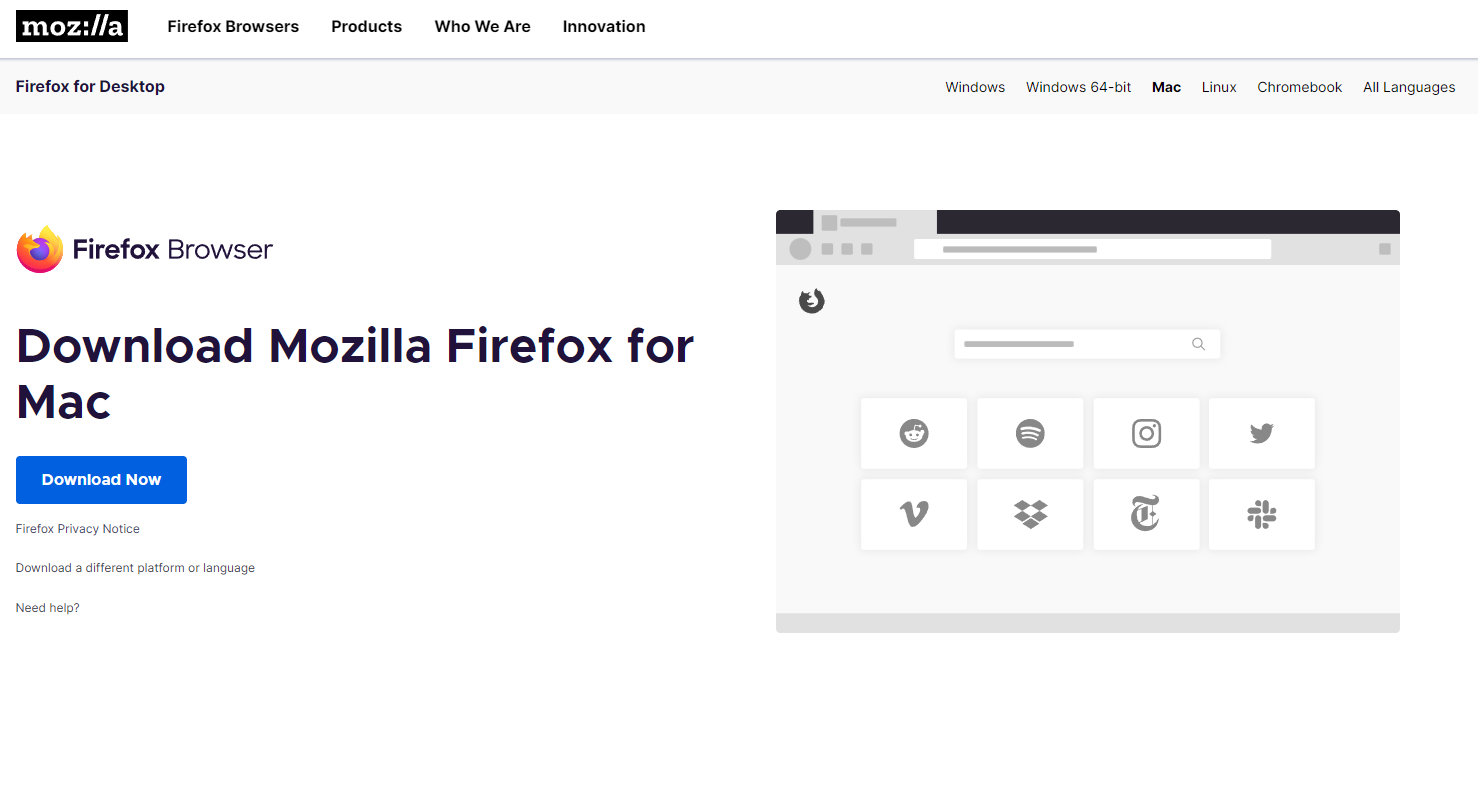
- 다운로드 해서 설치해주면 된다!
2) geckodriver 파일 받기
geckodriver repo : https://github.com/mozilla/geckodriver/releases
- mac 이므로
macos-aarch64버전을 받아주자.
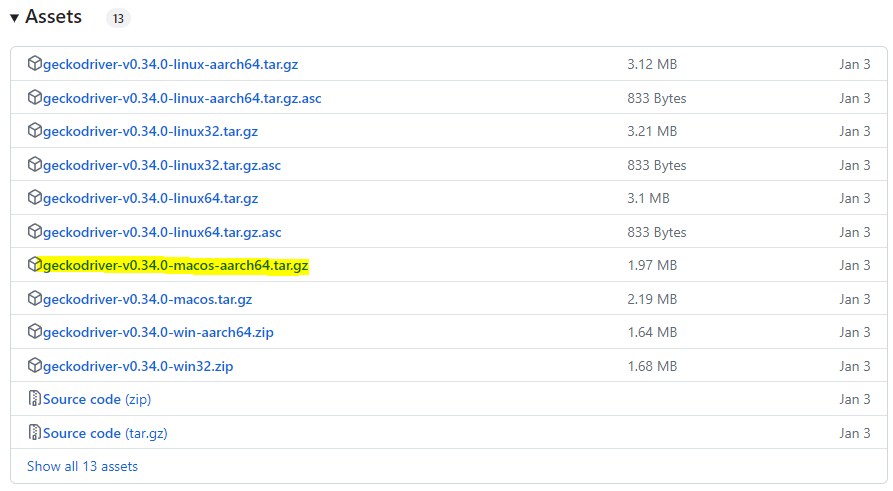
-> 다운받은 후, tar -xvzf 명령을 통해 압축을 풀어주면 geckodriver 파일이 생긴다.
- 이 파일을 통해 실행된다!
3) Java Programming [On Mac]
- 네이버 뉴스를 크롤링하기 위한 자바 프로그램 작성
1) News.java
뉴스 URL,뉴스 Text를 하나의 객체로 관리하기 위해 객체 생성
public record News(
        String newsLink,
        String newsText
) {
}
2) Crawler.java
- 추후에
url별로 파싱을 하고 싶어서,url을 입력받도록 구현 --headless옵션을 주어서Ubuntu Server에서도 GUI 없이 구동되도록 구현- 창이 열릴 때,
축소된 상태로 열리는 경우가 있어서, 헤드라인 8개 항목을 모두 가져오기 위해,더보기 클릭 버튼함수 구현
import org.openqa.selenium.By;
import org.openqa.selenium.WebDriver;
import org.openqa.selenium.WebElement;
import org.openqa.selenium.firefox.FirefoxDriver;
import org.openqa.selenium.firefox.FirefoxOptions;

import java.util.ArrayList;
import java.util.List;

public class Crawler {
    private static final String NAVER_SOCIETY_NEWS_URL = "https://news.naver.com/section/102";
    private static final String NAVER_LIFE_NEWS_URL = "https://news.naver.com/section/103";
    private static final String NAVER_IT_NEWS_URL = "https://news.naver.com/section/105";

    private final WebDriver webDriver;
    private final List<News> newsList = new ArrayList<>();

    public Crawler(){
        FirefoxOptions options = new FirefoxOptions();
        options.addArguments("--headless");  // headless 모드로 설정

        this.webDriver = new FirefoxDriver(options);  // 옵션을 사용하여 WebDriver 인스턴스 생성
    }

    public List<News> crawlingNews() {
        openBrowser(NAVER_IT_NEWS_URL);

        getHeadlineNews();

        closeBrowser();

        return newsList;
    }

    private void openBrowser(String Url) {
        // 매개변수로 전달된 경로에 대해 접속 & 파이어폭스 창을 연다
        webDriver.get(Url);
    }

    private void closeBrowser() {
        // 웹 드라이버 종료
        webDriver.quit();
    }

    private void getHeadlineNews() {
        // 파이어폭스가 열릴 때, 충분한 넓이로 열리지 않아 더보기 값이 가져와지지 않을때를 대비하여 '더보기' 버튼 클릭
        clickMoreInnerBtn();

        // 1) class 이름이 'sa_list'인 ul 태그 선택
        WebElement ulList = webDriver.findElement(By.className("sa_list"));

        // 2) sa_list 안의 모든 li 태그 선택
        List<WebElement> liItems = ulList.findElements(By.className("sa_item"));

        // 3) 선택된 모든 li 태그를 순회
        for (WebElement element : liItems) {
            // 4) sa_text 라는 이름의 className 첫번째 요소만을 선택 (findElement)
            WebElement saTextElement = element.findElement(By.className("sa_text"));

            // 5) 뉴스 링크 추출
            String newsUrl = getNewsUrl(saTextElement);

            // 6) 뉴스 헤드라인 텍스트 추출
            String newsText = getNewsText(saTextElement);

            // 뉴스 객체 생성
            News news = new News(newsUrl, newsText);

            // 뉴스 리스트에 추가
            newsList.add(news);
        }
    }

    private String getNewsUrl(WebElement saTextElement) {
        // 선택된 li 태그의 'sa_text_title'인 div 태그 선택
        WebElement newsLinkElement = saTextElement.findElement(By.className("sa_text_title"));

        // div 태그안의 a 태그 href 경로를 추출
        return newsLinkElement.getAttribute("href");
    }

    private String getNewsText(WebElement saTextElement) {
        // 선택된 li 태그의 'sa_text_strong'인 div 태그 선택
        WebElement newsTextElement = saTextElement.findElement(By.className("sa_text_strong"));

        // div 태그 안의 text 값을 추출
        return newsTextElement.getText();
    }

    private void clickMoreInnerBtn() {
        // '뉴스 더보기' 버튼 요소 선택
        WebElement moreInnerButton = webDriver.findElement(By.className("section_more_inner"));

        // '뉴스 더보기' 버튼 클릭
        moreInnerButton.click();
    }
}
3) JsonWriter.java
파싱한 정보를 'news.json 이라는 파일로 저장하기 위해 JsonWriter 구현
- 기존에
news.json에 저장된 값들이 있는 경우,중복 제거를 위해Map<>형태로 가져오도록 구현. 이를 통해, 동일한url에 대한 값들이 들어오는 경우 중복 처리가 가능하게 구현
import com.fasterxml.jackson.core.type.TypeReference;
import com.fasterxml.jackson.databind.ObjectMapper;

import java.io.File;
import java.io.IOException;
import java.util.HashMap;
import java.util.List;
import java.util.Map;

public class JsonWriter {
    private final ObjectMapper objectMapper = new ObjectMapper();
    private final File file = new File("news.json");

    public void write(List<News> newsList) {
        try {
            Map<String, String> existingNews = new HashMap<>();

            // 파일이 존재하면 기존 데이터를 읽어오기
            if (file.exists()) {
                existingNews = objectMapper.readValue(file, new TypeReference<Map<String, String>>() {
                });
            }

            // 새로운 뉴스 추가
            for (News news : newsList) {
                existingNews.put(news.newsLink(), news.newsText());
            }

            // 업데이트된 리스트를 파일에 쓰기
            objectMapper.writeValue(file, existingNews);
        } catch (IOException e) {
            e.printStackTrace();
        }
    }
}
4) Main.java
.jar파일로Ubuntu Server에서 실행할것이기 때문에,geckodriver의 위치를 현재.jar파일의 위치와 같게 하기 위해System.setProperty()추가- webdriver의 위치 설정
import java.util.List;

public class Main {
    public static void main(String[] args) {
        System.setProperty("webdriver.gecko.driver", "./geckodriver");

        Crawler crawler = new Crawler();

        List<News> newsList = crawler.crawlingNews();

        JsonWriter jsonWriter = new JsonWriter();

        jsonWriter.write(newsList);
    }
}
여기까지 구현한 후,
gradle build를 통해.jar파일을 로컬에서 실행해보았다.
하지만.. 여러 가지의 문제들이 발생했으니.. 따흑..
그건 맨 아래 Trouble Shooting에서 설명하겠다!만약, 오류가 발생하면 Trouble Shooting 확인해보기!
4) .jar 파일 실행 [On Ubuntu]
로컬 환경 [Mac] 에서 정상적으로 작동하는 것을 확인했으니, Ubuntu 환경에서 geckodriver만 알맞게 바꾸어주면 정상적으로 동작할 것이다!
왜냐하면
- mac : geckodirver for mac-aarch64
- ubuntu : geckodriver for linux-aarch64
이므로 서로 os가 다르기 때문에 다시 다운로드 받아주어야함
git-clone을 통해 받아온 repository를
gradle clean build -x test를 통해
.jar파일로 만들어 준 뒤 작업하였음!
git-clone & .jar 파일 만드는 방법은 모두 알테니 패스
-
ls명령어를 통해 확인

-
실행 및 확인
// jar 실행
java -jar crawler.jar

// ls 명령어로 news.json 생성 확인
ls

// cat 명령어를 통해 news.json 파일 확인
cat news.json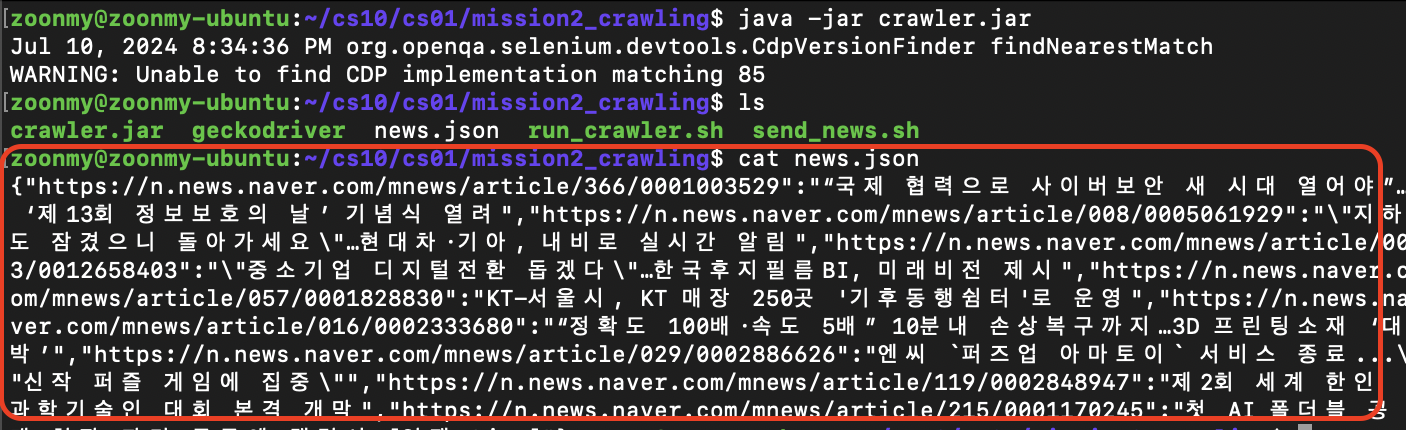
Trouble Shooting
1) manifest 속성이 없습니다.
- 오류 화면

Manifest 속성이란?
- Manifest파일은 자바 에플리케이션의 정보를 담은 메타데이터 파일
해결
1) build.gradle에 mainClass를 지정 [오류 발생]
mainClassName = 'Main'

jar {
    manifest {
        attributes(
                'Main-Class': mainClassName
        )
    }
}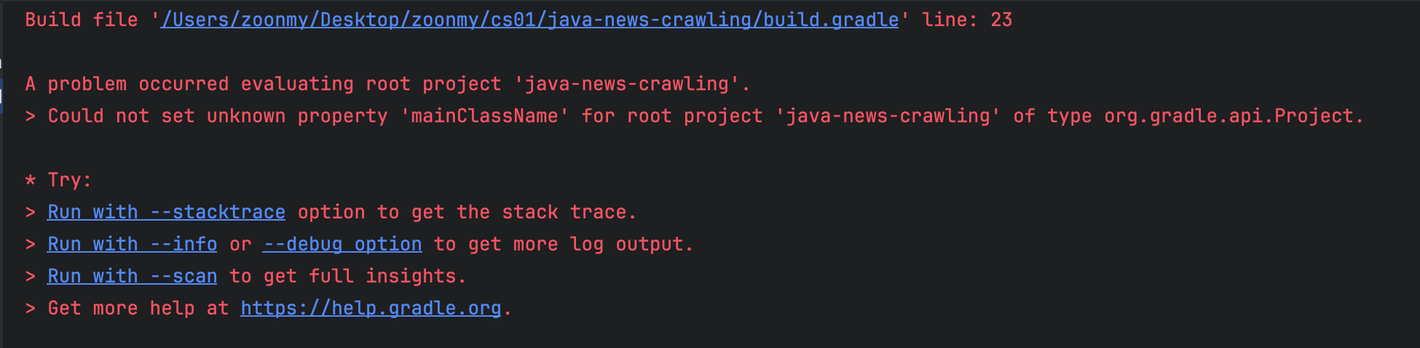
→ build.gradle 파일에 해당 내용을 추가해주었지만, 또 다른 에러 발생
2) build.gradle 에 application 플러그인을 설정하여 해결 [오류 발생]
application플러그인은mainClassName속성을 사용하여 JAR 파일의 매니페스트에Main-Class속성을 자동으로 추가이를 통해
java -jar명령어로 JAR 파일을 실행할 때 어떤 클래스의main메서드를 호출할지 지정할 수 있기 떄문에, 명시해주어야 함!
- 수정한 build.gradle 파일
plugins {
    id 'java'
    id 'application' // 추가된 부분
}

...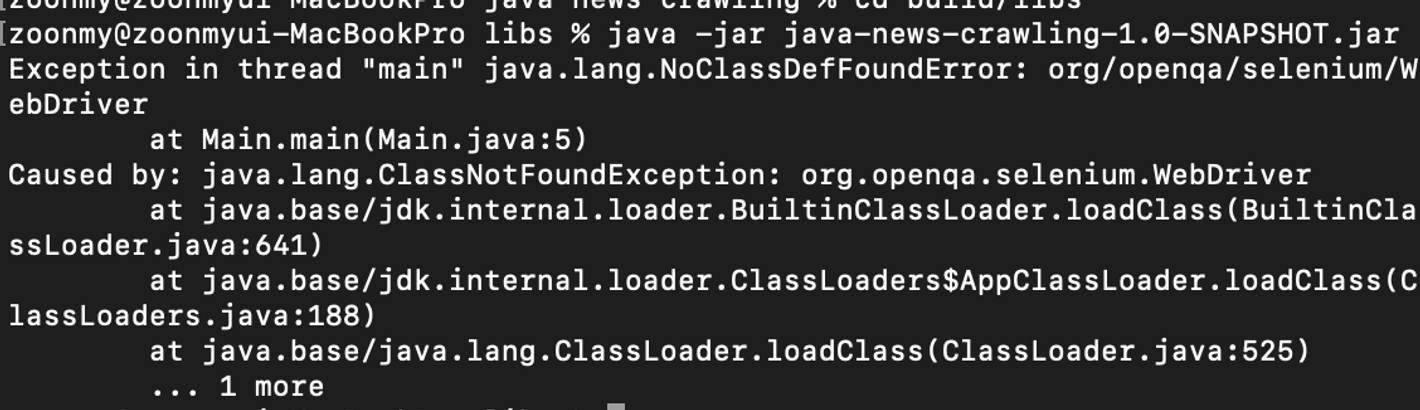
→ build는 잘되었지만, 역시나 실행은 되지 않았다. 아래와 같은 오류 발생
3) shadowJAR 을 통해 해결 [완전 해결!]
위의 오류 코드를 분석해보자.
→
Main.java파일에서org.openqa.selenium.WebDriver를 못찾아서 발생한 문제이다.분명히
build.gradle에도 잘 넣어주고, 의존성 주입도 해서 로컬에서는 잘 실행됐는데 왜 못찾는다고 뜰까..?
→ 기본적으로 gradle로 빌드를 하면 내가 만들 코드만 컴파일 돼서
build/libs경로에 jar 파일로 패키징된다.→ 개발이 끝나고 IDE를 벗어나 커맨드로 동작시키려면 dependency로 걸어서 사용하던 라이브러리 파일들은 내가 손수 찾아서 클래스패스에 넣어줘야 한다
직접 클래스패스에 넣어주는 방법도 있다.
- 참고한 링크 : https://blog.leocat.kr/notes/2017/10/10/gradle-copy-dependencies#google_vignette
하지만 나는 이번에 shadowJar 이라는 플러그인을 써보려고 한다!
- https://imperceptiblethoughts.com/shadow/
- 전체
build.gradle파일
plugins {
    id 'java'
    id 'application'
    id 'com.github.johnrengelman.shadow' version '8.1.1' // 추가된 부분
}

group = 'org.example'
version = '1.0-SNAPSHOT'

repositories {
    mavenCentral()
}

dependencies {
    /* selenium 의존성 추가 */
    implementation group: 'org.seleniumhq.selenium', name: 'selenium-java', version: '4.22.0'

    /* Jackson 의존성 추가 */
    implementation group: 'com.fasterxml.jackson.core', name: 'jackson-databind', version: '2.17.2'

    testImplementation platform('org.junit:junit-bom:5.9.1')
    testImplementation 'org.junit.jupiter:junit-jupiter'
}

mainClassName = 'Main'

jar {
    manifest {
        attributes(
                'Main-Class': mainClassName
        )
    }
}

shadowJar { // 추가된 부분
    archiveClassifier.set('all')
}

test {
    useJUnitPlatform()
}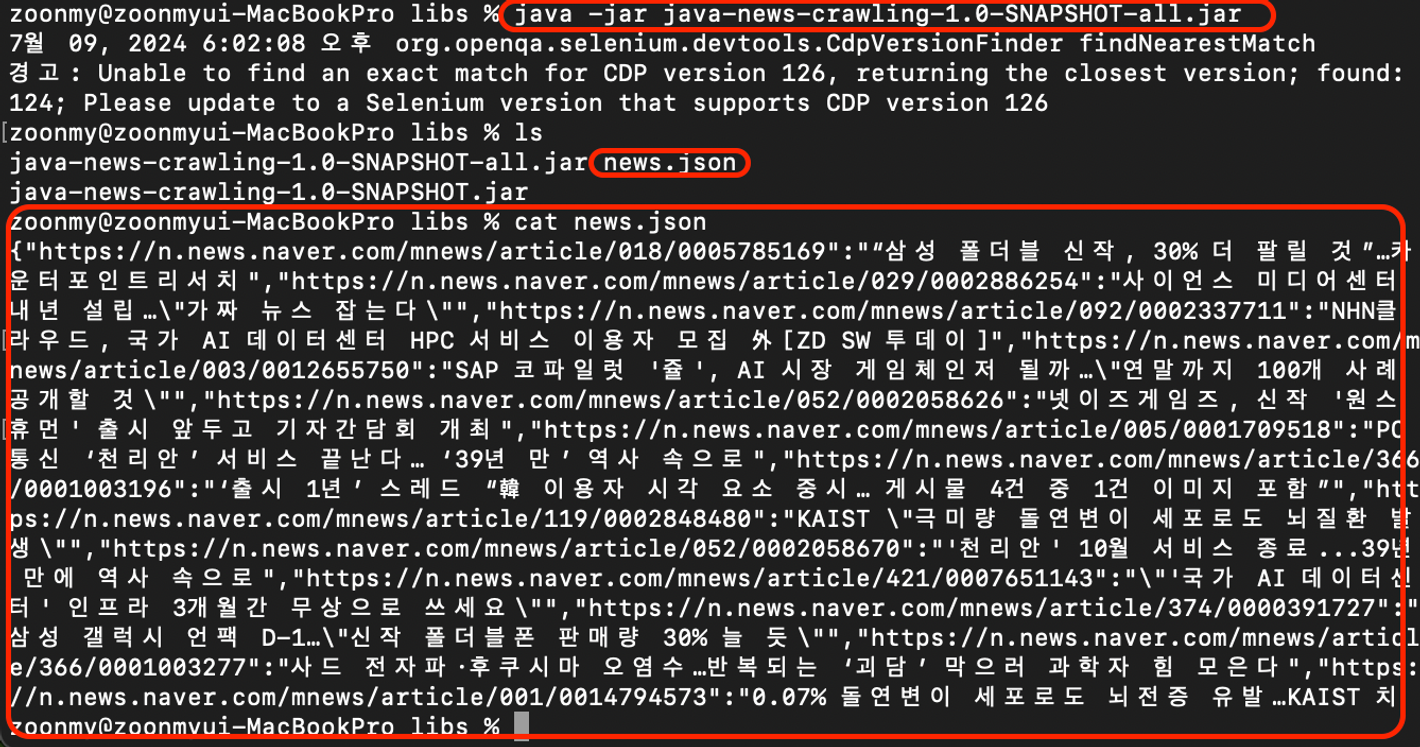
- 정상적으로
MAC 환경에서 크롤링이 잘 되어서,news.json파일이 생성된 것을 볼 수 있다!
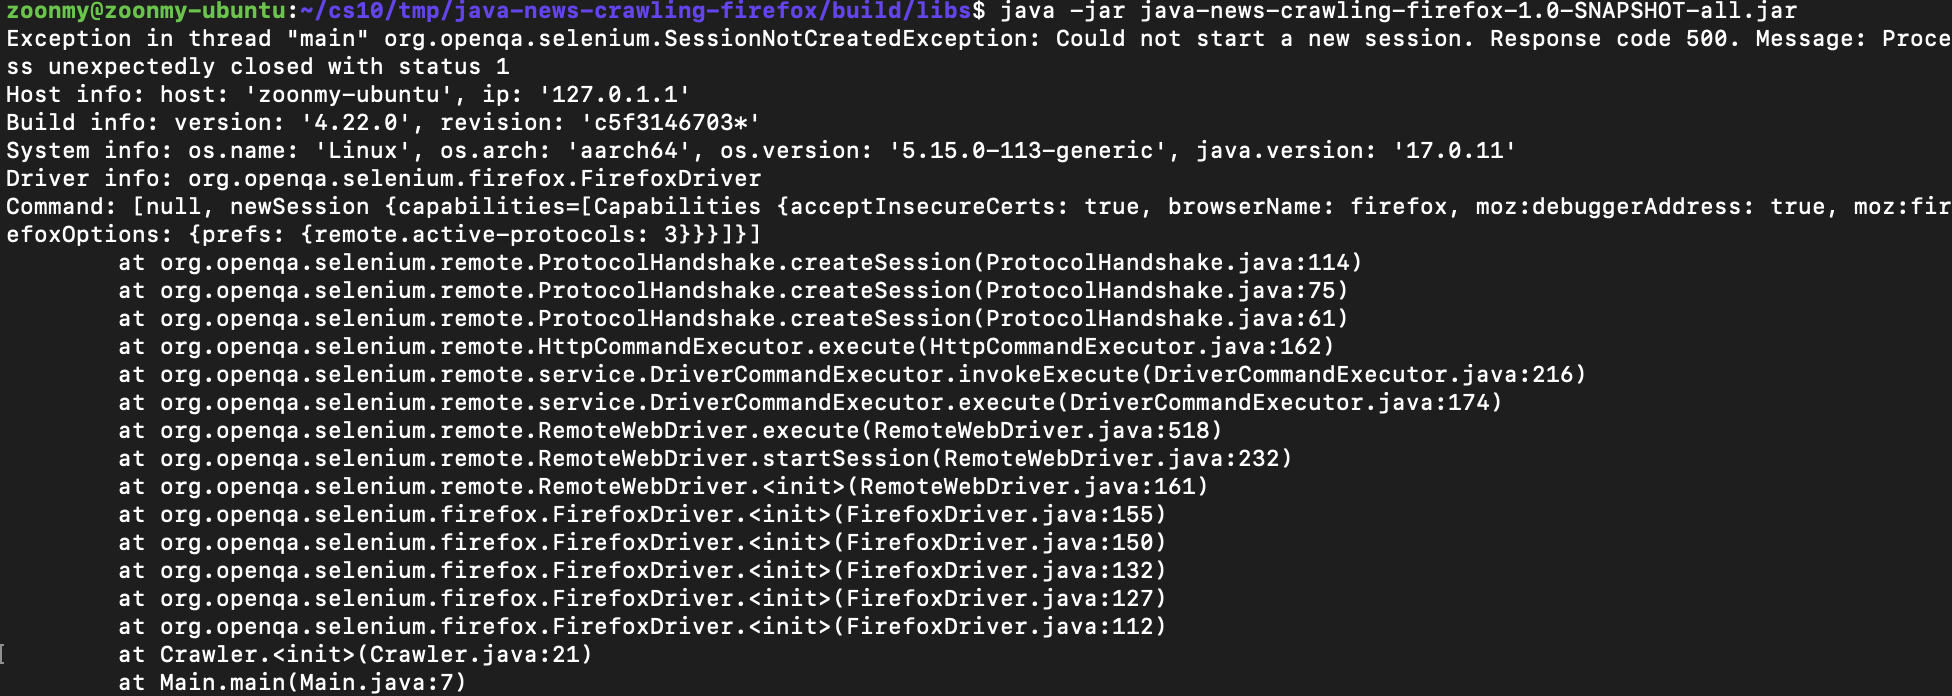
2) 가상환경 [Ubuntu Server] 에서의 실행 실패!
현재 Ubuntu 22.04 를 설치한 가상환경에서, Desktop 버전도 깔아놓은 상태였기 때문에 이제는 잘 될거라고 생각하고 mac에서 ubuntu로 옮겨서 실행해보았다.
하지만, 또 다른 문제가 생겼다.
- 오류 화면
해결
- 오류 메세지를 분석해보면,
Could not start a new Session이라고 적혀있다.
현재
.jar파일을 실행하고 있는 환경은Mac OS 터미널 -> ssh로 접속 (to Ubuntu)이다.즉,
Ubuntu Desktop환경이 아닌,Ubuntu Server환경이라고 볼 수 있다.
Ubuntu Server환경에서는GUI를 띄우지 못하기 때문에, 발생한 오류!
--headless 옵션을 통해 해결해주자
- 기존 코드 [오류 발생 코드]
private final WebDriver webDriver = new FirefoxDriver();- 개선 코드 [오류 해결 코드]
private final WebDriver webDriver;

public Crawler(){
        FirefoxOptions options = new FirefoxOptions();

        options.addArguments("--headless");  // headless 모드로 설정

        this.webDriver = new FirefoxDriver(options);  // 옵션을 사용하여 WebDriver 인스턴스 생성
}
--headless옵션을 통해Ubuntu Server환경에서도 동작할 수 있도록 개선하여 해결!