
Thymeleaf란?
타임리프는 스프링 부트에서 사용하는 view 템플릿 엔진이다. 쉽게 말해 프론트 화면을 구성할 수 있도록 해주고 스프링부트 단일 서버만으로 프론트와 백엔드 모두 처리할 수 있게 해준다.
주요 특징
- HTML 구조를 기반으로 작성된다. (문법이 그대로 적용!)
- 템플릿에 HTML 파일 필수
- Controller 에서 넘겨준 Model 데이터로 출력
- 반복, 조건문 지원
- return은 String으로
예제
@GetMapping("user") public String user(Model model) { Map<String, Object> user = new HashMap<>();
user.put("userId", "test1");
user.put("userName", "hihi");

---
아이디:<span>[[${user.userId}]]</span><br>
이름:<span>[[${user.userName}]]님</span><br>
이런식으로 컨트롤러에서 넘긴 값을 받아서 출력하게 된다.
값을 받는 방식은 총 3가지가 있다.
- [[...]]
- th:text="..."
th:text="${user.userId}" - data-th-text="..."
data-th-text="${user.userAge}"
1번은 컨트롤러의 값을 데이터로 치환해서 그대로 출력하는 방식이다.
2번은 가장 많이 쓰이는 방식으로 서버가 실행되어야 제대로 출력되고, 그렇지 않으면 아무것도 안 보이게 된다.
3번은 HTML5 엄격 검사 통과해야 할 때 사용된다.
list 형태로 넘기는 방식
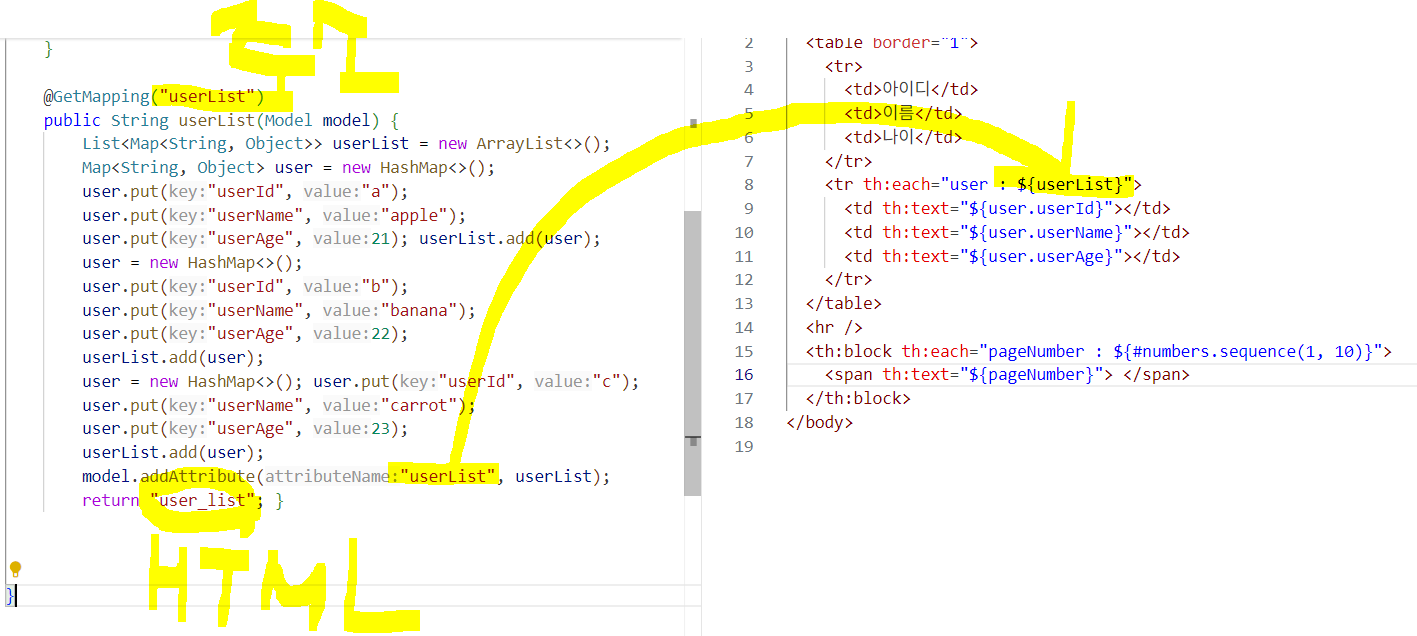
위의 사진처럼, 리스트로 받아서 넘기는 방법도 존재한다. 이때 attubuteName이 그대로 넘겨 사용된다. 리턴 옆에 string은 화면에 출력하게 될 html의 이름이다.
조건문
이름 : <span th:if="${name} != null" th:text="${name}"> </span>
<span th:unless="${name} != null" th:text="이름없음"></span>
<br />
권한 : <span th:text="${auth} != null ? ${auth} : '권한없음'"></span> <br />
담당 카테고리 :
<span th:switch="${category}">
  <span th:case="1"> 커뮤니티</span>
  <span th:case="2"> 장터</span>
  <span th:case="3"> 갤러리</span>
</span>
이런식으로 if문을 통해 값이 들어오면 값을, 없으면 이름없음으로 표시할 수 있고, case에 따라 다르게 출력하는 방식도 가능하다.
Pagination
웹사이트를 방문하면, 게시판 글에 페이지 번호 보이는 것은 기본 기능이다. 페이지 출력 코드를 간단히 정리해보자.
Controller 코드
@GetMapping("pagination")
    public String pagination( Model model,
    @RequestParam(defaultValue = "1") int page) {
    int startPage = (page-1) / 10* 10+ 1;
    int endPage = startPage + 9;
    model.addAttribute("startPage", startPage);
    model.addAttribute("endPage", endPage);
    model.addAttribute("page", page);
    return "pagination";
}- 현재 페이지를 기준으로 시작 페이지(startPage) 와 끝 페이지(endPage) 를 계산한다.
- 한 번에 10개 페이지 번호를 출력한다.
View 코드 1 (굵은 글씨 강조만)
<th:block th:each="pageNumber : ${#numbers.sequence(startPage, endPage)}">
  <span
    th:if="${page} == ${pageNumber}"
    th:text="${pageNumber}"
    style="font-weight: bold"
  ></span>
  <span th:unless="${page} == ${pageNumber}" th:text="${pageNumber}"></span>
</th:block><span>에 굵은 글씨 (font-weight: bold) 적용- 링크 이동 x
View 코드 2 (링크)
<th:block th:each="pageNumber : ${#numbers.sequence(1, 10)}">
  <a th:href="@{/linkUrl(page=${pageNumber})}" th:text="${pageNumber}"></a>
</th:block>
- 모두 링크 형태로 출력
- 각 페이지 번호를 클릭하면 이동

파랑입니다.