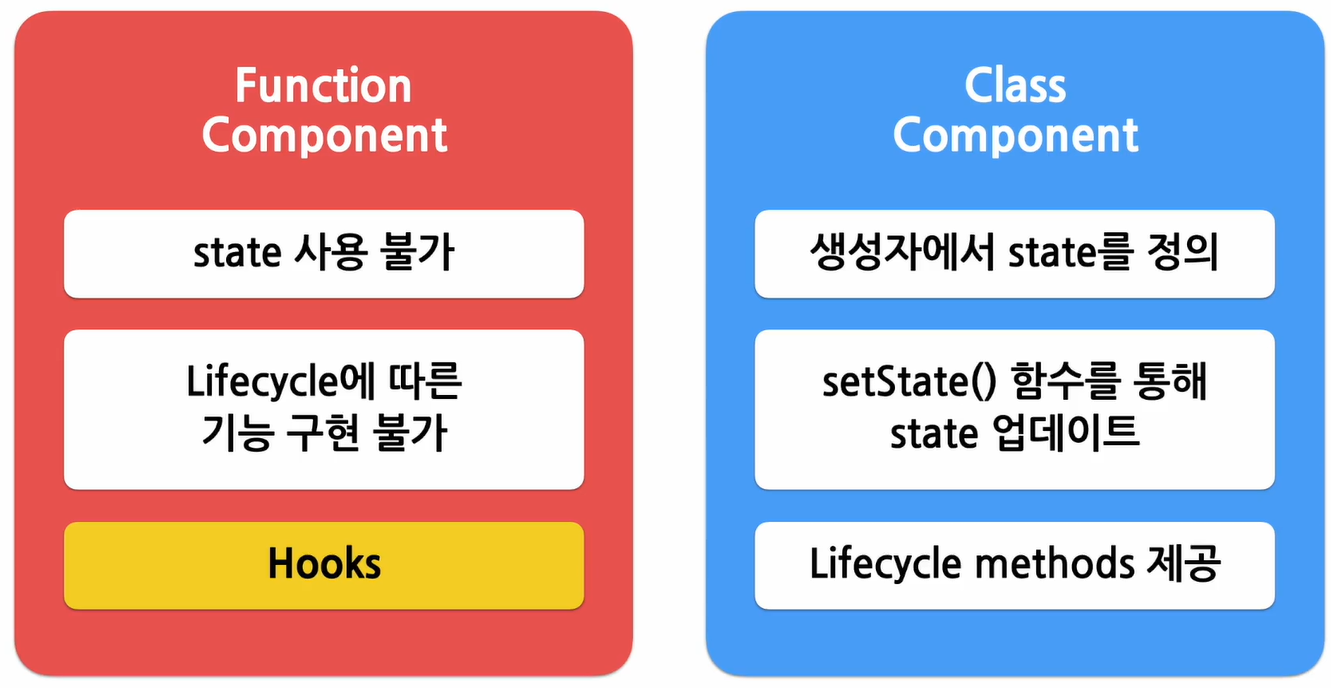
state & LifeCycle은 주로 클래스 컴포넌트와 관련됨.
State
리액트의 핵심 중 핵심!!!
- 리액트 Component의 상태 = 리액트 Component의 데이터
= 리액트 Componenet의 변경 가능한 데이터 - state는 사전에 미리 정해진 것이 아닌 React 컴포넌트를 개발하는 개발자가 정의함.
- 정의 시 중요한 점
- 렌더링이나 데이터 흐름에 사용되는 값만 state에 포함시켜야 함.
- 스테이트가 변경될 경우, 컴포넌트가 재렌더링 되기 때문에 렌더링과 데이터 흐름에 관련없는 값을 포함하면 불필요한 경우에 컴포넌트가 다시 렌더링되어 성능이 저하될 수 있기 때문이다.
- 따라서 렌더링과 데이터 흐름에 관련있는 값만 스테이트에 포함해야 함.
- 관련없다면 컴포넌트의 인스턴스 필드로 정의하면 됨.
- 렌더링이나 데이터 흐름에 사용되는 값만 state에 포함시켜야 함.
- state는 JavaScript 객체이다.
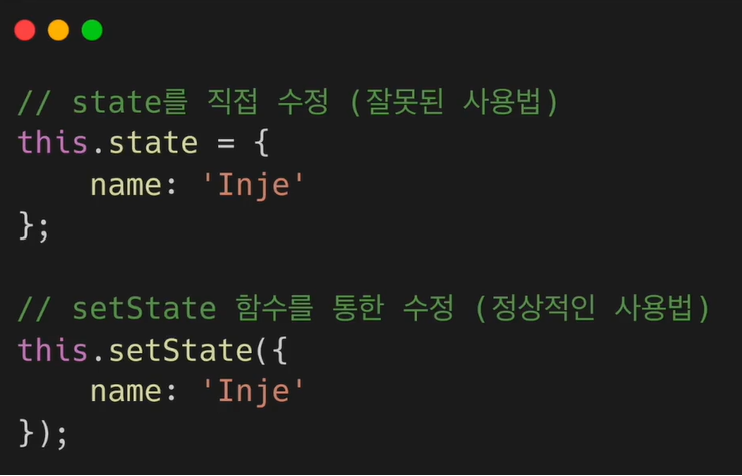
- state는 직접 수정할 수 없다(하면 안된다).
클래스 컴포넌트에서 state를 변경하고자 할 떄는 꼭 setState 함수를 사용해야 함.
LifeCylce
최근에는 클래스 컴포넌트를 거의 사용하지 않기 때문에 이런 개념이 있다는 것 정도만 알면 됨.
- 리액트 Component의 생명주기
- Unmount 되는 경우
* 상위 컴포넌트에서 현재 컴포넌트를 더 이상 화면에 표시하지 않게 될 때
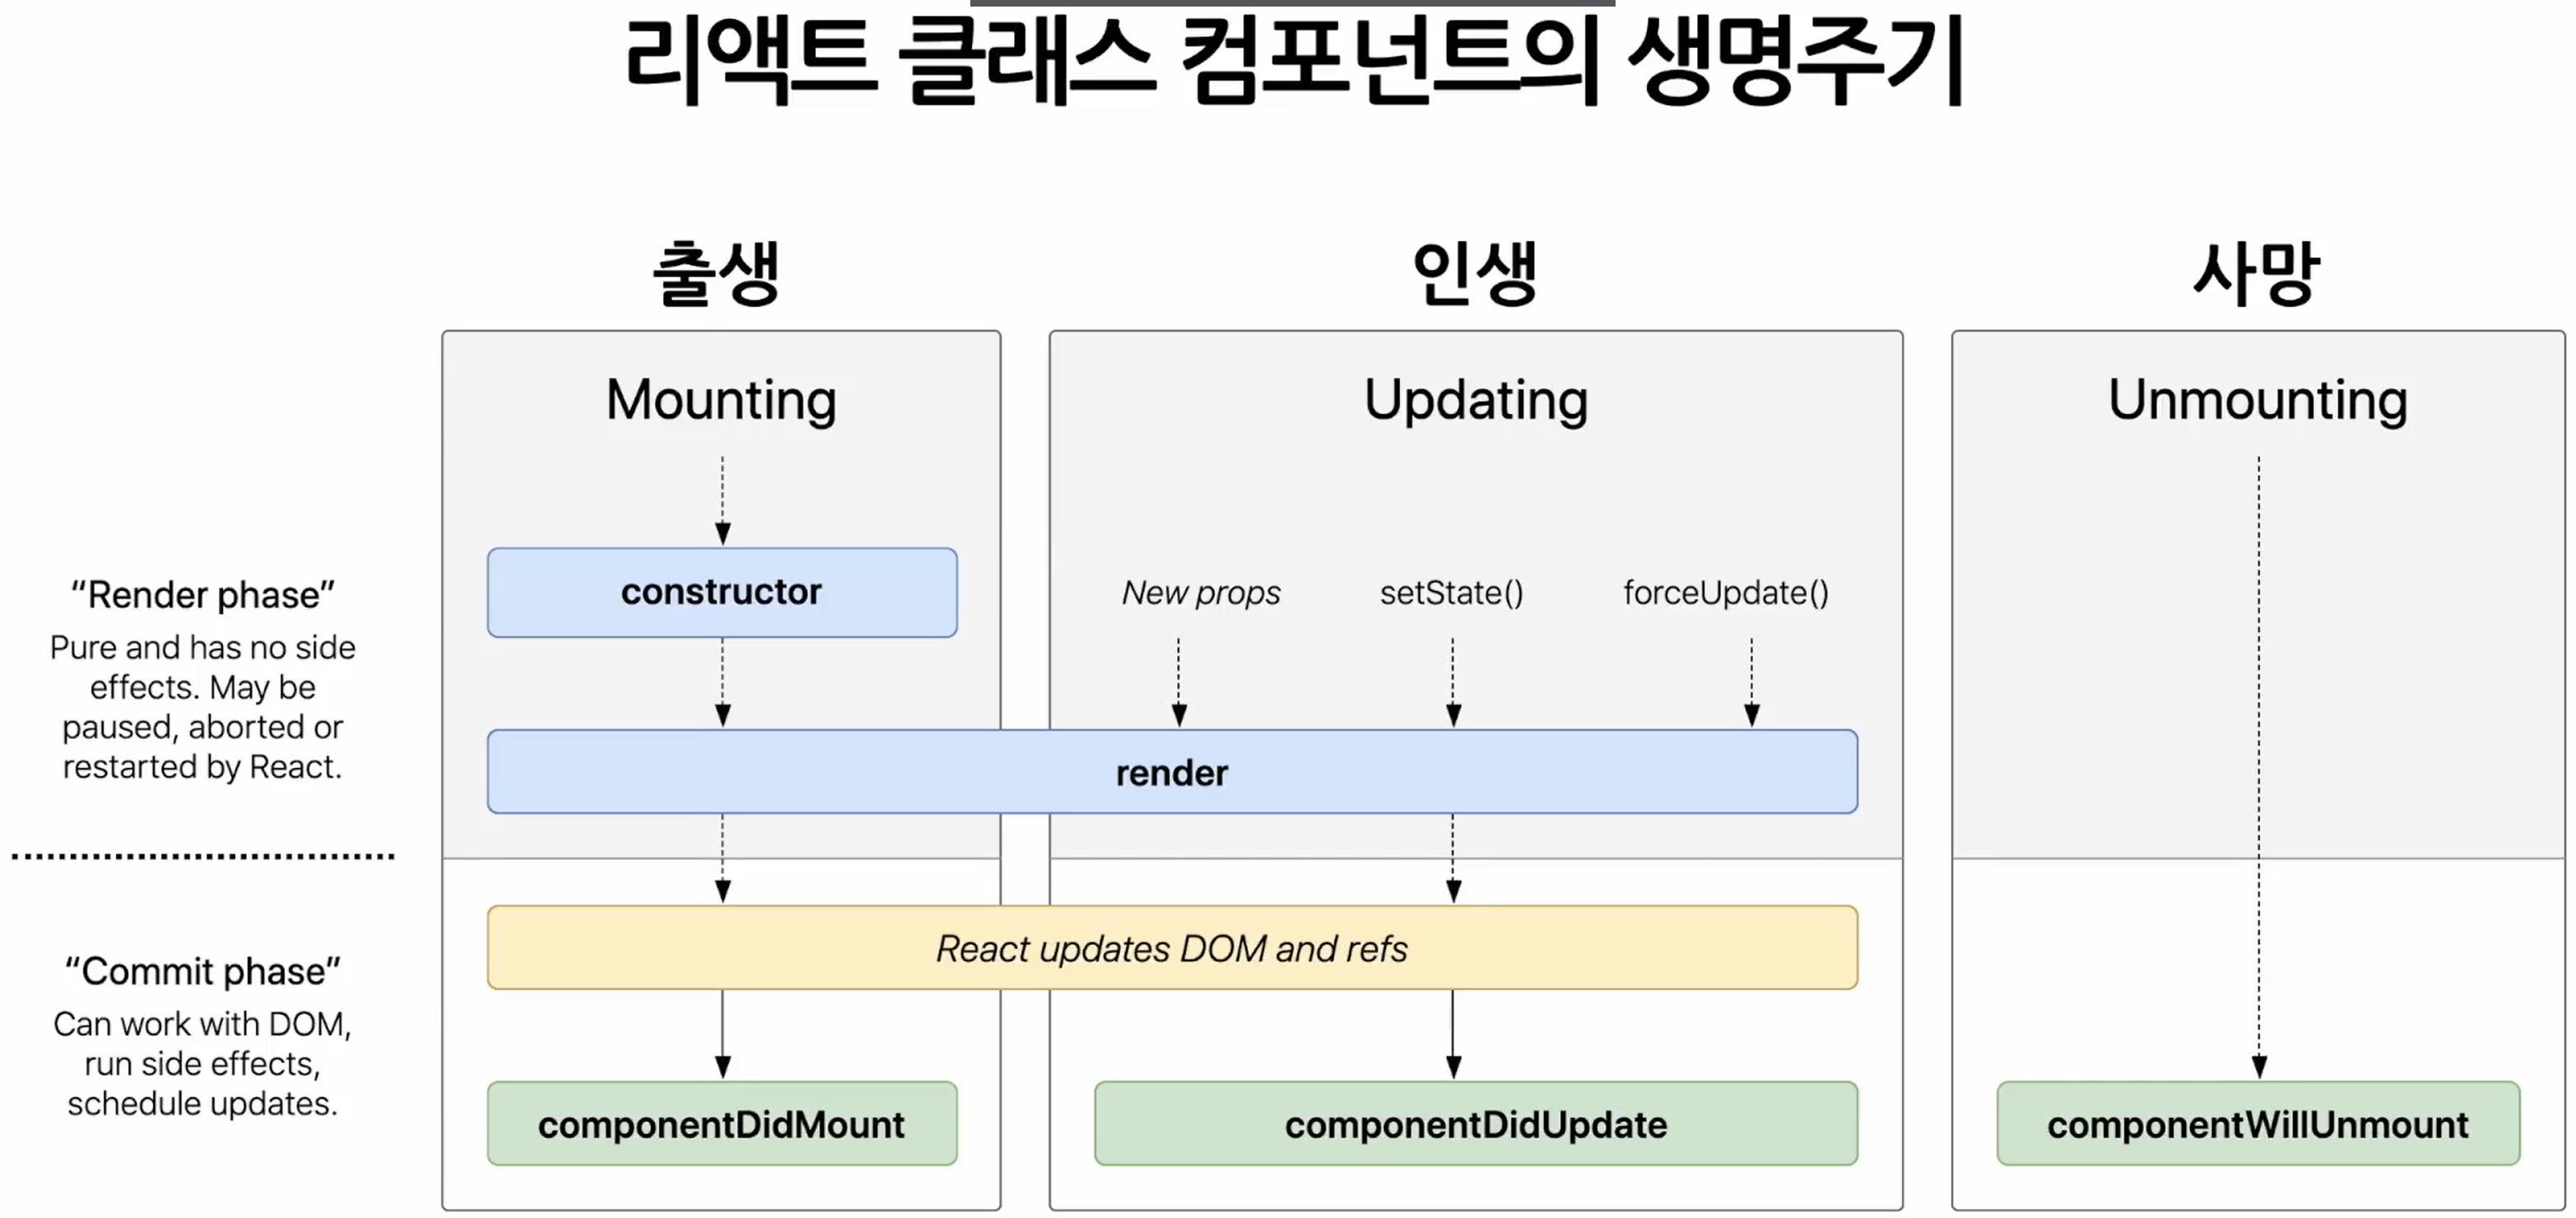
- Unmount 되는 경우
- Component는 계속 존재하는 것이 아니라 시간의 흐름에 따라 생성되고 업데이트 되다가 사라진다.
state 사용하기
import React from "react";

const styles = {
  wrapper: {
    margin: 8,
    padding: 8,
    display: 'flex',
    flexDirection: 'row',
    border: '1px solid grey',
    borderRadius: 16,
  },
  messageText: {
    color: 'black',
    fontSize: 16,
  },
};

class Notification extends React.Component {
  constructor(props) {
    super(props);

      this.state = {};
    }

    componentDidMount() {
      console.log(`${this.props.id} componentDidMount() called.`);
  }

    componentDidUpdate() {
      console.log(`${this.props.id} componentDidUpdate() called.`);
  }

    componentWillUnmount() {
      console.log(`${this.props.id} componentWillUnmount() called.`);
  }

  render() {
    return (
      <div style={styles.wrapper}>
        <span style={styles.messageText}>{this.props.message}</span>
      </div>
    );
  }
}

export default Notification;
import React from "react";
import Notification from "./Notification";
const reservedNotifications = [
{
id: 1,
message: "안녕하세요, 오늘 일정을 알려드립니다.",
},
{
id: 2,
message: "점심식사 시간입니다.",
},
{
id: 3,
message: "이제 곧 미팅이 시작됩니다.",
},
];
var timer;
class NotificationList extends React.Component {
constructor(props) {
super(props);
this.state = {
notifications: [],
};
}
componentDidMount() {
const { notifications } = this.state;
timer = setInterval(() => {
if (notifications.length < reservedNotifications.length) {
const index = notifications.length;
notifications.push(reservedNotifications[index]);
this.setState({
notifications: notifications,
});
} else {
this.setState({
notifications: [],
});
clearInterval(timer);
}
}, 1000);
}
componentWillUnmount() {
clearInterval(timer);
}
render() {
return (
<div>
{this.state.notifications.map((notification) => {
return <Notification key={notification.id} message={notification.message} />;
})}
</div>
);
}
}
export default NotificationList;import React from 'react';
import { createRoot } from 'react-dom/client';
import './index.css';
import App from './App';
import reportWebVitals from './reportWebVitals';
import Library from './chapter_03/Library';
import Clock from './chapter_04/Clock';
import CommentList from './chapter_05/CommentList';
import NotificationList from './chapter_06/NotificationList';
createRoot(document.getElementById('root')).render(
<React.StrictMode>
<NotificationList />
</React.StrictMode>
);
reportWebVitals();
Hooks
- 갈고리
원래 존재하는 어떤 기능에 마치 갈고리를 거는 것처럼 끼어들어가 같이 수행되는 것을 의미함. - hook이 수행하는 기능에 따라서 이름을 짓게 되었는데 각 기능을 사용하겠따는 의미로 use를 앞에 붙임.
개발자가 직접 커스텀 훅을 만들어 사용할 수도 있는데 이름 앞에 use를 붙여 hook이라는 것을 나타내야 함.
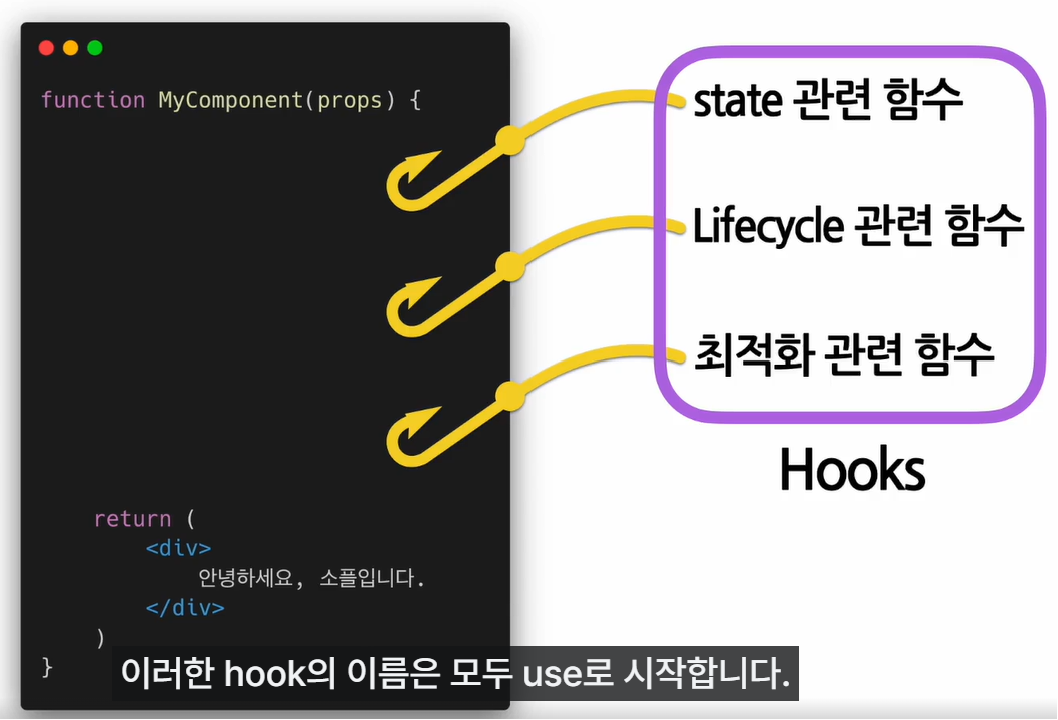
<대표적인 hook>
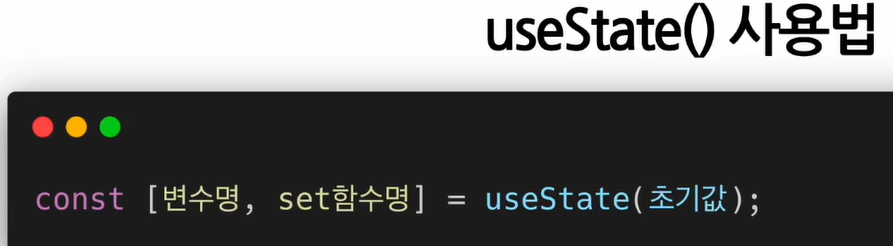
- useState()
: state를 사용하기 위한 hook- 함수 컴포넌트에서는 기본적으로 state라는 것을 제공하지 않기 때문에 class 컴포넌트처럼 state를 사용하고 싶으면 useState hook을 사용해야 한다.
- useState를 노출할 때는 파라미터로 선언할 state으이 초기값이 들어간다. 클래스 컴포넌트의 생성자에서 state를 선언할 때 초기값을 넣어주는 것과 동일한 것이다. 이렇게 초기값을 넣어 useState를 노출하면 return 값으로 배열이 나온다. 배열
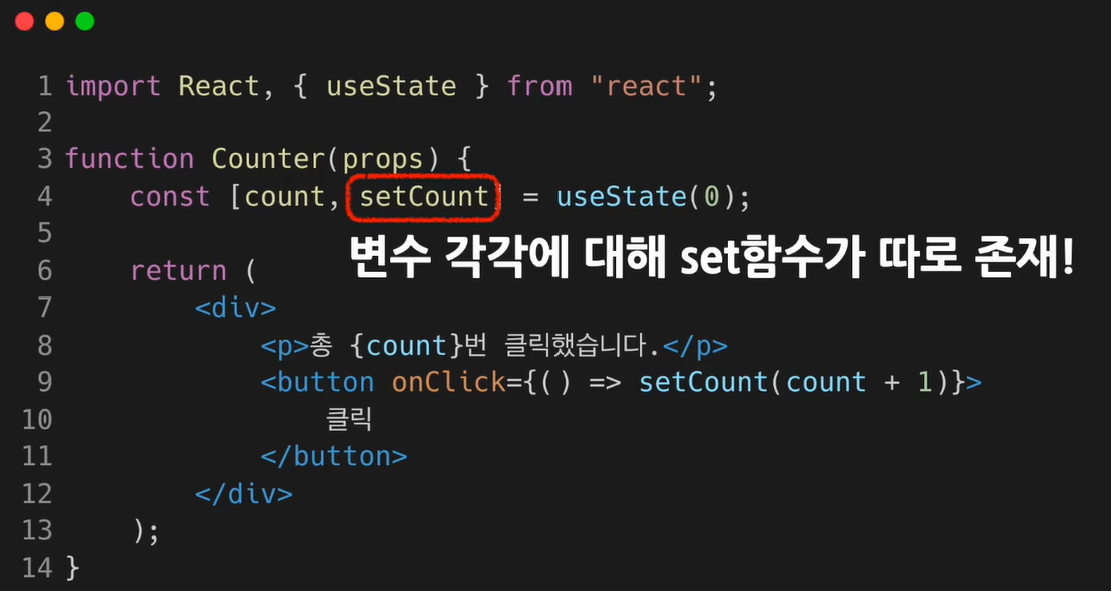
첫 번째는state로 선언된 변수,두 번째는해당 state의 set함수이다.
- 클래스 컴포넌트에서는 setState함수 하나를 사용해 모든 state값을 업데이트 할 수 있었지만 useState를 사용할 때는 변수 각각에 대해 set함수가 따로 존재함.
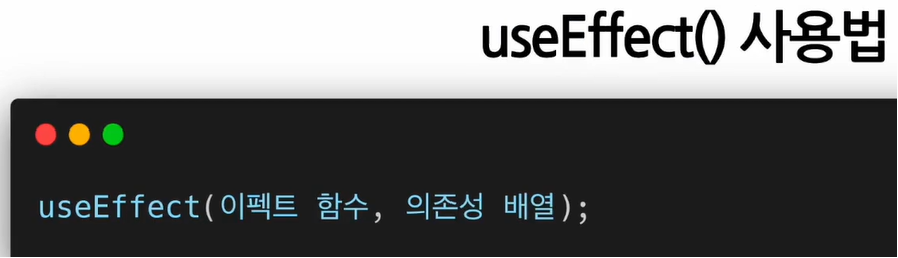
- useEffect()
: Side effect(부작용 but, React에서는 효과, 영향)를 수행하기 위한 Hook
: 클래스 컴포넌트에서 제공하는 생명 주기 함수와 동일한 기능을 하나로 통합해 제공함.- React에서는 부정적 의미로 사용되지 않지만 effect라고 하는 이유 : 다른 컴포넌트에 영향을 미칠 수 있으며 렌더링 중에는 작업이 완료될 수 없기 때문. 렌더링 끝난 이후 실행되어야 하는 작업들
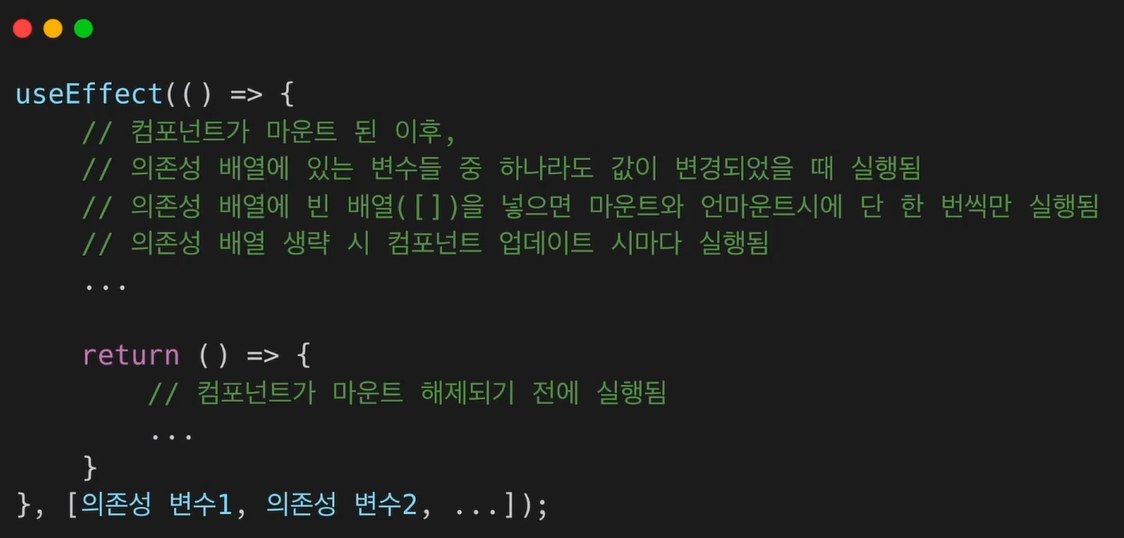
이런 작업들이 사이드로 실행된다는 의미에서 Side effect라고 불림. - 의존성 배열 : 이 이펙트가 의존하고 있는 배열. 배열 안에 있는 변수 중에 하나라도 값이 변경되었을 때 이펙트 함수가 실행된다.
- 이펙트 함수가 mount와 unmount시 단 한 번만 실행되게 하고 싶으면 의존성 배열에 빈 배열을 넣으면 된다. - 해당 이펙트가 props나 state에 있는 어떤 값에도 의존하지 않는 것이 되어 여러 번 실행되지 않는다.

- 의존성 배열 생략 시 컴포넌트가 업데이트 될 때마다 호출됨

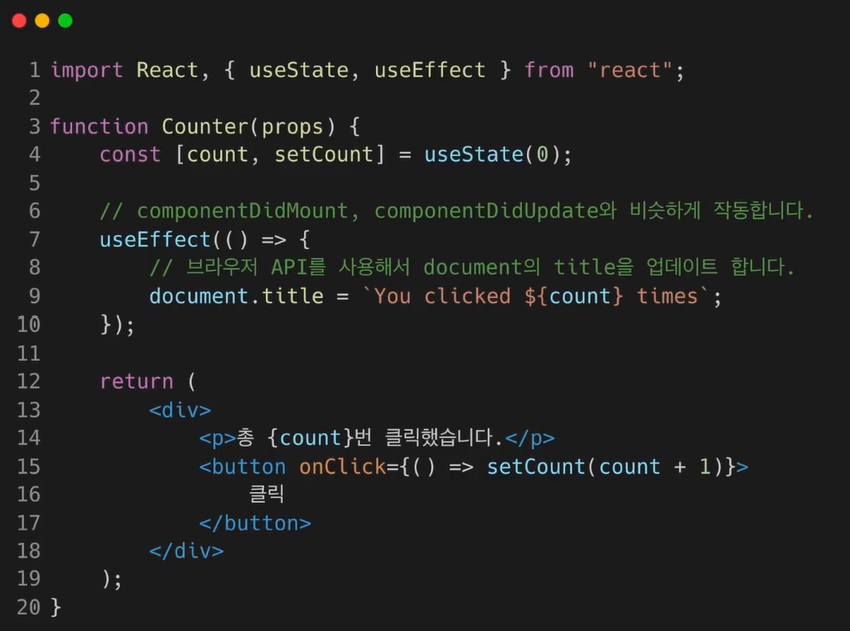
- 이 코드는 이펙트 함수가 처음 컴포넌트가 마운트 됐을 때 실행되고 이후 컴포넌트가 업데이트 될 때마다 실행된다. 결과적으로 componentDidMount, componentDidUpdate와 동일한 역할을 함.
또한 이펙트는 함수 컴포넌트 안에서 선언되기 때문에 해당 컴포넌트의 props와 state에 접근할 수도 있다. 이 코드에서는 count라는 state에 접근하여 해당 값이 포함된 문자열을 생성해 사용함.
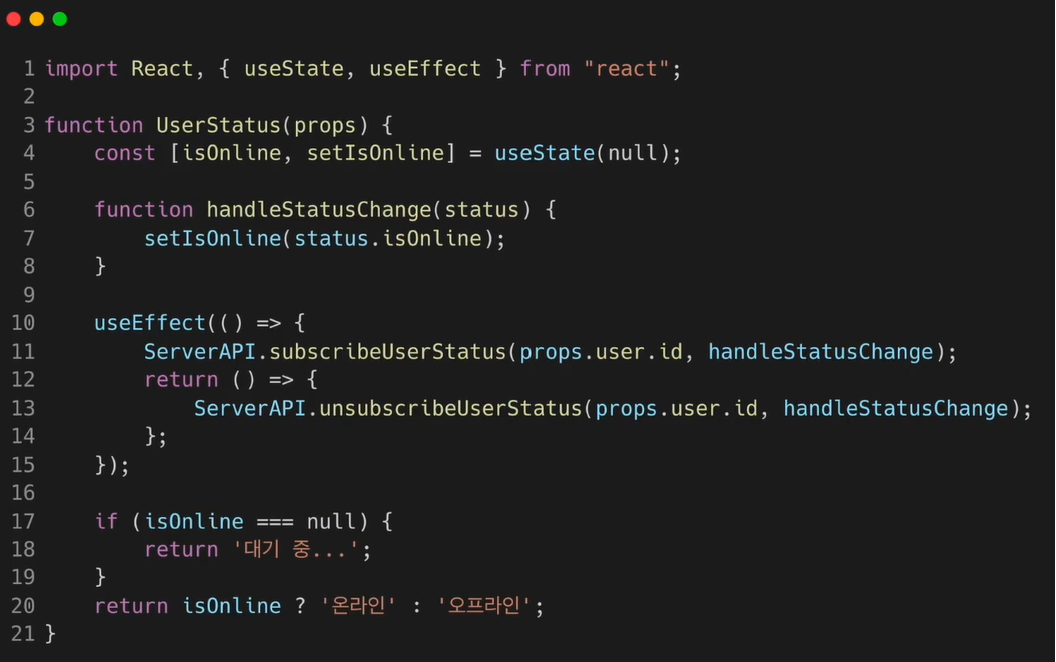
- 이 코드는 componeneWillUnmount와 동일한 기능.
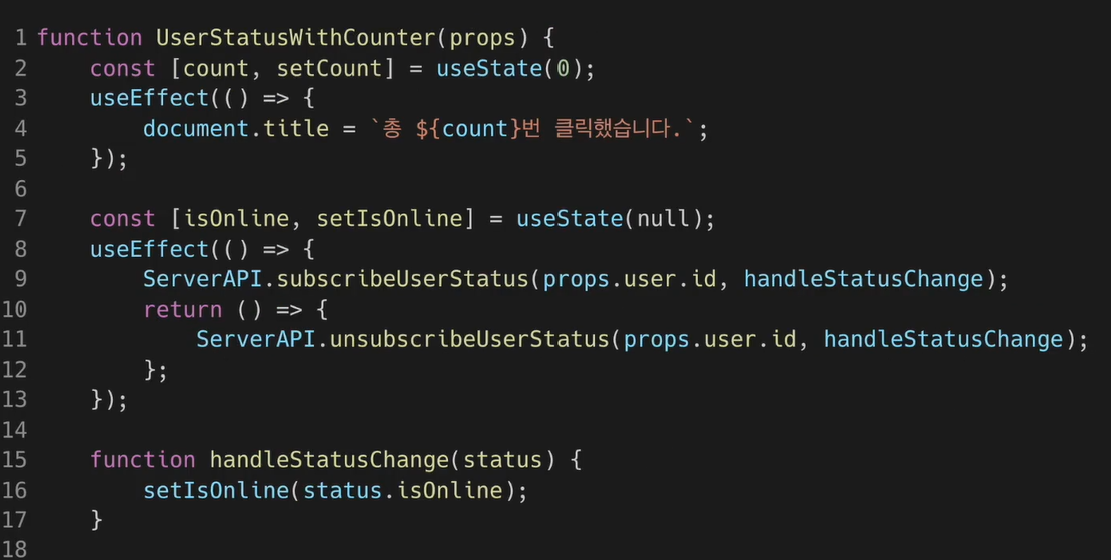
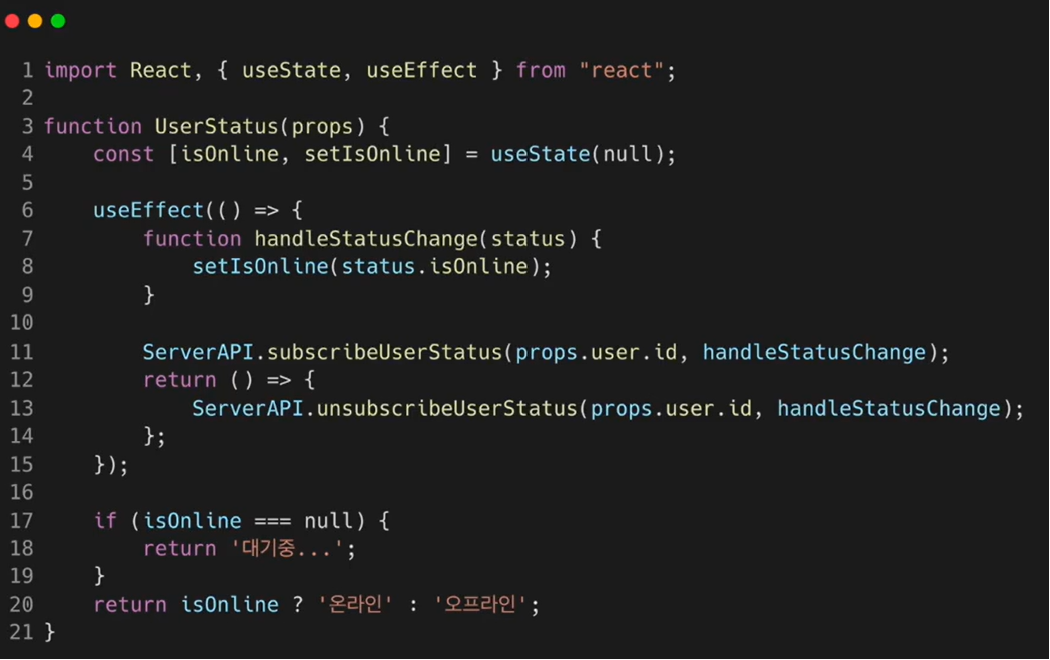
1) useEffect에서 먼저 서버 API를 사용해 사용자의 상태를 구독
2) 함수를 리턴return () => { Server ~};하는데 해당 함수 안에는 구독을 해지하는 API를 호출하도록 되어 있음. useEffect에서 리턴하는 함수는 컴포넌트가 unmount될 때 호출됨.
3) 결과적으로 useEffect의 리턴함수 역할을 componentWillUnmount함수와 동일한 역할을 함
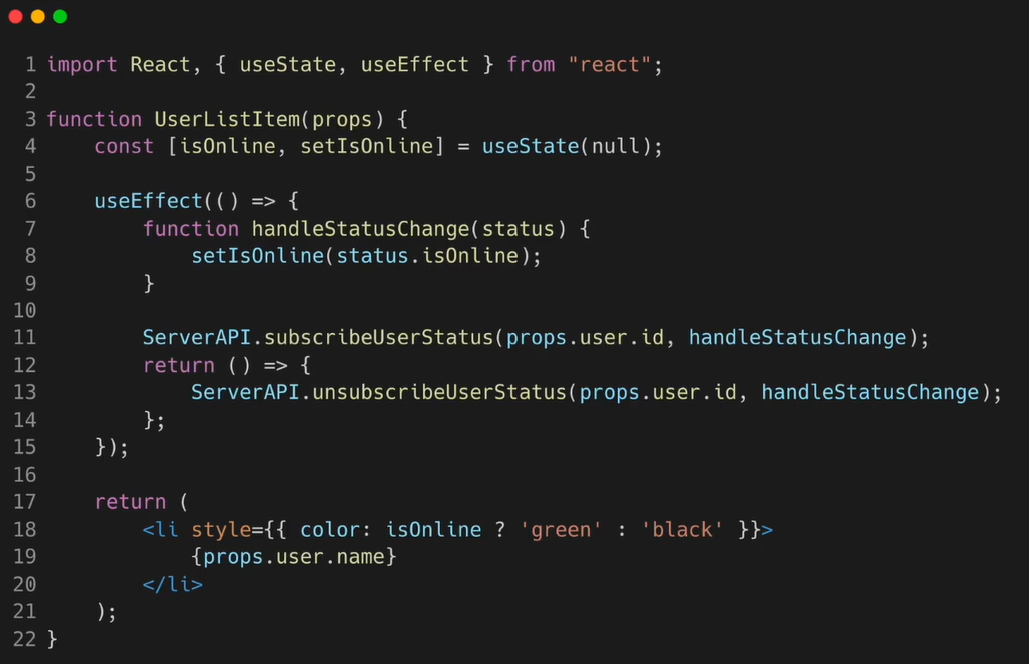
- 2개의 useEffectHook을 사용하는 코드.
useStateHook과 useEffectHook을 각각 두 개씩 사용함.
- 정리
- React에서는 부정적 의미로 사용되지 않지만 effect라고 하는 이유 : 다른 컴포넌트에 영향을 미칠 수 있으며 렌더링 중에는 작업이 완료될 수 없기 때문. 렌더링 끝난 이후 실행되어야 하는 작업들
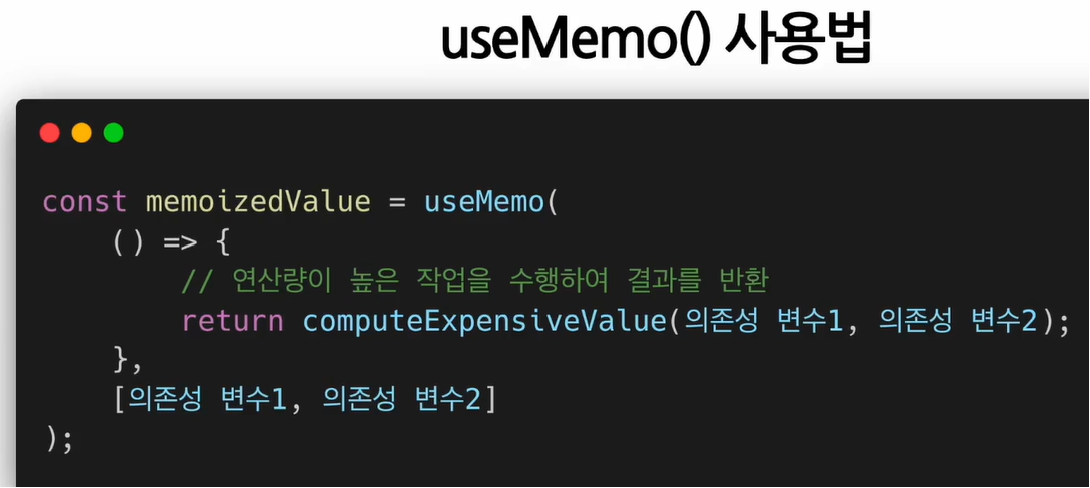
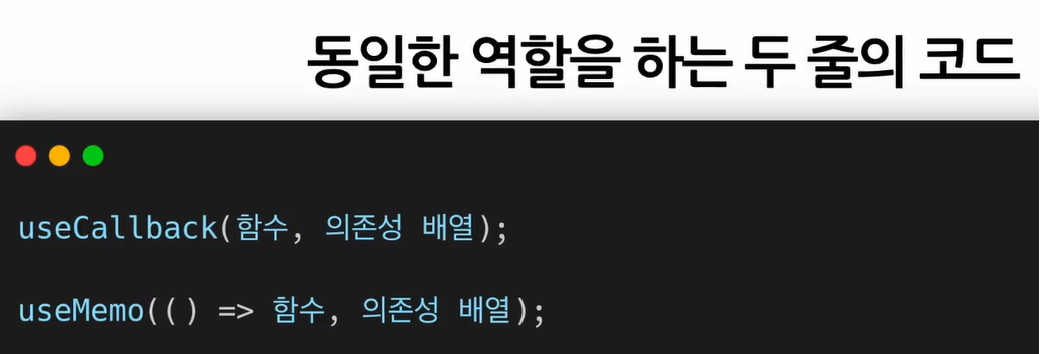
- useMemo()
: Memoized value를 리턴하는 Hook- Memoization : 최적화를 위해 사용하는 개념. 비용이 높은 = 연산량 많이 드는 함수의 호출 결과를 저장해두었다가 같은 입력 값으로 함수를 호출하면 새 함수를 호출하지 않고 이전에 저장해둔 호출 결과를 바로 반환. -> 결과적으로 호출 결과를 받기까지 걸리는 시간 단축 + 불필요한 중복연산 하지 않아 컴퓨터 자원 절약
=>메모를 해두었다가 나중에 다시 사용한다. - Memoized Value : Memoization된 결과 값
- 파라미터로 Memoized Value를 생성하는 creat함수와 의존성 배열을 받음.
의존성 배열에 들어있는 변수가 변했을 때만 새 create함수를 노출하여 결과값 반환. 그렇지 않은 경우 기존함수의 결과값 그대로 반환.
useMemo Hook을 사용하면 컴포넌트가 다시 렌더링 될 때마다 연산량이 높은 작업 반복하는 것을 피할 수 있다(결과적으로 빠른 렌더링 속도).
useMemo로 전달된 함수는 렌더링이 일어나는 동안 실행됨. 따라서 일반적으로 렌더링이 일어나는 동안 실행돼서는 안 될 작업을 useMemo의 함수의 넣으면 안 됨.- 예) useEffect Hook에서 실행돼야 할 sideEffect - 서버에서 데이터를 받아오거나 수동으로 DOM을 변경하는 작업 등은 렌더링이 일어나는 동안 실행돼선 안되기 때문에 useMemo Hook 함수에 넣으면 안 됨.
- 예) useEffect Hook에서 실행돼야 할 sideEffect - 서버에서 데이터를 받아오거나 수동으로 DOM을 변경하는 작업 등은 렌더링이 일어나는 동안 실행돼선 안되기 때문에 useMemo Hook 함수에 넣으면 안 됨.
- 의존성 배열을 넣지 않을 경우, 렌더링 일어날 때마다 매번 create함수 실행됨. 따라서 useMemo Hook에 의존성 배열을 넣지 않고 사용하는 것은 아무 의미가 없다.

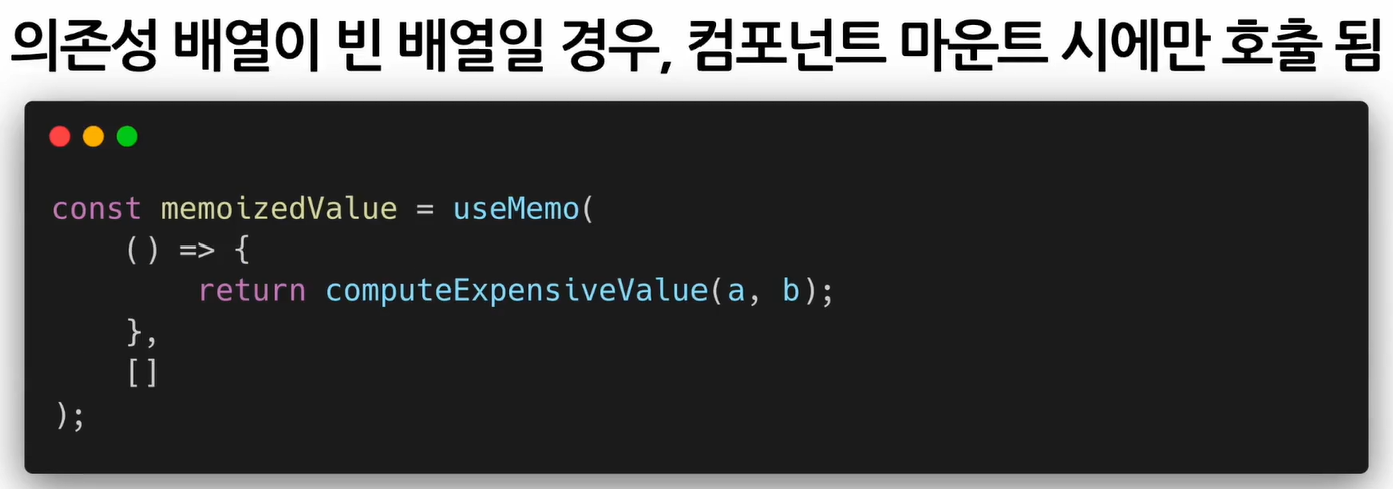
- 의존성 배열에 빈 배열을 넣을 경우, 컴포넌트 마운트 될 때만 creat함수 호출됨. 결국 마운트 이후에는 값이 변경되지 않는 것.
- 마운트 시점에만 한 번 값을 계산할 필요가 있는 경우 이렇게 사용하면 됨. 하지만 대부분 useMemo Hook에 의존성 배열 변수들을 넣고 해당 변수들의 값이 바뀜에 따라 새로 값을 계산해야 할 경우 사용함.
- Memoization : 최적화를 위해 사용하는 개념. 비용이 높은 = 연산량 많이 드는 함수의 호출 결과를 저장해두었다가 같은 입력 값으로 함수를 호출하면 새 함수를 호출하지 않고 이전에 저장해둔 호출 결과를 바로 반환. -> 결과적으로 호출 결과를 받기까지 걸리는 시간 단축 + 불필요한 중복연산 하지 않아 컴퓨터 자원 절약
- useCallback
: useMemo() Hook과 유사하지만 값이 아닌 함수를 반환.
: 컴포넌트가 렌더링 될 때마다 함수를 새로 정의하는 것이 아닌 의존성 배열의 값이 바뀐 경우에만 함수를 새로 정의해 리턴하는 것.- 함수, 의존성 배열을 파라미터로 받음. 파라미터로 받는 함수를
callback이라고 부름. 의존성 배열에 있는 변수 중 하나라도 변경되면 Memoization된 callback함수를 반환함.
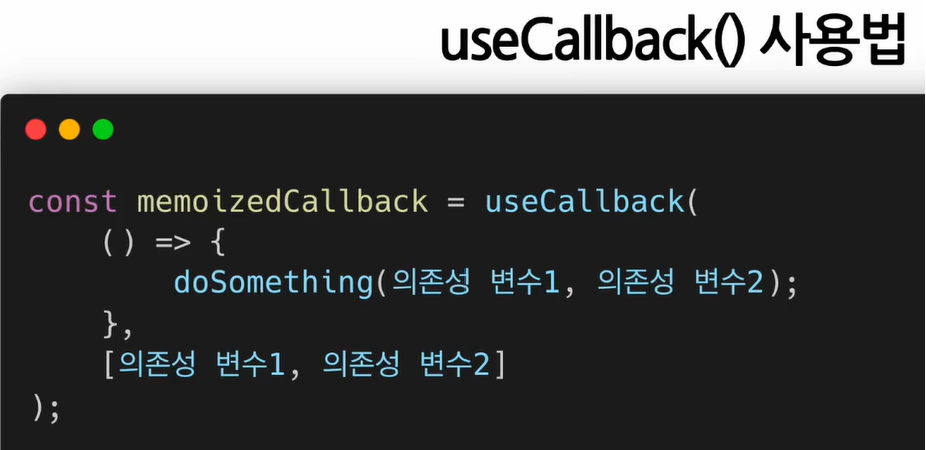
- 의존성 배열에 따라 Memoized 값을 반환한다는 점에서 useMemo Hook과 완전히 동일함.
useCallback Hook을 사용해 특정 변수의 값이 변한 경우에만 함수를 다시 정의하도록 해 불필요한 반복 작업을 없앰.
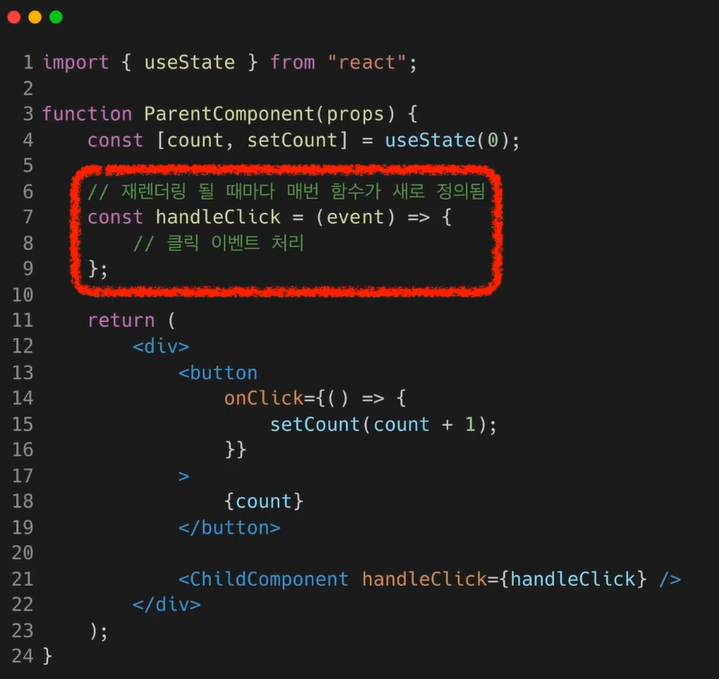
- 컴포넌트 내에서 정의한 함수를 자식 컴포넌트의 props로 넘겨 사용하는 경우 )
부모 컴포넌트가 다시 렌더링이 될 때마다 매번 자식 컴포넌트도 렌더링됨.
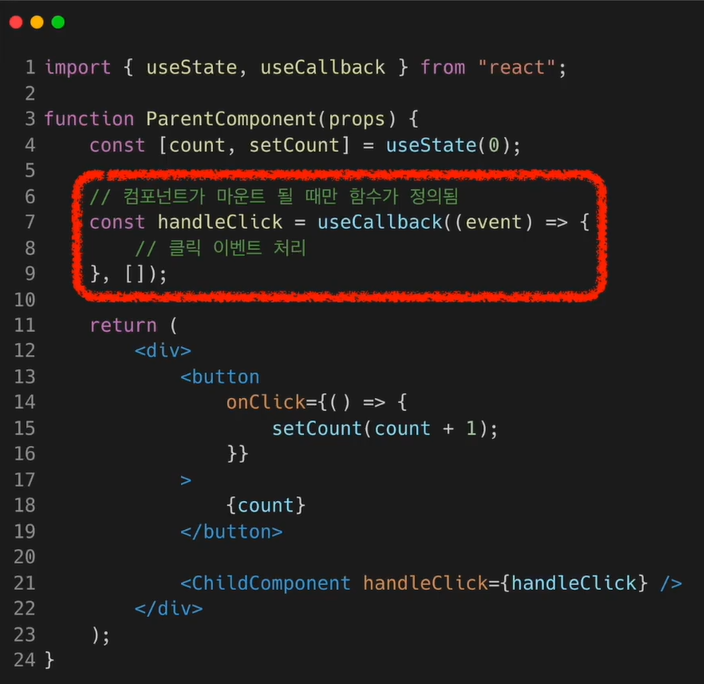
- useCallback Hook 사용 시 )
특정 변수의 값이 변한 경우에만 함수를 다시 정의하게 되어 함수가 다시 정의되지 않는 경우에는 자식 컴포넌트도 재렌더링 일어나지 않음.
이 경우 의존성 배열에 빈 배열이 들어갔기 때문에 컴포넌트가 처음 마운트 되는 시점에만 함수가 정의되고 이후에는 다시 정의되지 않아 자식 컴포넌트도 불필요하게 재렌더링 되지 않음.
- 함수, 의존성 배열을 파라미터로 받음. 파라미터로 받는 함수를
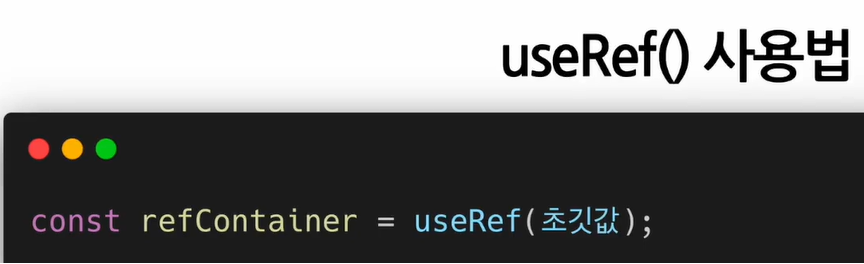
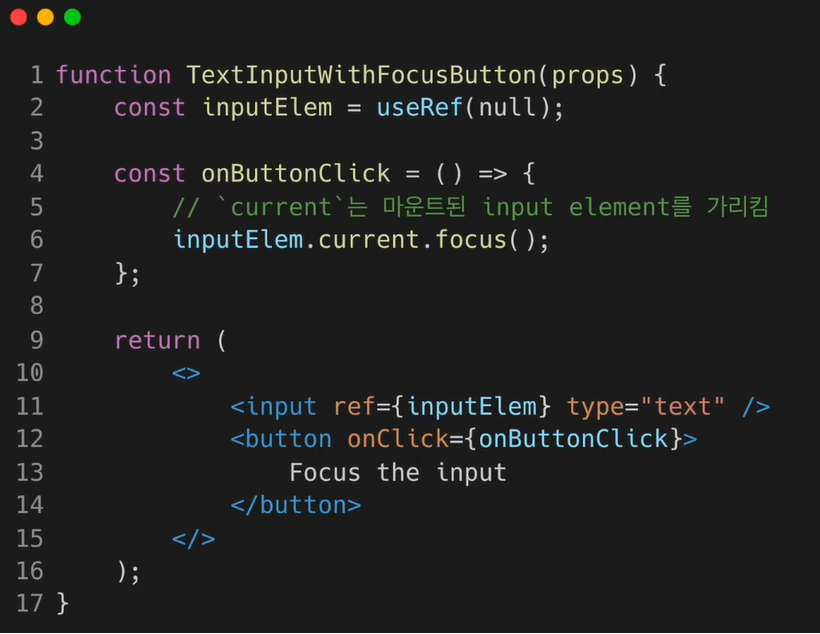
- useRef()
: Reference를 사용(반환)하기 위한 Hook.- Reference : 특정 컴포넌트에 접근할 수 있는 객체
- refObject.current
current속성은현재 참조하고 있는 Element를 의미함. - 파라미터로 초기값을 넣으면 해당 초기값으로 초기화된 레퍼런스 객체를 반환함.
초기값이 null이면 current의 값이 null인 레퍼런스 객체가 반환됨.
반환된 레퍼런스 객체는 컴포넌트의 LifeTime 전체에 걸쳐 유지됨. 즉, 컴포넌트 마운트 해제 전까지 계속 유지됨.
useRef Hook은 변경 가능한 current라는 속성을 가진 하나의 상자.
- useRef Hook을 사용해 버튼 클릭 시 input에 포커스 하도록 하는 코드. 초기 값으로 null을 넣었고 결과로 반환된 inputElim이라는 레퍼런스 객체를 input 태그에 넣어줌. 그리고 버튼 클릭 시 호출되는 함수에서 inputElim.current를 통해 실제 엘리먼트에 접근하여 포커스 함수를 호출함.
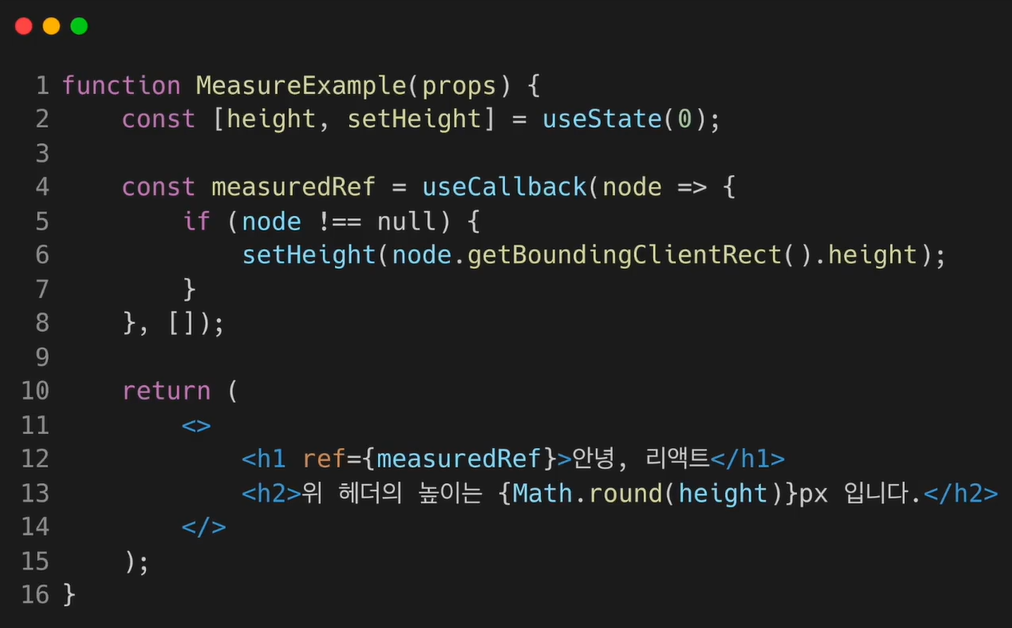
- useRef() Hook은 내부의 데이터가 변경됐을 때 별도로 알리지 않는다.
따라서 current속성을 변경한다고 해서 재렌더링이 일어나지 않음. 돕노드의 변화를 알기 위한 가장 기초적인 방법은 Callback ref를 사용하는 것. React는 ref가 다른 노드에 연결될 때마다 callback을 호출함.
Hook의 규칙
단순한 JavaScript 함수지만 두 가지 지켜야 할 규칙이 있다.
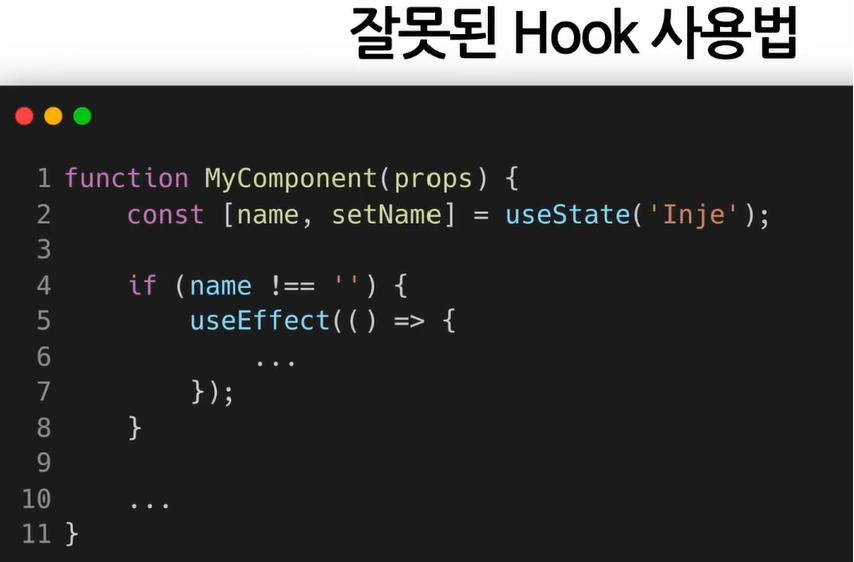
1. Hook은 무조건 최상위 레벨(React함수 컴포넌트)에서만 호출해야 한다.
따라서 반복문, 조건문 또는 중첩된 함수 안에서 Hook을 호출하면 안 된다.
이 규칙에 따라 Hook은 컴포넌트가 렌더링될 때마다 매번 같은 순서로 호출돼야 한다. 그래야 React가 다수의 useState Hook과 useEffect Hook에 호출해서 컴포넌트의 state를 올바르게 관리할 수 있다.
리액트 함수 컴포넌트에서만Hook을 호출해야 한다.
따라서 일반적인 자바스크립트 함수에서 Hook을 호출하면 안 된다. React함수 컴포넌트, 직접 만든 커스텀 Hook에서만 호출할 수 있다. 이 규칙에 따라 React 컴포넌트에 있는 state와 관련된 모든 로직은 소스 코드를 통해 명확하게 확인 가능해야 한다.
eslint-plugin-react-hooks
Custom Hook 만들기
목적 : 반복적으로 사용되는 로직을 Hook으로 만들어 재사용하기 위함.
<Custom Hook을 만들어야 하는 상황>
- 중복되는 코드
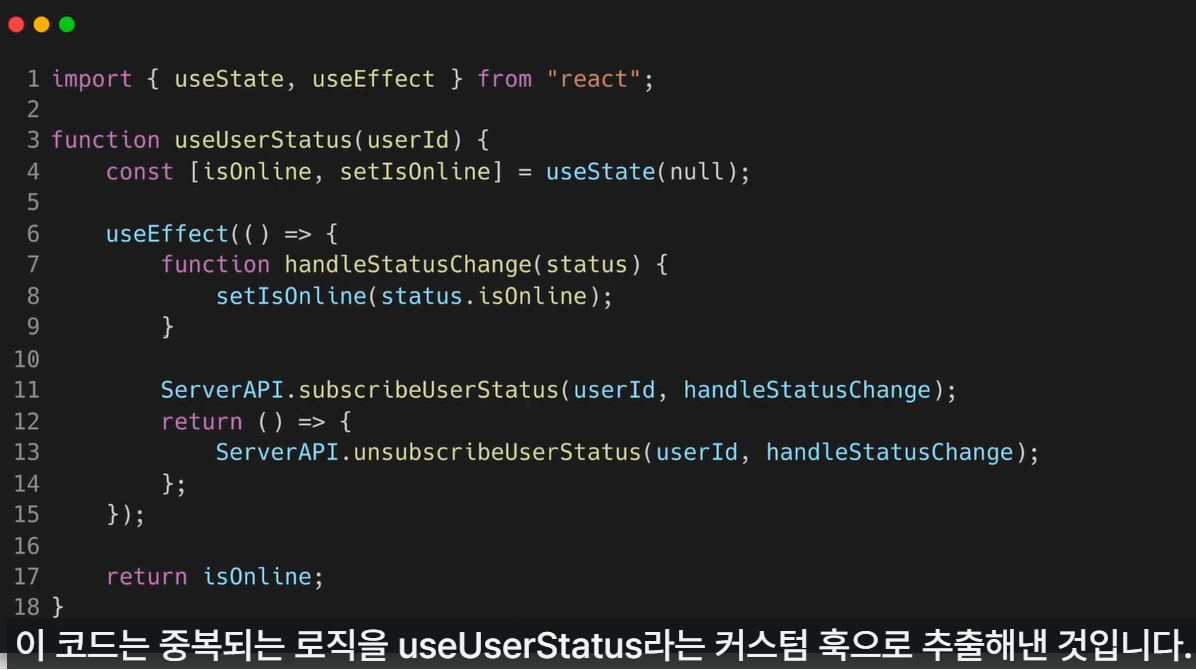
- Custom Hook 추출하기
: 두 개의 자바스크립트 함수에서 하나의 로직을 공유하도록 하고 싶을 때는 새로운 함수를 하나 만드는 방법을 사용한다. React함수 컴포넌트와 Hook은 모두 함수이기 때문에 동일한 방법을 사용할 수 있는 것이다. - Custom Hook은 이름이
use로 시작하고 내부에서 다른 Hook을 호출하는 하나의 자바스크립트 함수다. - 두 개의 컴포넌트에서 중복되는 로직을 추출해 가져온 것. 다만 다른 컴포넌트 내부에서와 마찬가지로 다른 훅을 호출하는 것은 무조건 커스텀 훅의 최상위 레벨에서만 해야 한다. React컴포넌트와 달리 커스텀 훅은 특별한 규칙이 없다(파라미터의 값에 대한). 개발자가 직접 정할 수 있다. 즉, 단순한 함수와도 같다. 훅의 2가지 규칙은 적용된다.
- Custom Hook 사용하기
동작에는 변경없고 중복되는 로직만 추출해 커스텀 Hook으로 만든 것.
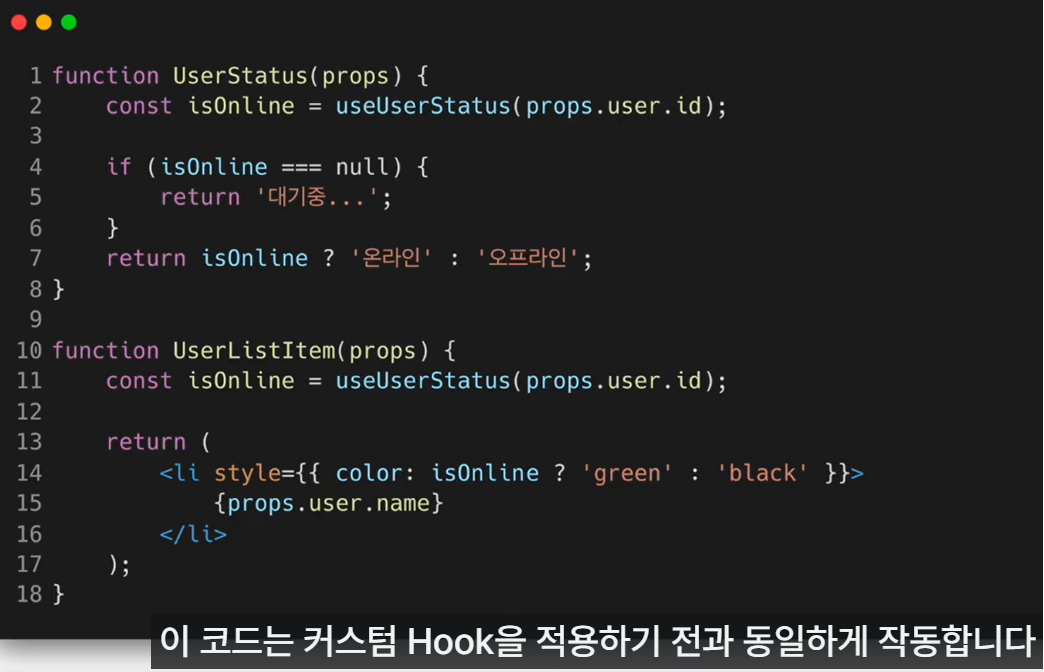
- Custom Hook 이름은
반드시 use로 시작해야 한다. - 여러 개의 컴포넌트에서 하나의 Custom Hook을 사용할 때 컴포넌트 내부에 있는 모든 state와 effects는 전부 분리되어 있다.
- React 컴포넌트는 각각의 Custom Hook 호출에 대해 분리된 state를 얻게 되기 때문.
- 각 Custom Hook의 호출 또한 완전히 독립적이다.
- Custom Hook 이름은
- Hook들 사이에서 데이터를 공유하는 방법
- useState Hook을 사용해 userId라는 state를 만듦. 현재 선택된 사용자의 아이디를 저장하기 위한 용도. 이 유저 아이디는 useUserStatus Hook의 파라미터로 들어감. 이를 통해 setUserID 함수를 통해 유저 아이디가 변경될 때 마다 useUserStatus Hook은 이전에 선택된 사용자를 구독 취소하고 새로 선택된 사용자의 온라인 여부를 구독하게 됨.
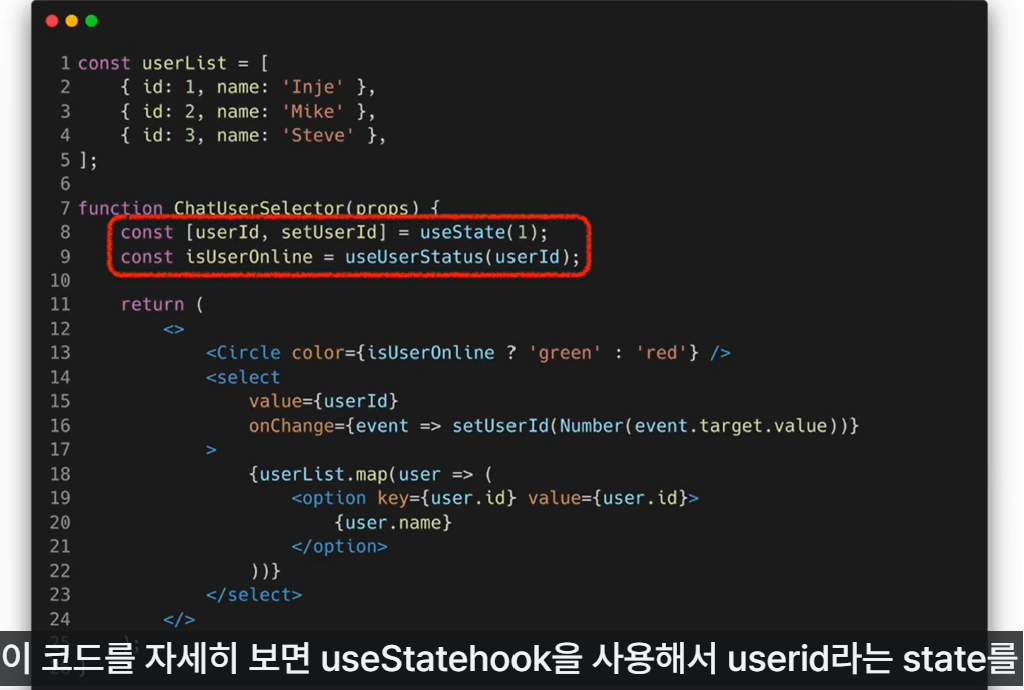
- useState Hook을 사용해 userId라는 state를 만듦. 현재 선택된 사용자의 아이디를 저장하기 위한 용도. 이 유저 아이디는 useUserStatus Hook의 파라미터로 들어감. 이를 통해 setUserID 함수를 통해 유저 아이디가 변경될 때 마다 useUserStatus Hook은 이전에 선택된 사용자를 구독 취소하고 새로 선택된 사용자의 온라인 여부를 구독하게 됨.
실습 - Hooks 사용
1) useCounter() Custom Hook 만들기
import React, {useState} from "react";

function useCounter(initialValue) {
  const [count, setCount] = useState(initialValue);

  const increaseCount = () => setCount((count) => count + 1);
  const decreaseCount = () => setCount((count) => Math.max(count - 1), 0);

  return [count, increaseCount, decreaseCount];
}

export default useCounter;
// useCounter Hook은 초기 카운트 값을 파라미터로 받아 카운트라는 이름의
// state를 생성하여 값을 제공하고 카운트 증가 및 감소를 편리하게 할 수 있도록
// 함수를 제공하는 훅이다.
2) Accommodate 컴포넌트 만들기
useCounter Hook을 사용하는 Accommodate 함수 컴포넌트 만들기.
이 컴포넌트를 사람을 수용하는 시설에서 사용한다고 가정.
import React, {useState, useEffect} from "react";
import useCounter from "./useCounter";
const MAX_CAPACITY = 10;
function Accommodate(props) {
const [isFull, setIsFull] = useState(false);
const [count, increaseCount, decreaseCount] = useCounter(0);
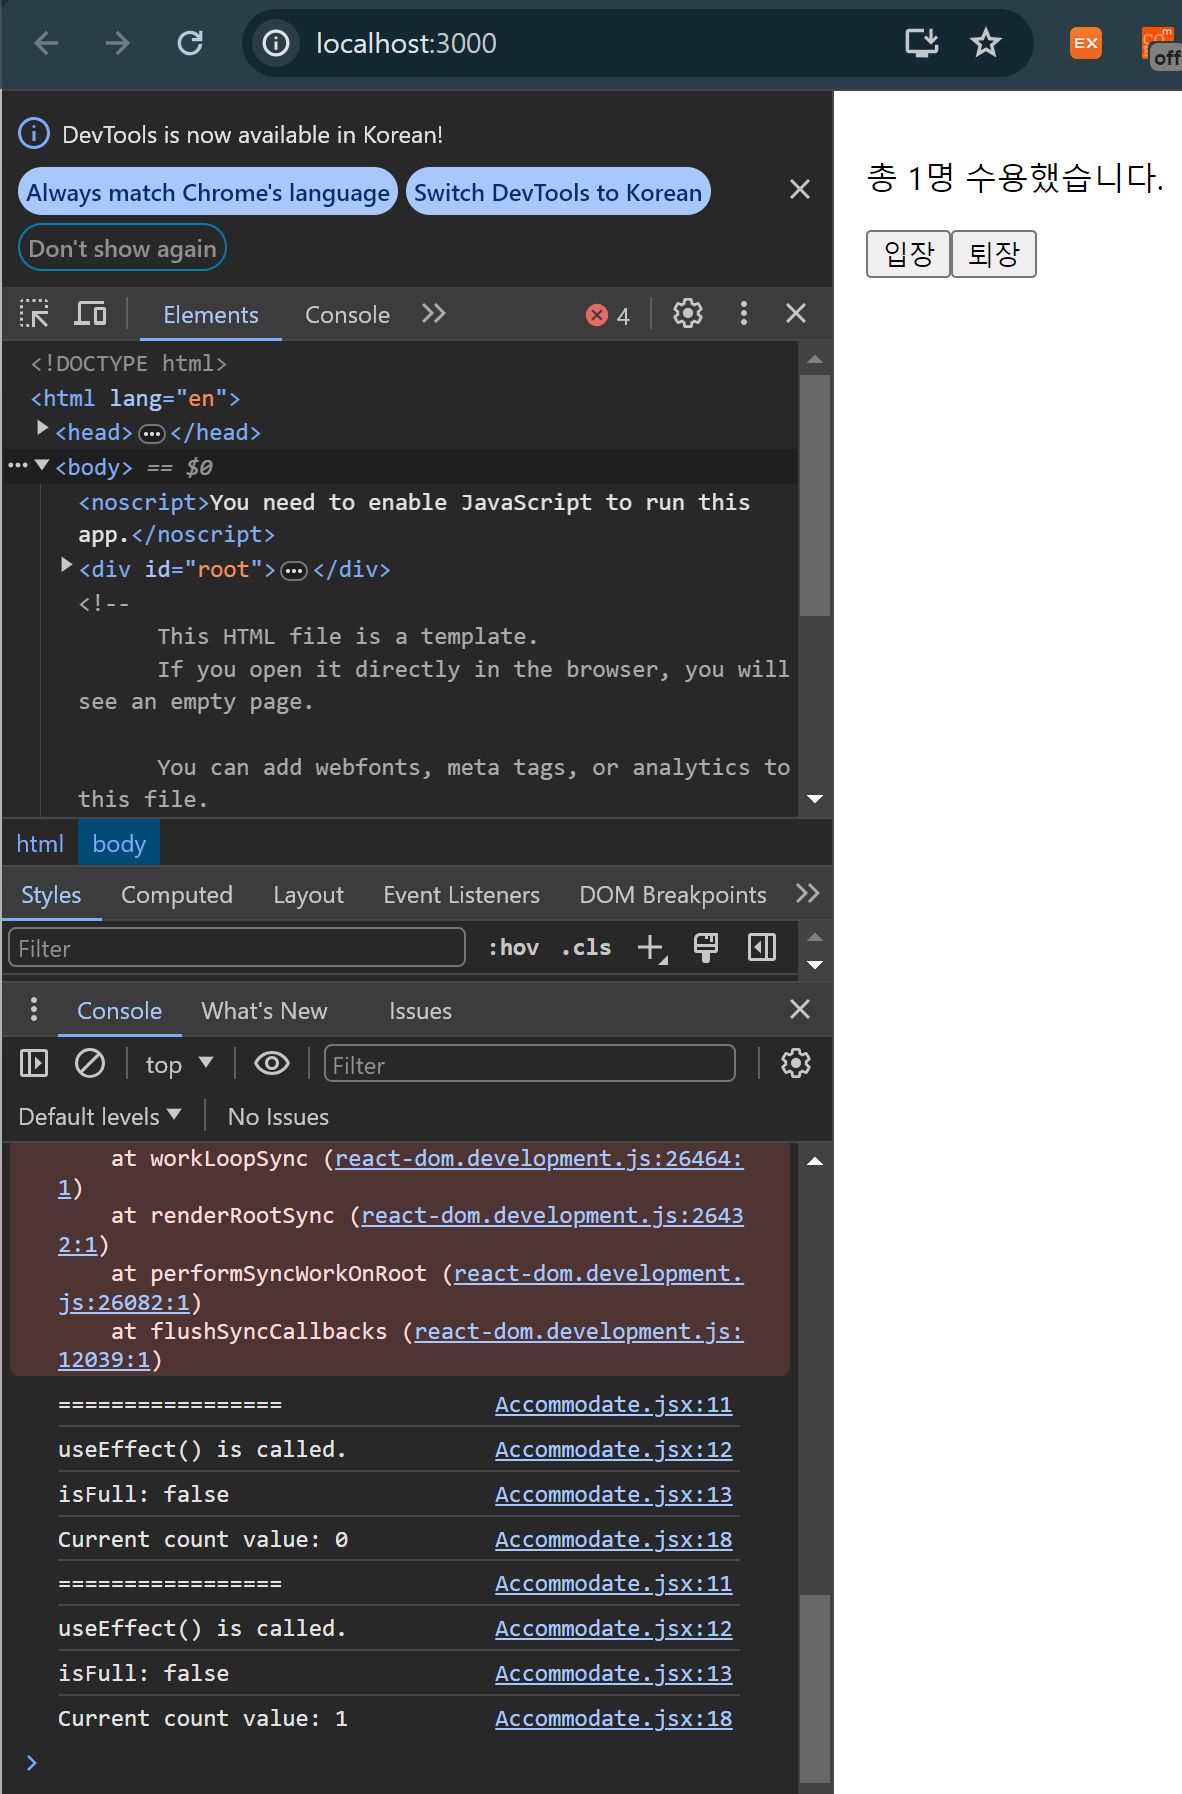
useEffect(() => {
console.log("=================");
console.log("useEffect() is called.");
console.log(`isFull: ${isFull}`);
});
useEffect(() => {
setIsFull(count >= MAX_CAPACITY);
console.log(`Current count value: ${count}`);
}, [count]);
return (
<div style={{ padding: 16 }}>
<p>{`총 ${count}명 수용했습니다.`}</p>
<button onClick={increaseCount} disabled={isFull}>
입장
</button>
<button onClick={decreaseCount}>퇴장</button>
</div>
);
}
export default Accommodate;
// useCounter Hook을 사용해 카운트를 관리함.
// 최대 카운트 개수는 MAX_CAPACITY라는 이름의 상수로 정의.
// 카운트 개수가 최대 용량을 초과하면 경고 문구가 표시되며 더 이상 입장 불가.
// useEffect Hook 작동 방식 확인 위해 일부러 두 개의 useEffect Hook 사용
// 1) 의존성 배열 없는 형태 : 컴포넌트 마운트 된 직후 호출. 이후 컴포넌트 업데이트 될 때마다 호출.
// 2) 의존성 배열 있는 형태 : 컴포넌트가 마운트 된 직후 호출. 이후 카운트 값 바뀔 때마다 호출.
// 이때 용량 가득 찼는지 아닌지의 상태를 isFull state에 저장.import React from 'react';
import { createRoot } from 'react-dom/client';
import './index.css';
import App from './App';
import reportWebVitals from './reportWebVitals';
import Library from './chapter_03/Library';
import Clock from './chapter_04/Clock';
import CommentList from './chapter_05/CommentList';
import NotificationList from './chapter_06/NotificationList';
import Accommodate from './chapter_07/Accommodate';
createRoot(document.getElementById('root')).render(
<React.StrictMode>
<Accommodate />
</React.StrictMode>
);
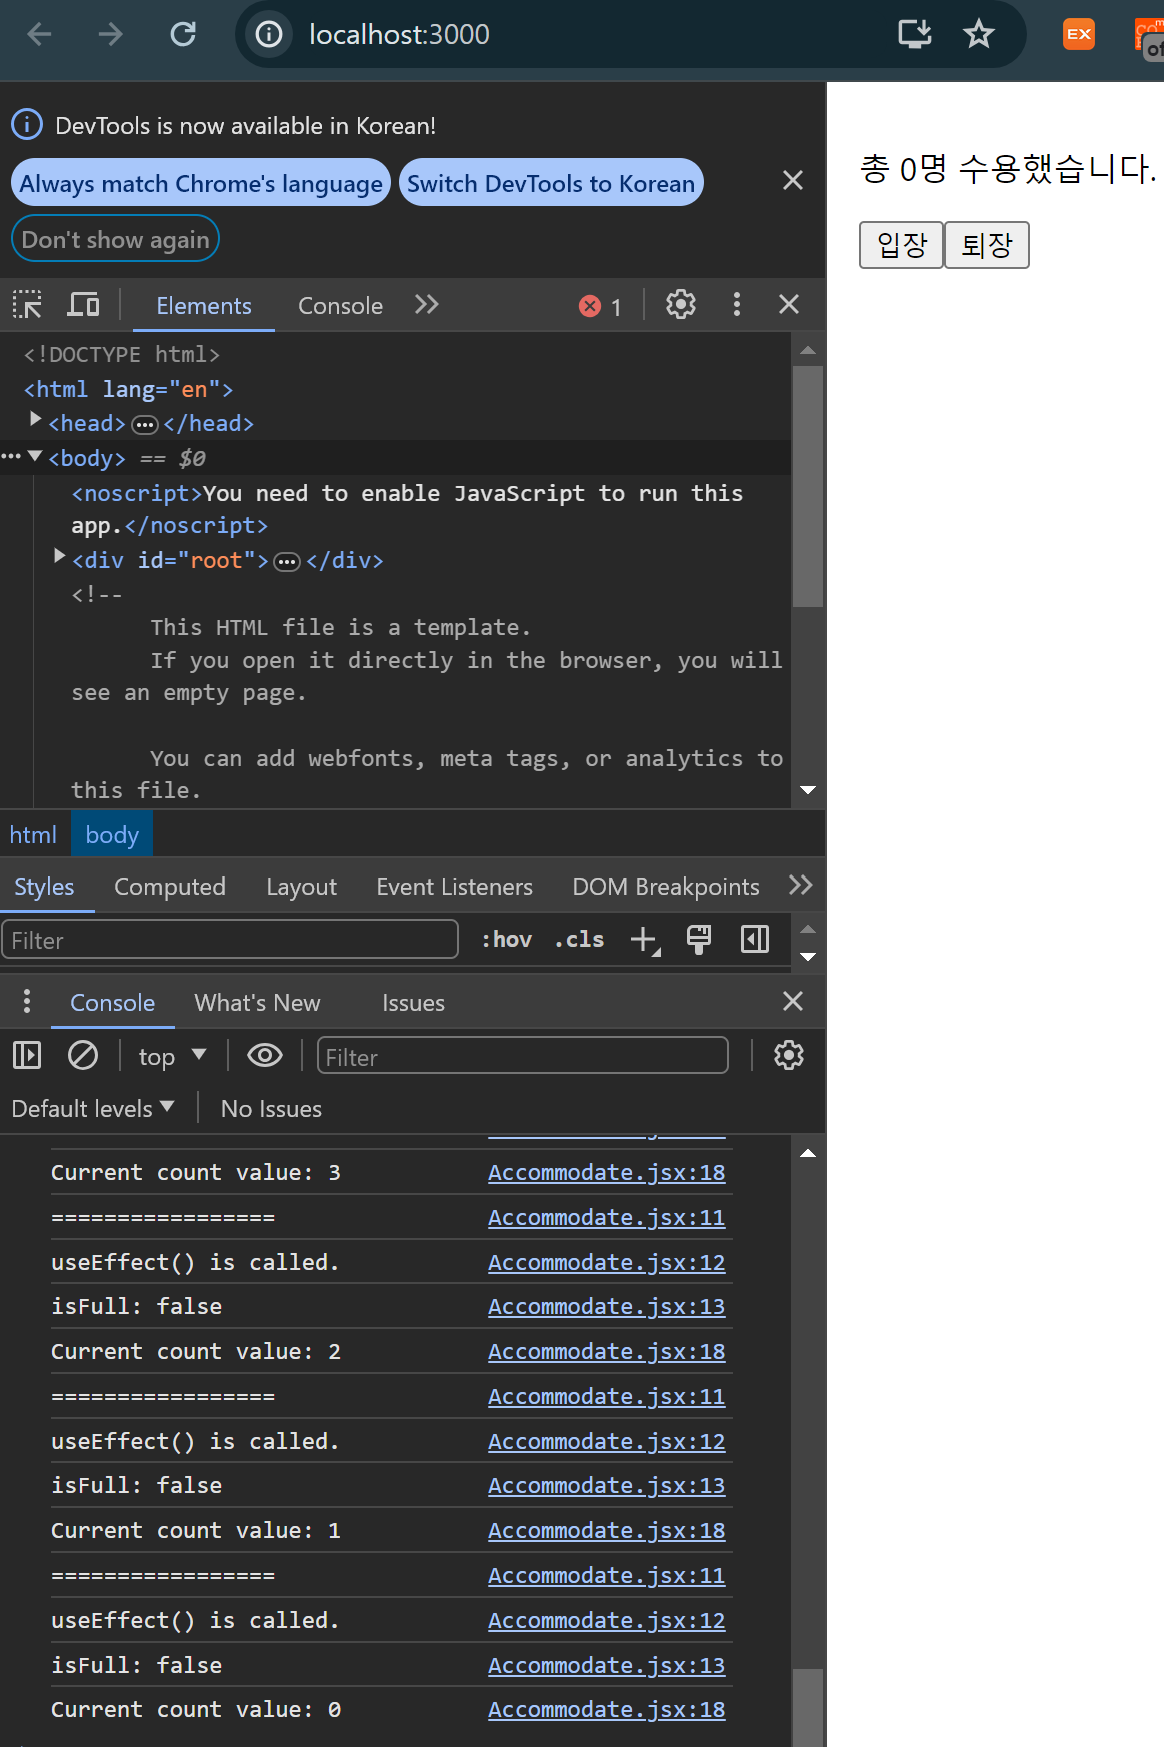
reportWebVitals();입장을 누르면 두 개의 useEffec Hook이 호출되는데 카운트 값은 1 증가함.
여기서 의존성 배열이 없는 useEffect Hook이 호출된 이유는 컴포넌트가 업데이트 됐기 때문. 의존성 배열이 있는 useEffect Hook이 호출된 이유는 카운트 값이 변경되었기 때문.
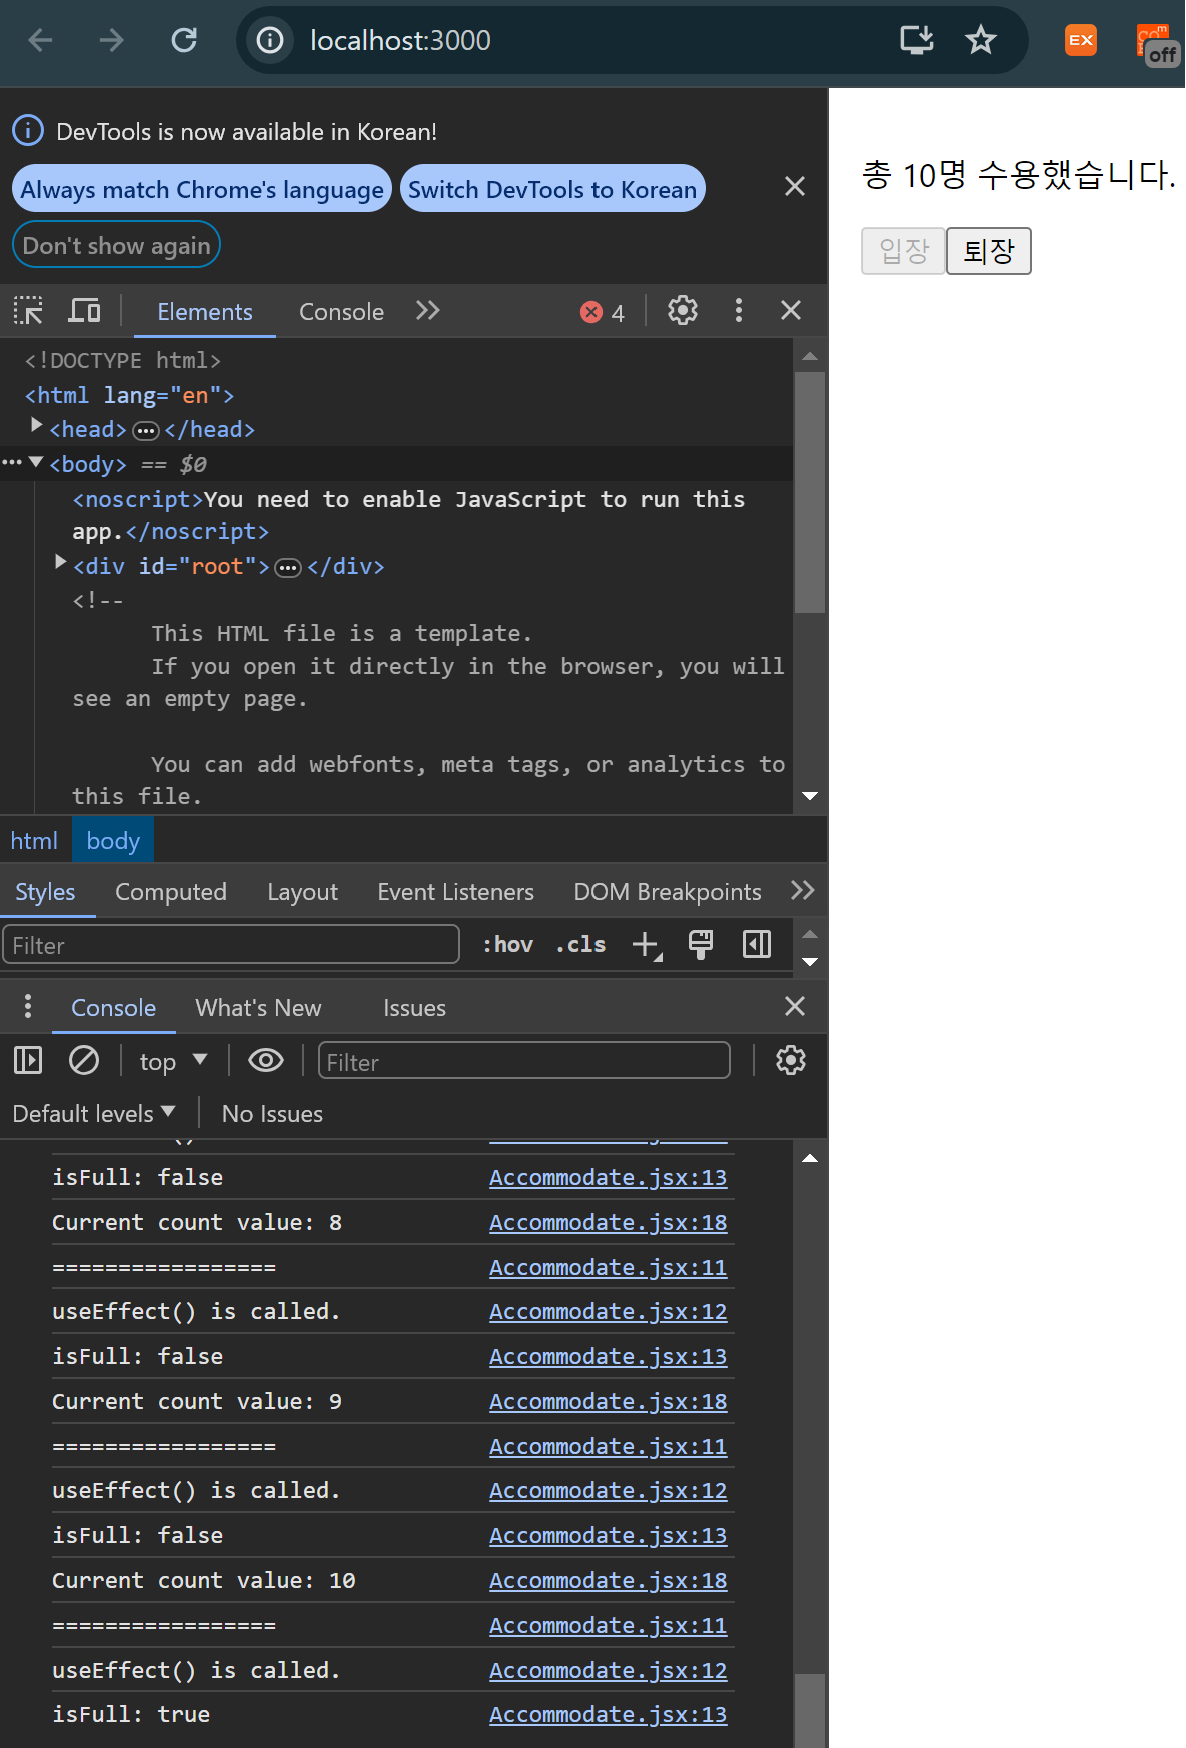
정원이 가득차면 isFull의 값이 true가 되기 때문에 입장 버튼이 비활성화 되어 더 이상 누를 수 없게 됨.
로그를 보면 카운트 값이 10이 된 이후에는 더 이상 변하지 않기 때문에 카운트를 의존성 배열에 갖고 있는 useEffect Hook은 호출되지 않음.
퇴장 버튼을 누르면 다시 2개의 useEffect Hook이 호출되고 카운트 값이 줄어듦.

useConter Hook에서 Math.max함수를 사용하여 카운트 값이 0 아래로 내려갈 수 없게 만들었기 때문에 값이 0이 되면 더 이상 useEffect Hook도 호출되지 않음