리액트는 무엇인가
사용자 인터페이스를 만들기 위한 자바스크립트 라이브러리
라이브러리 = 자주 사용되는 기능들을 정리해 모아놓은 것
사용자 인터페이스
User Interface, UI

앵귤러js 뷰js = 프레임워크
리액트 = 라이브러리
왜?
프레임워크 = 흐름의 제어 권한을 개발자가 아닌 프레임워크가 가지고 있다
라이브러리 = 제어 권한이 개발자에게 있다
리액트 =
사용자와 웹사이트의 상호작용을 돕는 인터페이스를 만들기 위한 자바스크립트 기능 모음집
싱글 페이지 애플리케이션
리액트의 장점과 단점
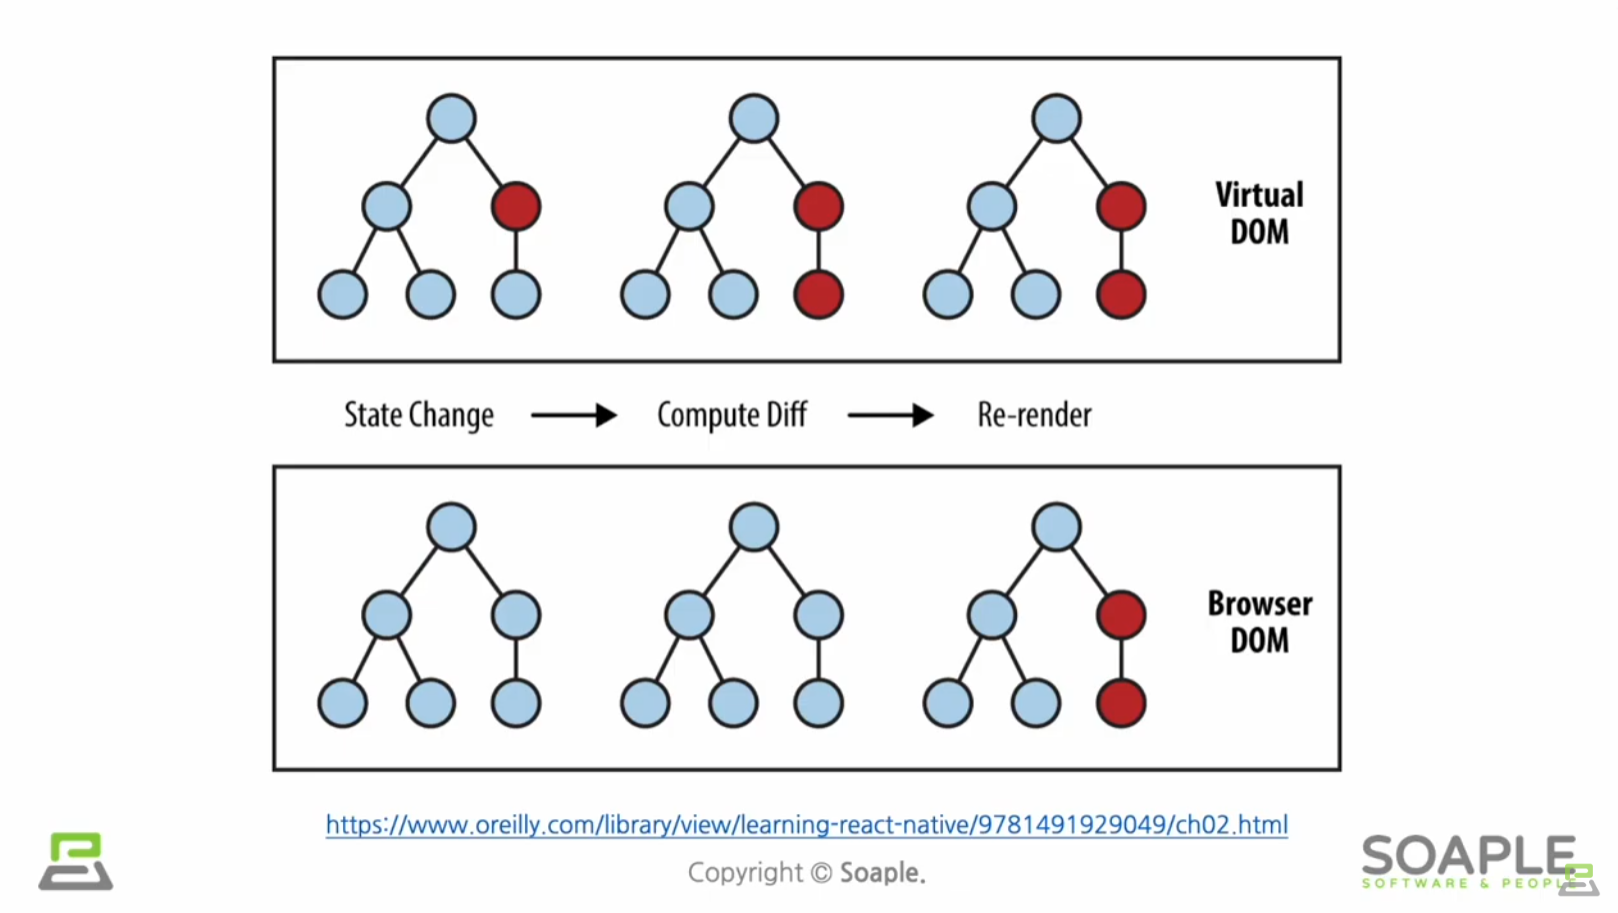
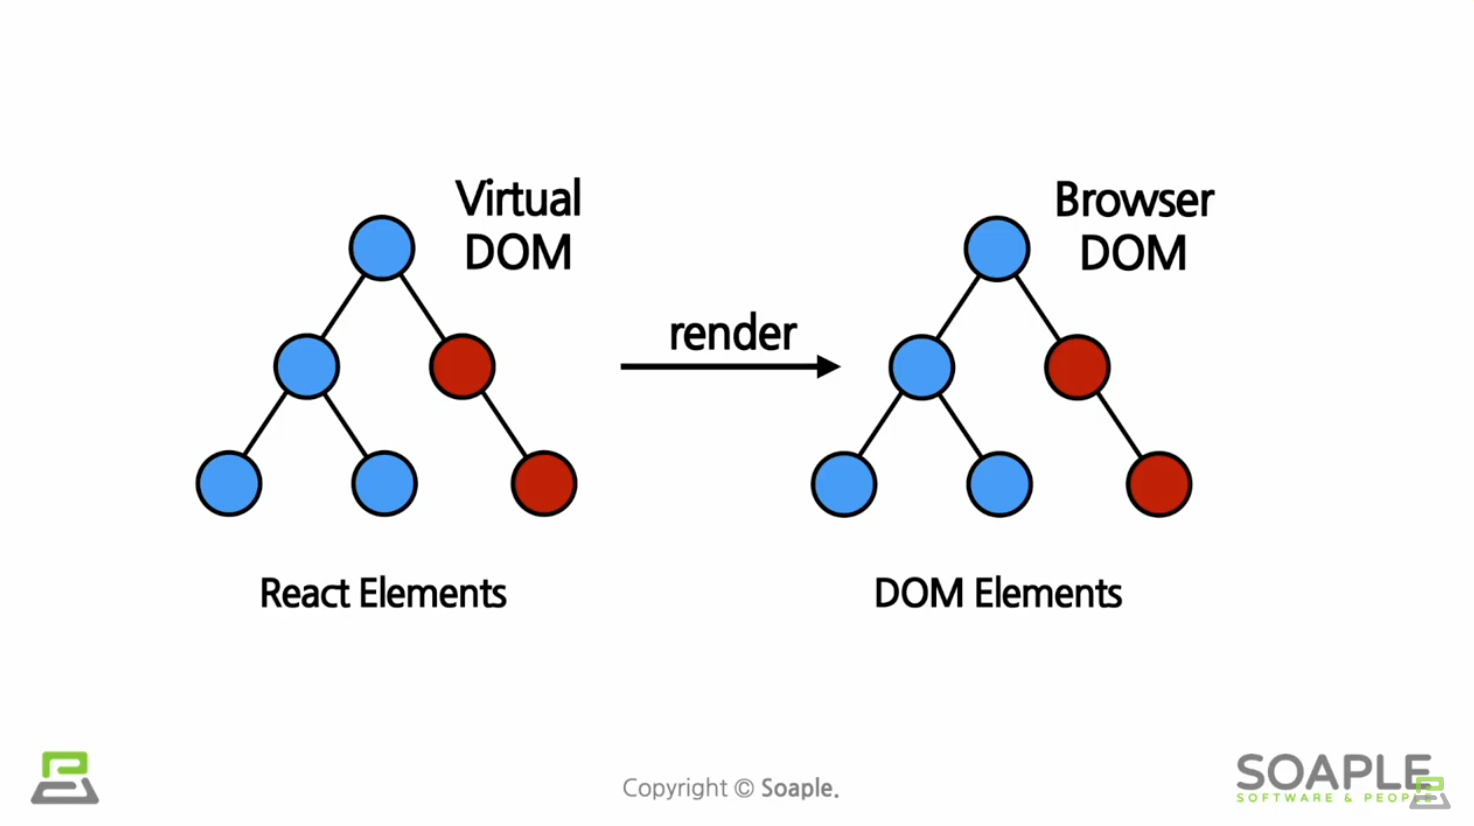
Virtual DOM = 가상의 돔 도큐먼트오브젝트모델의 약자
웹페이지를 정의하는 하나의 객체
Component-Based = 레고 블록을 조립하듯 컴포넌트들을 모아서 개발
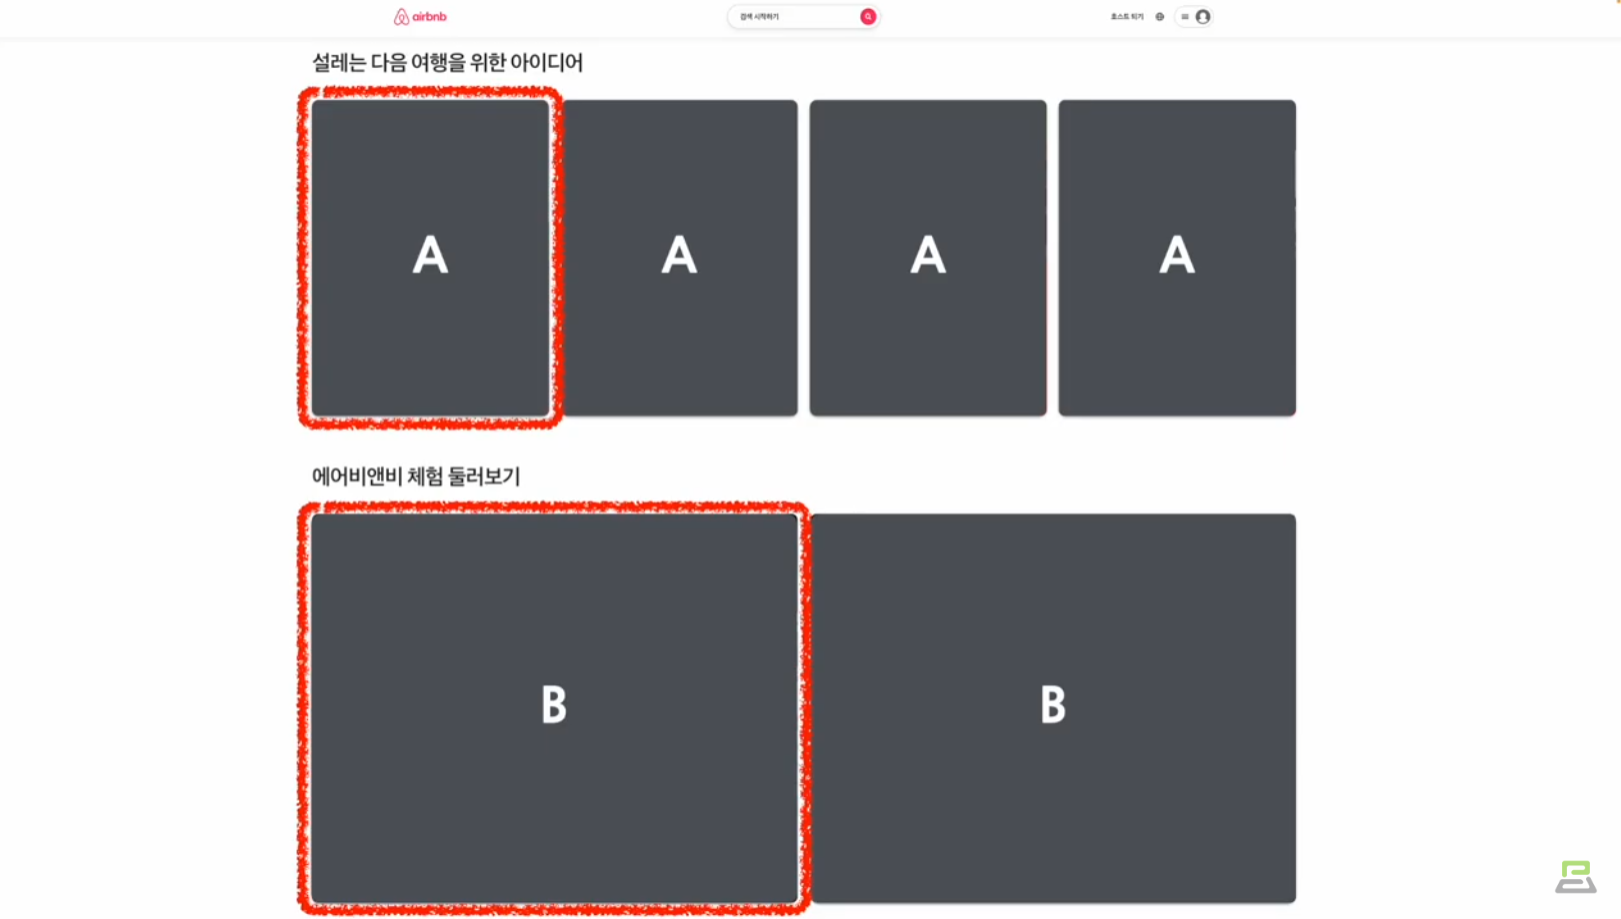
재사용성 (Reusability)
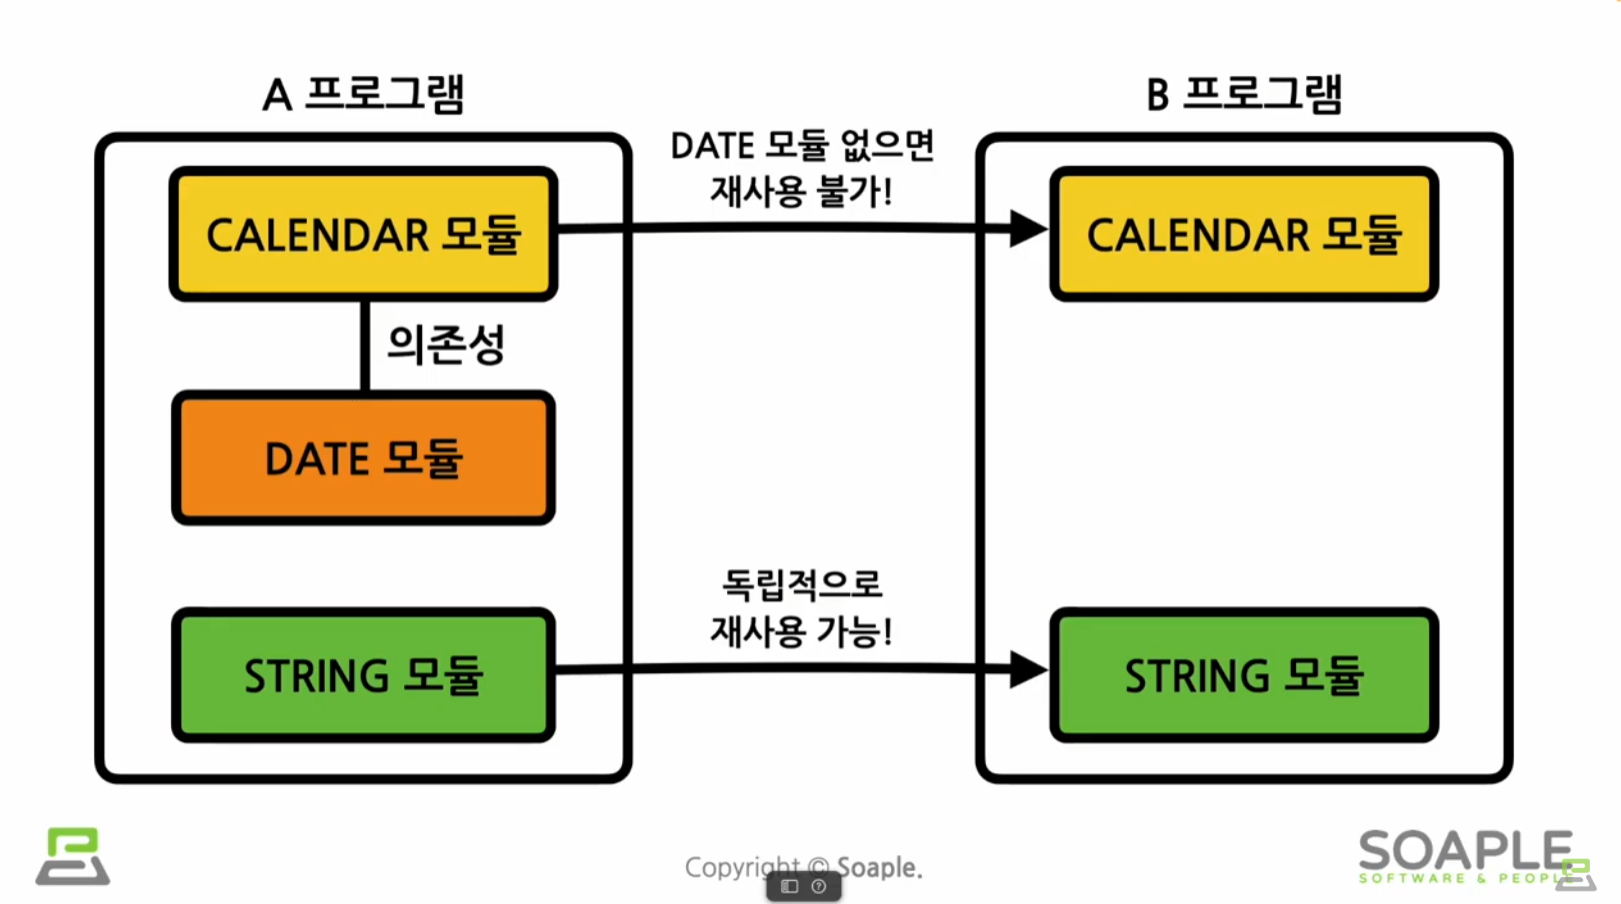
다른 모듈에 대한 의존성을 낮추고 호환성 문제가 발생하지 않도록 개발해야 한다
개발 기간이 단축됨
유지 보수가 용이함
활발한 지식공유&커뮤니티
단점
방대한 학습량
계속해서 변화함
높은 상태관리 복잡도
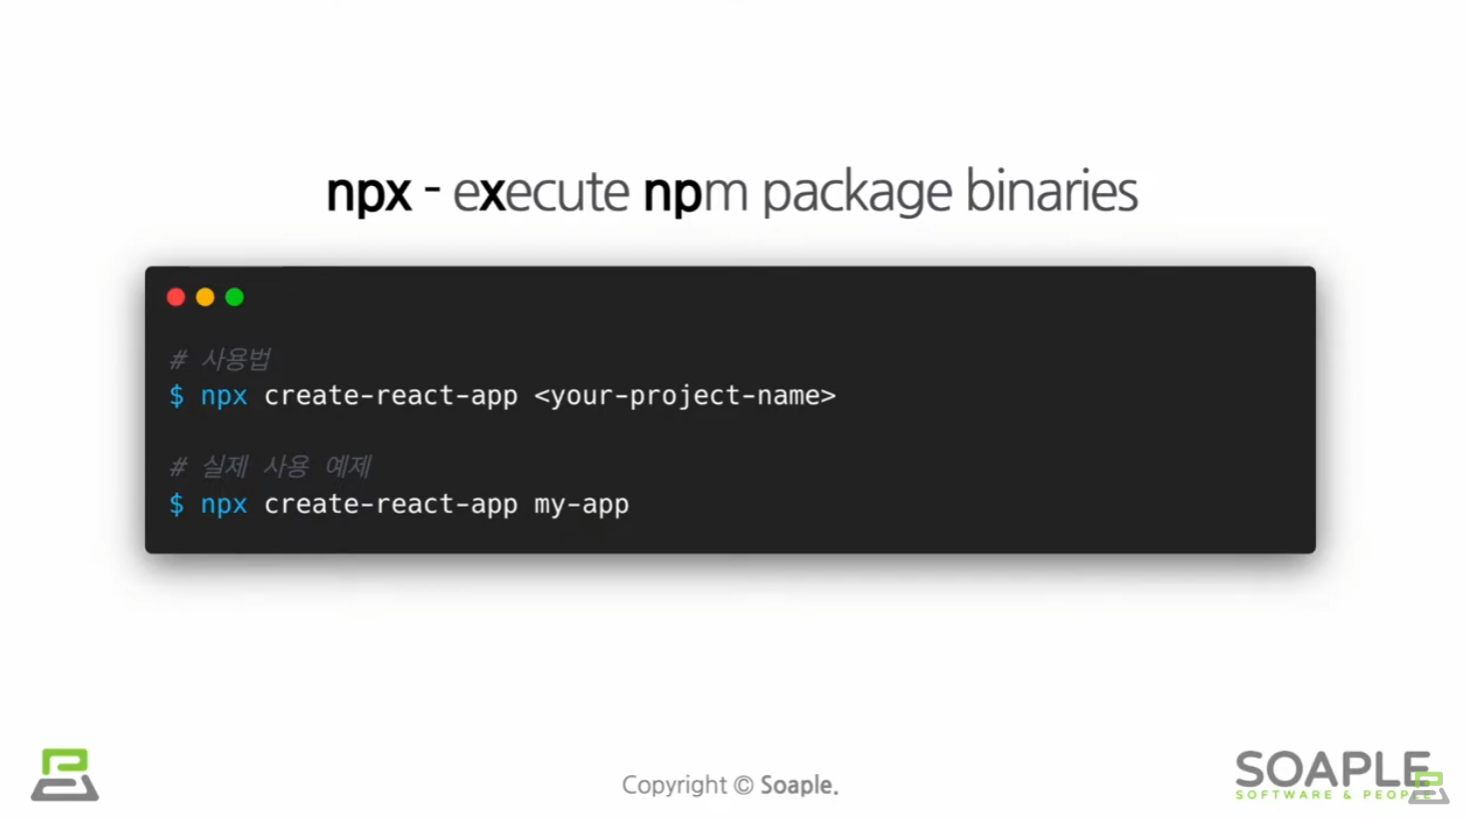
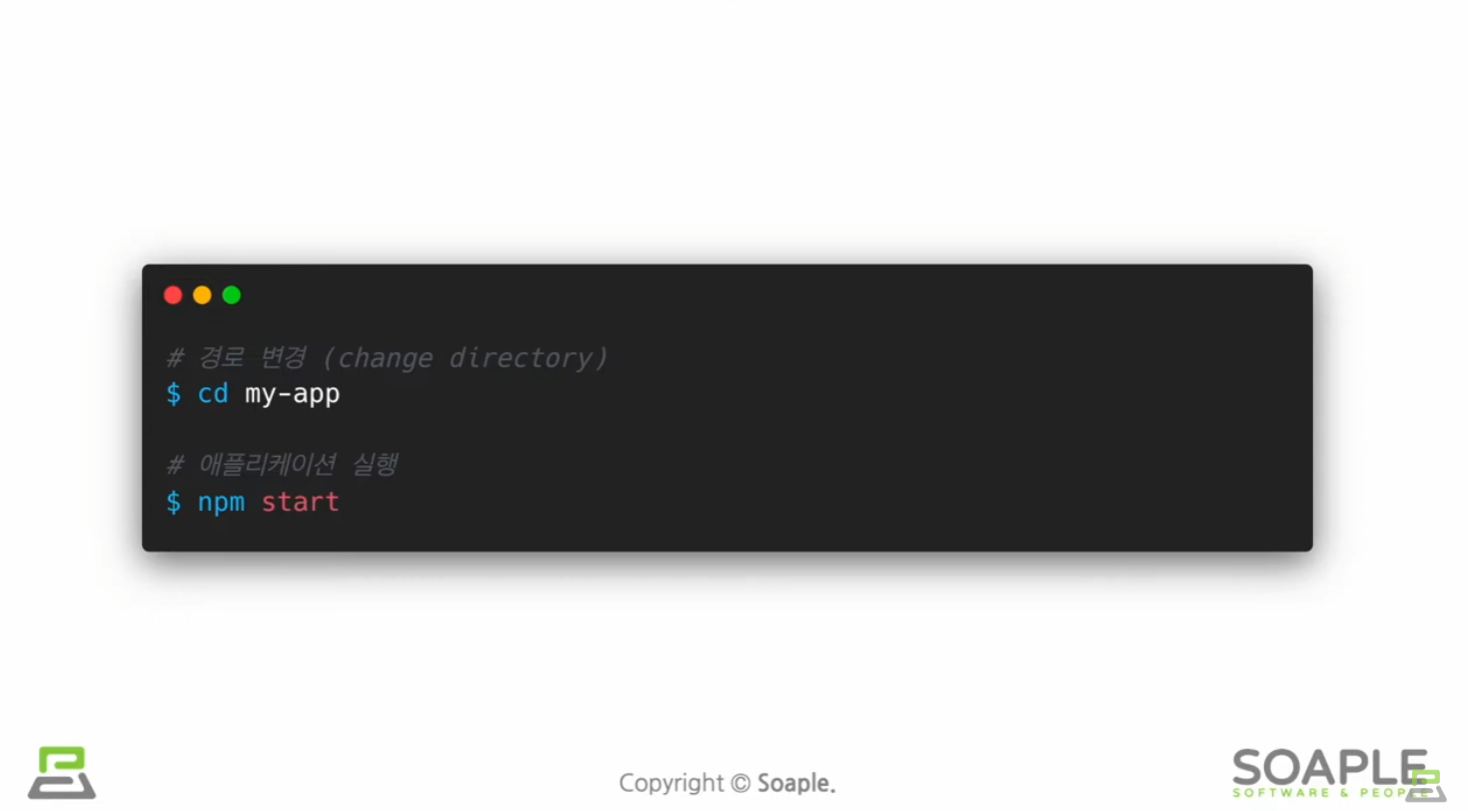
리액트 시작하기
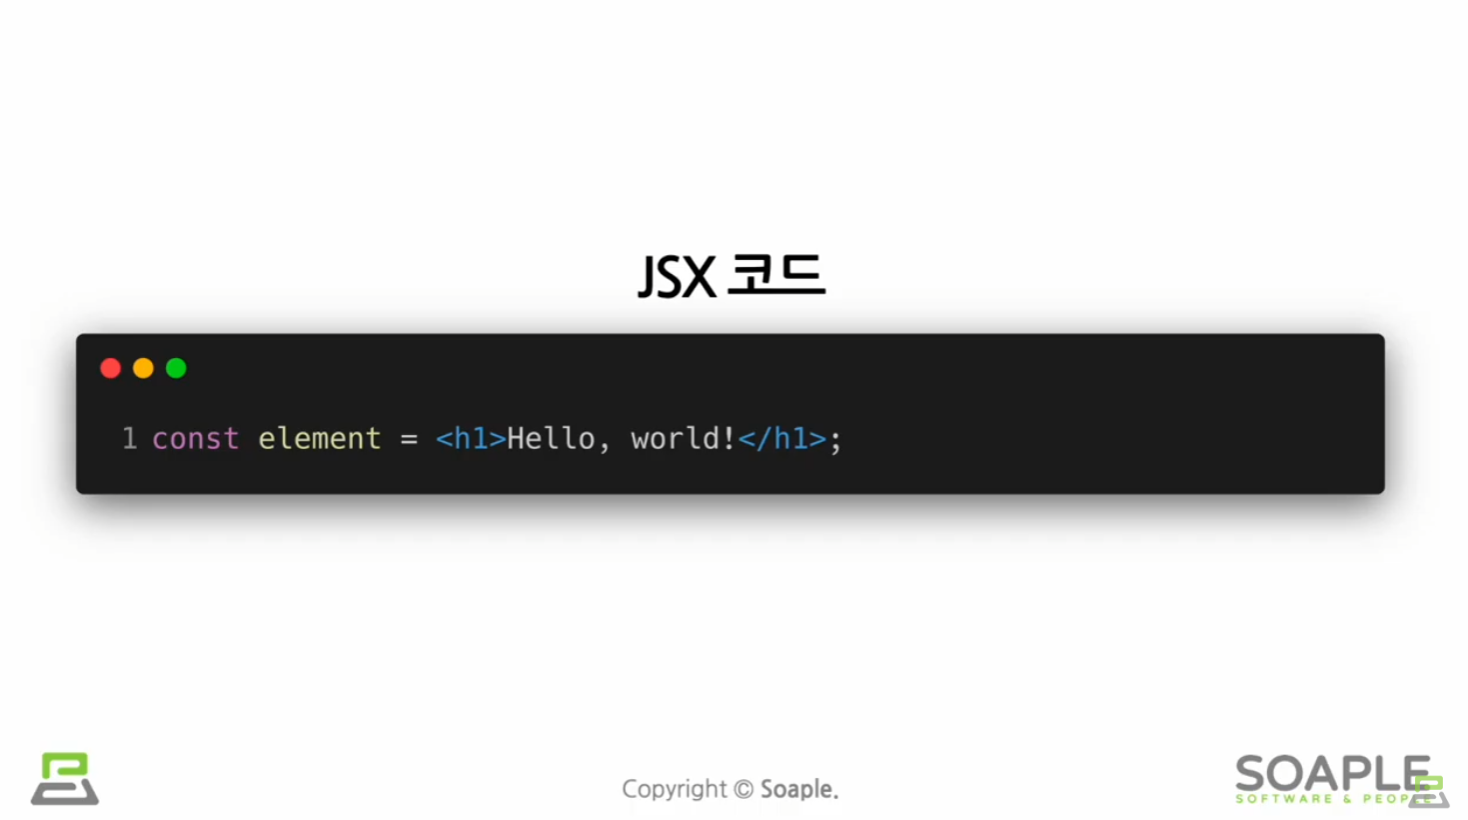
JSX
JSX란
JavaScript + Xml/HTML
A syntax extension to JavaScript
자바스크립트의 확장 문법
JSX의 역할
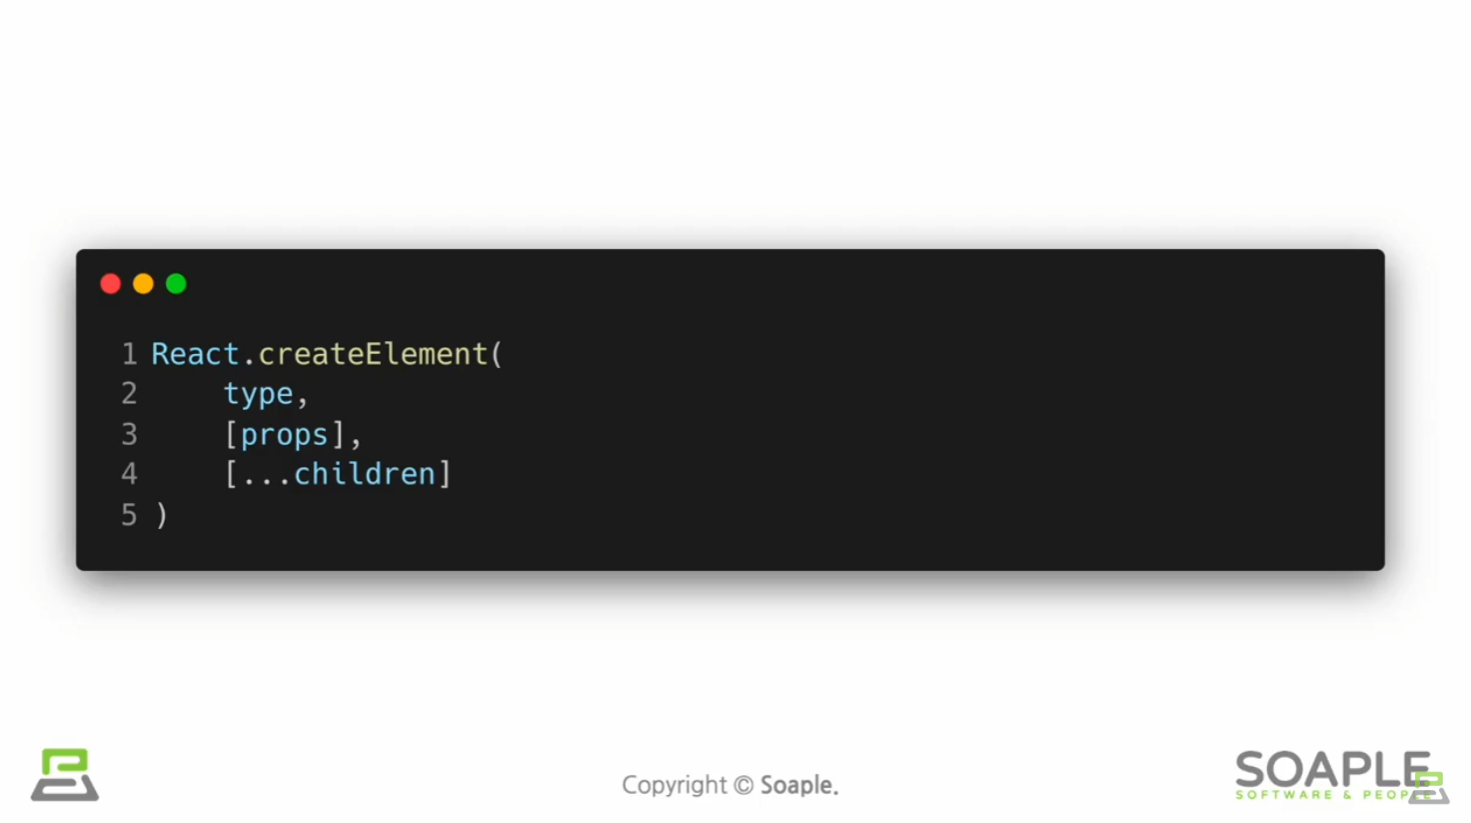
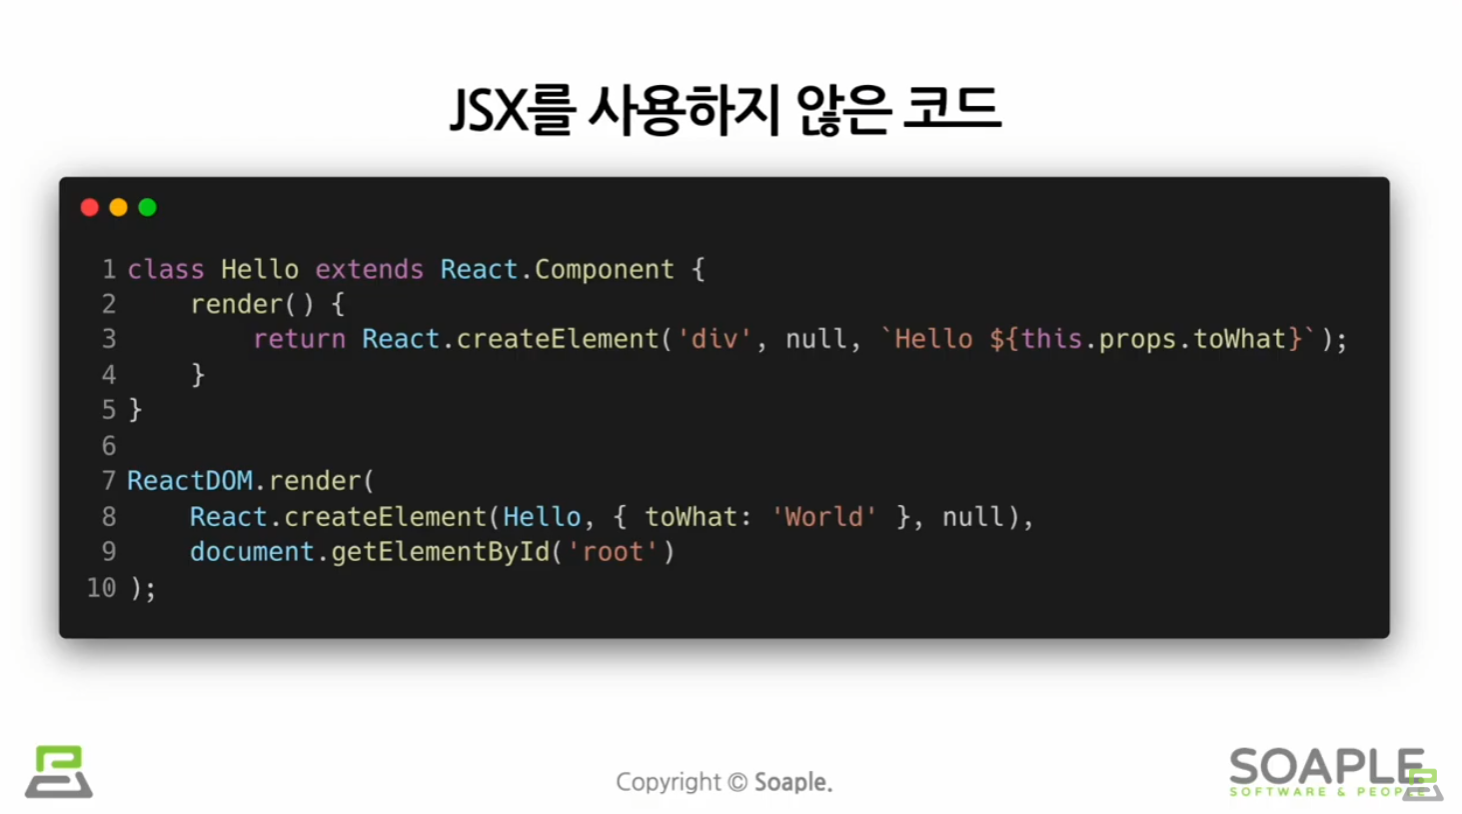
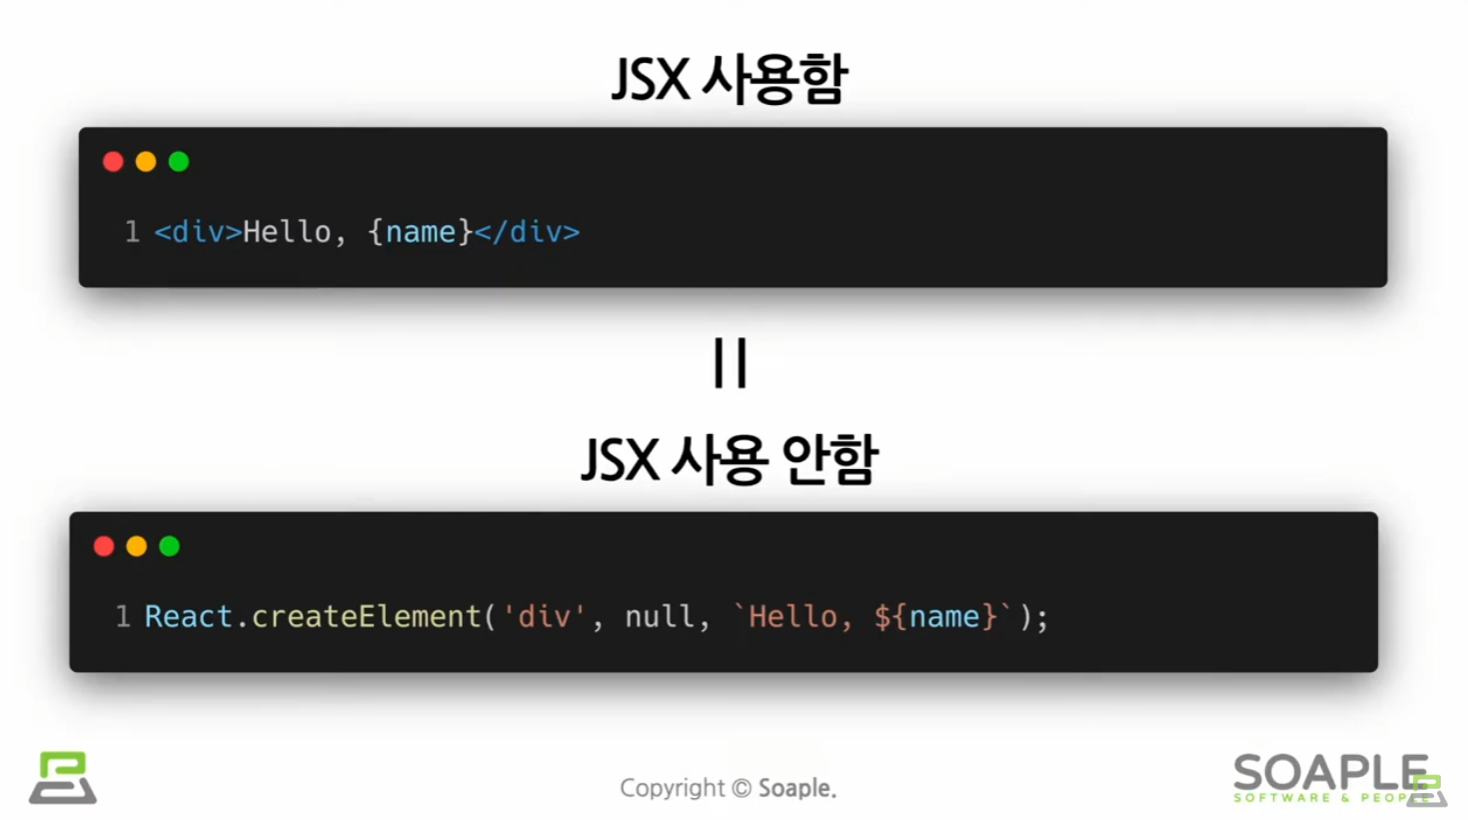
리액트에서 JSX를 쓰는 것이 필수는 아님
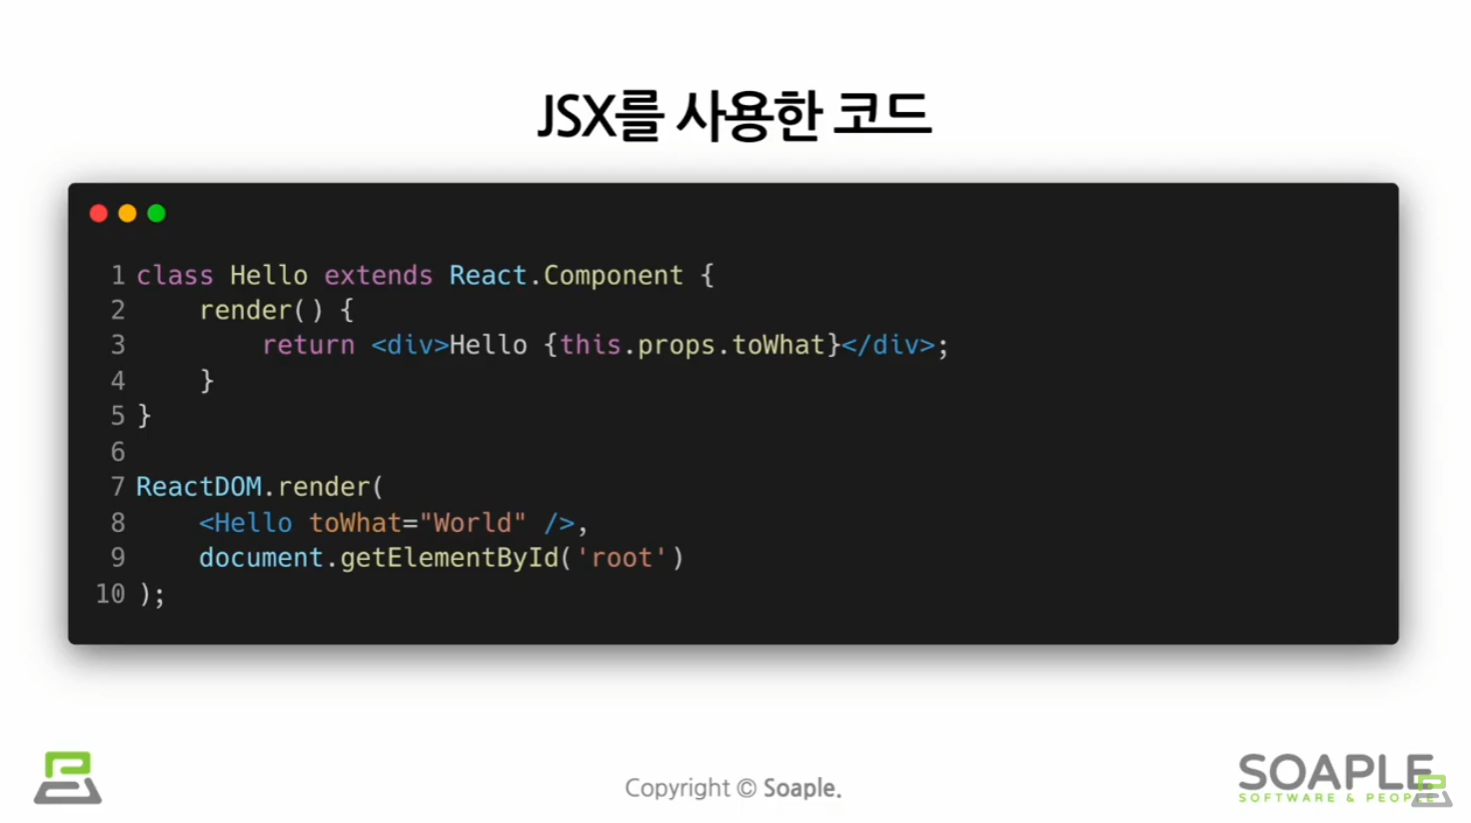
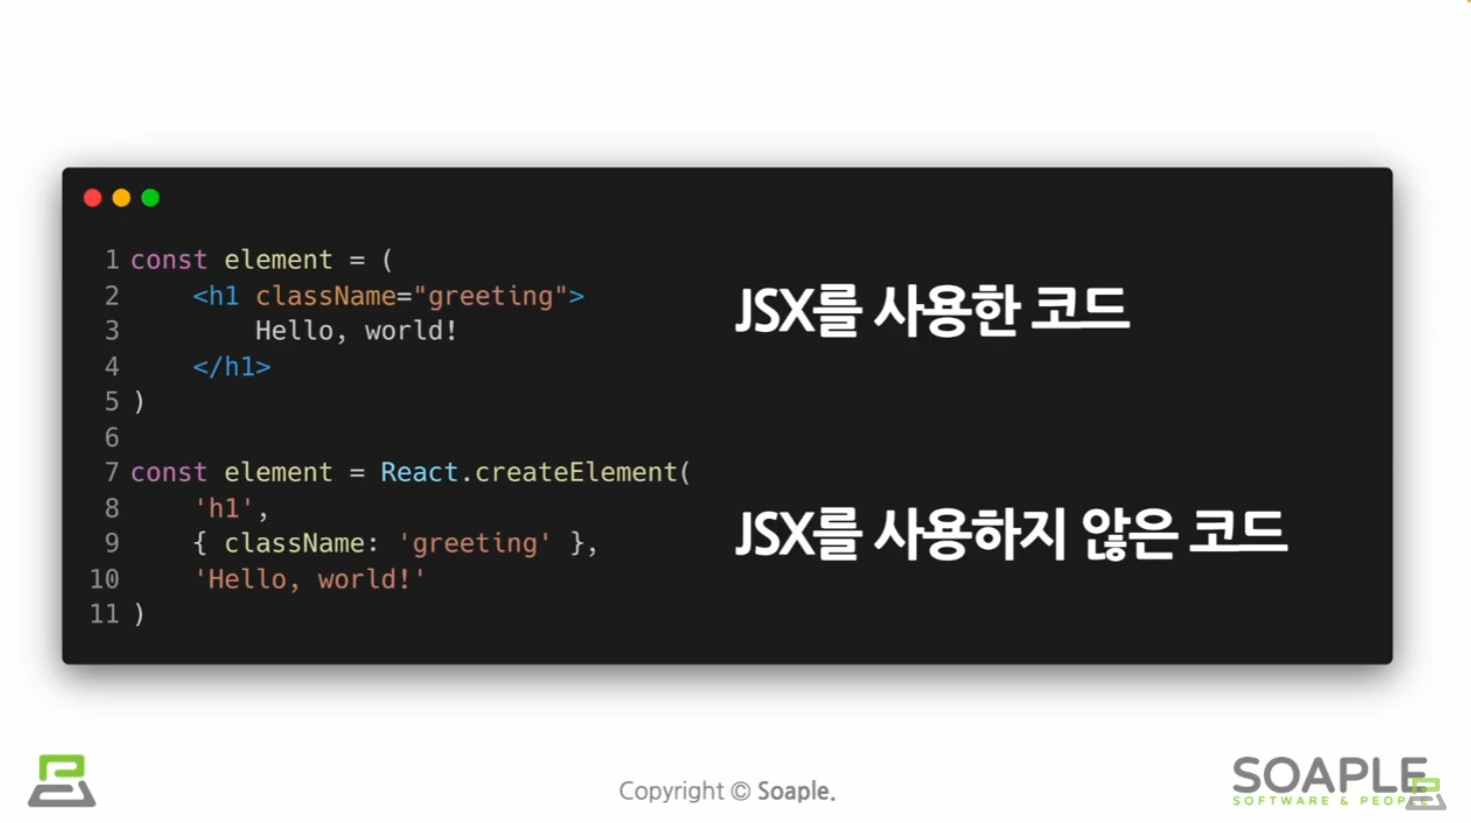
JSX를 사용하면 코드가 더 간결해지고 생산성과 가독성이 올라가기 때문에 사용하는 것을 권장
JSX의 장점
간결한 코드
가독성 향상
Injection Attacks 방어

Rendering Elements
Elements란?
리액트 앱을 구성하는 가장 작은 블록들
화면에서 보이는 것을 기술한다
Elements의 생김새
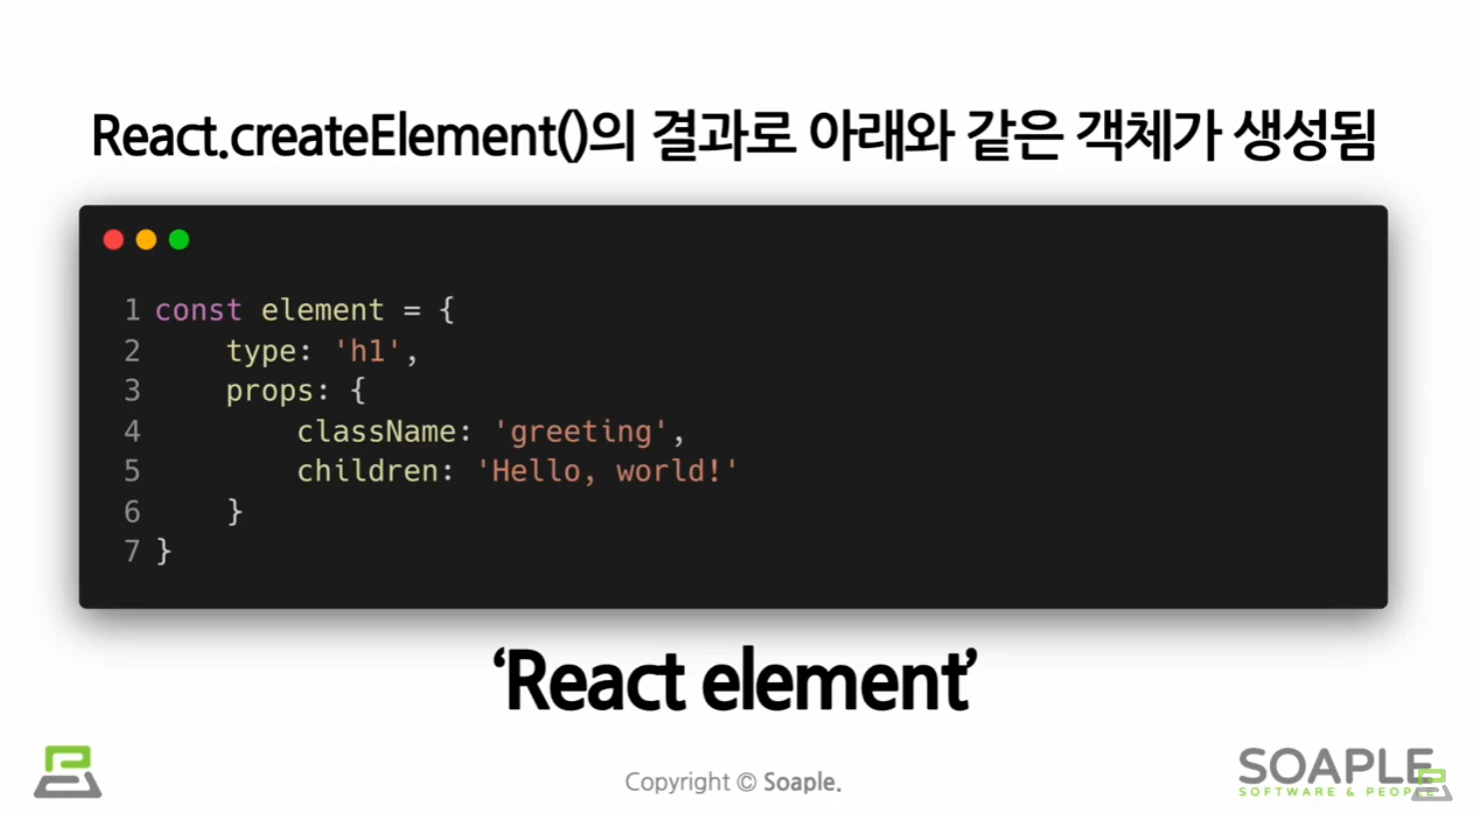
리액트 Elements는 자바스크립트 객체 형태로 존재
Elements의 특징
im+multable = 불변성
한번 생성된 elements는 변하지 않고
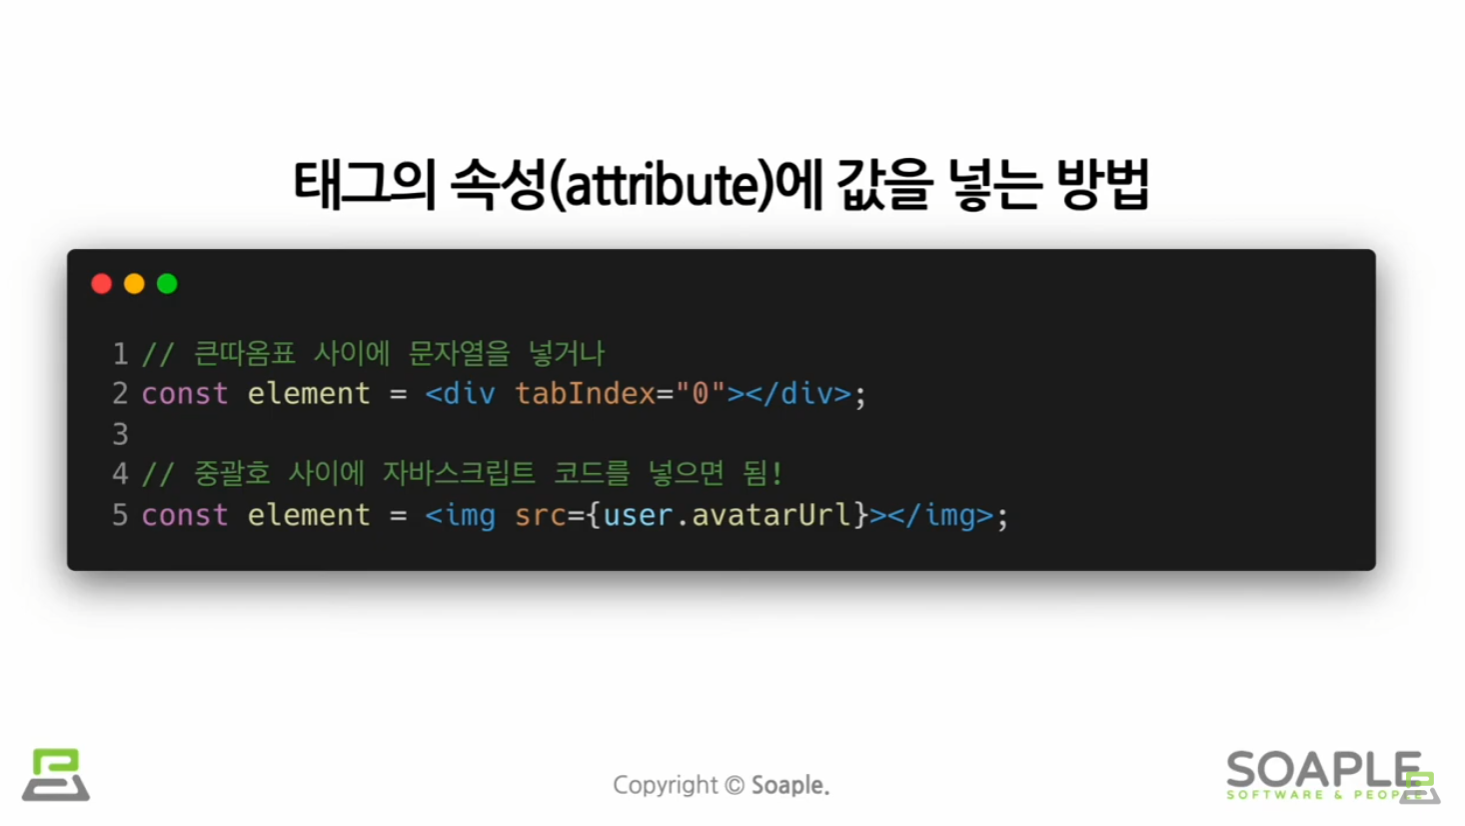
elements 생성후에는 children이나 attributes를 바꿀 수 없다
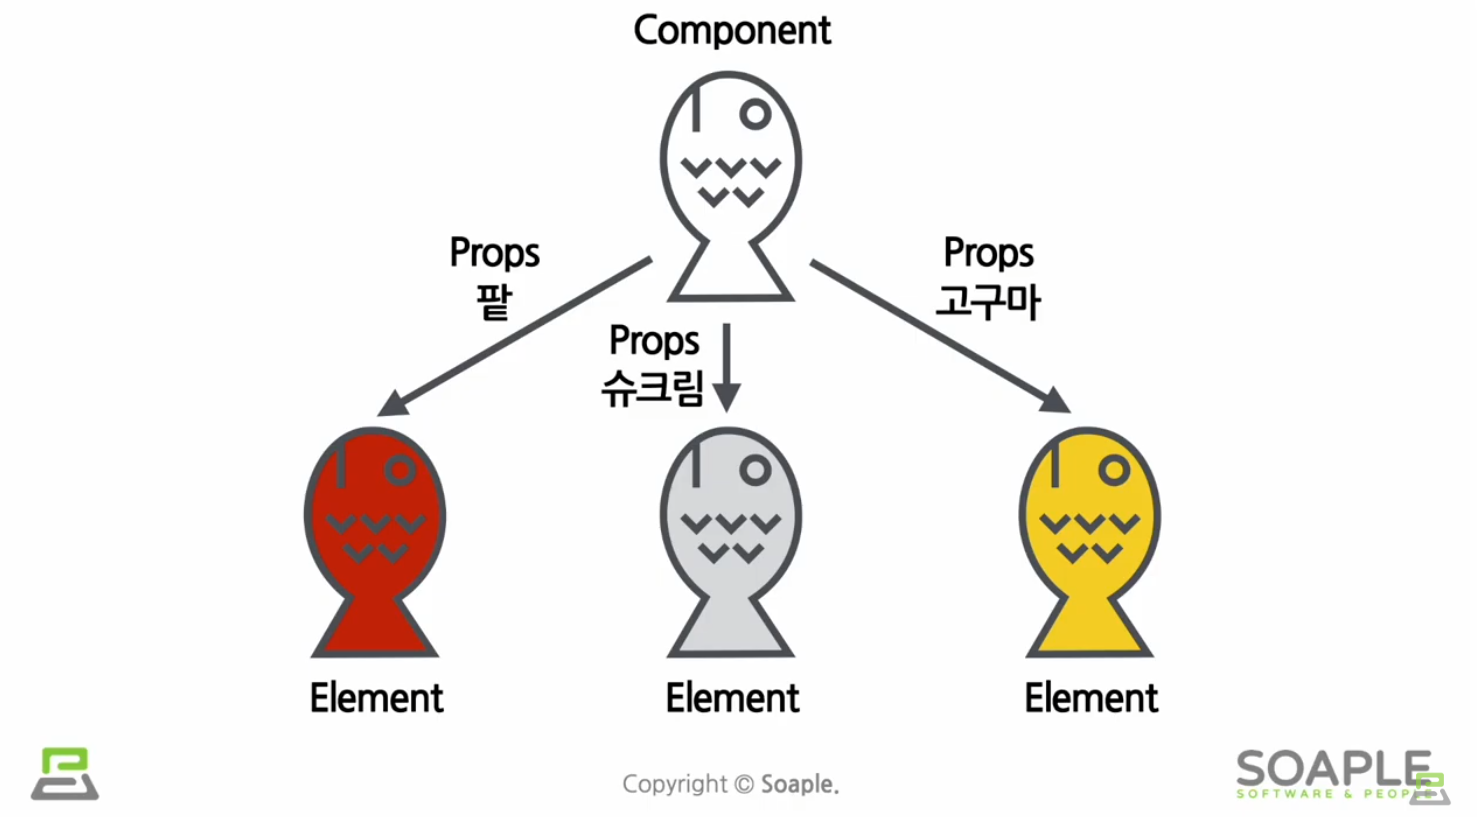
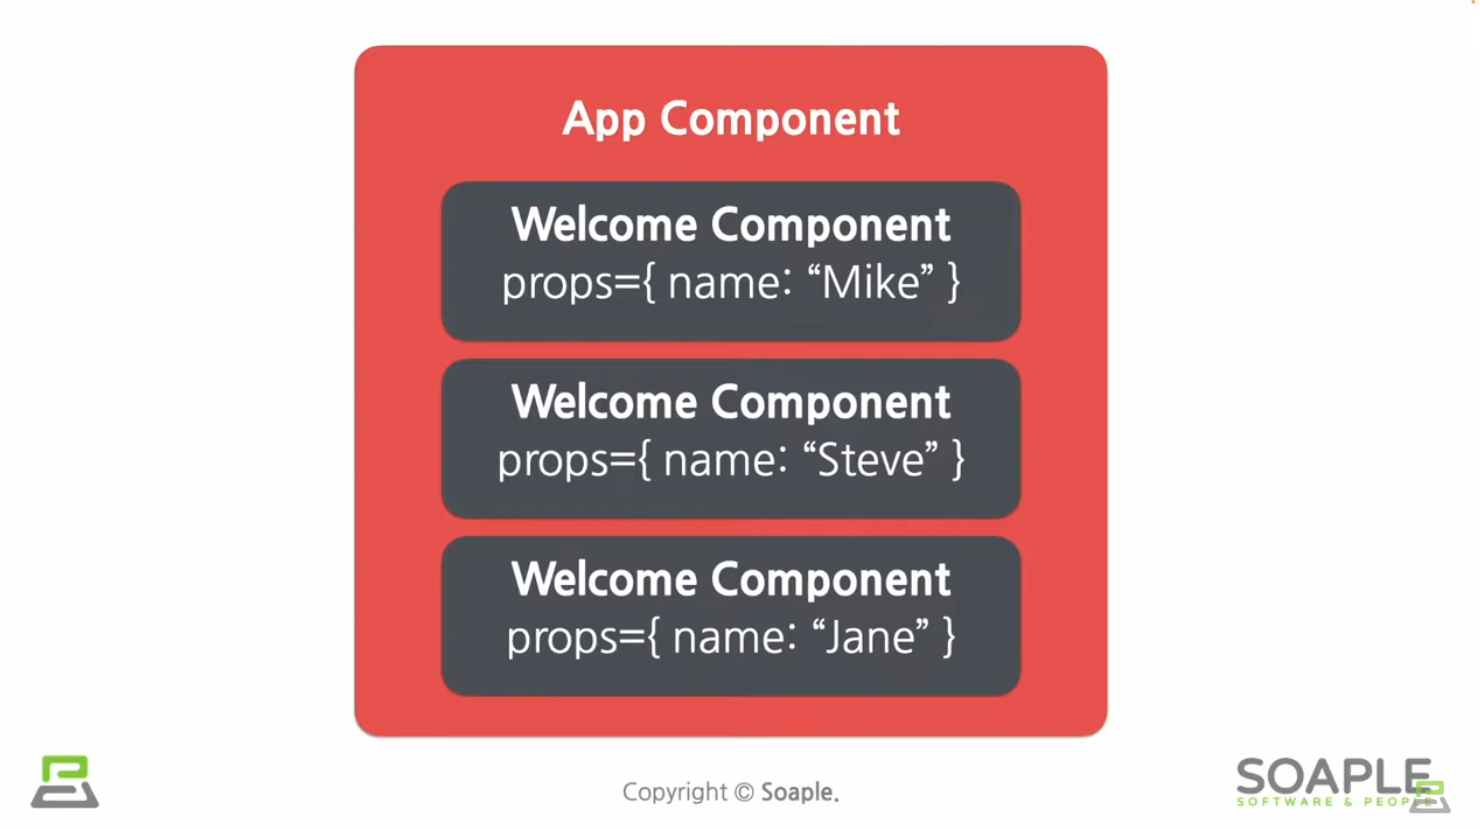
Components and Props
props란?
property
component의 속성,특성
컴포넌트에 전달할 다양한 정보를 담고 있는 자바스크립트 객체

props의 특징
read only 값을 변경할 수 없다
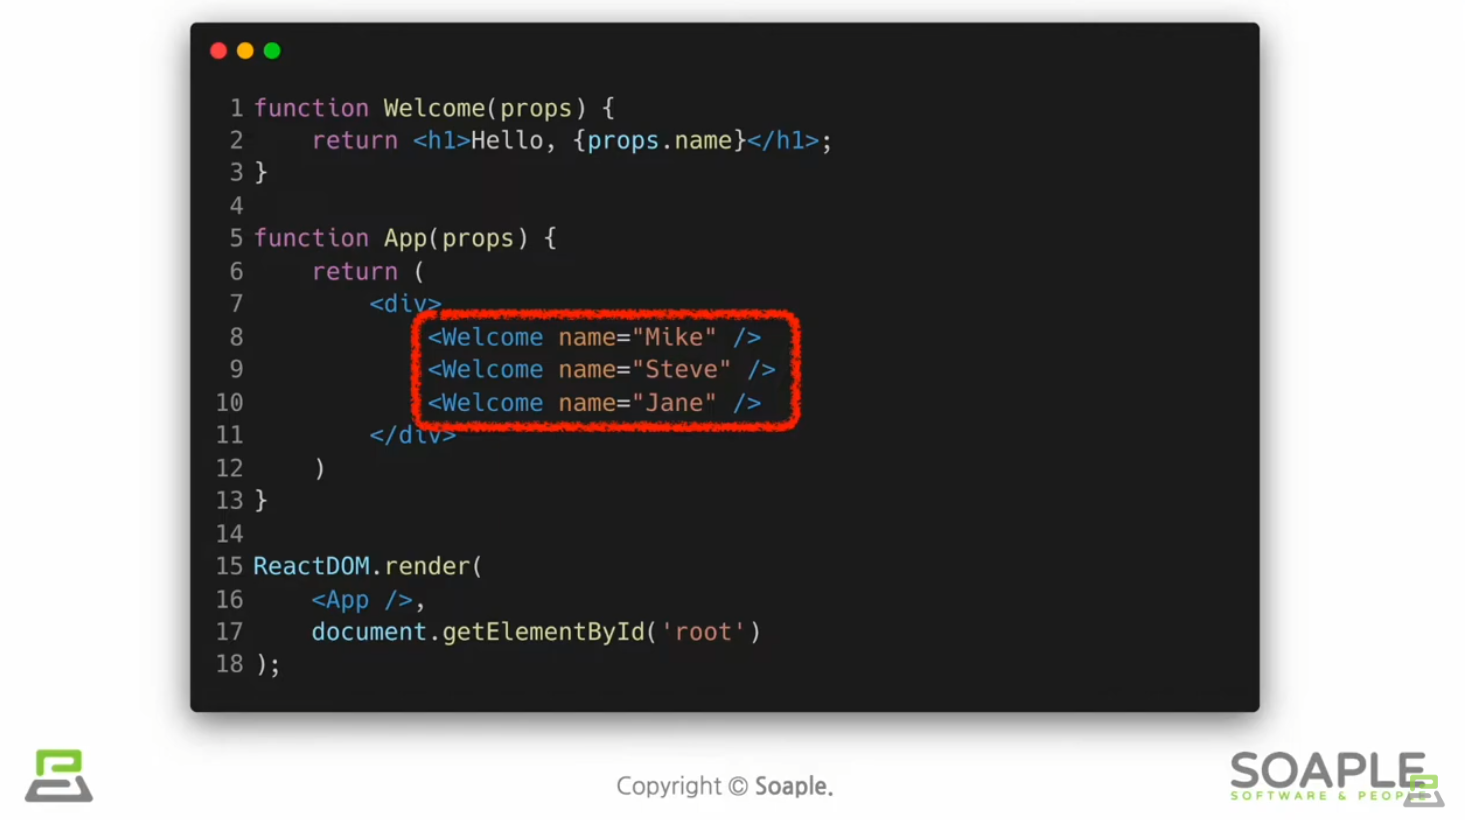
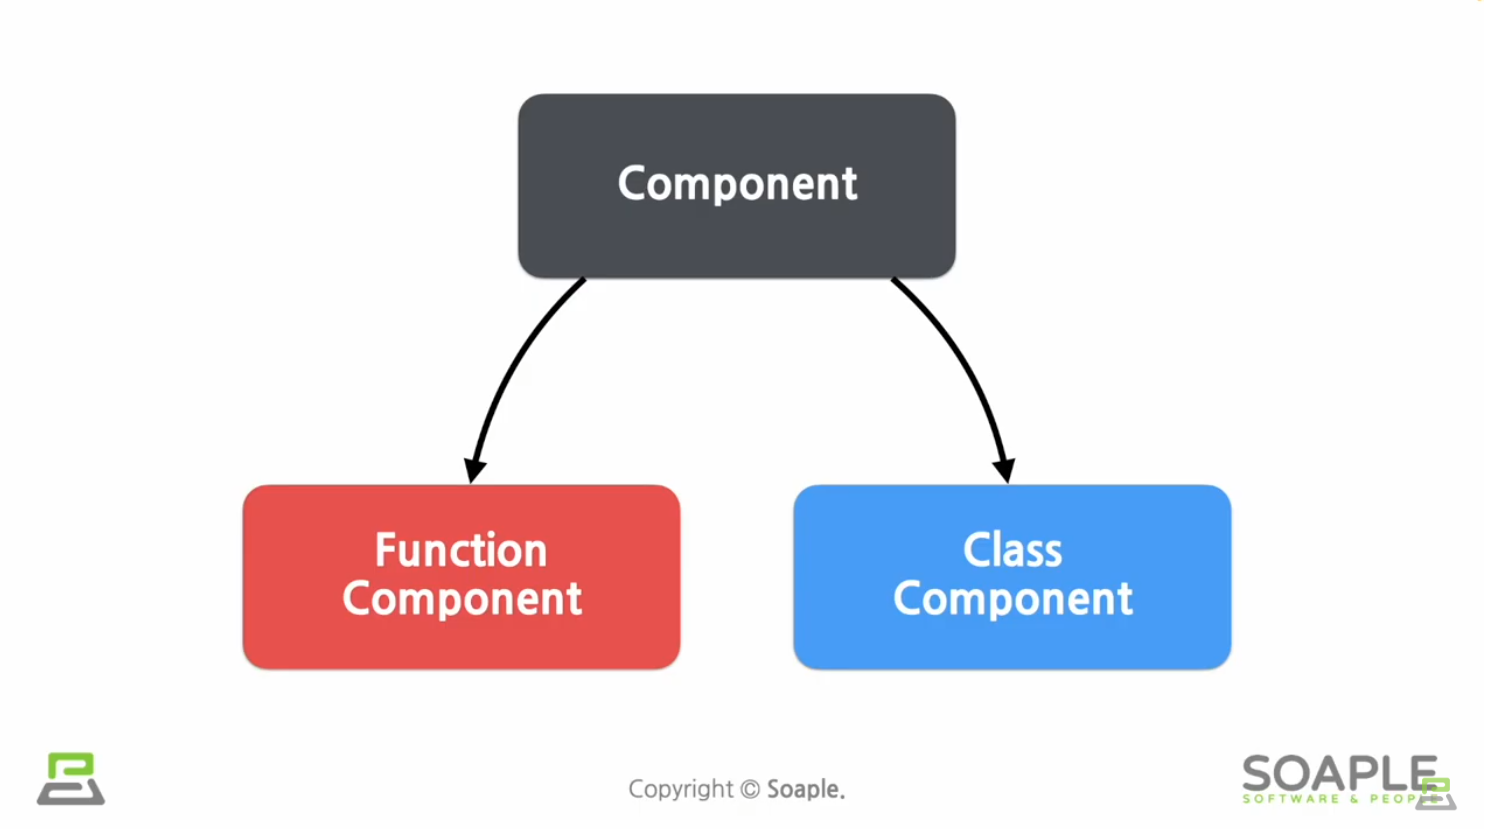
function Components

Class Components
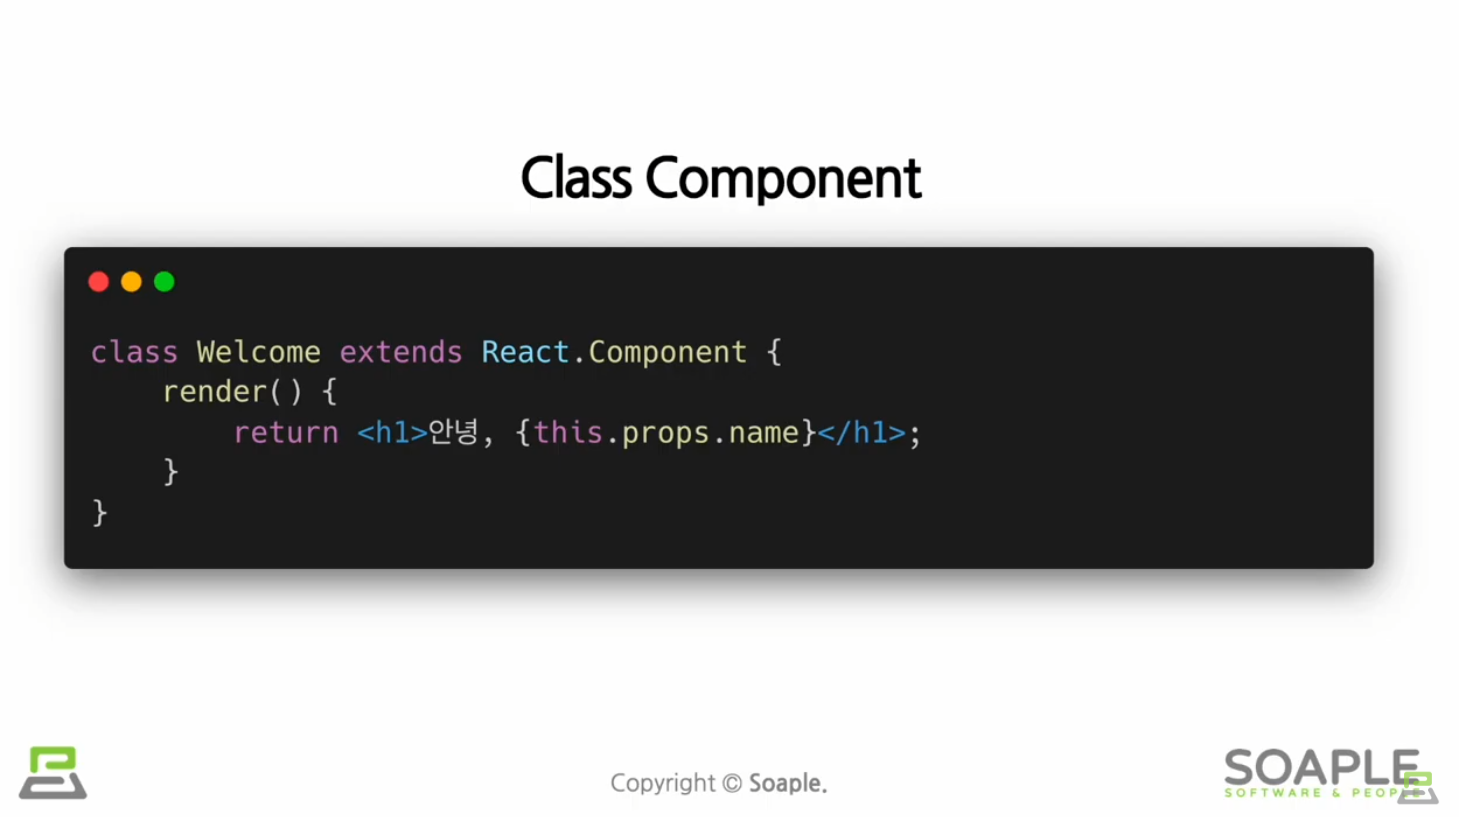
Component의 이름은 항상 대문자로 시작해야 한다
react는 소문자로 시작하는 컴포넌트를 DOM tag로 인식하기 때문
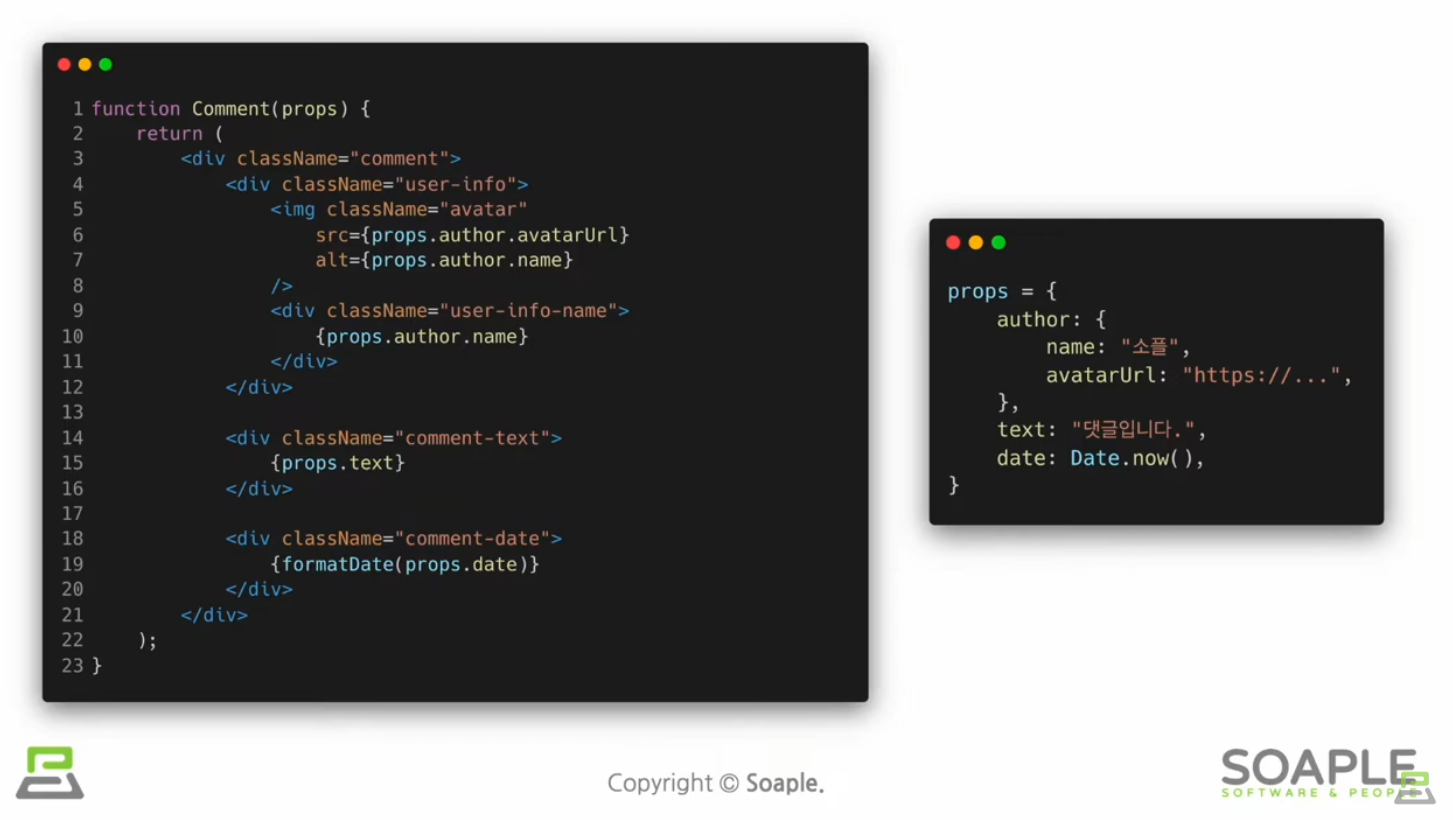
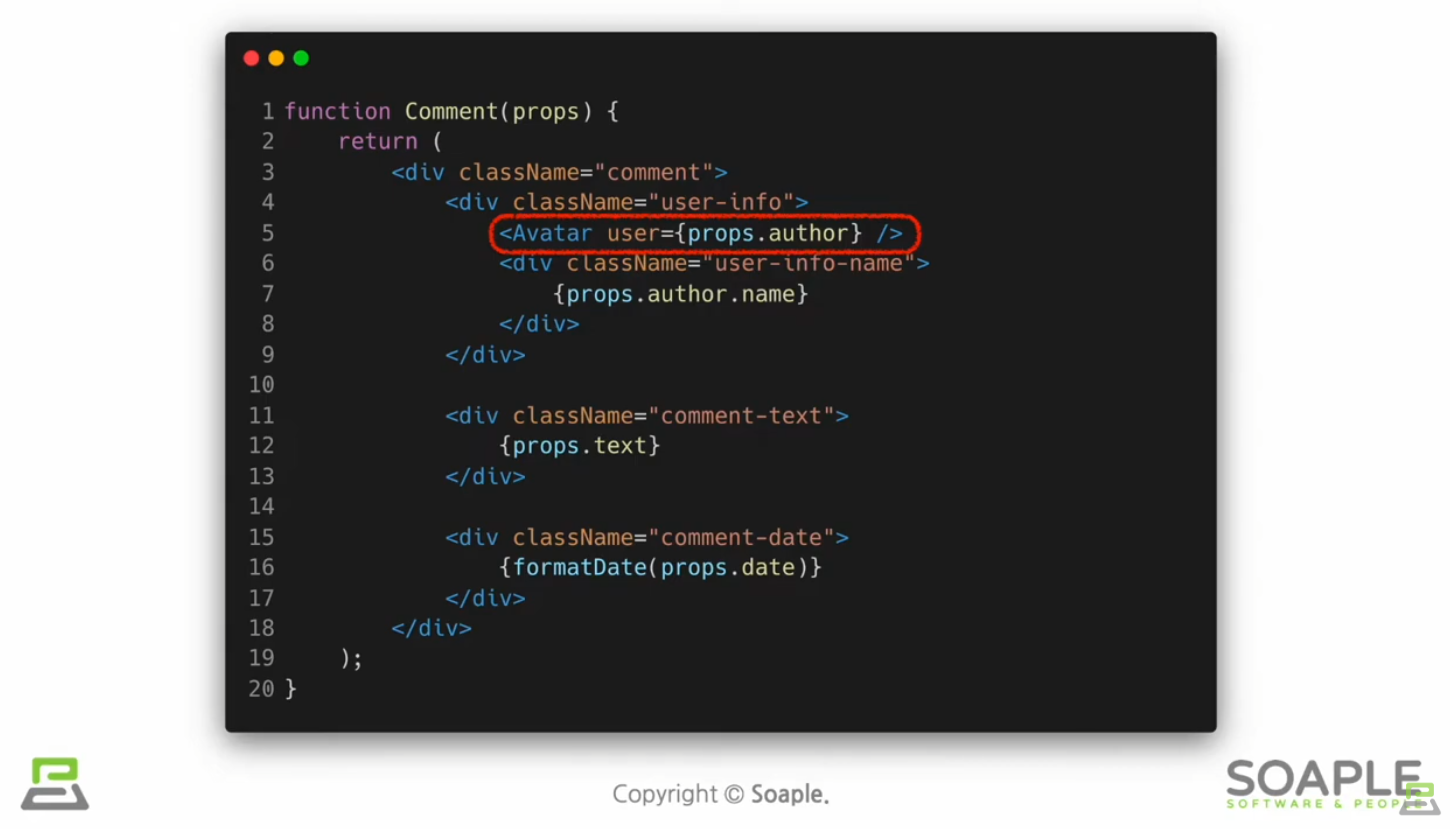
Component 합성
Component 안에 또다른 컴포넌트 생성 가능
=> 복잡한 화면을 여러개의 컴포넌트로 나눠서 구현 가능
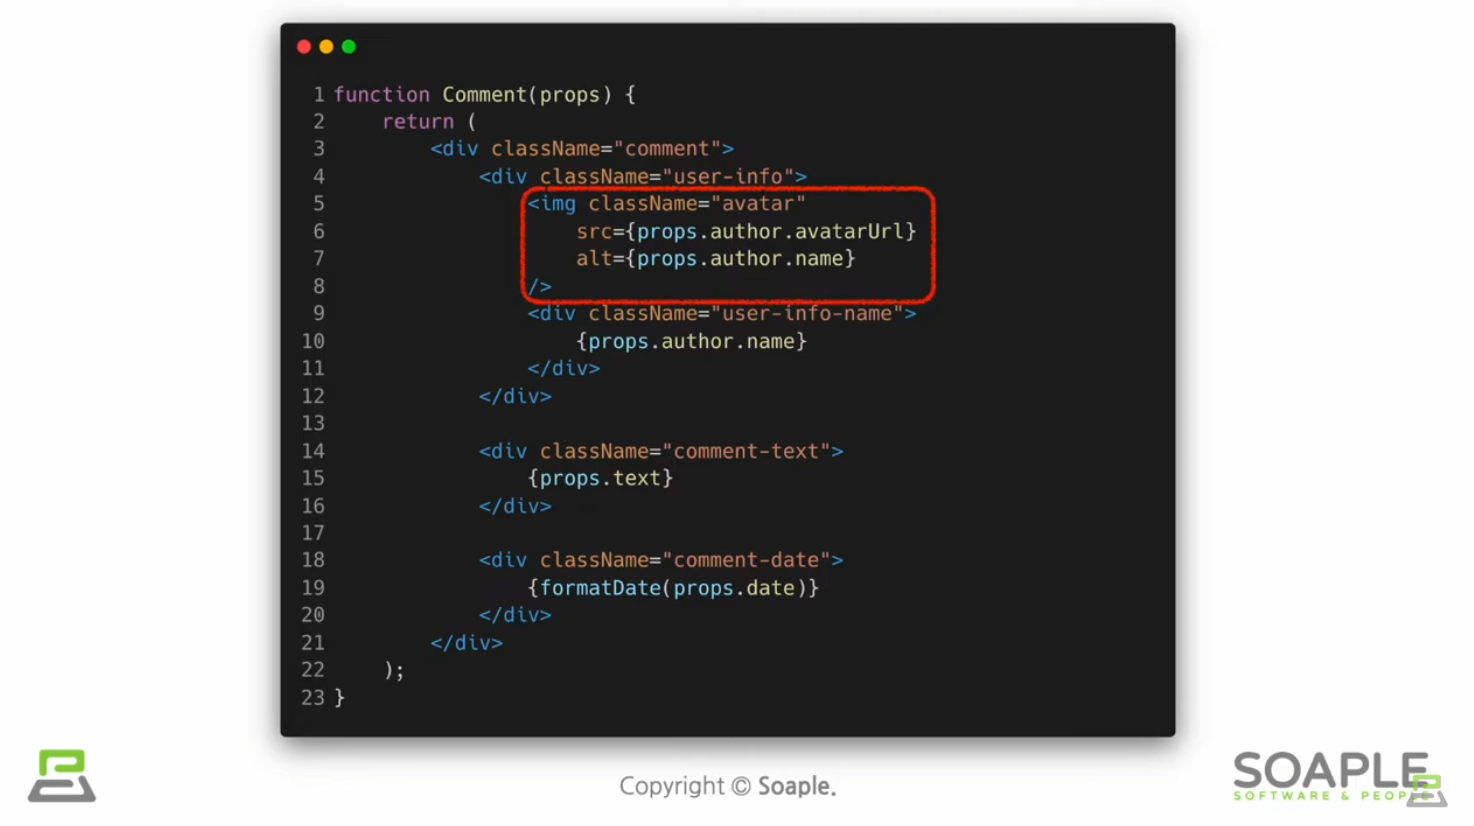
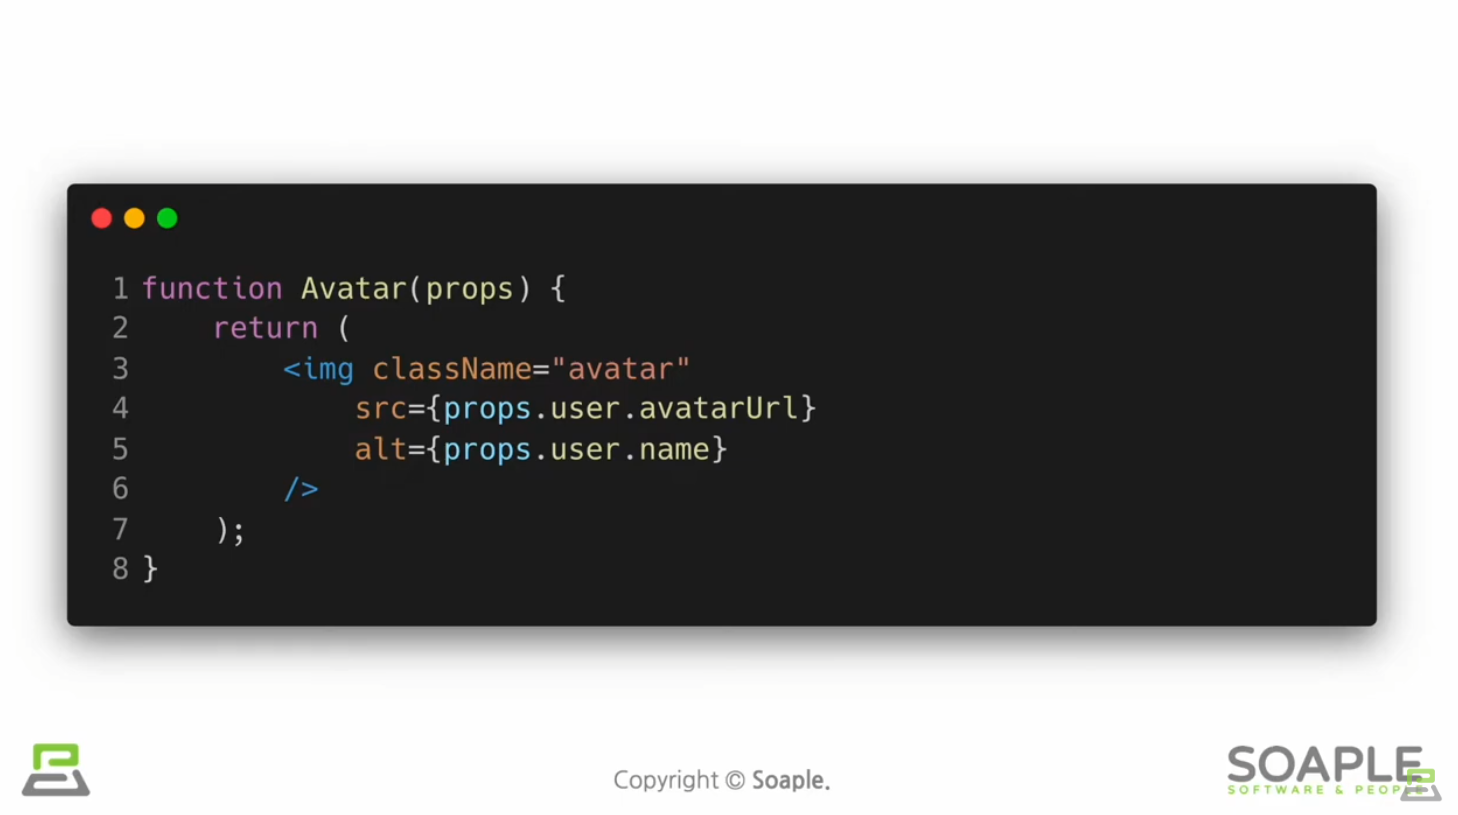
Component 추출
큰 컴포넌트를 나누는 것
재사용성이 높아지고 개발 속도가 빨라진다
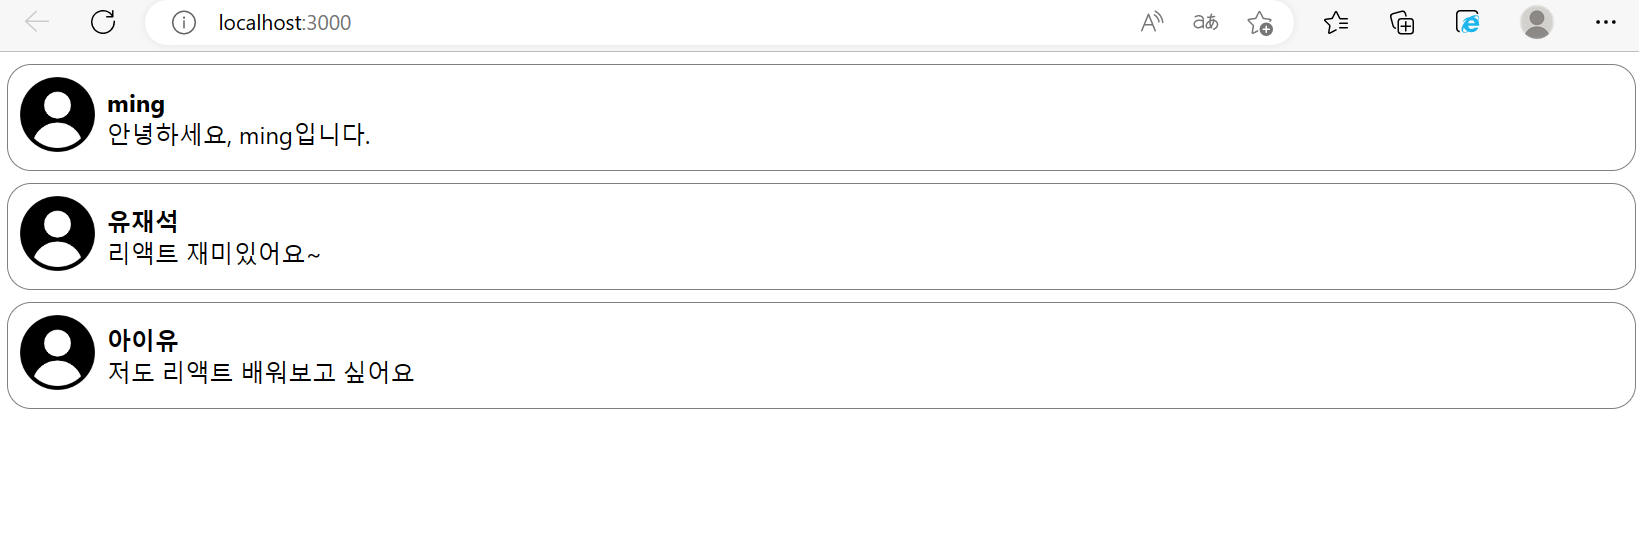
(실습) 댓글 컴포넌트 만들기
Comment.jsx
import React from "react";

const styles = {
    wrapper: {
        margin: 8,
        padding: 8,
        display: "flex",
        flexDirection: "row",
        border: "1px solid grey",
        borderRadius: 16,
    },
    imageContainer: {},
    image: {
        width: 50,
        height: 50,
        borderReadius: 25,
    },
    contentContainer: {
        marginLeft: 8,
        display: "flex",
        flexDirection: "column",
        justifyContent: "center",
    },
    nameText: {
        color: "black",
        fontSize: 16,
        fontWeight: "bold",
    },
    commentText: {
        color: "black",
        fontSize: 16,
    },
};


function Comment(props) {
    return (
        <div style={styles.wrapper}>
            <div style={styles.imageContainer}>
                <img
                    src="https://encrypted-tbn0.gstatic.com/images?q=tbn:ANd9GcTTH7Ef1AWxj1FXo8qUxpn1PE325zPFC0ZZnw&usqp=CAU"
                    style={styles.image}
                />
            </div>

            <div style={styles.contentContainer}>
                <span style={styles.nameText}>{props.name}</span>
                <spna style={styles.commentText}>{props.comment}</spna>
            </div>
        </div>
    );
}

export default Comment;
CommentList.jsx
import React from "react";
import Comment from "./Comment";


const comments = [
    {
        name: "ming",
        comment: "안녕하세요, ming입니다.",
    },
    {
        name: "유재석",
        comment: "리액트 재미있어요~",
    },
    {
        name: "아이유",
        comment: "저도 리액트 배워보고 싶어요",
    },
];


function CommentList(comment) {
    return (
        <div>
            {comments.map((comment) => {
                return (
                <Comment name={comment.name} comment={comment.comment}/>
                );
            })}
        </div>
    );
}

export default CommentList;
index.js
import React from 'react';
import ReactDOM from 'react-dom';
import './index.css';
import reportWebVitals from './reportWebVitals';

import CommentList from './chapter_05/CommentList';


  ReactDOM.render(
  <React.StrictMode>
    <CommentList />
  </React.StrictMode>,
  document.getElementById('root')
);


reportWebVitals();
결과물
State and Lifecycle
state란?
리액트 Component의 변경 가능한 데이터
state는 개발자가 정의한다
렌더링이나 데이터 흐름에 사용되는 값만 state에 포함시켜야함
state는 자바스크립트 객체
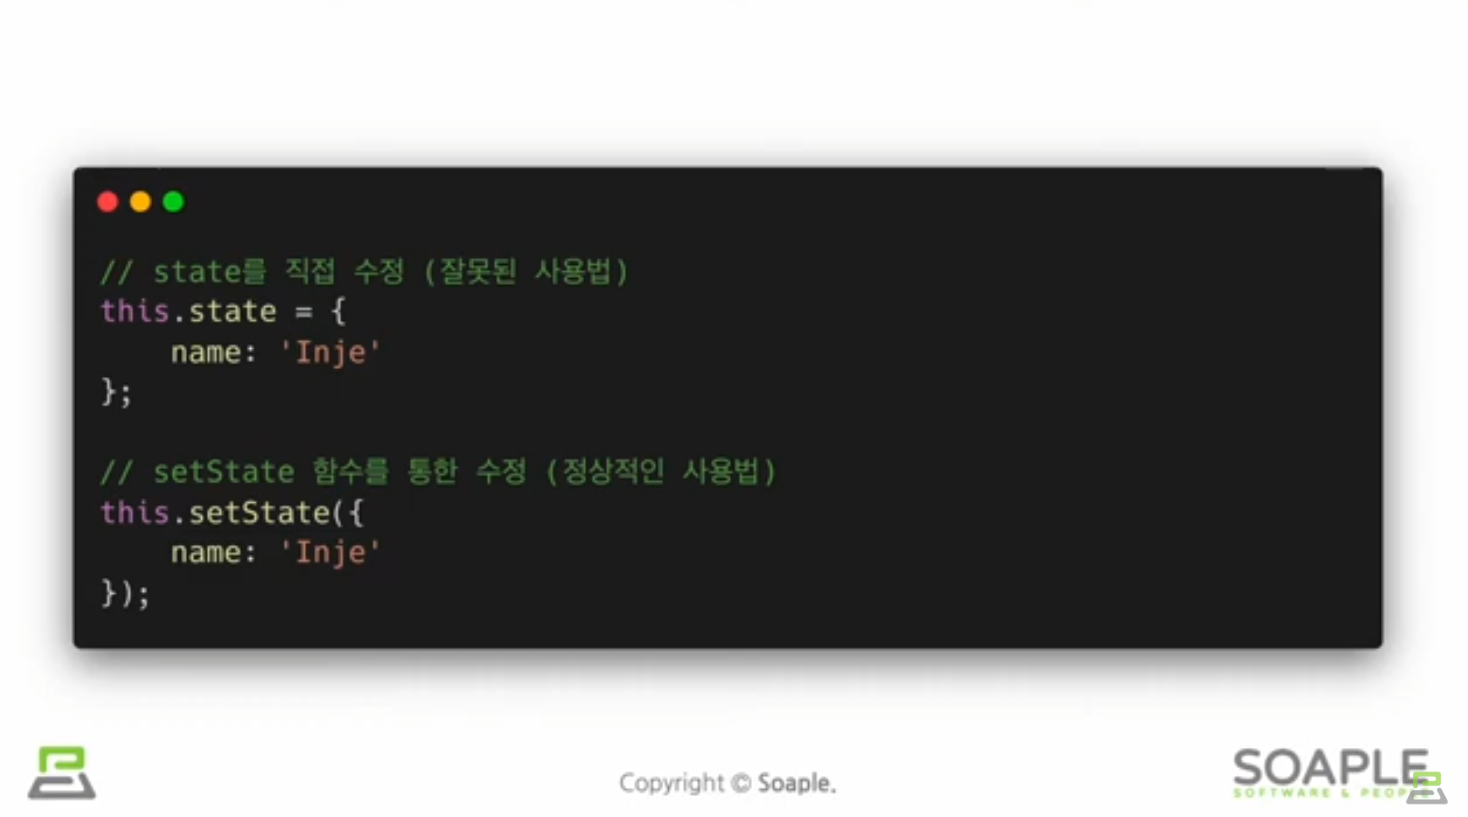
state는 직접 수정할 수 없다(하면 안 된다)
Lifecycle
리액트 Component의 생명주기
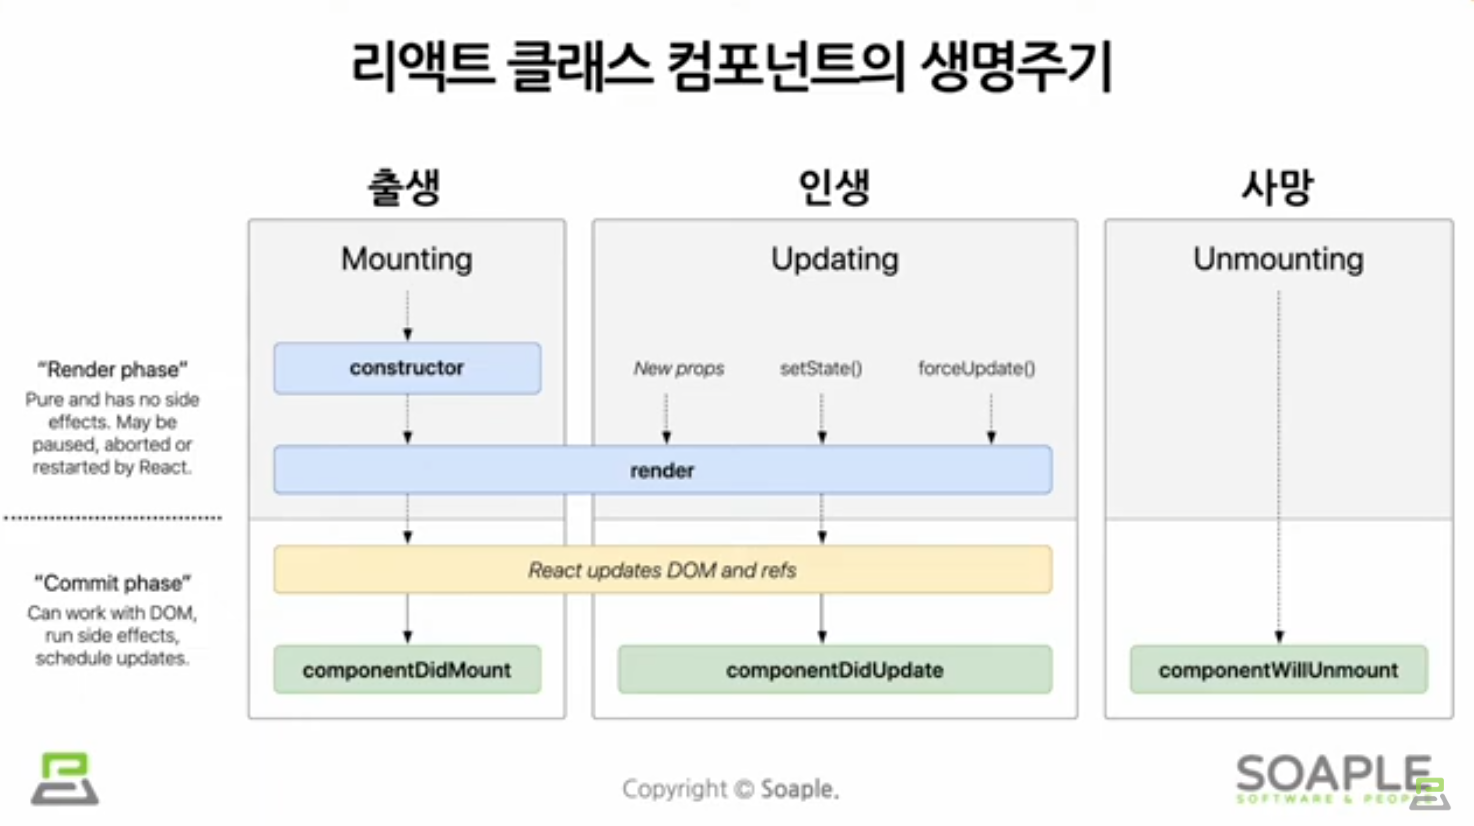
컴포넌트는 계속 존재하는 것이 아니라 시간의 흐름에 따라 생성되고 업데이트되다가 사라진다
(실습) state 사용하기
NotificationList.jsx
import React from "react";
import Notification from "./Notification";

const reservedNotifications = [
    {
        message: "안녕하세요, 오늘 일정을 알려드립니다.",
    },
    {
        message: "점심식사 시간입니다.",
    },
    {
        message: "이제 곧 미팅이 시작됩니다.",
    },
];

var timer;

class NotificationList extends React.Component {
    constructor(props) {
        super(props);

        this.state = {
            notifications: [],
            //앞으로 사용할 데이터를 class에 넣어서 초기화
        };
    }

    componentDidMount() {
        const { notifications } = this.state;
        timer = setInterval(() => {
            if (notifications.length < reservedNotifications.length) {
                const index = notifications.length;
                notifications.push(reservedNotifications[index]);
                this.setState({
                    notifications: notifications,
                    //state를 업데이트하기 위해 setState 사용
                });
            } else {
                clearInterval(timer);
            }
        }, 1000);
    }
    //1초마다 정해진 작업을 수행하게 함

    render() {
        return(
            <div>
                {this.state.notifications.map((notification) => {
                    return <Notification message={notification.message} />;
                })}
            </div>
        );
    }
}

export default NotificationList;
Notification.jsx
import React from "react";

const styles = {
    wrapper: {
        margin: 8,
        padding: 8,
        display: "flex",
        flexDirection: "row",
        border: "1px solid grey",
        borderRadius: 16,
    },
    messageText: {
        color: "black",
        fontSize: 16,
    },
};

class Notification extends React.Component {
    constructor(props) {
        super(props);

        this.state = {};
        //state에 아무런 데이터도 가지고 있지 않다
    }

    render() {
        return (
            <div style={styles.wrapper}>
                <span style={styles.messageText}>{this.props.message}</span>
            </div>
        );
    }
}

export default Notification;
결과물
React Developer Tools 설치하기


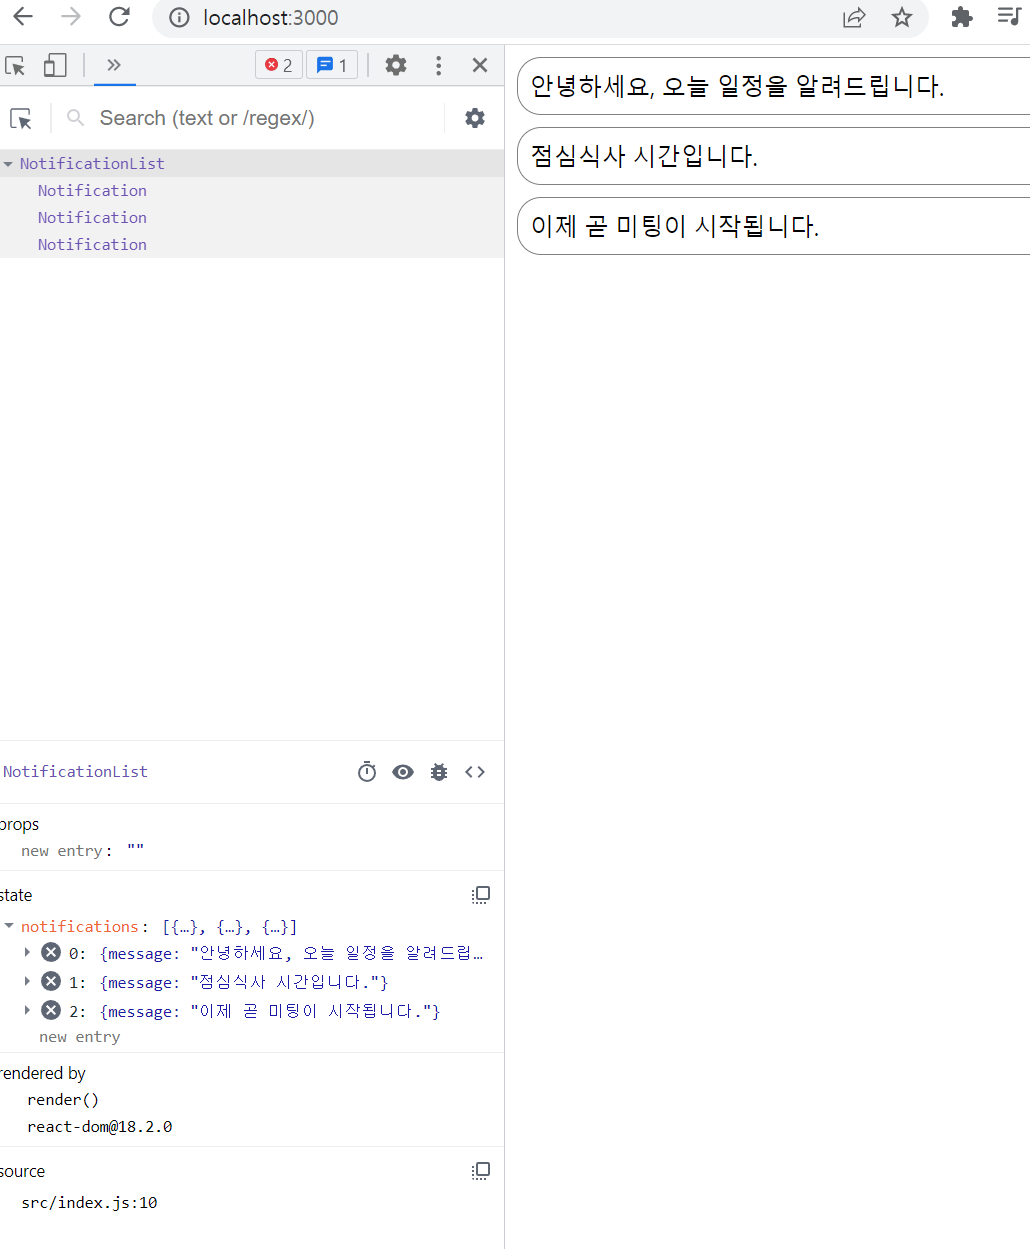
어떤 컴포넌트가 렌더링되었는지, 렌더링 소요시간, 왜 다시 렌더링되었는지 등 확인 가능 -> 이를 통해 불필요하게 렌더링되거나 무거운 컴포넌트를 찾아서 최적화함으로써 리액트 성능 개선
Hooks
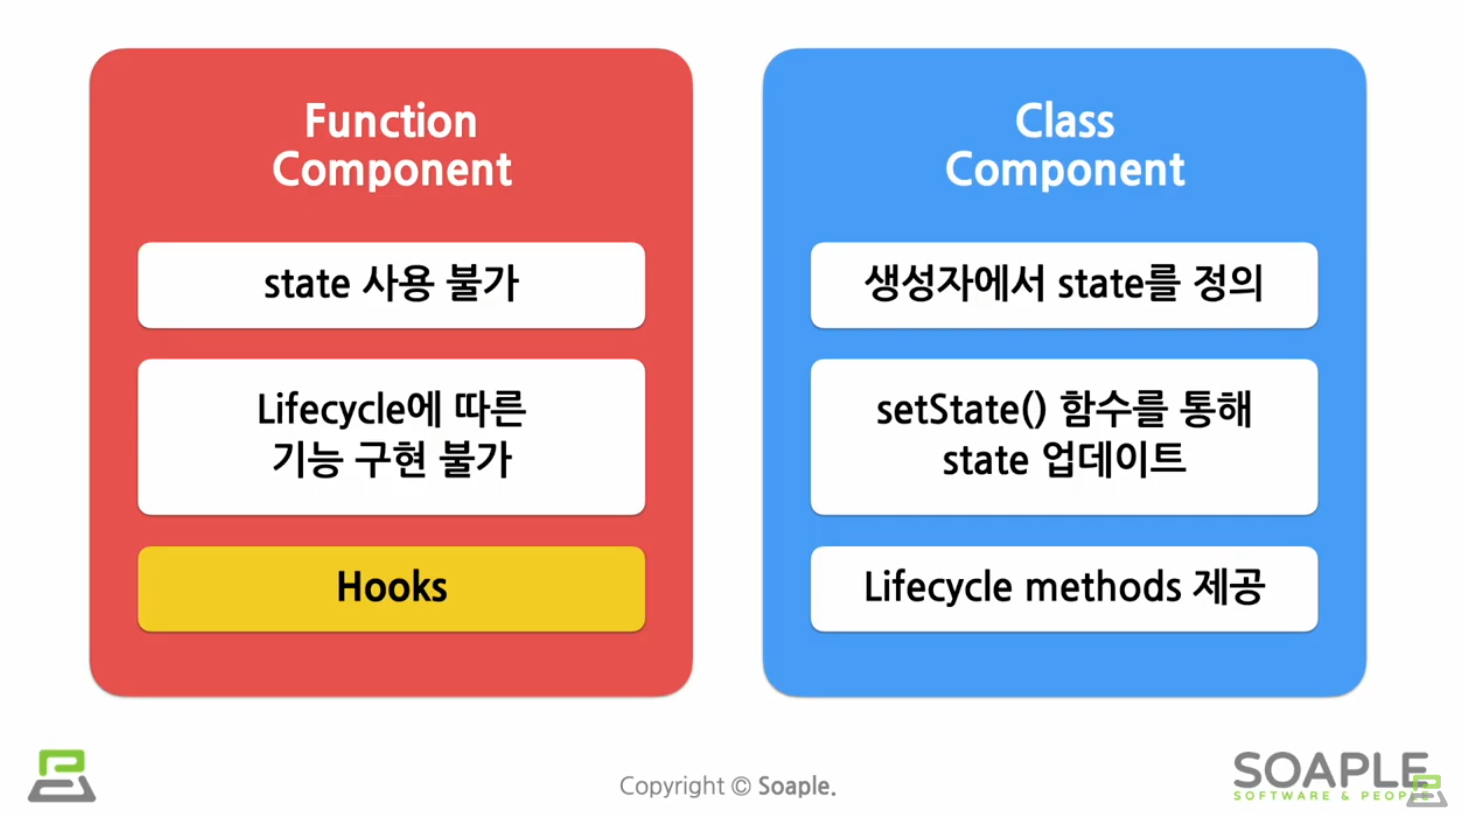
: 기존의 function component는 state 사용 불가/Lifecycle에 따른 기능 구현 불가였다 보완하기 위해 나온 게 Hooks

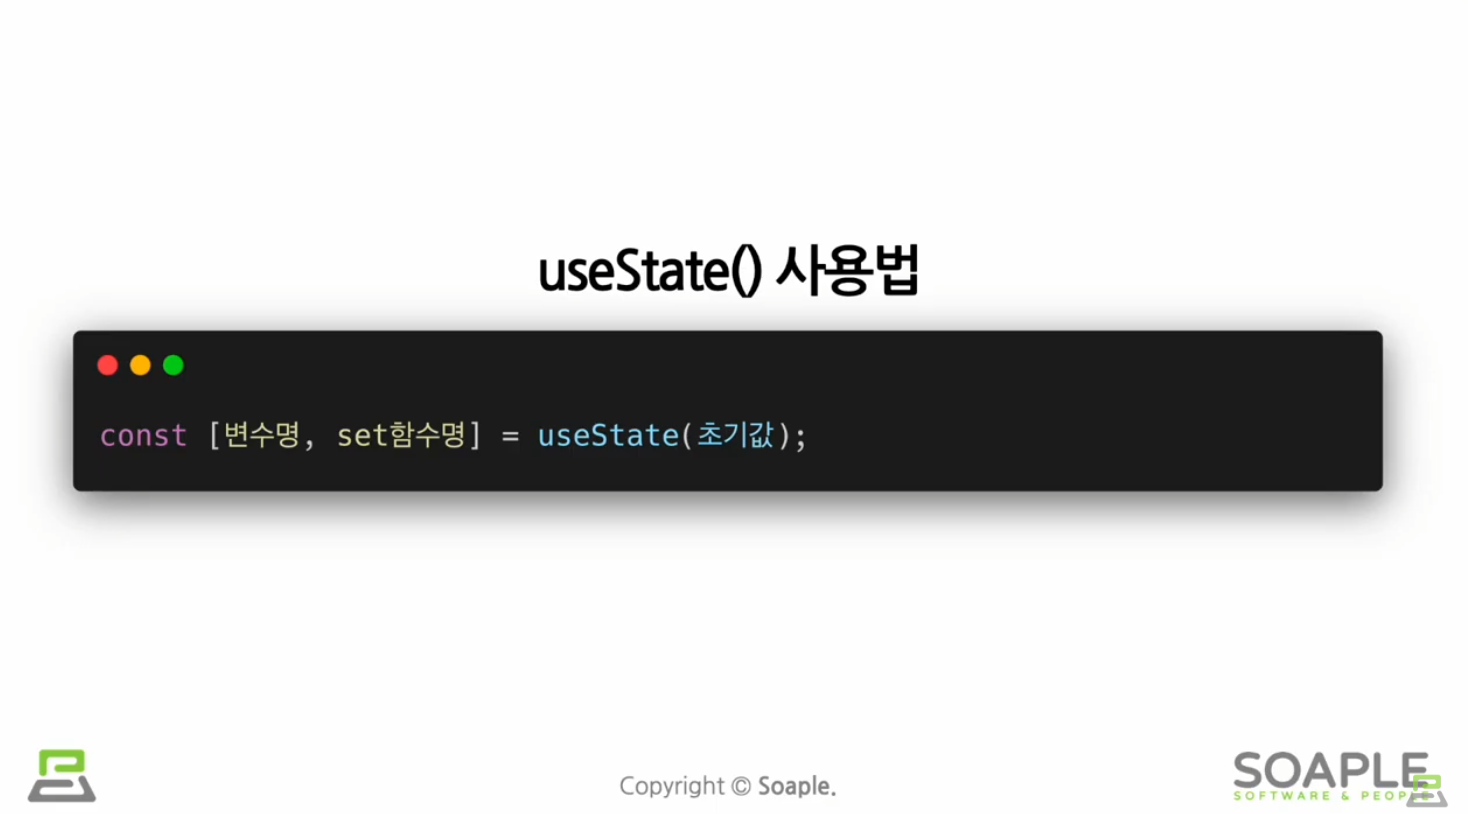
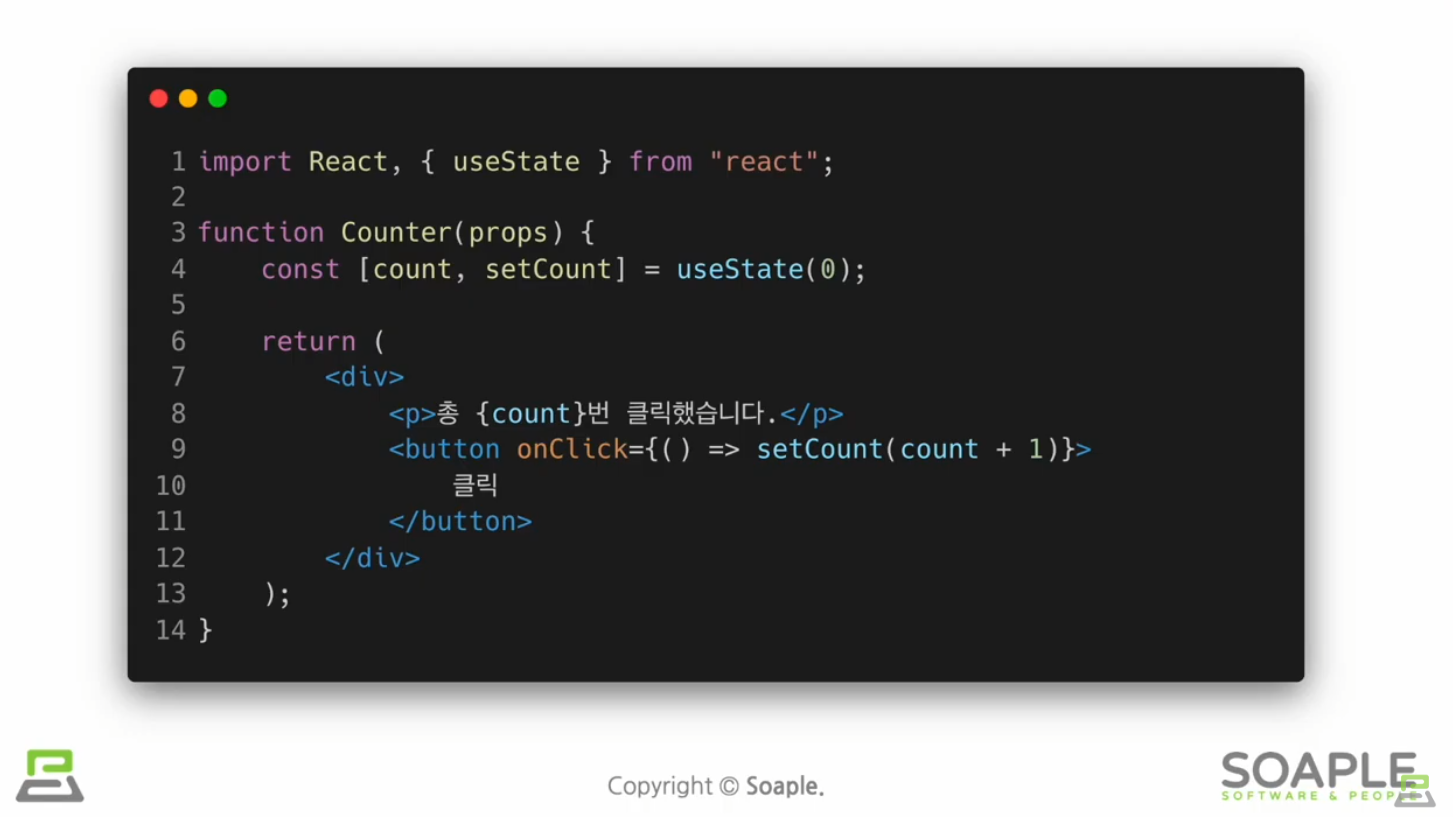
useState()
state를 사용하기 위한 Hook
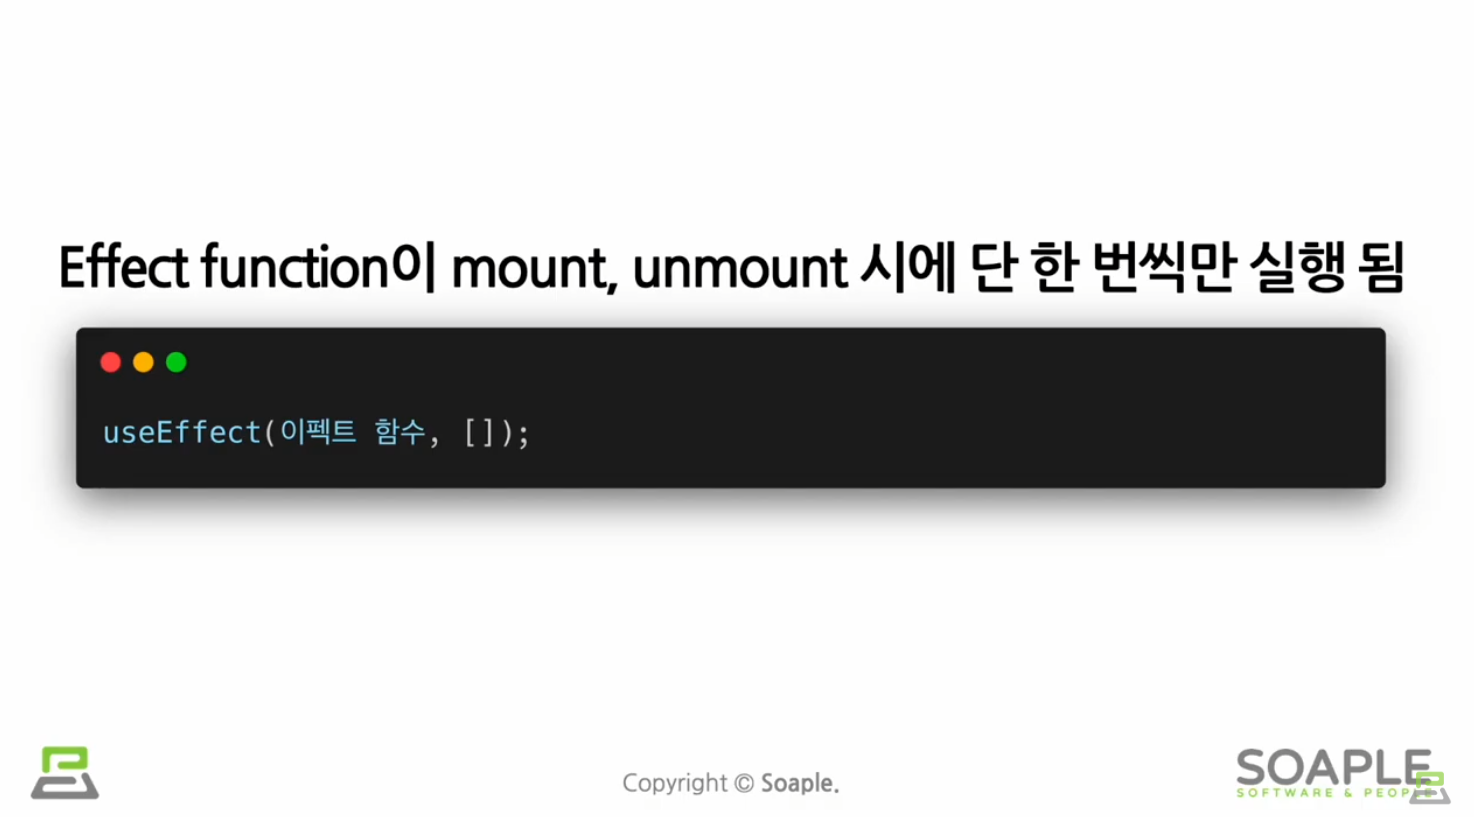
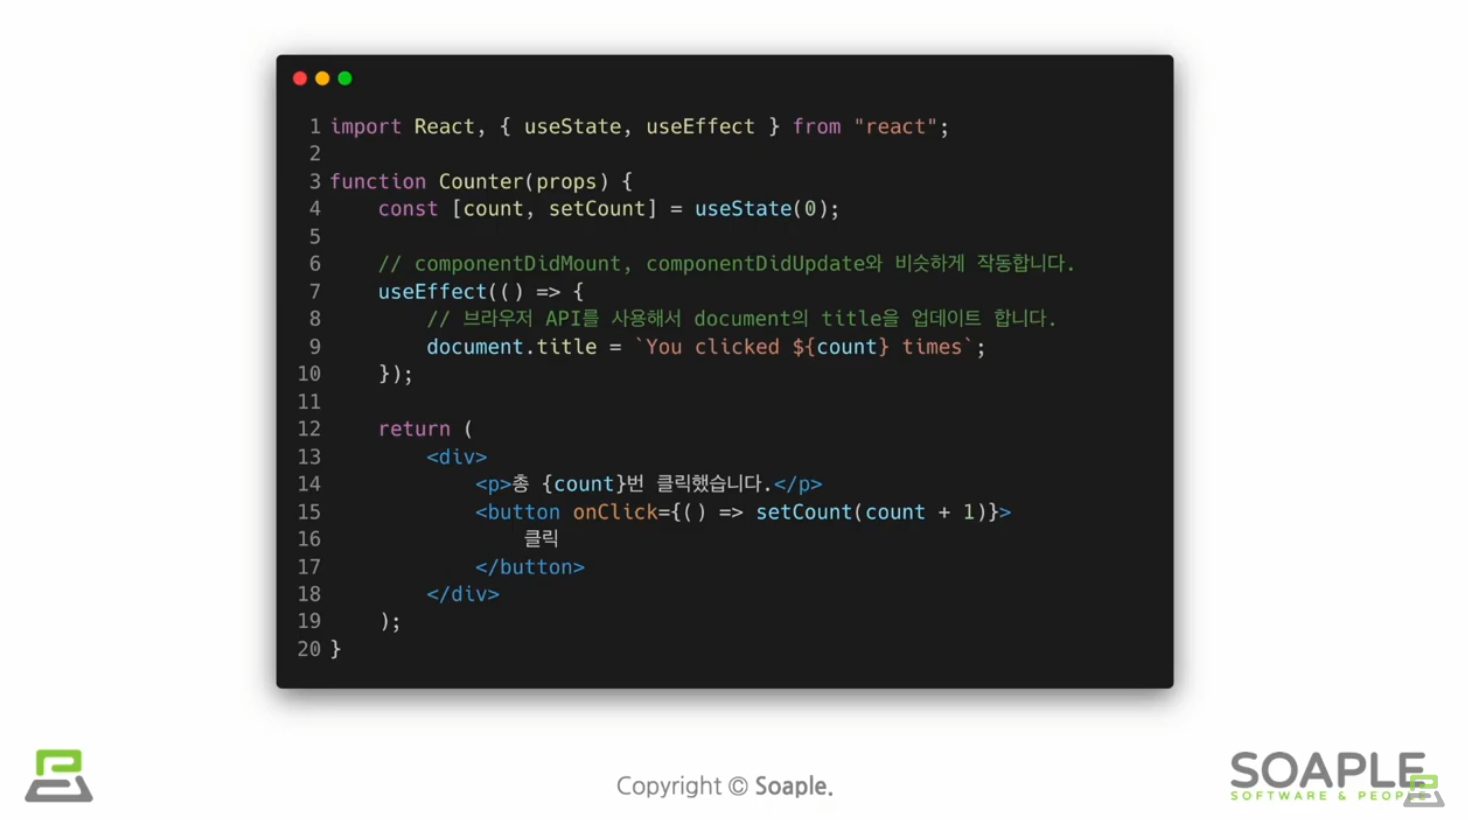
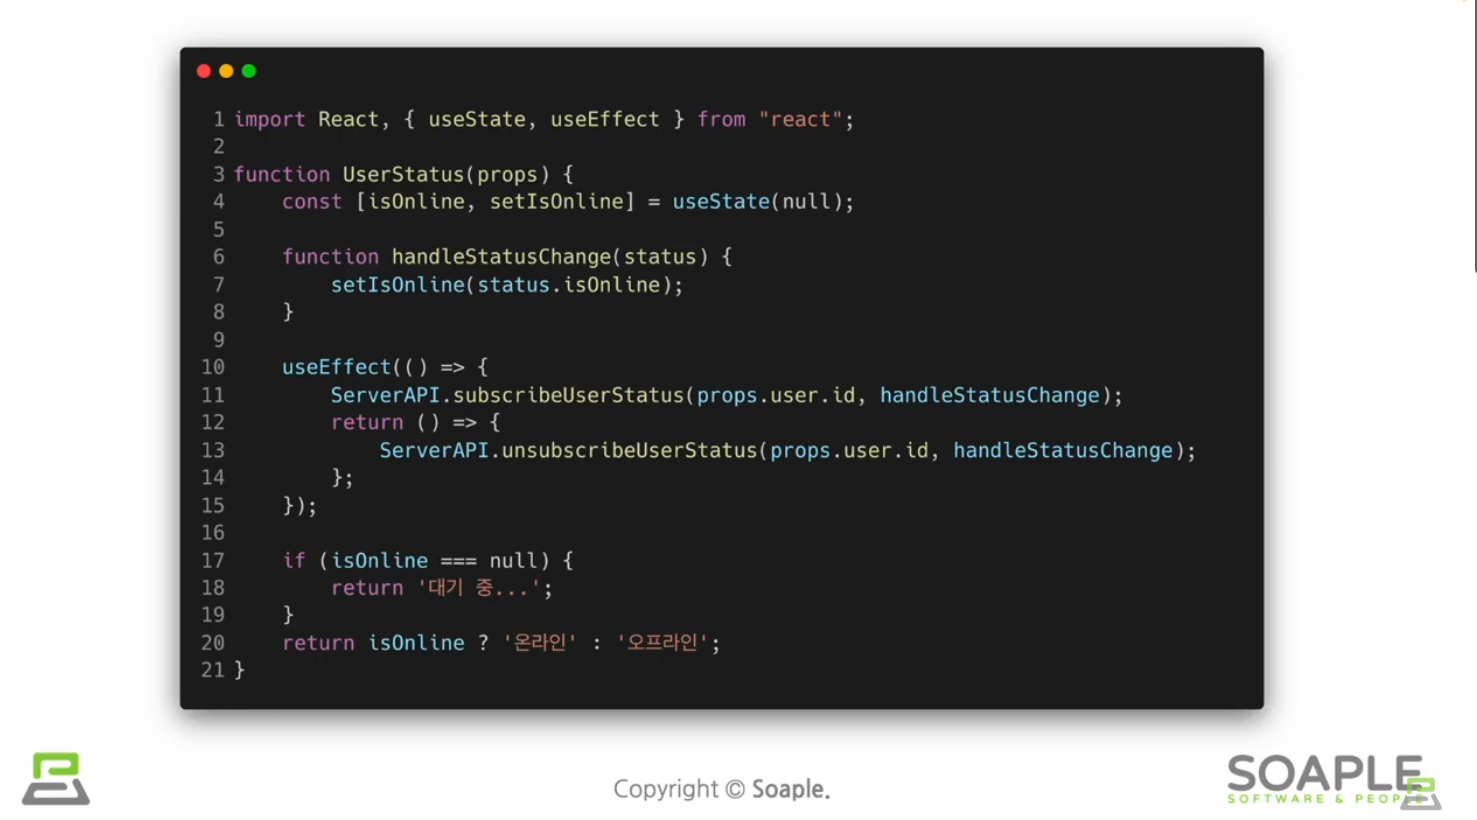
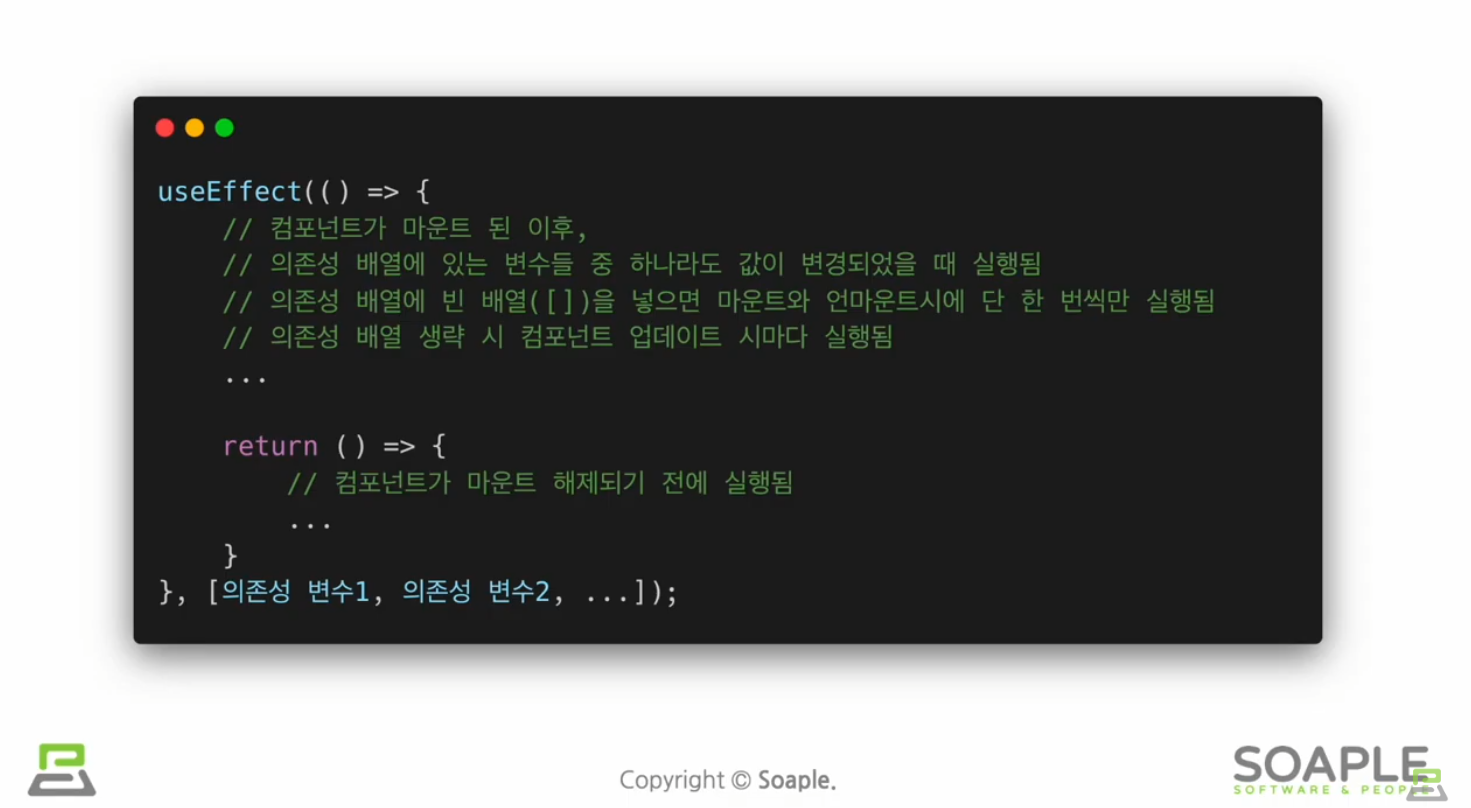
useEffect()
side effect(=효과, 영향/다른 컴포넌트에 영향을 미칠 수 있으며, 렌더링 중에는 작업이 완료될 수 없다)를 이용하기 위한 Hook


useMemo()
Memoized value를 리턴하는 Hook


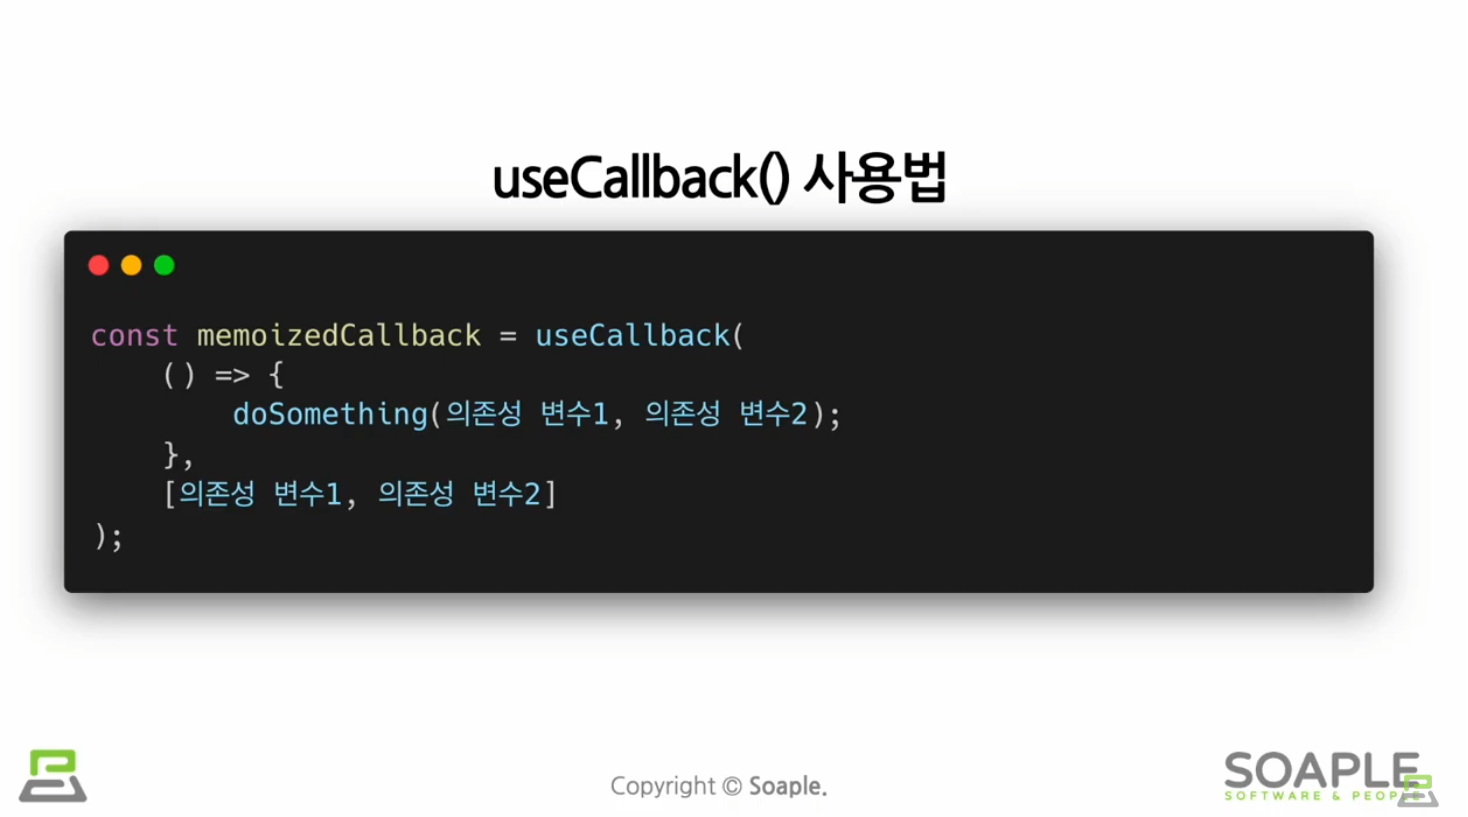
useCallback()
useMemo() Hook과 유사하지만 값이 아닌 함수를 반환

useRef()
Reference(특정 컴포넌트에 접근할 수 있는 객체)를 사용하기 위한 Hook
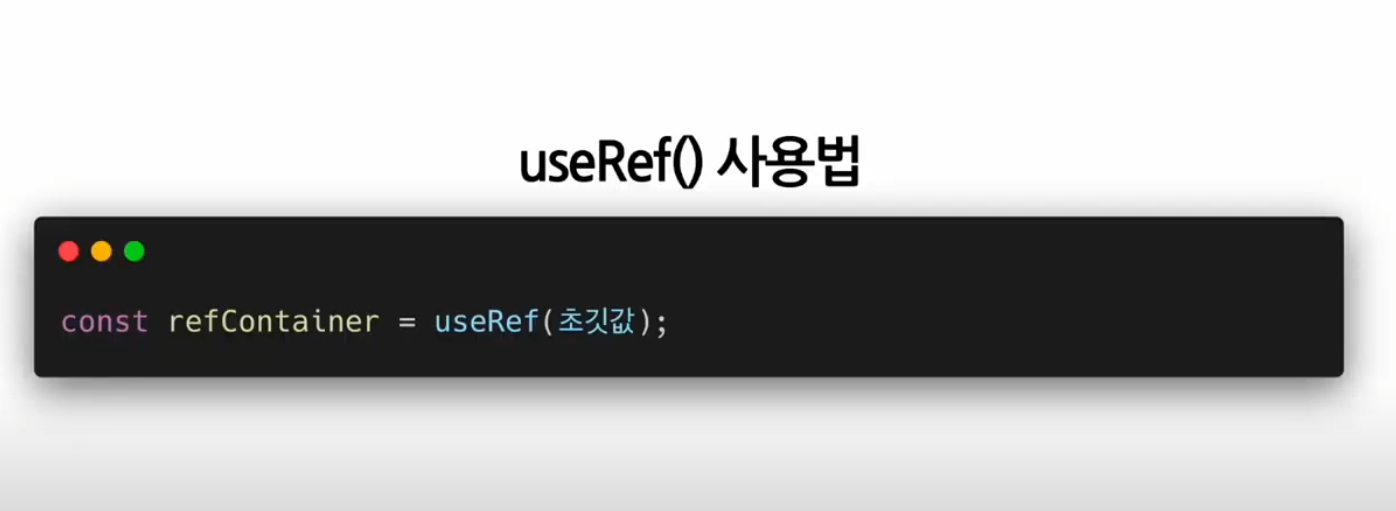
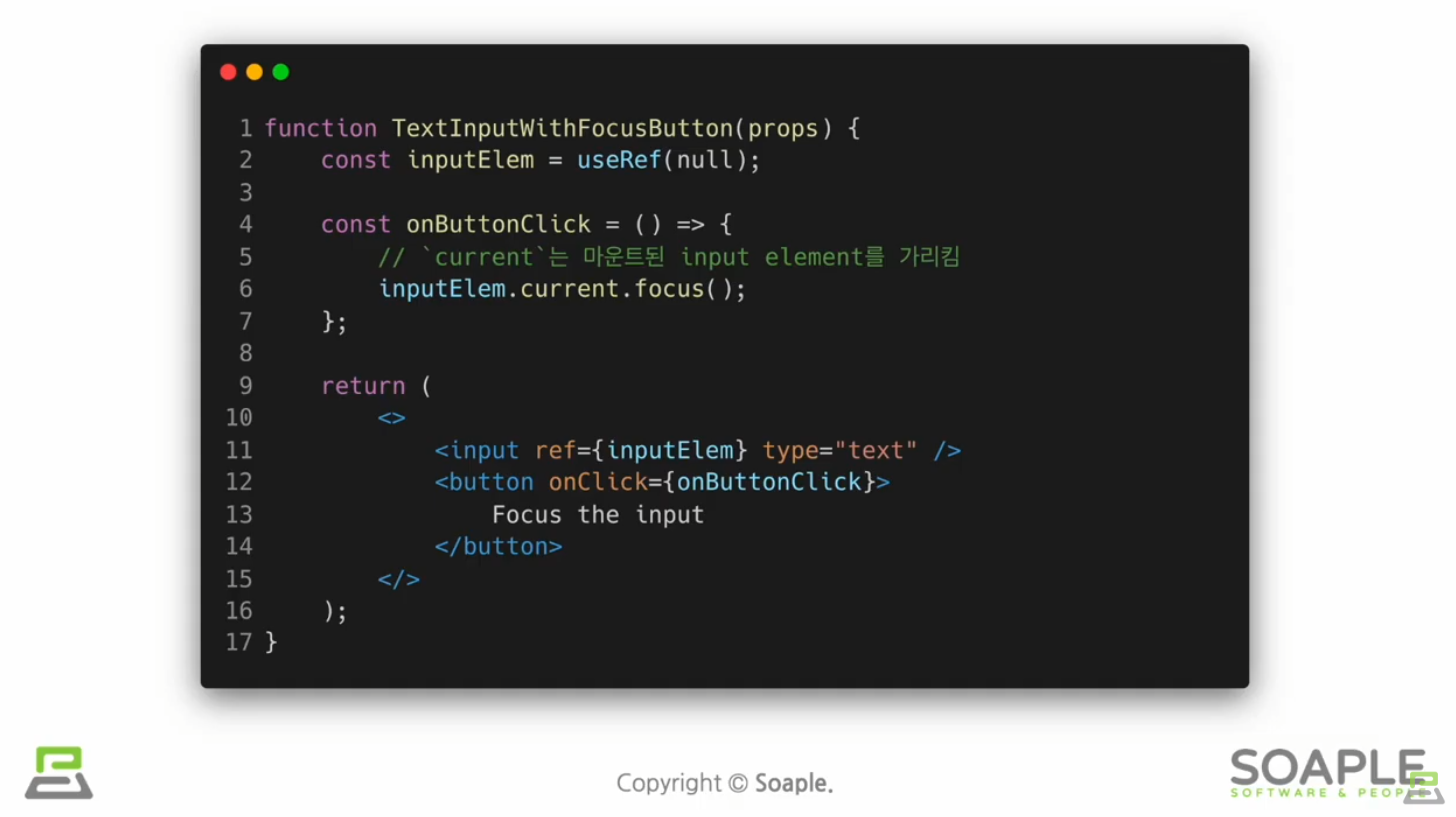
:useRef() Hook은 내부의 데이터가 변경되었을 때 별도로 알리지 않는다
Hook의 규칙
무조건 최상위 레벨에서만 호출해야 한다
컴포넌트가 렌더링될때마다 매번 같은 순서로 호출되어야 한다
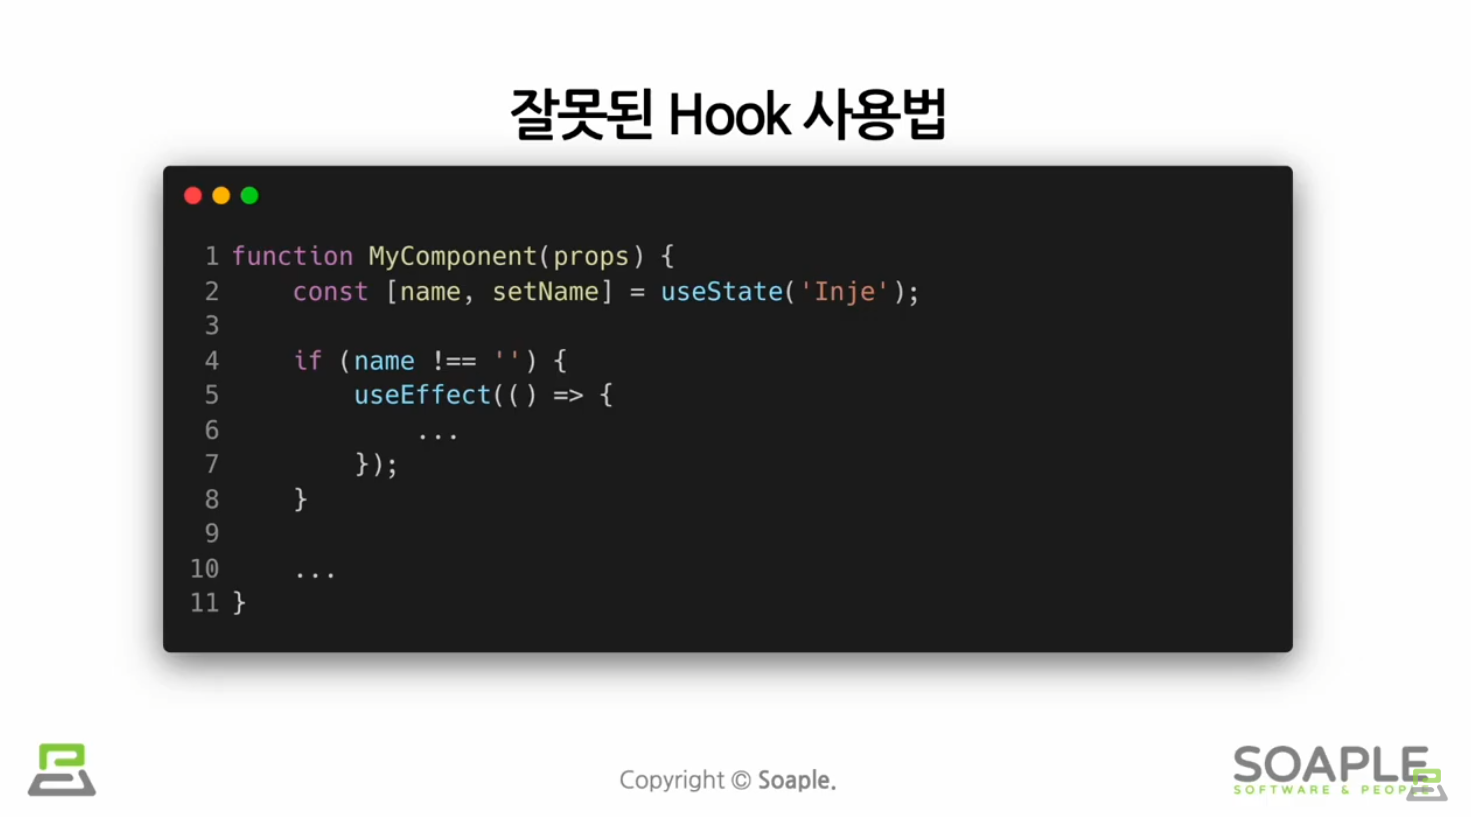
리액트 함수 컴포넌트에서만 Hook을 호출해야 한다
Custom Hook 만들기 예제
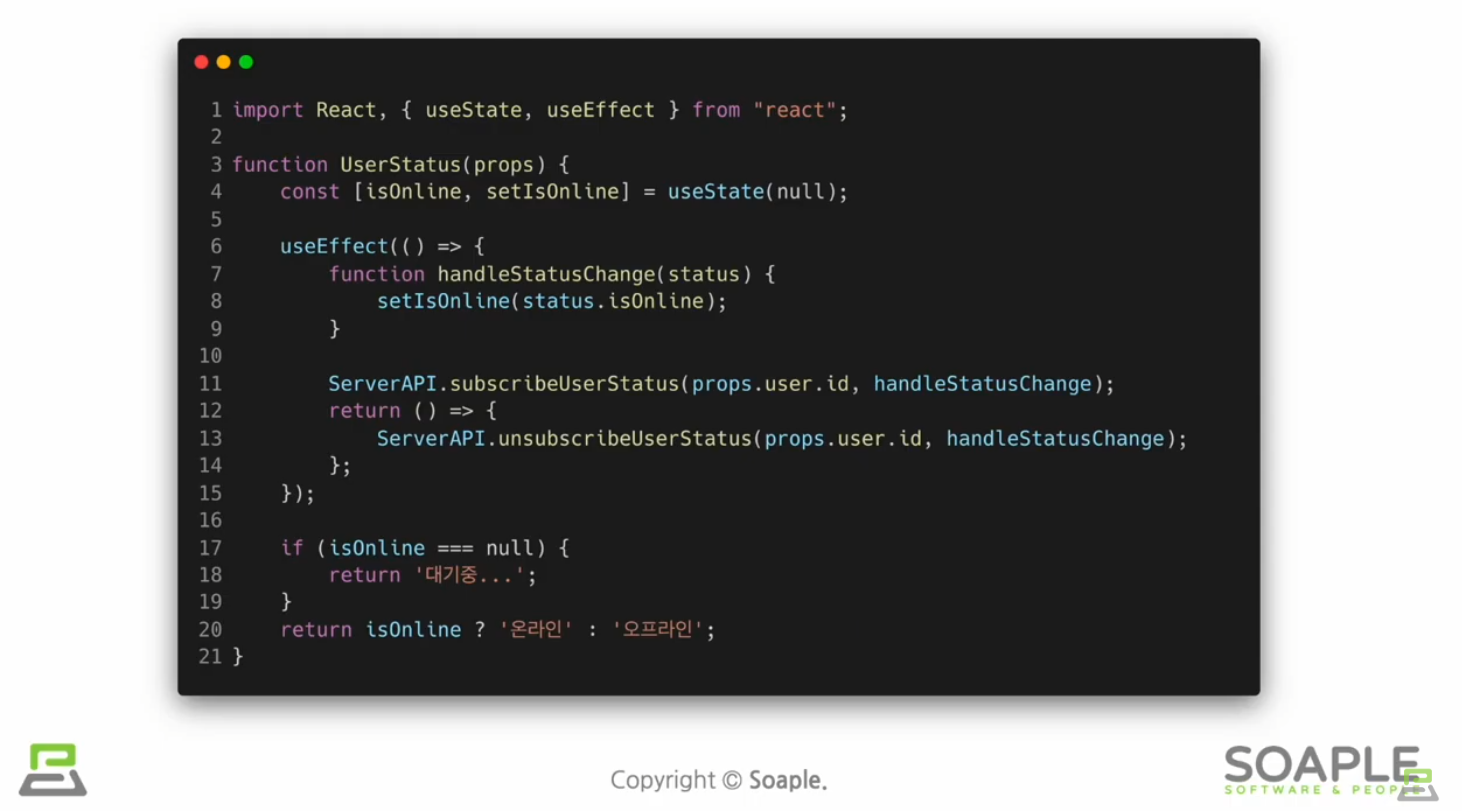
Custom Hook을 만들어야 하는 상황
Custom Hook 추출하기
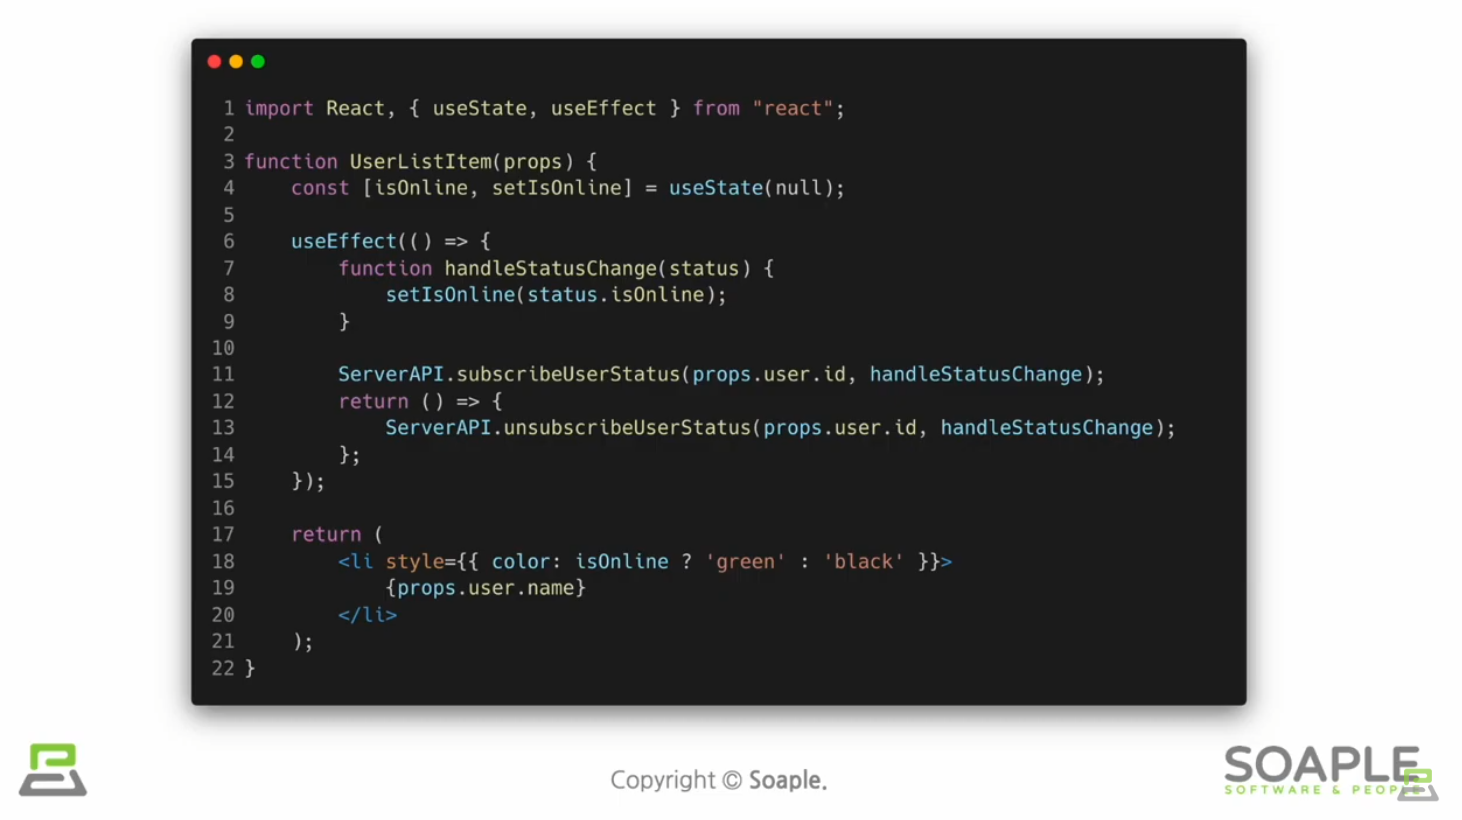
중복되는 로직을 커스텀훅으로 추출하기
커스텀훅은 이름이 use로 시작하고 내부에서 다른 Hook을 호출하는 하나의 자바스크립트 함수
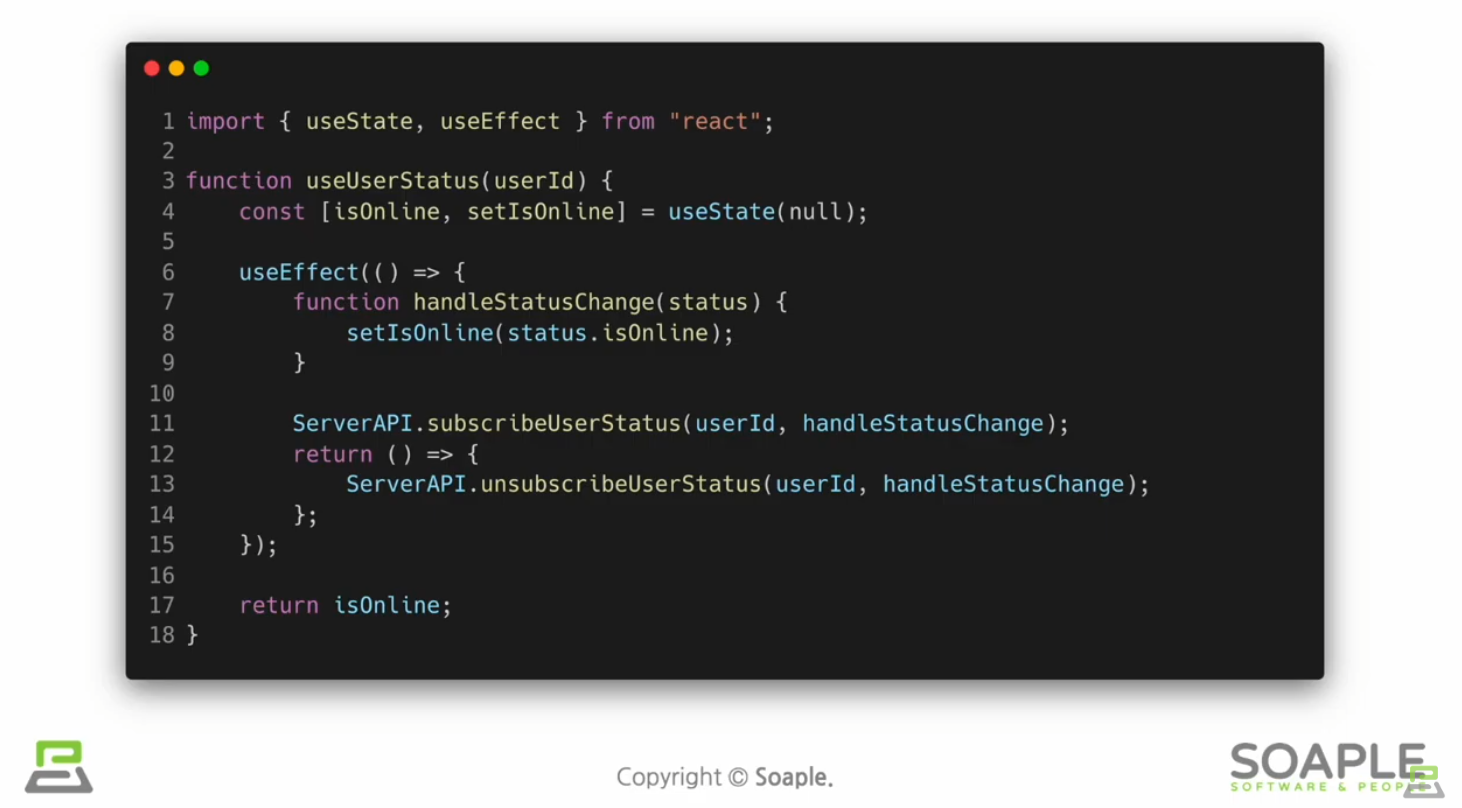
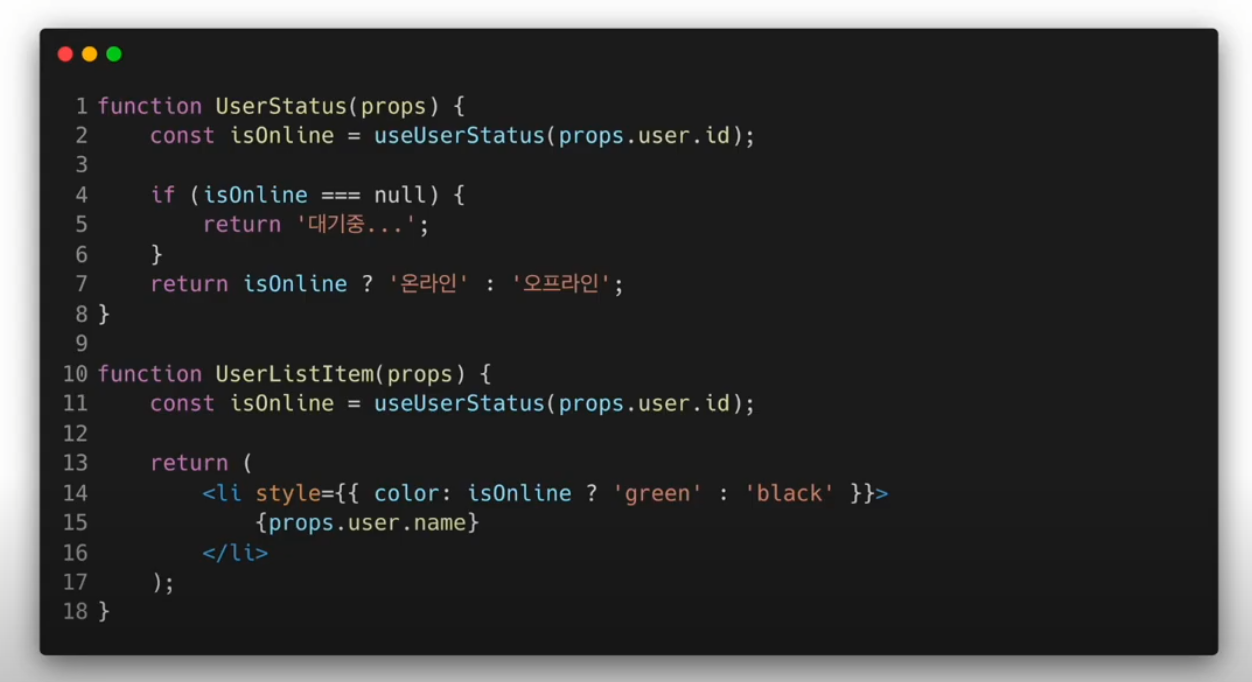
여러개의 컴포넌트에서 하나의 커스텀 훅을 사용할 때 컴포넌트 내부에 있는 모든 state와 effects는 전부 분리되어있다
(실습) Hooks 사용해보기
useCounter.jsx
import React, { useState } from "react";

function useCounter(initialValue) {
    const [count, setCount] = useState(initialValue);

    const increaseCount = () => setCount((count) => count + 1);
    const decreaseCount = () => setCount((count) => Math.max(count - 1, 0));

    return [count, increaseCount, decreaseCount];
}

export default useCounter;
Accommodate.jsx
import React, { useState, useEffect } from "react";
import useCounter from "./useCounter";

const MAX_CAPACITY = 10;

function Accommodate(props) {
    const [isFull, setIsFull] = useState(false);
    const [count, increaseCount, decreaseCount] = useCounter(0);

    useEffect(() => {
        console.log("=======");
        console.log("useEffect() is called.");
        console.log(`isFull: ${isFull}`);
    });

    useEffect(() => {
        setIsFull(count >= MAX_CAPACITY);
        console.log(`Current count value: ${count}`);
    }, [count]);

    return (
        <div style={{ padding: 16 }}>
            <p>{`총 ${count}명 수용했습니다`}</p>

            <button onClick={increaseCount} disabled={isFull}>
                입장
            </button>
            <button onClick={decreaseCount}>퇴장</button>

            {isFull && <p style={{ color: "red"}}>정원이 가득찼습니다.</p>}
        </div>
    );
}

export default Accommodate;
결과물
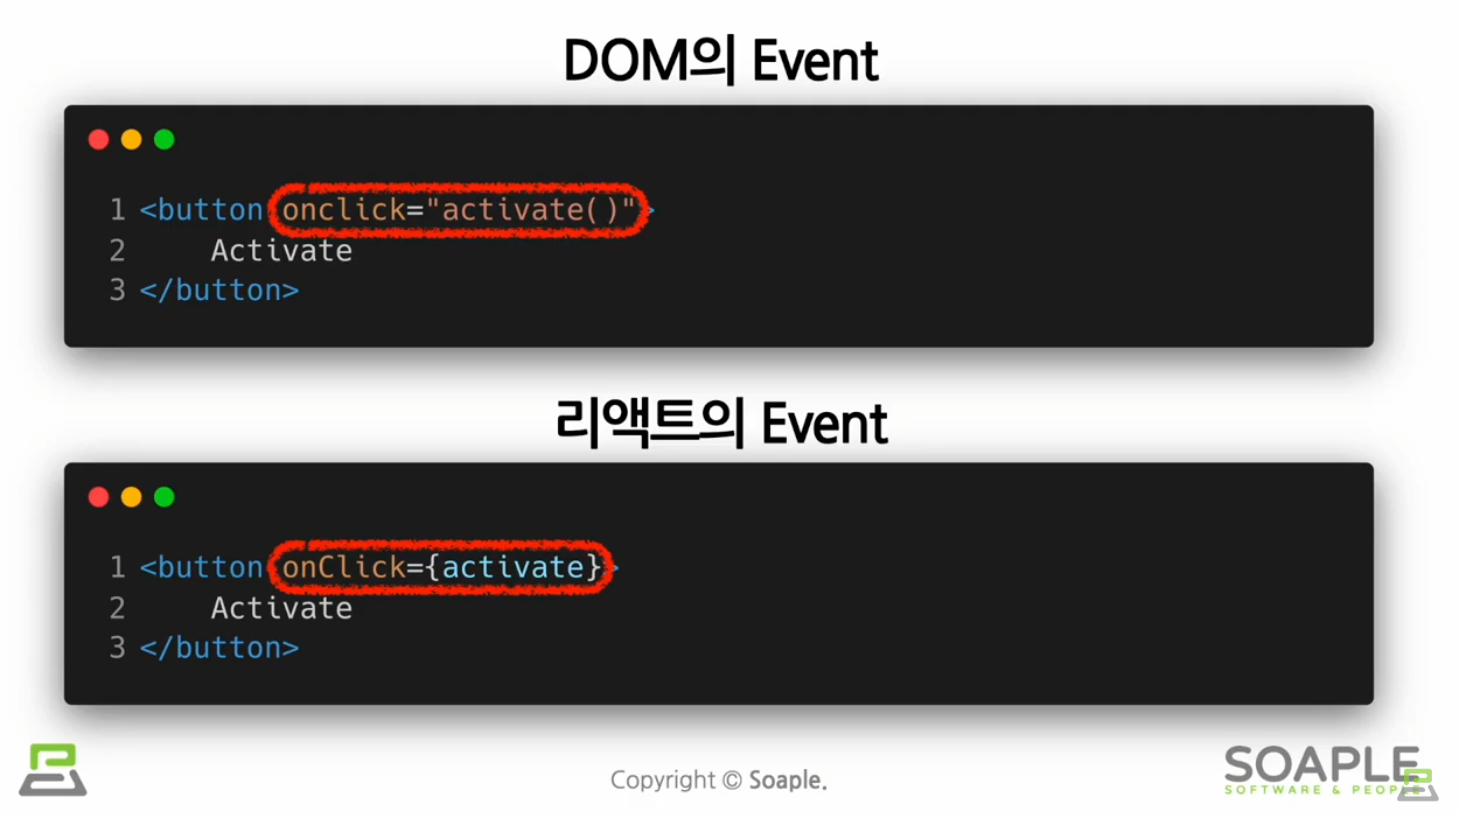
Handling Events
Event의 정의
어떤 일(사건)이 일어나는 것 ex. 버튼 클릭하는 것=버튼 클릭 이벤트
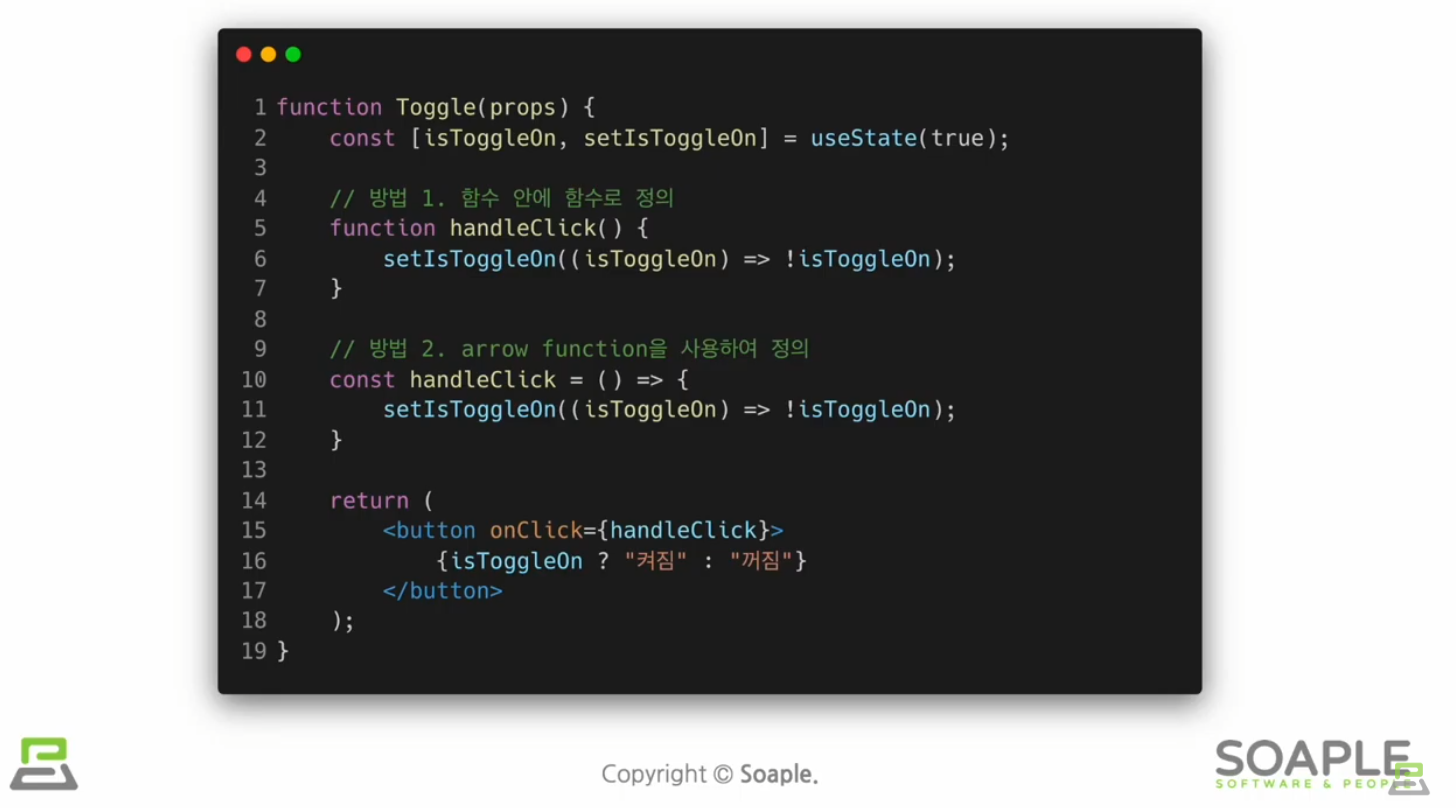
Event Handler(=Event Listener)
어떤 사건이 발생하면 사건을 처리하는 역할
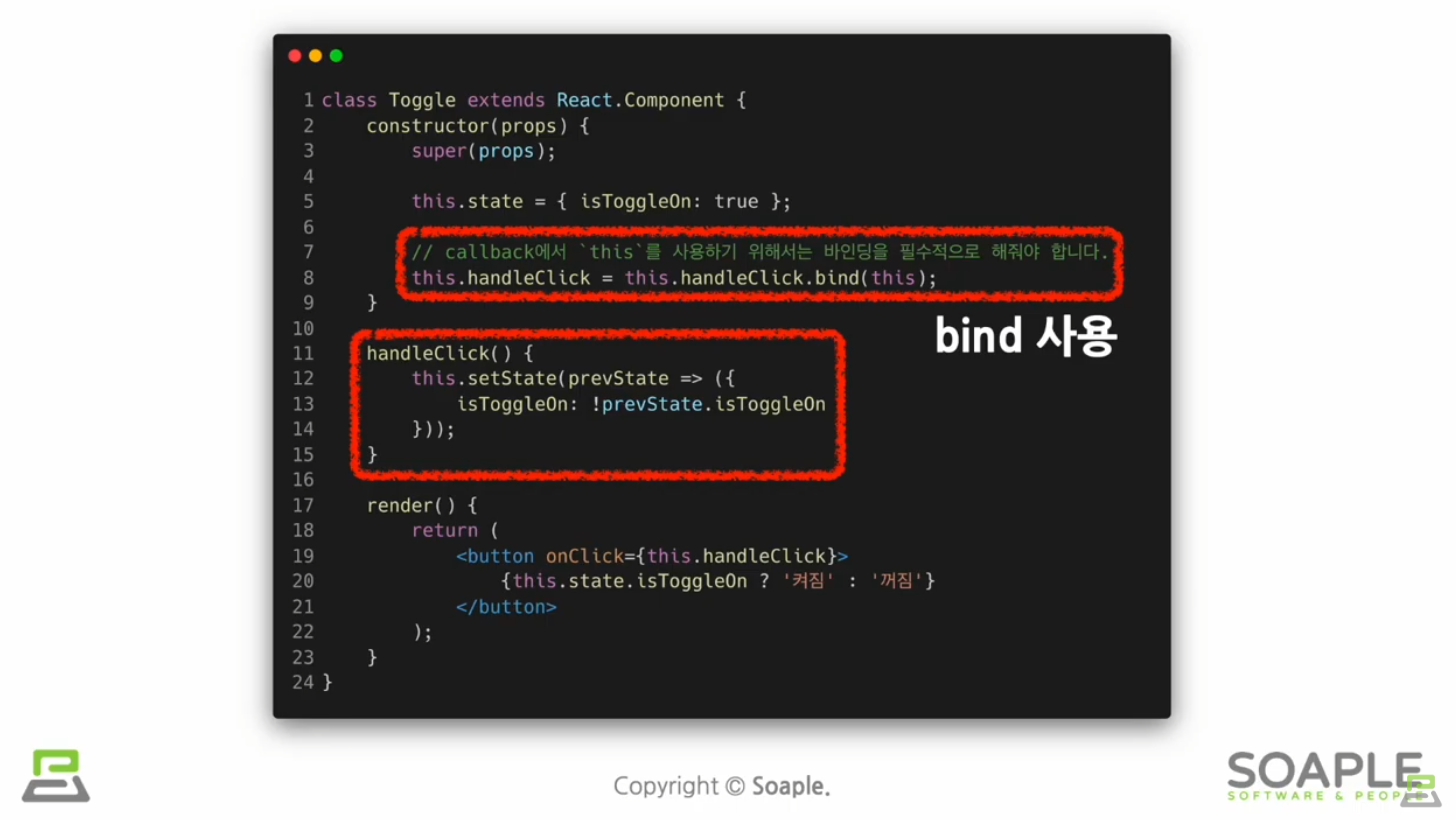

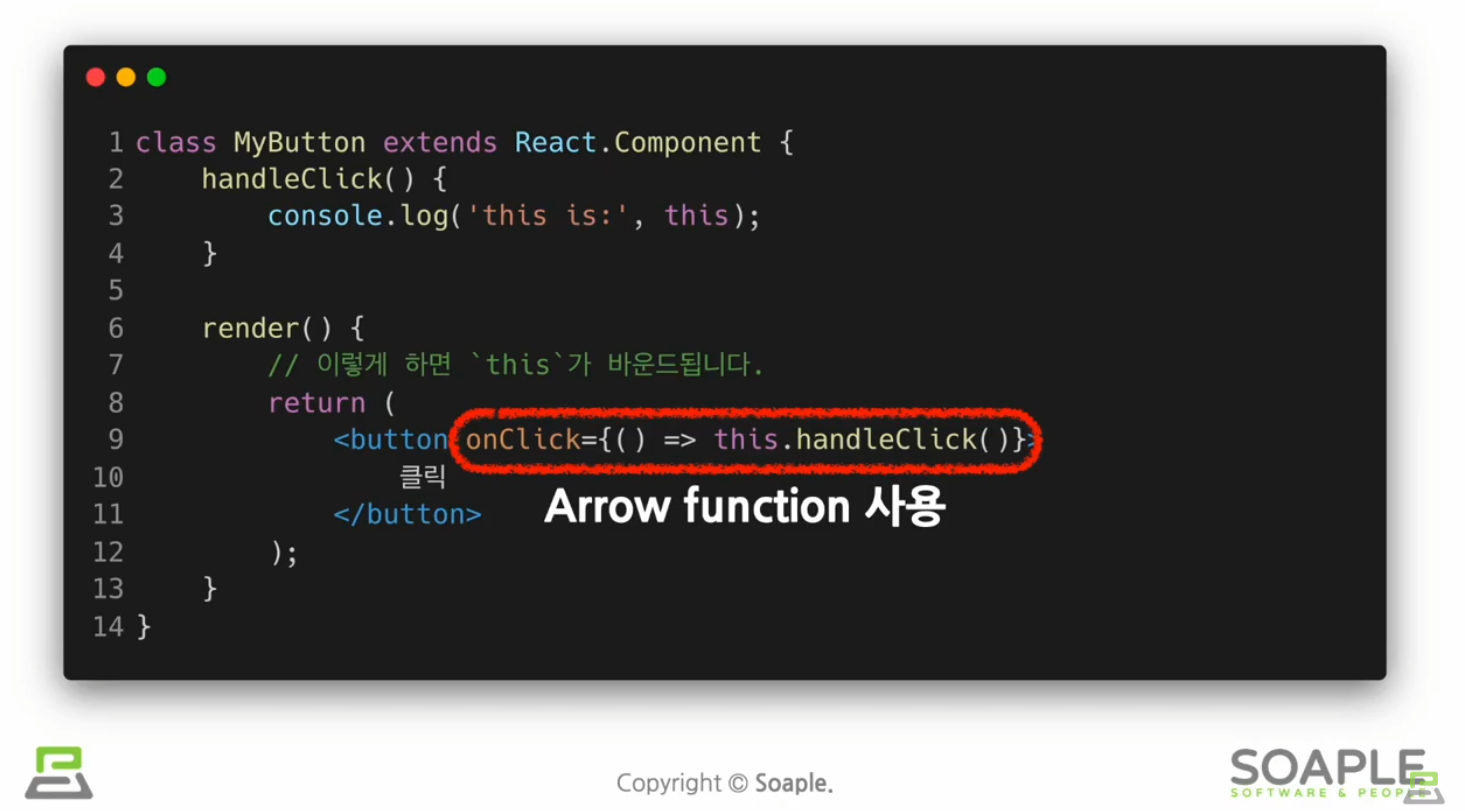
성능 문제를 위해서 Arrow보다는 위의 두가지를 더 권장
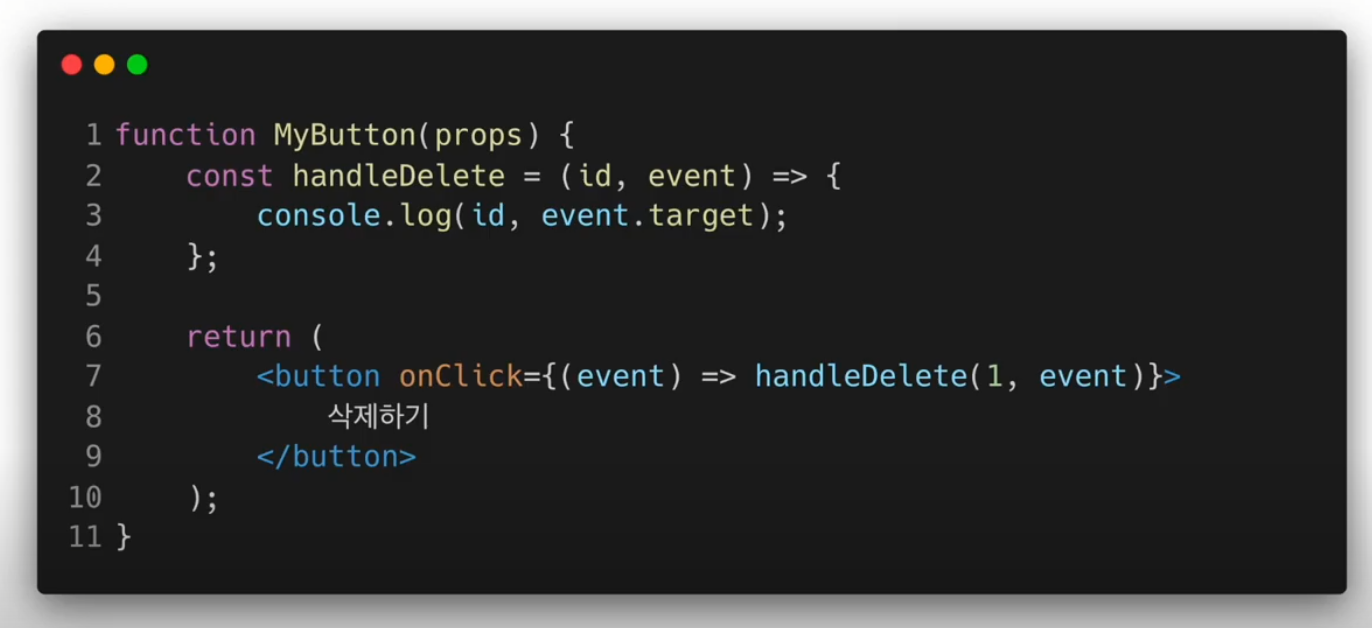
Argument(Parameter) 전달하기
클릭 이벤트 처리하기
ConfirmButton.jsx
import React, { useState } from "react";

function ConfirmButton(props) {

    const [isConfirmed, setIsConfirmed] = useState(false);

    const handleConfirm = () =>  {
        setIsConfirmed((prevIsConfirmed) => !prevIsConfirmed);
    };

        return(
            <button
                onClick={handleConfirm}
                disabled={isConfirmed}
            >
                {isConfirmed ? "확인됨" : "확인하기" }
            </button>
        );
}

export default ConfirmButton;
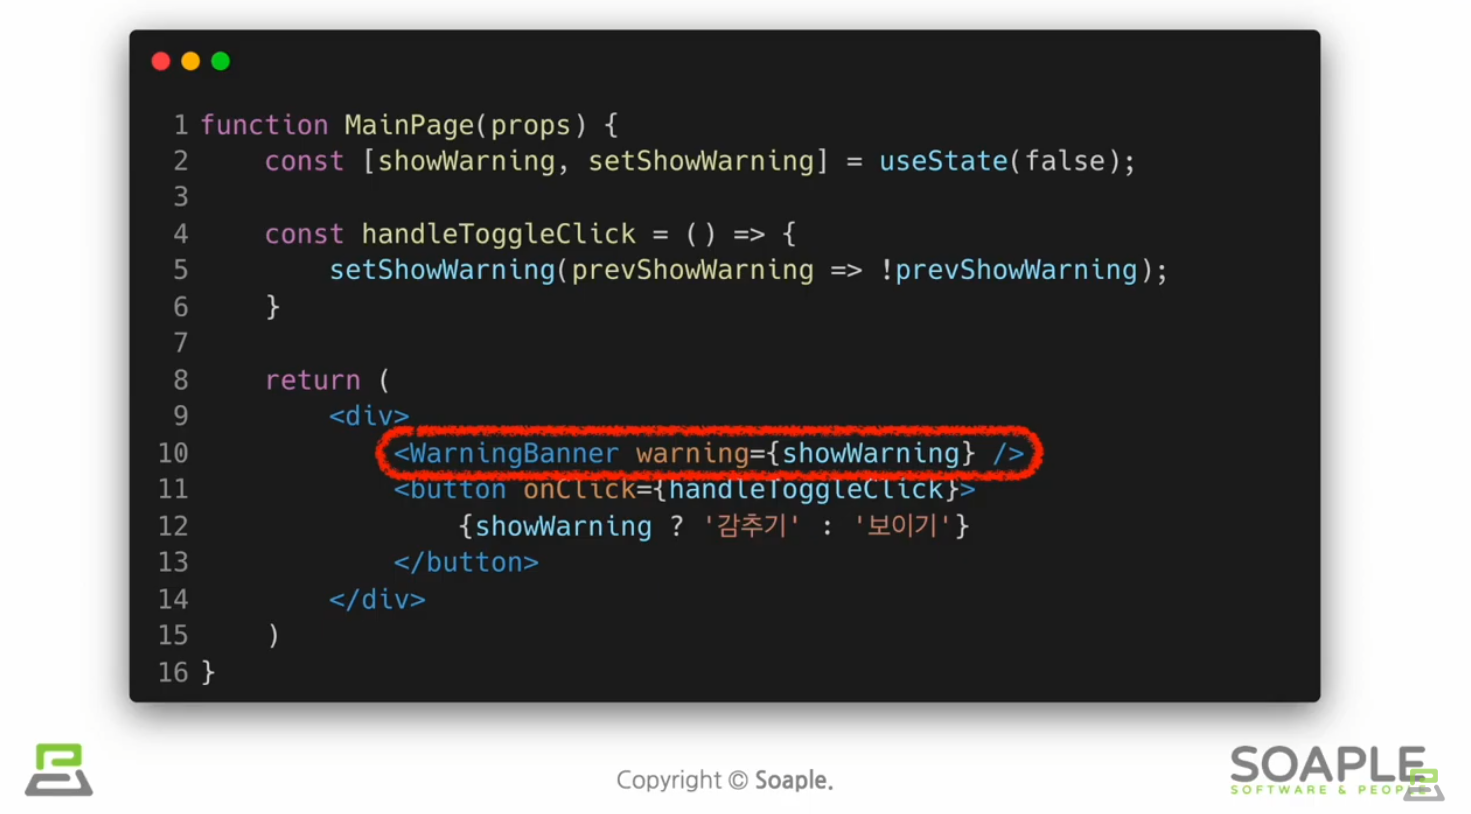
Conditional Rendering
어떠한 조건에 따라서 렌더링이 달라지는 것 ex. true이면 버튼을 보여주고, false이면 버튼을 가린다
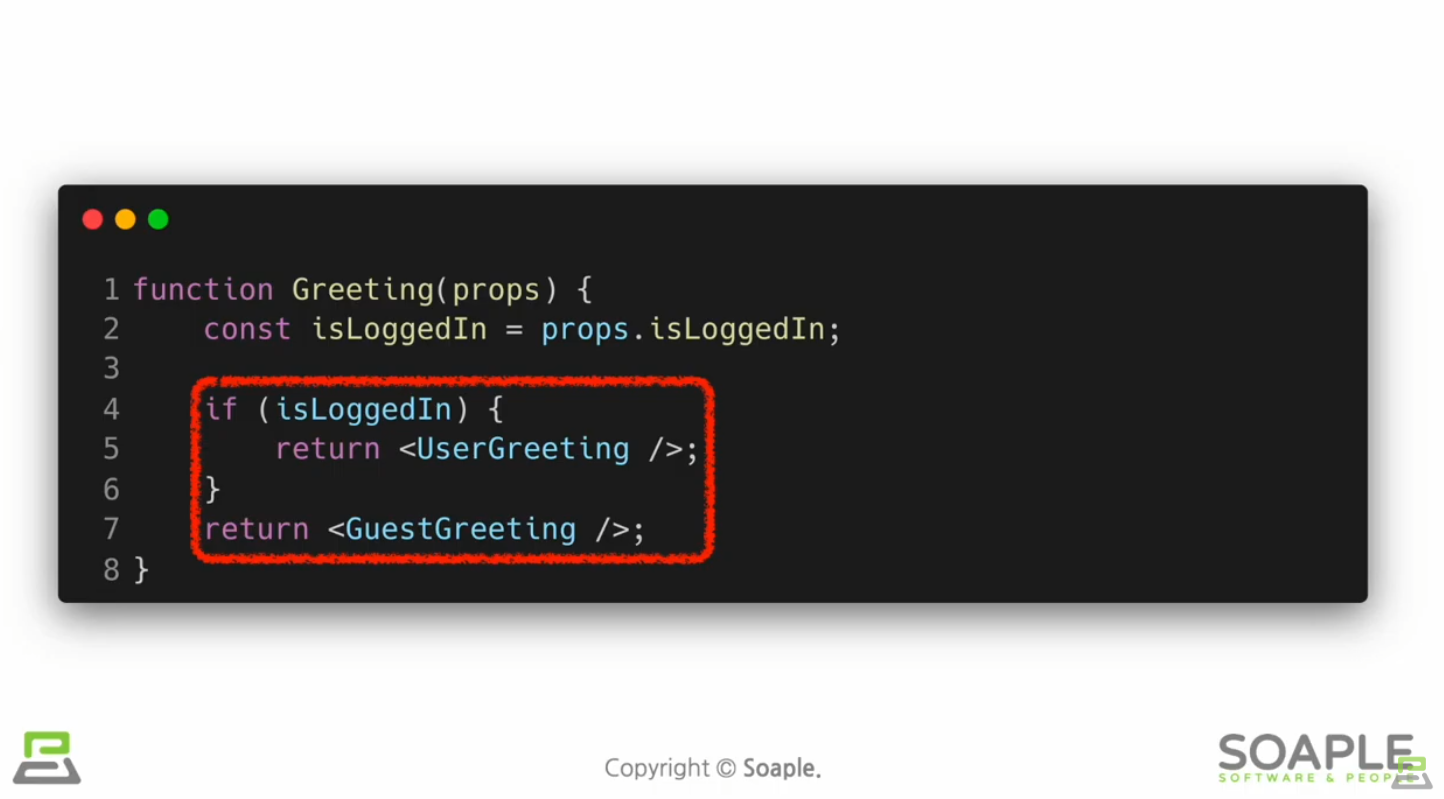
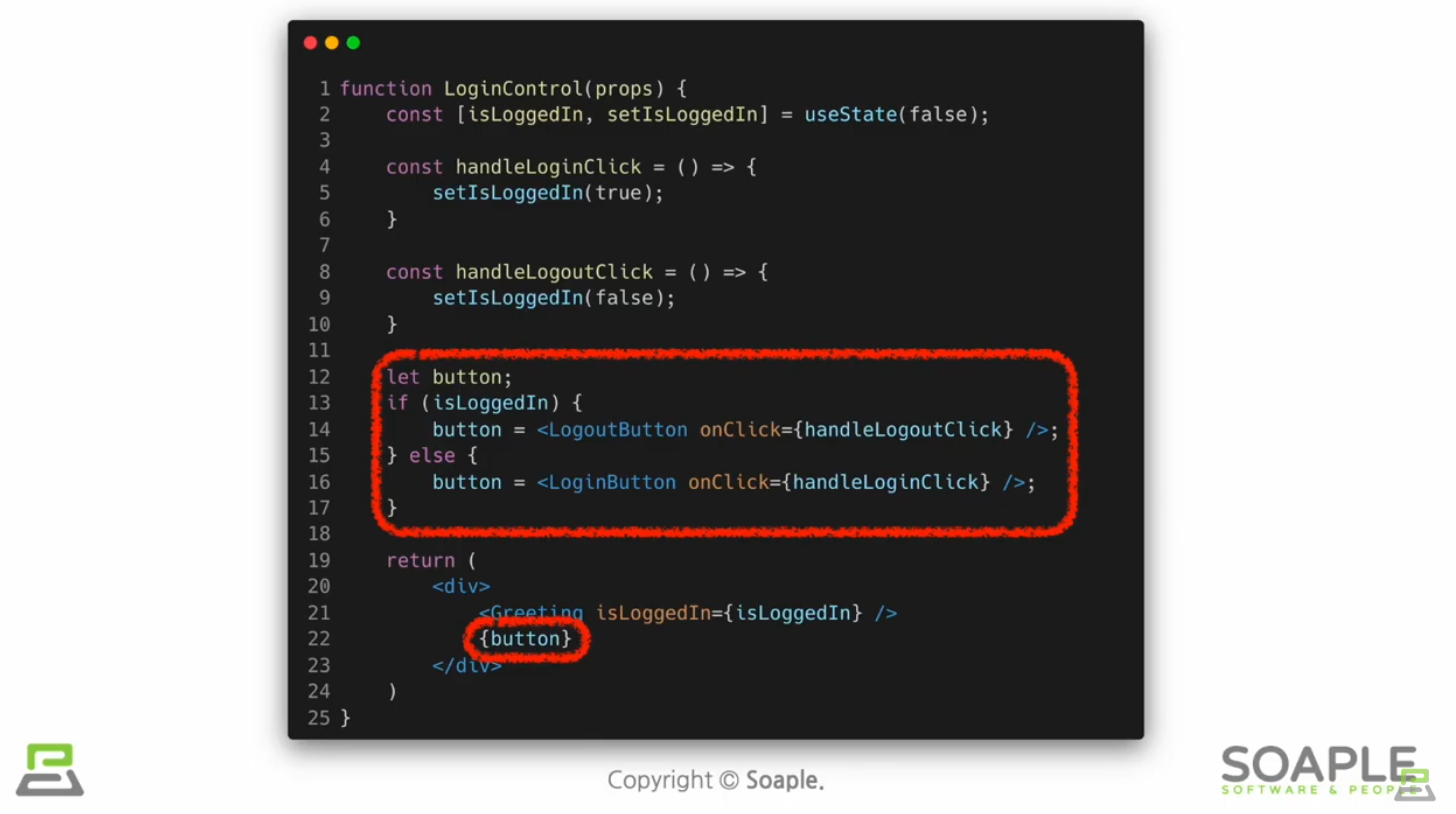
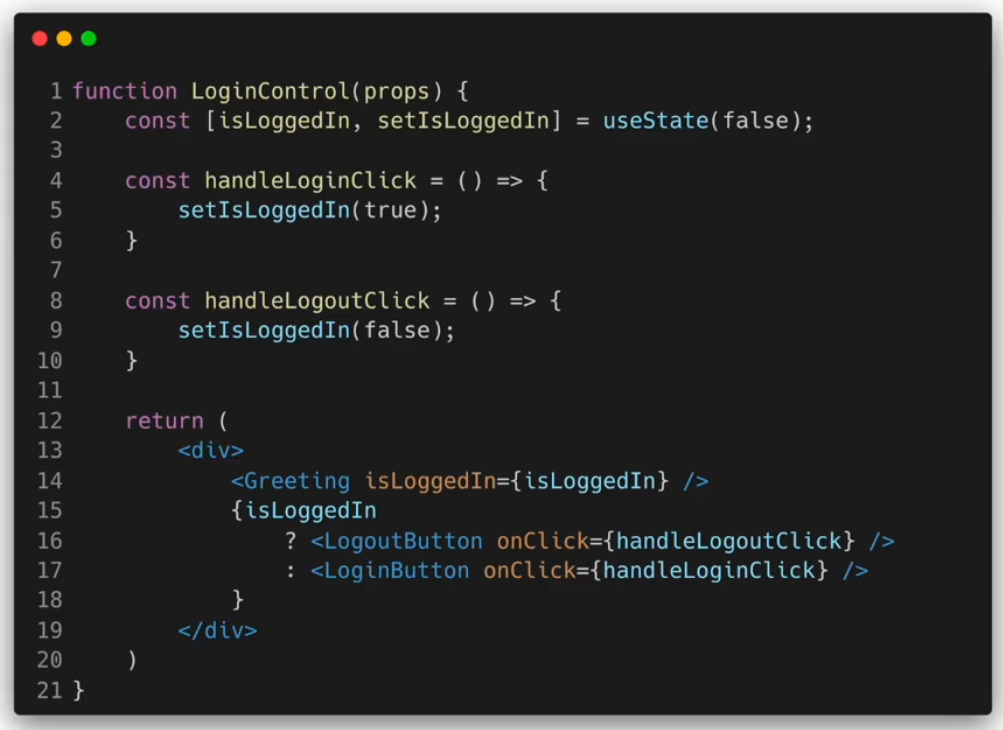
Element Variables
Inline Conditions
조건문을 코드 안에 집어넣는 것
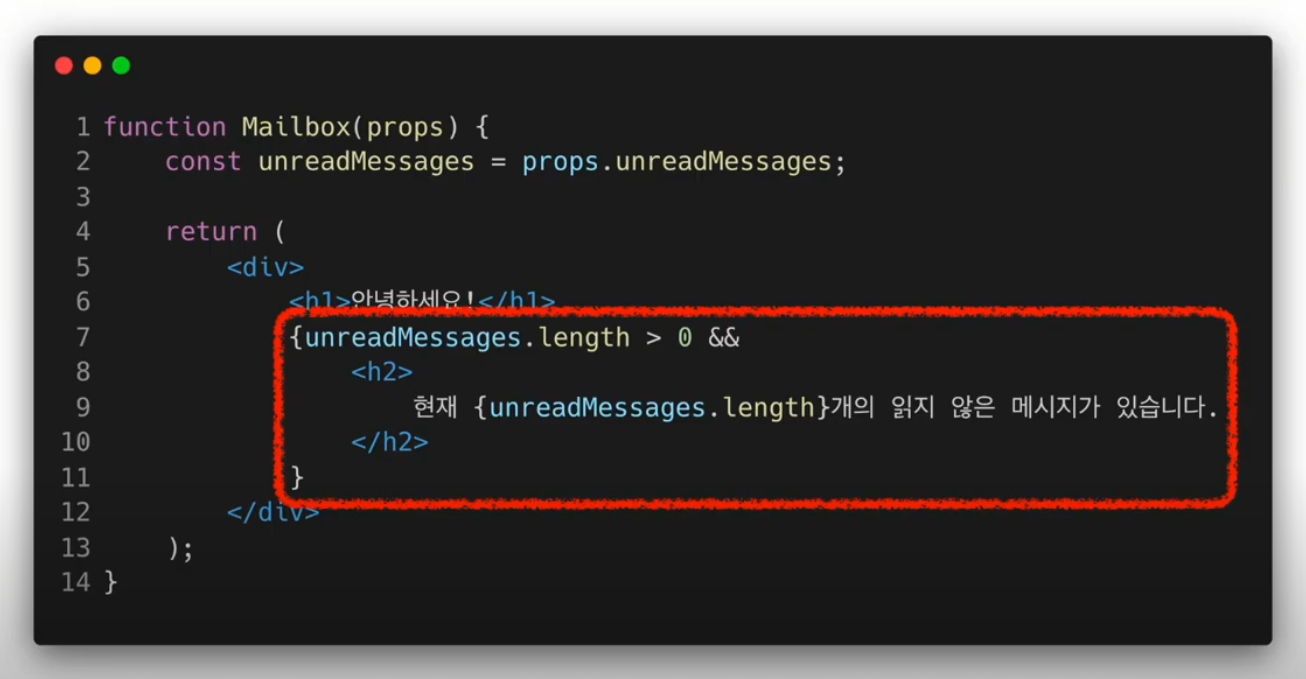
Inline If
&&연산자 사용

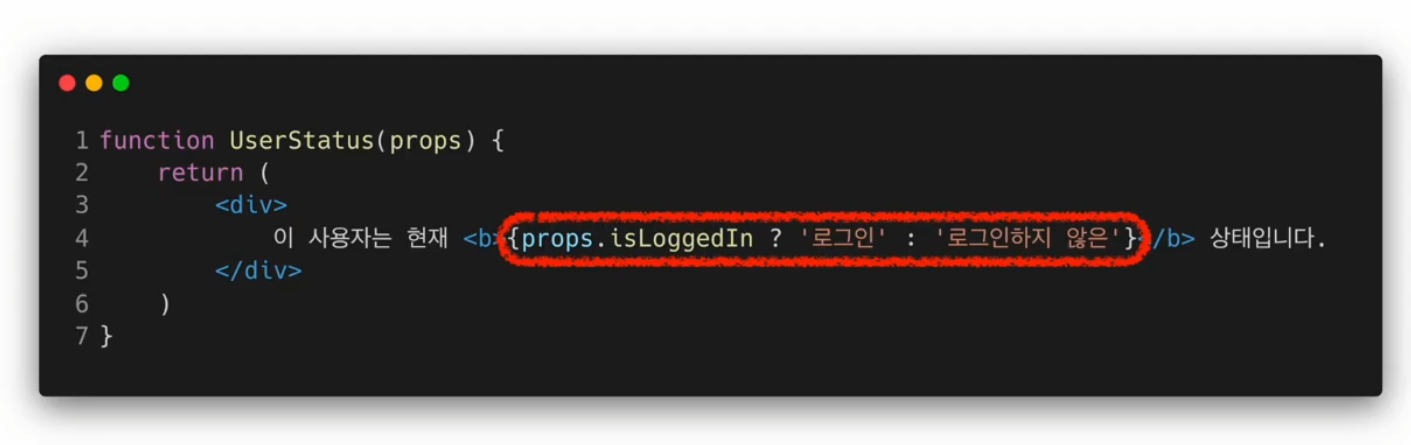
Inline If-Else
?연산자 사용

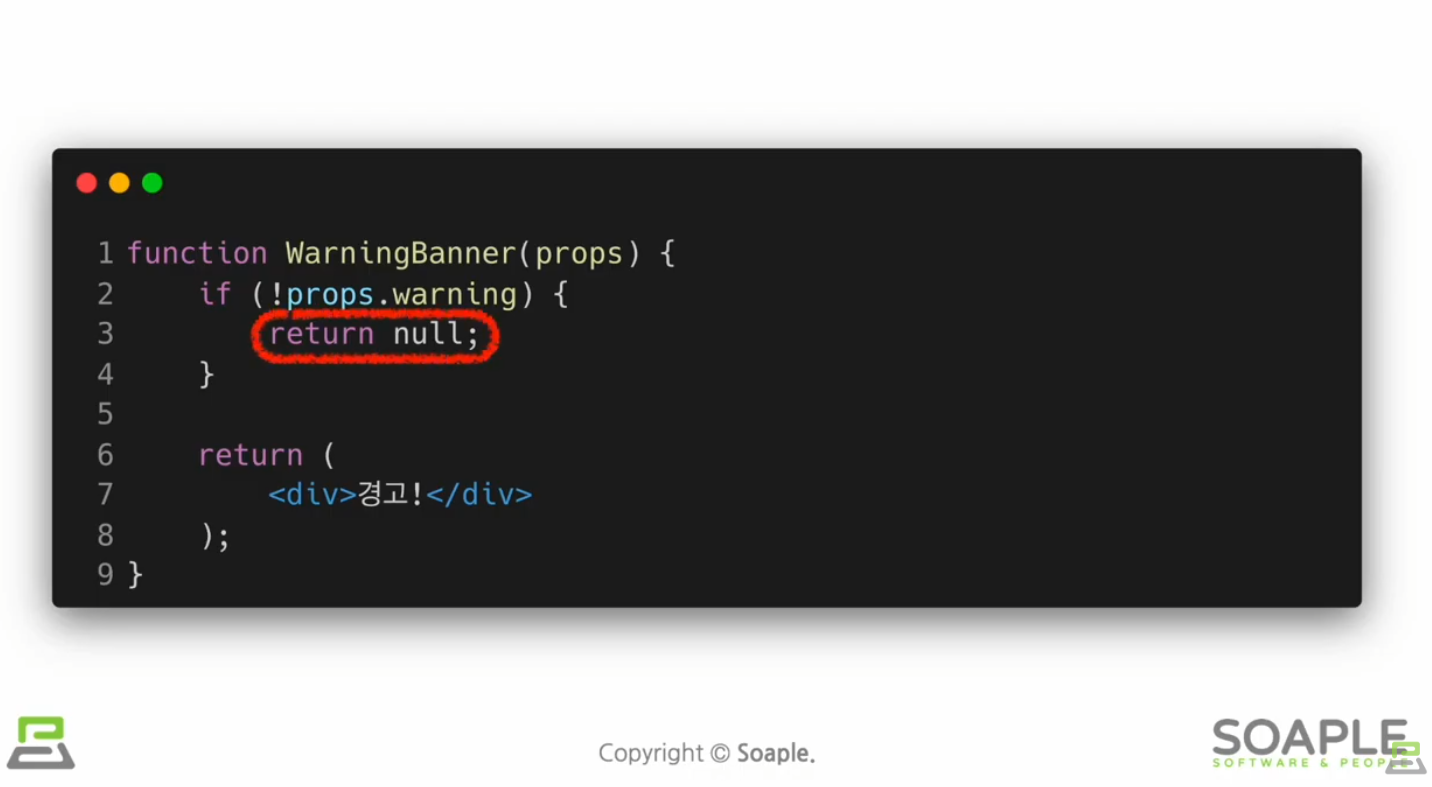
Component 렌더링 막기
null값 반환
로그인 여부 나타내는 툴바 만들기
Toolbar.jsx
import React from "react";

const styles = {
    wrapper: {
        padding: 16,
        display: "flex",
        flexDirection: "row",
        borderBottom: "1px solid grey",
    },
    greeting: {
        marginRight: 8,
    },
};

function Toolbar(props) {
    const { isLoggedIn, onClickLogin, onClickLogout } = props;

    return (
        <div style={styles.wrapper}>
            {isLoggedIn && <span style={styles.greeting}>환영합니다!</span>}

            {isLoggedIn ? (
                <button onClick={onClickLogout}>로그아웃</button>
            ) : (
                <button onClick={onClickLogin}>로그인</button>
            )}
        </div>
    );
}

export default Toolbar;
LandingPage
import React, { useState } from "react";
import Toolbar from "./Toolbar";

function LandingPage(props) {
    const [isLoggedIn, setIsLoggedIn] = useState(false);

    const onClickLogin = () => {
        setIsLoggedIn(true);
    };

    const onClickLogout = () => {
        setIsLoggedIn(false);
    };

    return (
        <div>
            <Toolbar
                isLoggedIn={isLoggedIn}
                onClickLogin={onClickLogin}
                onClickLogout={onClickLogout}
            />
            <div style={{ padding: 16 }}>소플과 함께하는 리액트 공부!</div>
        </div>
    );
}

export default LandingPage;
결과물
List and Keys
여러 개의 Component 렌더링하기
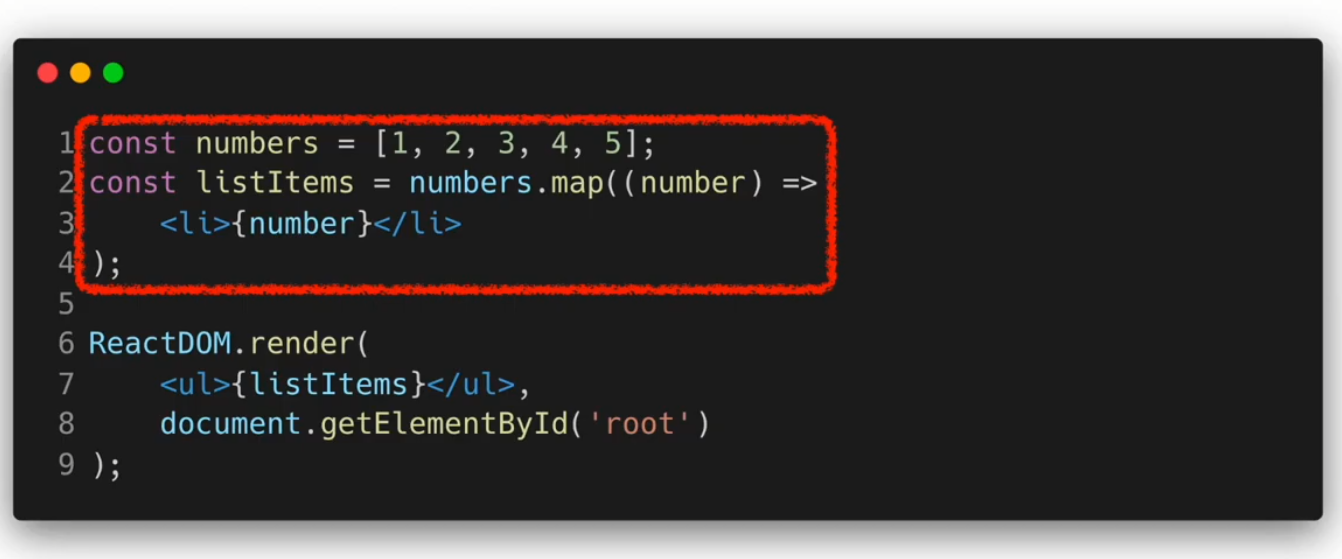
기본적인 리스트 컴포넌트
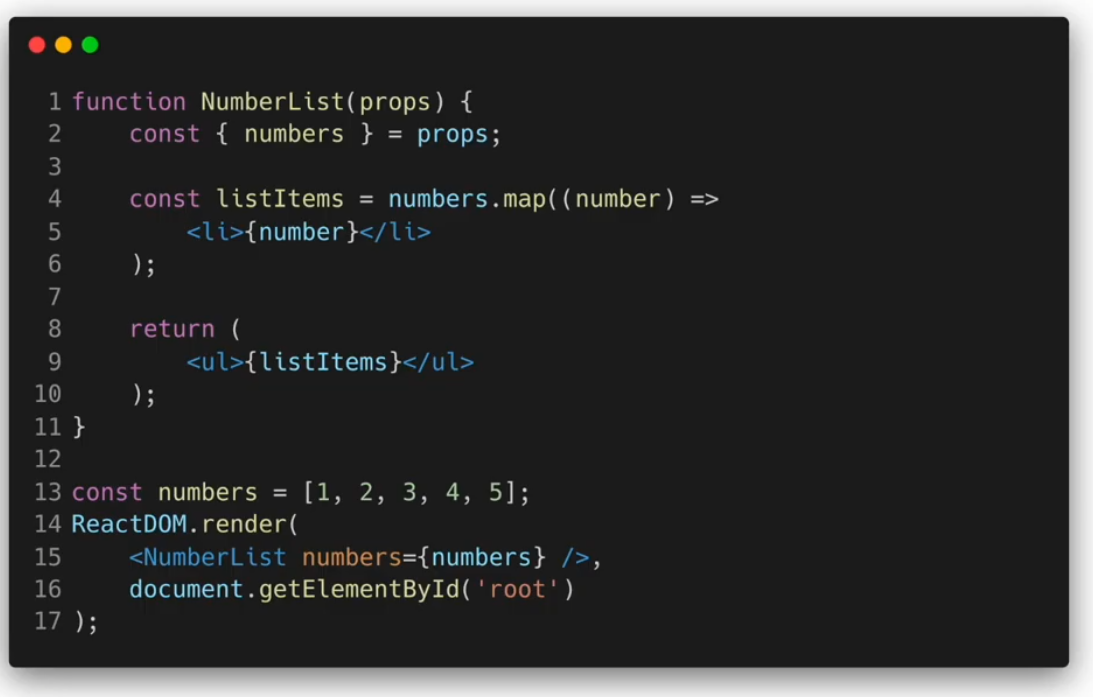
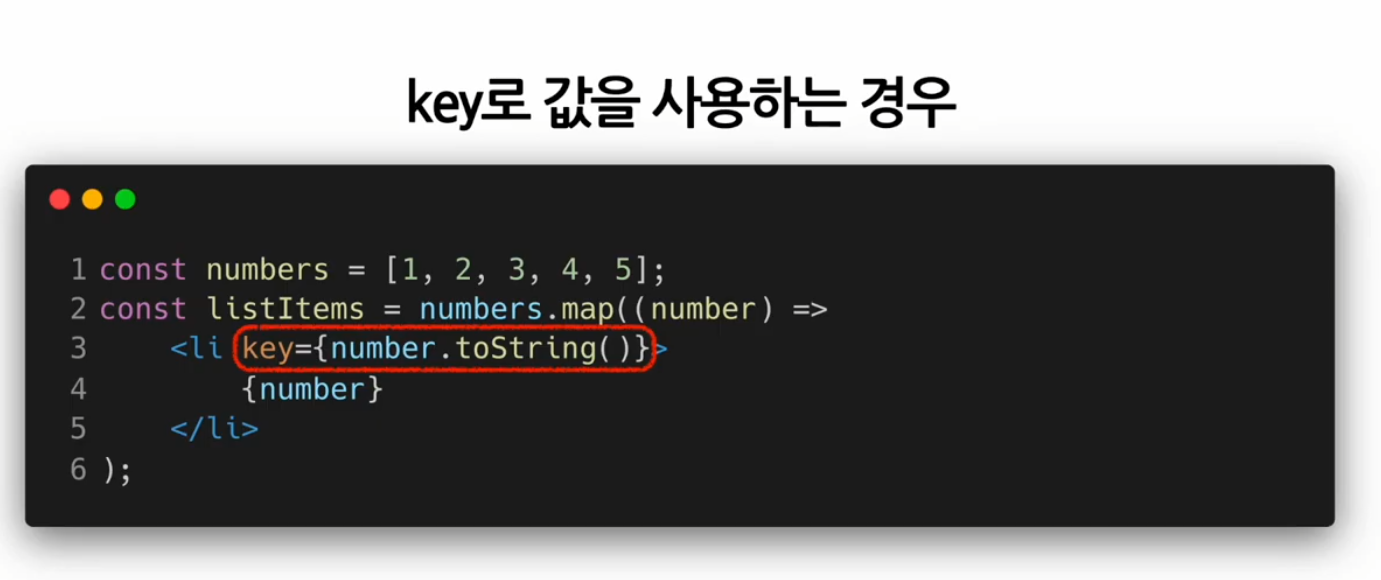
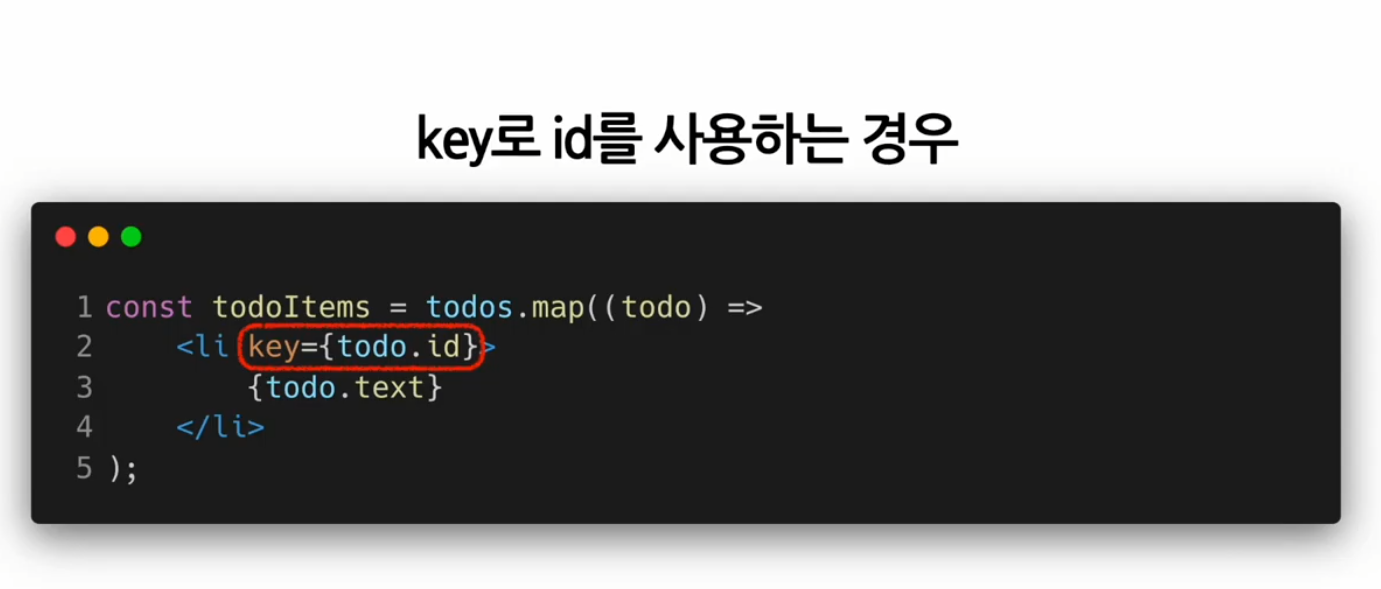
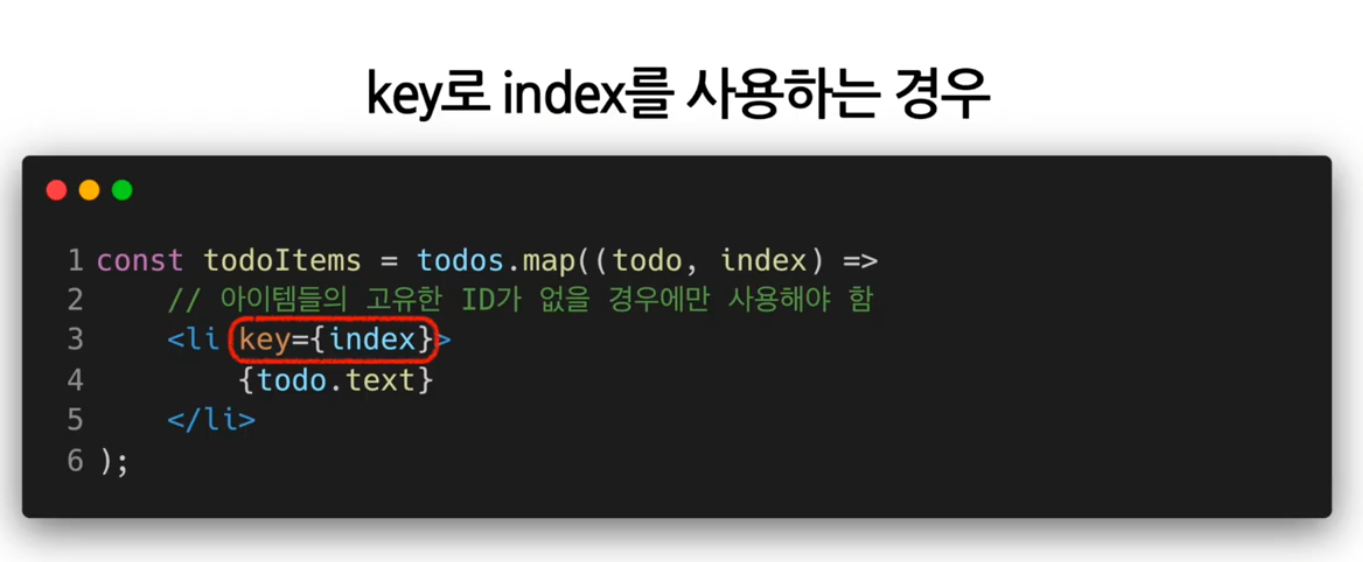
map() 함수 안에 있는 Elements는 꼭 key가 필요하다!!
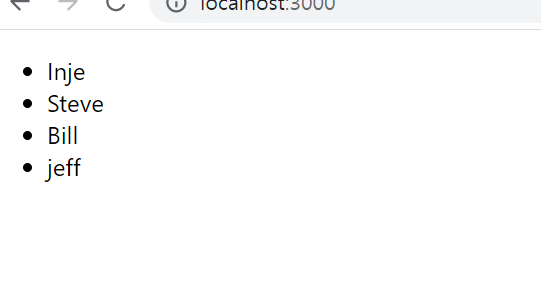
출석부 출력하기
AttendanceBook.jsx
import React from "react";

const students = [
    {
        id: 1,
        name: "Inje",
    },
    {
        id: 2,
        name: "Steve",
    },
    {
        id: 3,
        name: "Bill",
    },
    {
        id: 4,
        name: "jeff",
    },
];

function AttendanceBook(props) {
    return (
        <ul>
            {students.map((student) => {
                return <li key={student.id}>{student.name}</li>;
            })}
        </ul>
    );
}

export default AttendanceBook;
key값 빼먹지 않고 꼭 넣어주기!
결과물
Forms
사용자로부터 입력을 받기 위해 사용
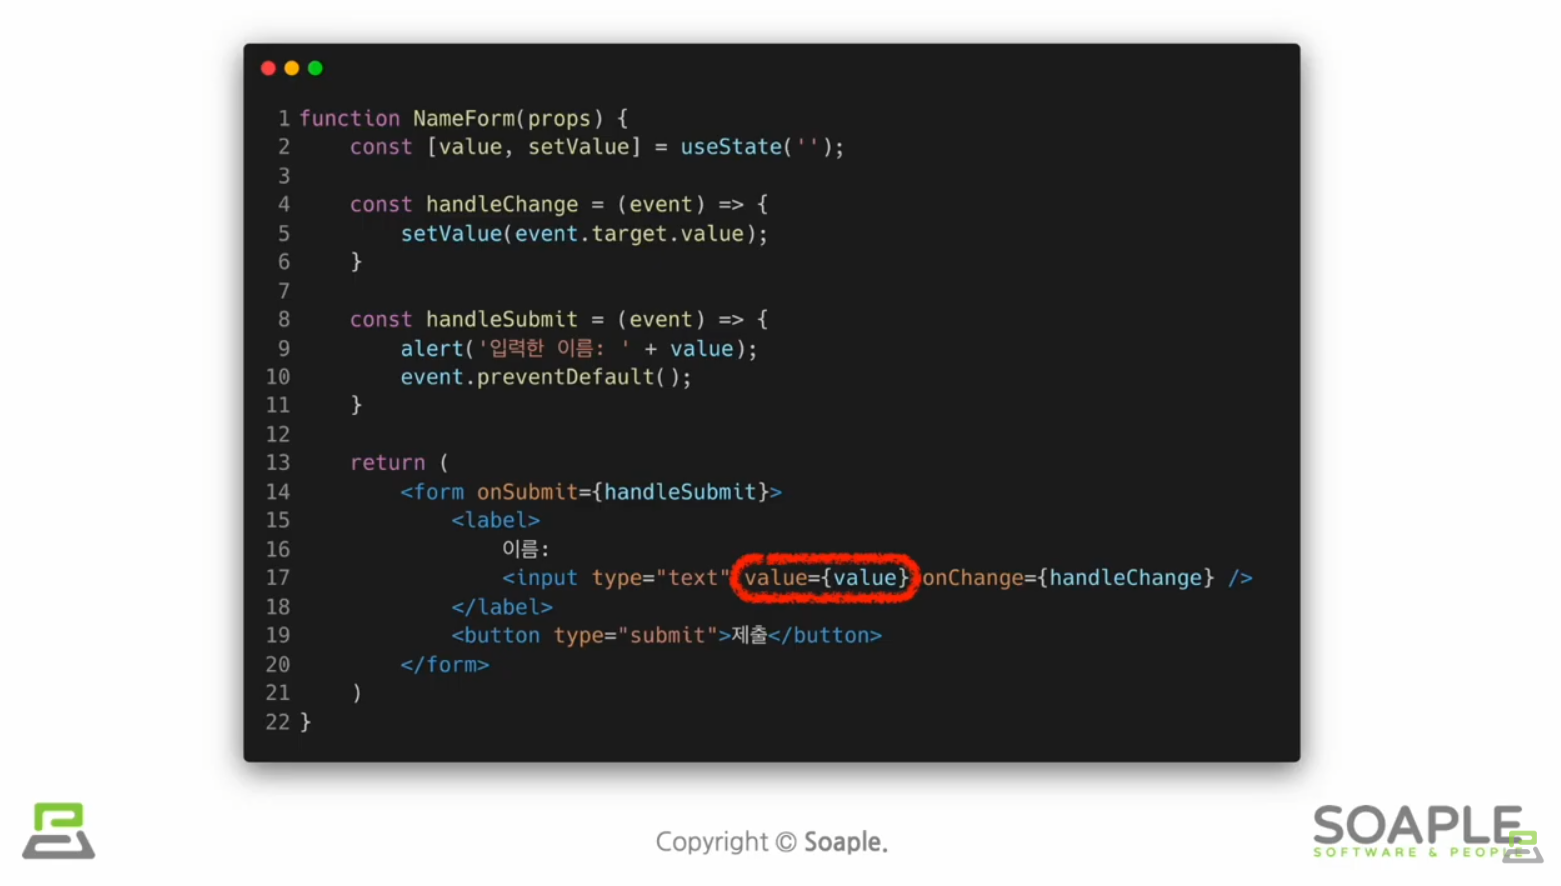
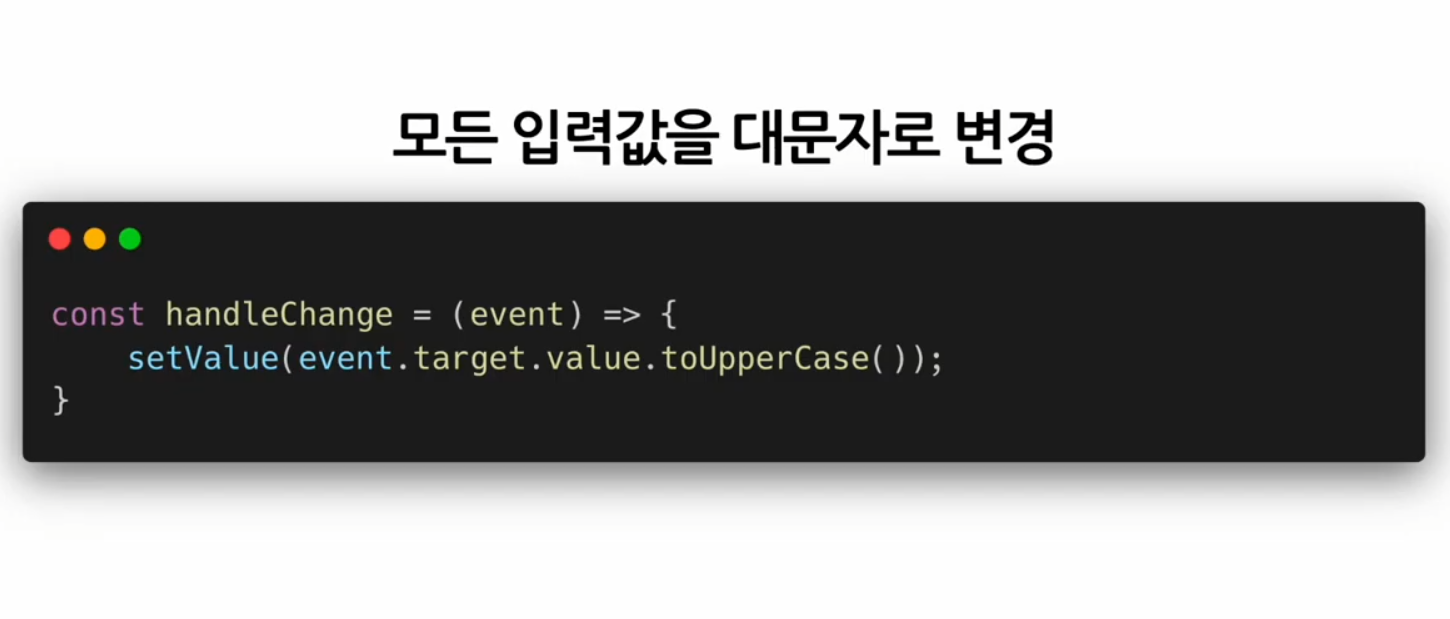
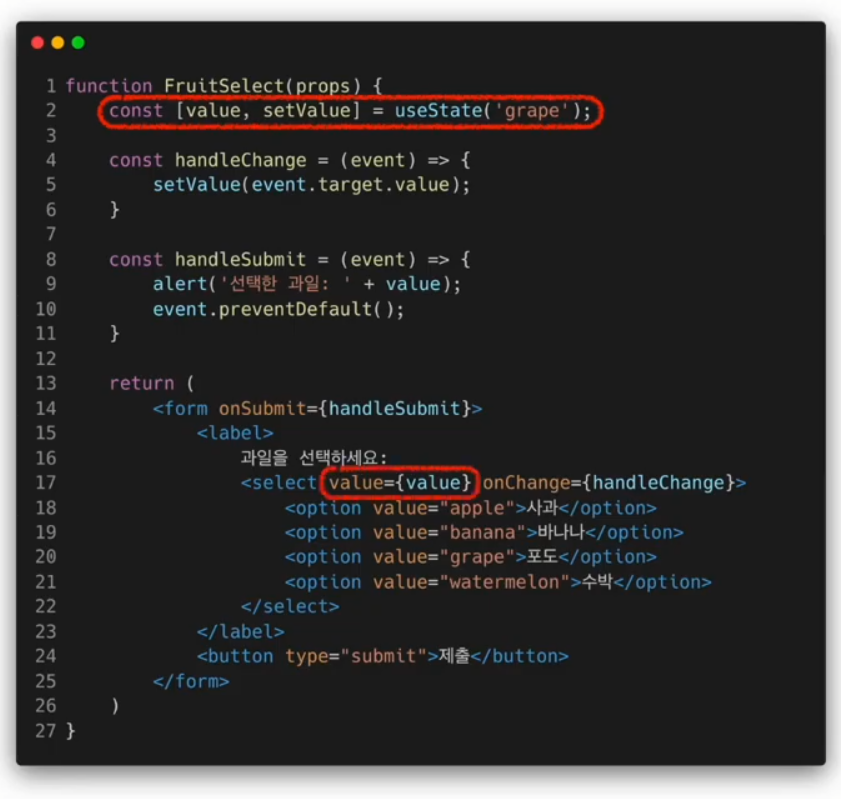
controlled components
값이 리액트의 통제를 받는 Input Form Element
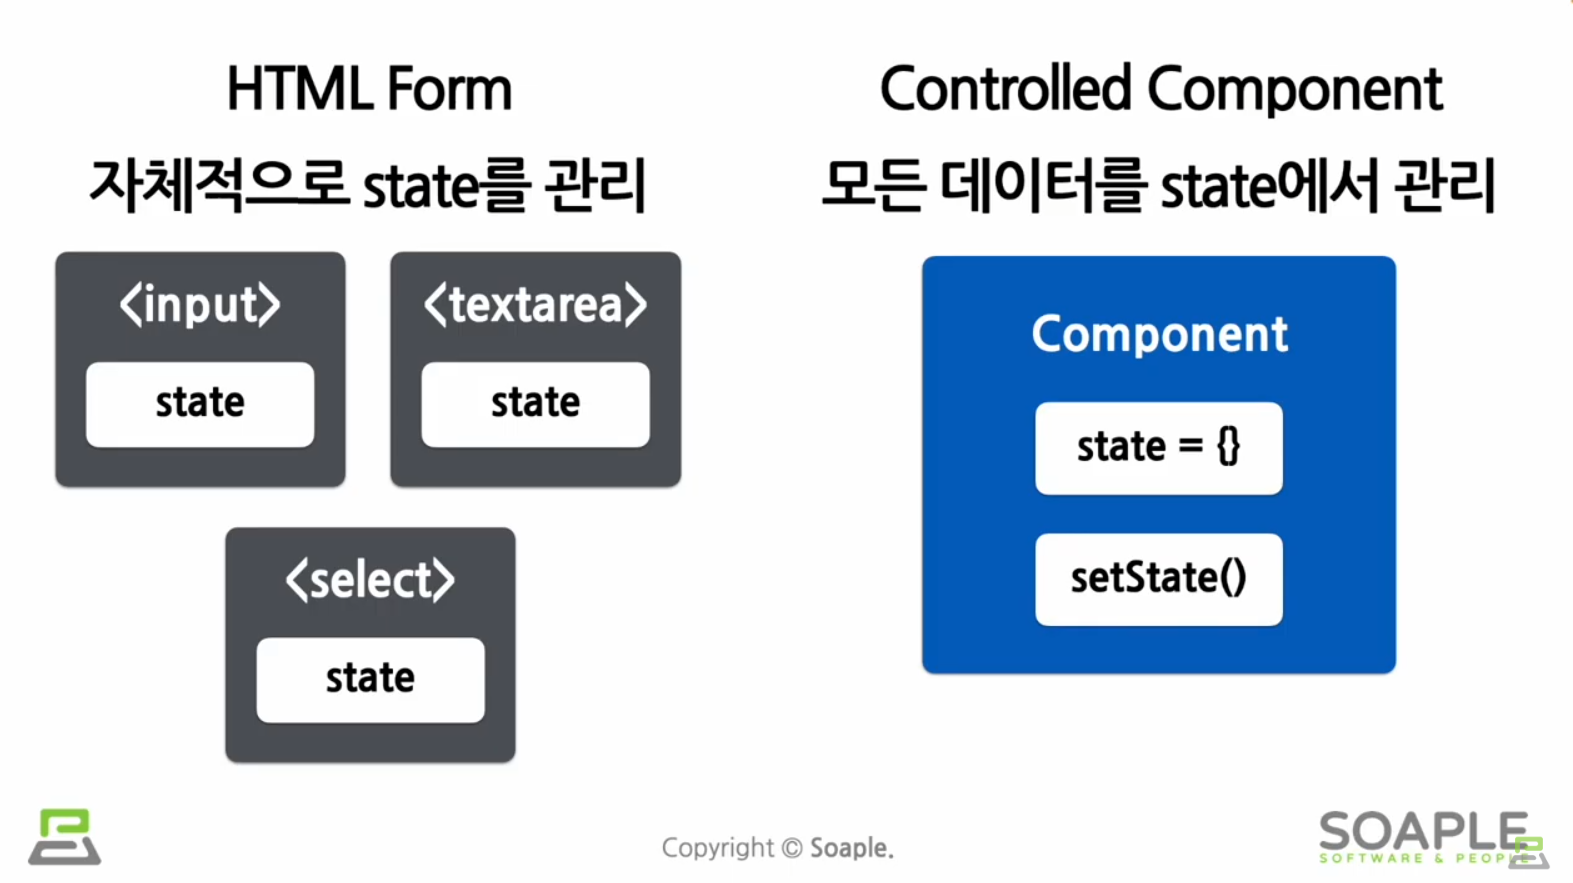
다양한 폼
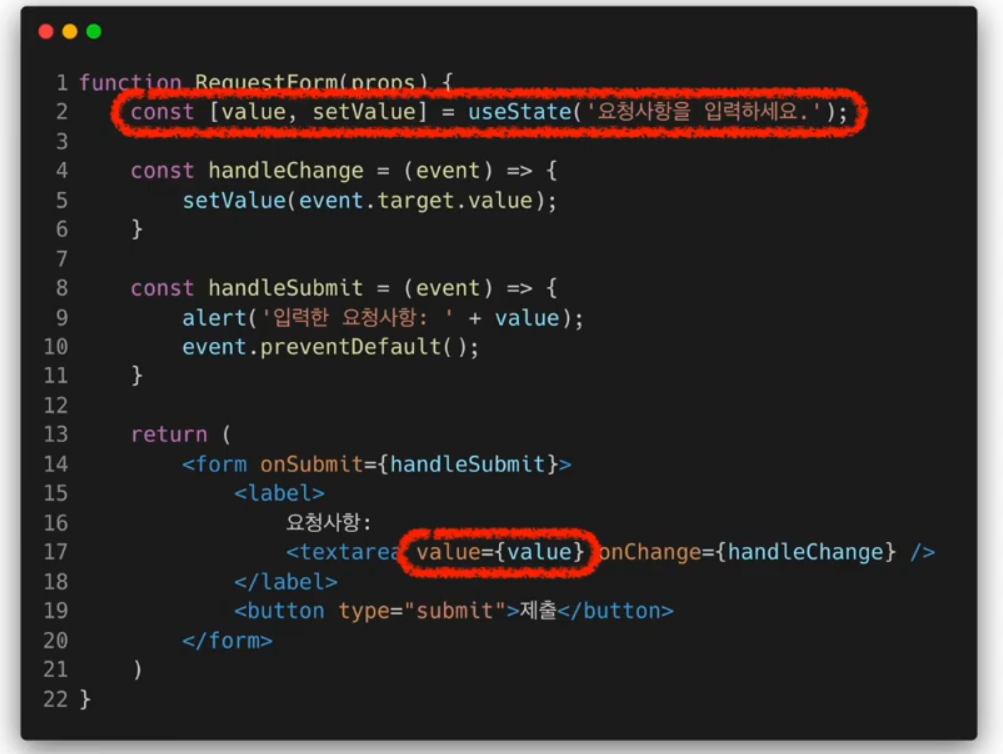
textarea 태그
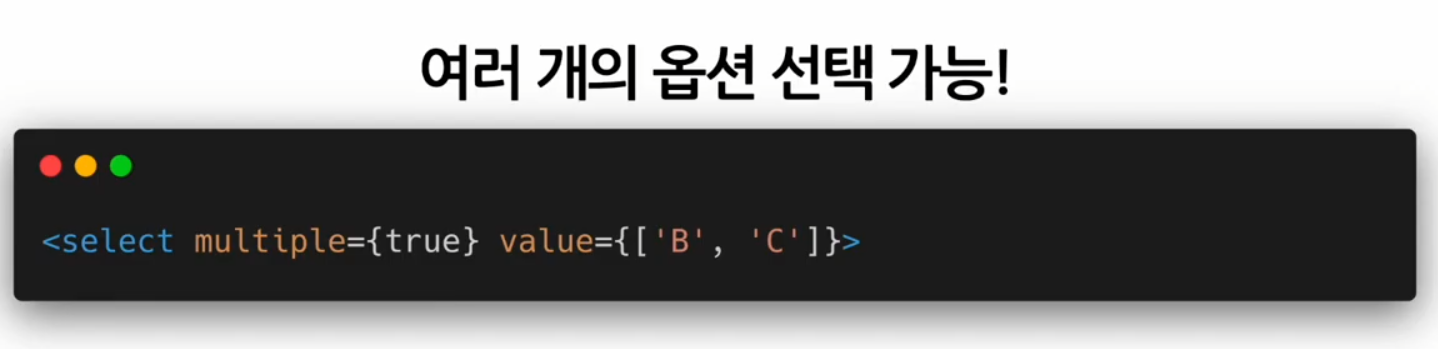
select 태그
Drop-down목록을 보여주기 위한 HTML태그
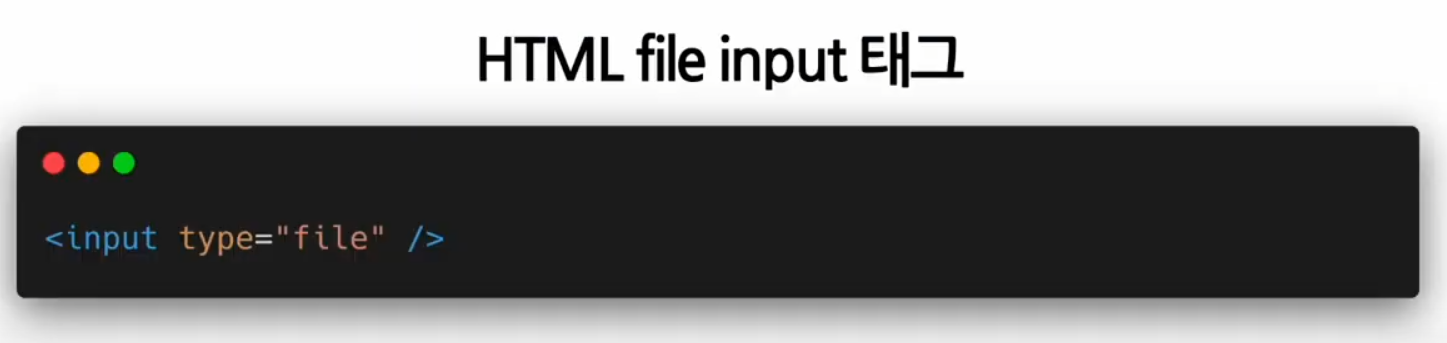
file Input 태그 (=>Uncontrolledd Component)
디바이스의 저장 장치로부터 하나 또는 여러 개의 파일을 선택할 수 있게 해주는 HTML 태그
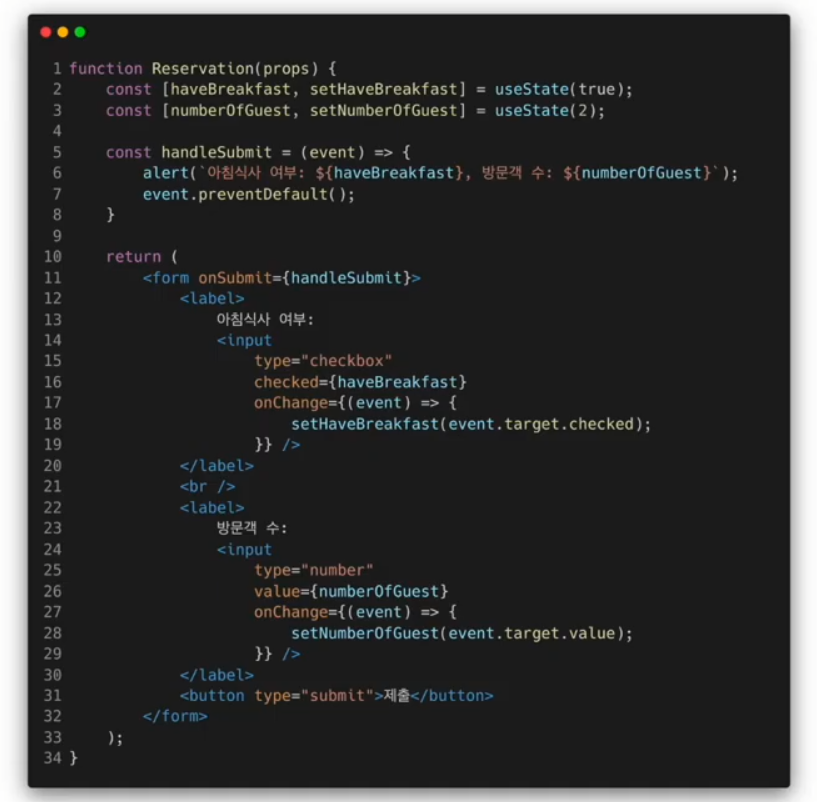
Multiple Inputs
여러개의 state를 선언하여 각각의 입력에 대해 사용
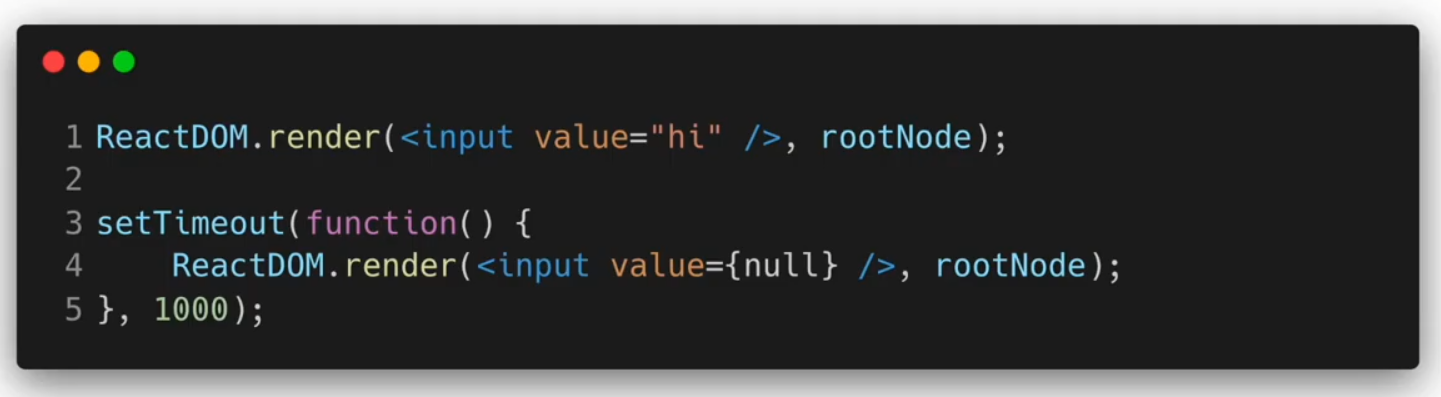
Input Null Value
사용자 정보 입력 받기
SignUp
import React, { useState } from "react";

function SignUp(props) {
    const [name, setName] = useState("");
    const [gender, setGender] = useState("남자");

    const handleChangeName = (event) => {
        setName(event.target.value);
    };

    const handleChangeGender = (event) => {
        setGender(event.target.value);
    }

    const handleSubmit = (event) => {
        alert(`이름: ${name}, 성별: ${gender}`);
        event.preventDegault();
    };

    return (
        <form onSubmit={handleSubmit}>
            <label>
                이름:
                <input type="text" value={name} onChange={handleChangeName} />
            </label>
            <br/>
            <label>
                성별:
                <select value={gender} onChange={handleChangeGender}>
                    <option value="남자">남자</option>
                    <option value="여자">여자</option>
                </select>
            </label>
            <button type="submit">제출</button>
        </form>
    );
}

export default SignUp;
결과물
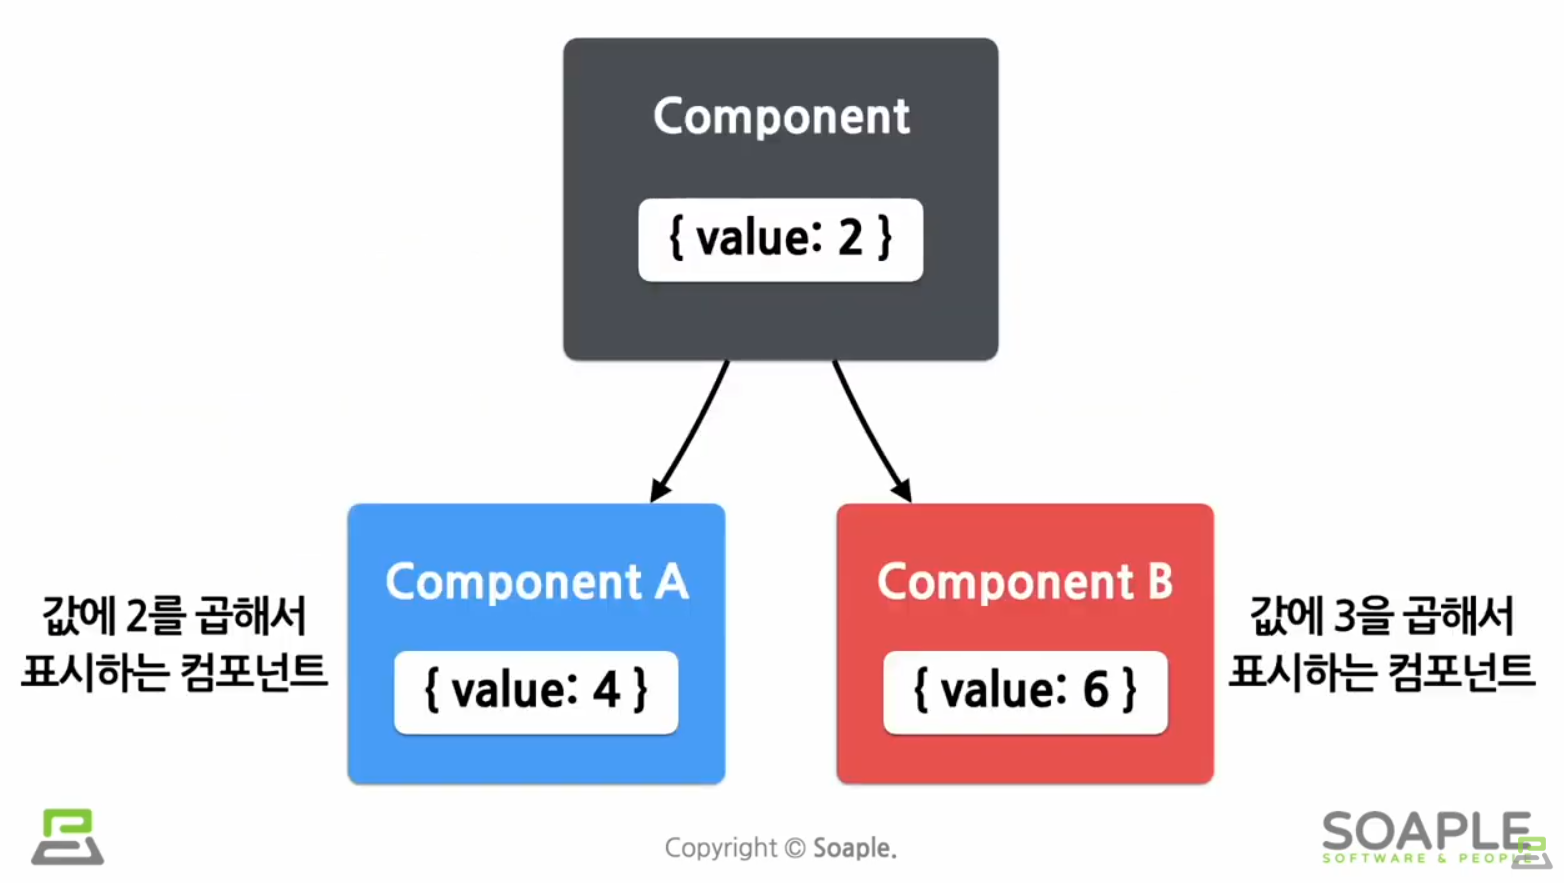
Lifting State Up
Shared State
state에 있는 데이터를 여러개의 하위 컴포넌트에 공통적으로 사용하는 경우
(하위 컴포넌트가 공통된 부모 컴포넌트의 state를 공유하여 사용)
하위 컴포넌트에서 state 공유하기
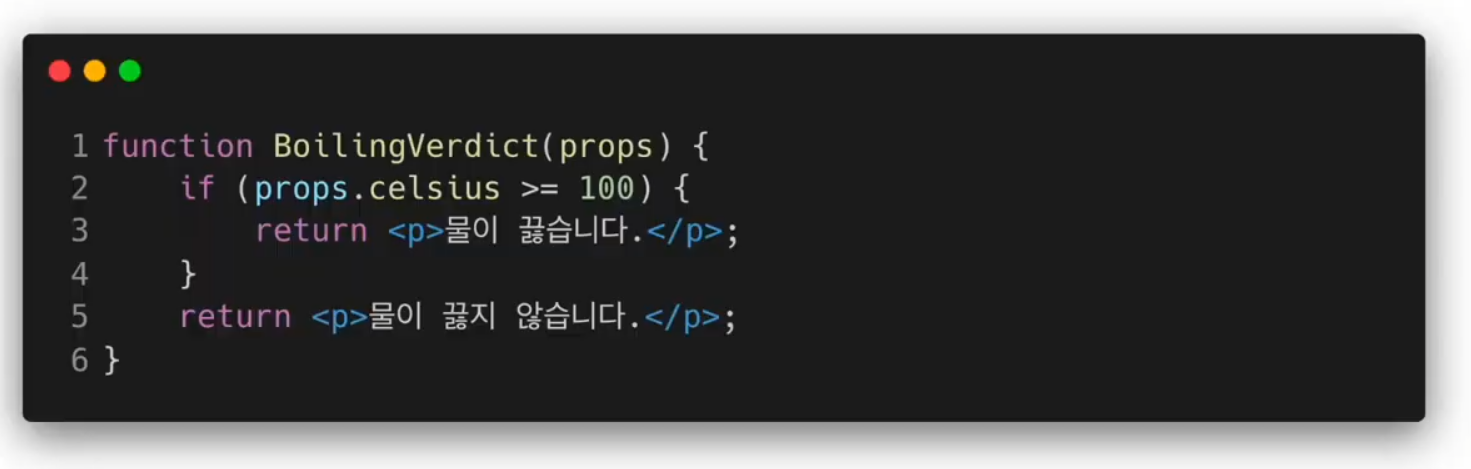
물의 끓음 여부를 알려주는 컴포넌트
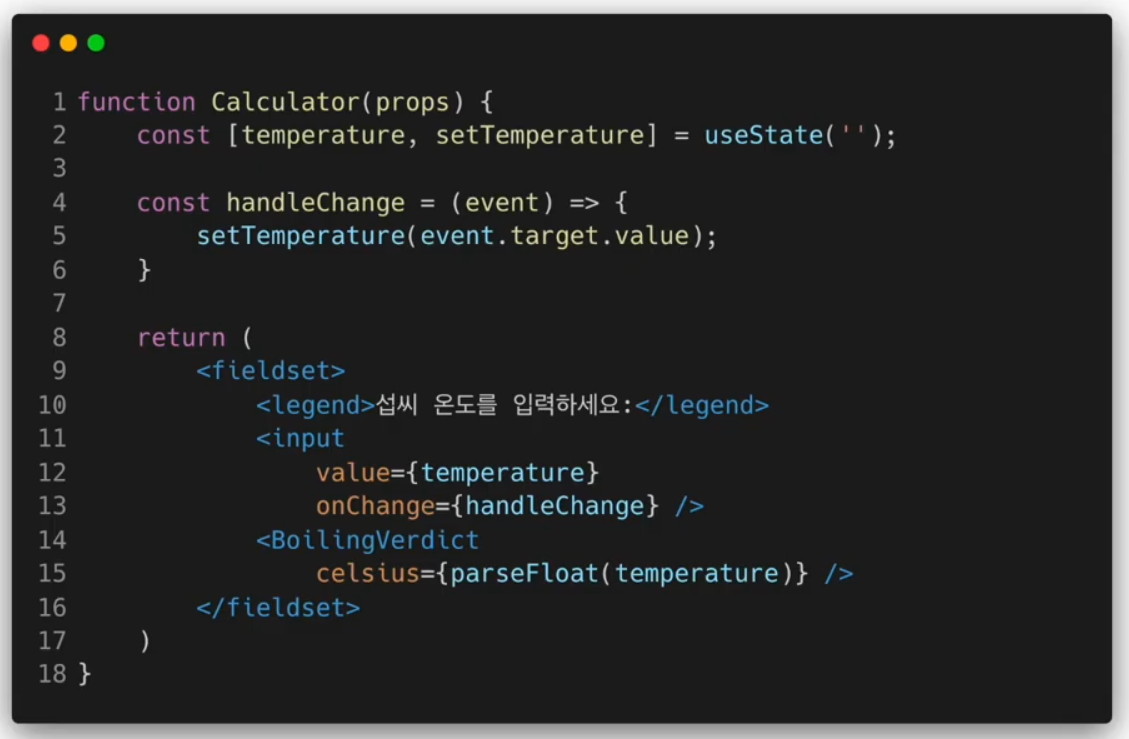
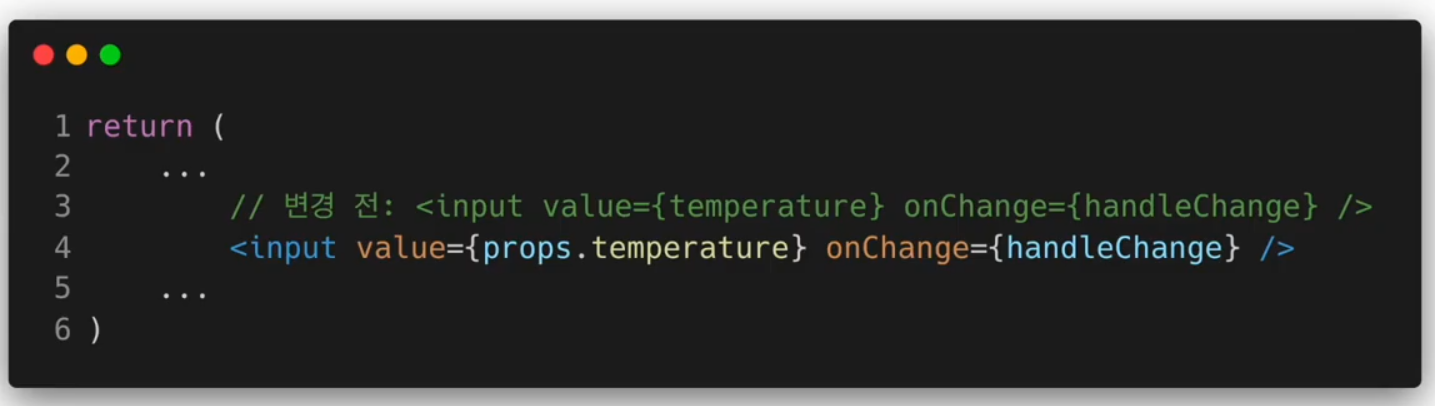
입력 컴포넌트 추출하기
Shared State 적용하기
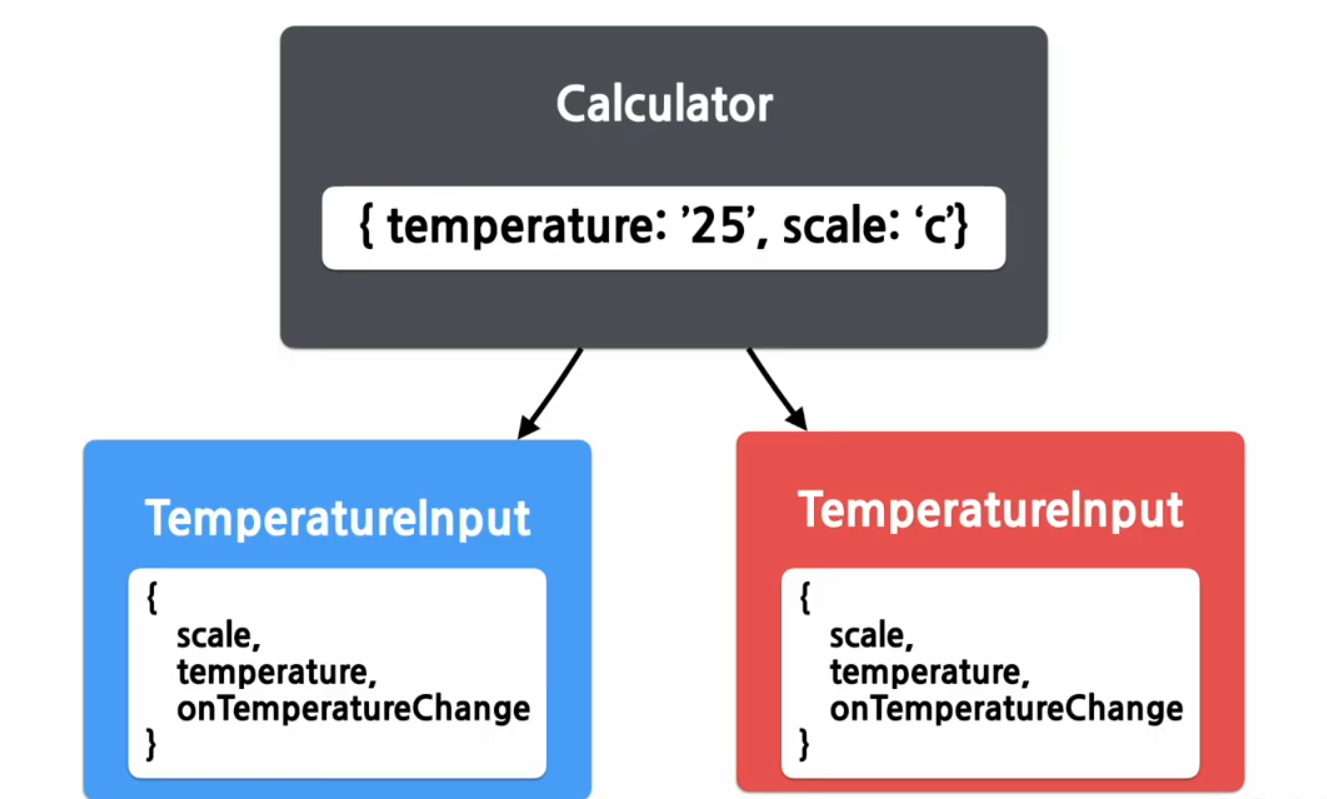
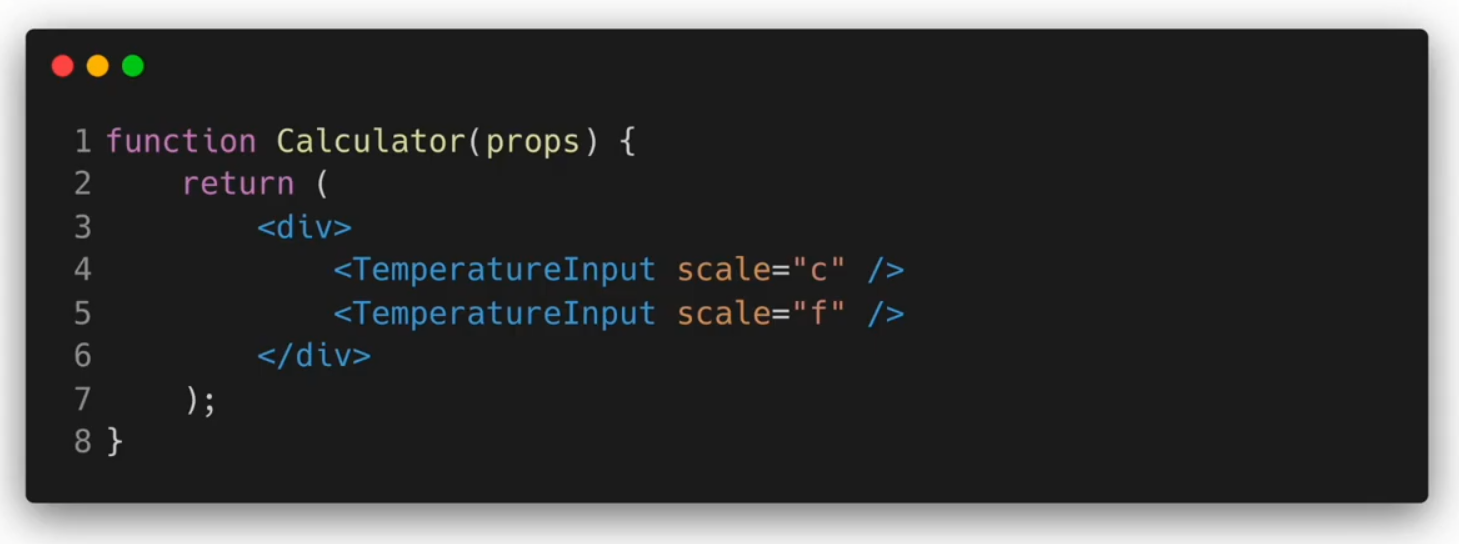
섭씨온도와 화씨온도 표시하기
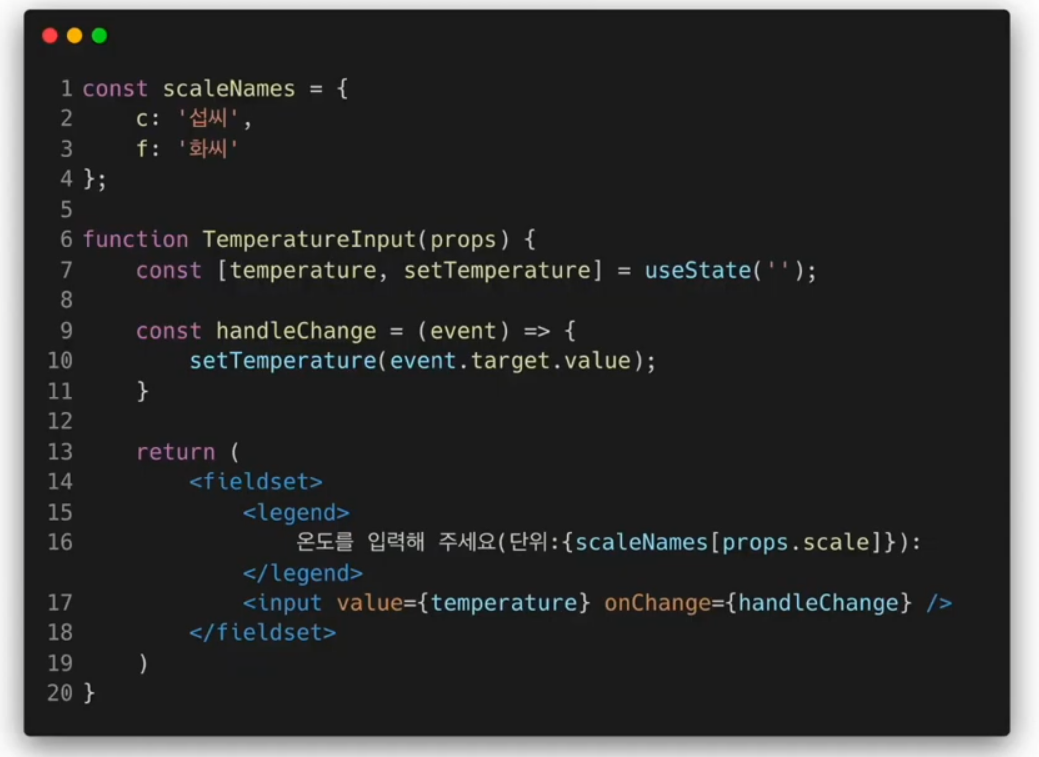
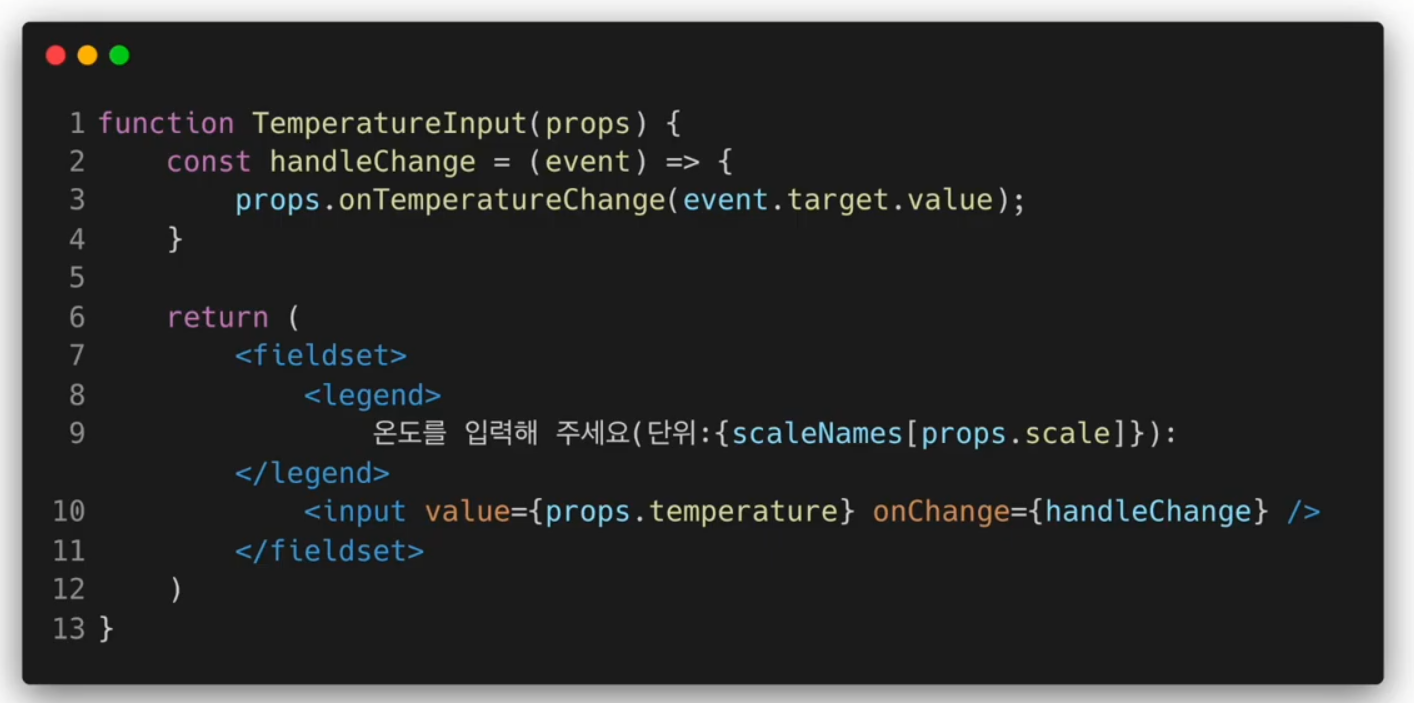
TemperatureInput.jsx
const scaleNmaes = {
    c: "섭씨",
    f: "화씨",
};

function TemperatureInput(props) {
    const handleChage = (event) => {
        props.onTemperatureChange(event.target.value);
    };

    return(
        <fieldset>
            <legend>
                온도를 입력해 주세요 (단위:{scaleNmaes[props.scale]});
            </legend>
            <input value={props.temperature} onChange={handleChage} />
        </fieldset>
    );
}

export default TemperatureInput;
Calculator
import React, { useState } from "react";
import TemperatureInput from "./TemperatureInput";
function BoilingVerdict(porps) {
if(porps.celsius >= 100) {
return <p>물이 끓습니다</p>;
}
return <p>물이 끓지 않습니다</p>;
}
function toCelsius(fahrenheit) {
return ((fahrenheit - 32) * 5) / 9;
}
function toFahrenheit(celsius) {
return (celsius * 9 ) / 5 +32;
}
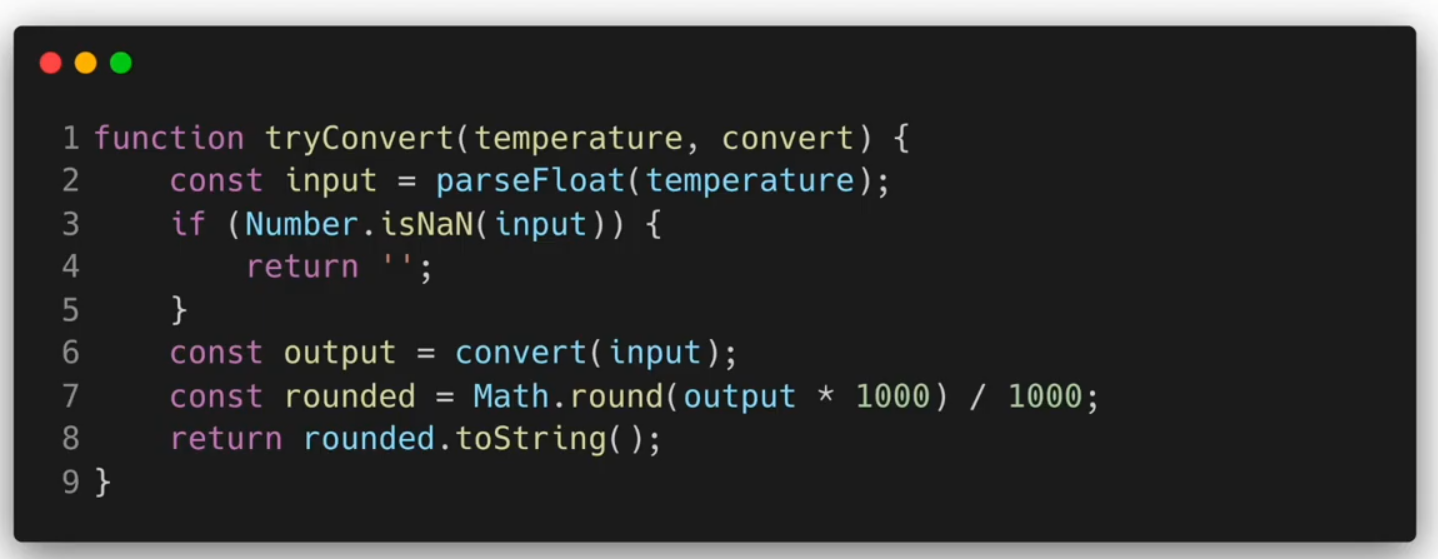
function tryConvert(temperature, convert) {
const input = parseFloat(temperature);
if(Number.isNaN(input)){
return "";
}
const output = convert(input);
const rounded = Math.round(output * 1000) / 1000;
return rounded.toString();
}
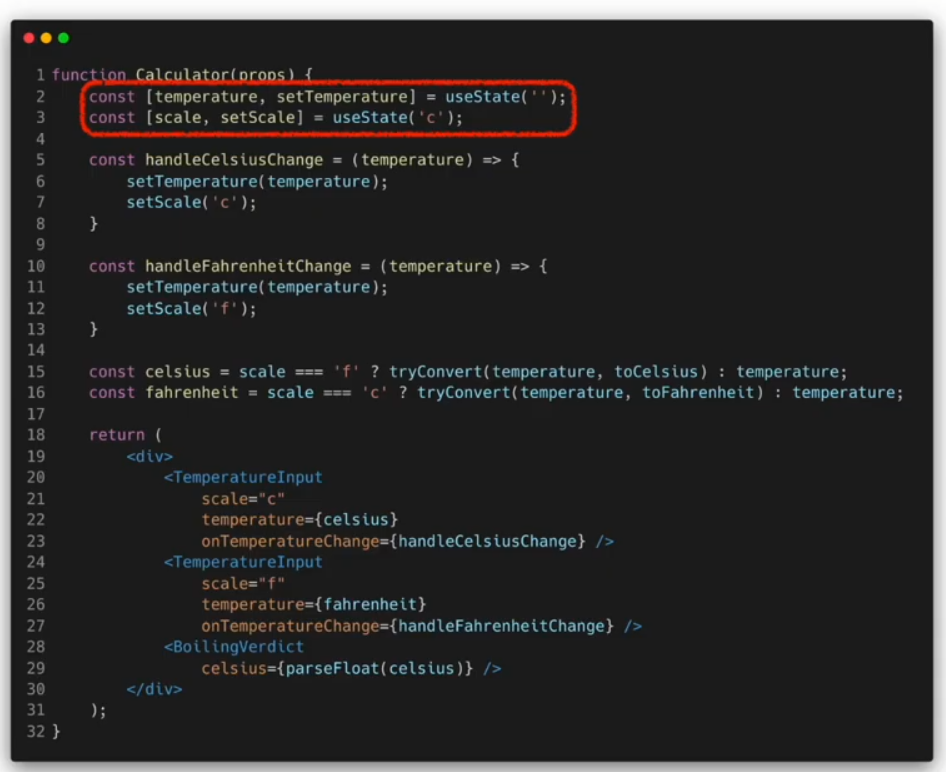
function Calculator(props) {
const [temperature, setTemperature] = useState("");
const [scale, setScale] = useState("c");
const handleCelsiusChange = (temperature) => {
setTemperature(temperature);
setScale("c");
};
const handleFahrenheitChange = (temperature) => {
setTemperature(temperature);
setScale("f");
};
const celsius =
scale === "f" ? tryConvert(temperature, toCelsius) : temperature;
const fahrenheit =
scale === "c" ? tryConvert(temperature, toFahrenheit) : temperature;
return (
<div>
<TemperatureInput
scale="c"
temperature={celsius}
onTemperatureChange={handleCelsiusChange}
/>
<TemperatureInput
scale="f"
temperature={fahrenheit}
onTemperatureChang={handleFahrenheitChange}
/>
<BoilingVerdict celsius={parseFloat(celsius)} />
</div>
);
}
export default Calculator;결과물
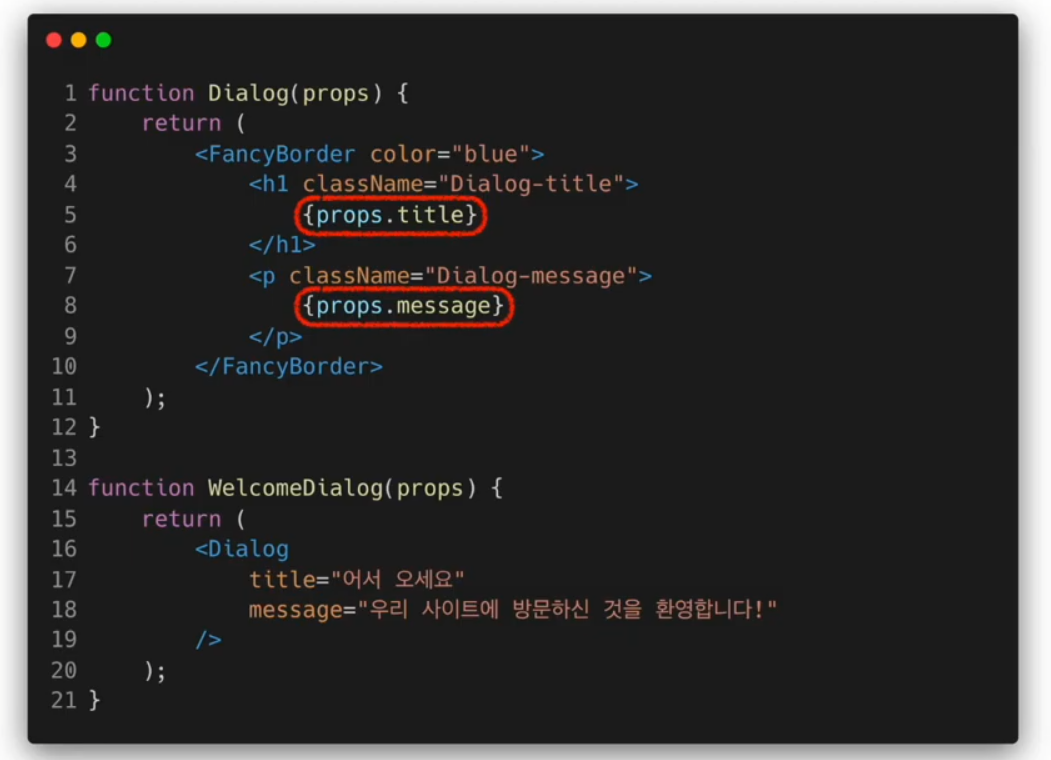
Composition vs Inheritance
Composition
여러 개의 컴포넌트를 합쳐서 새로운 컴포넌트를 만드는 것
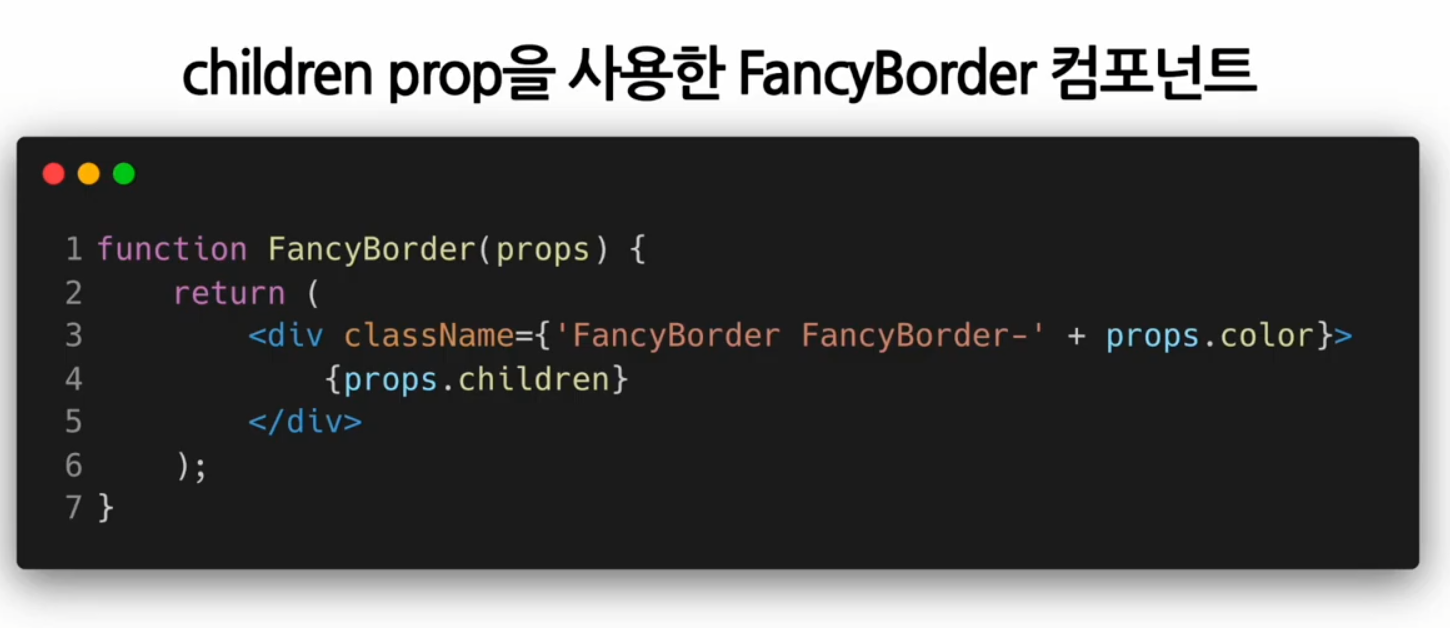
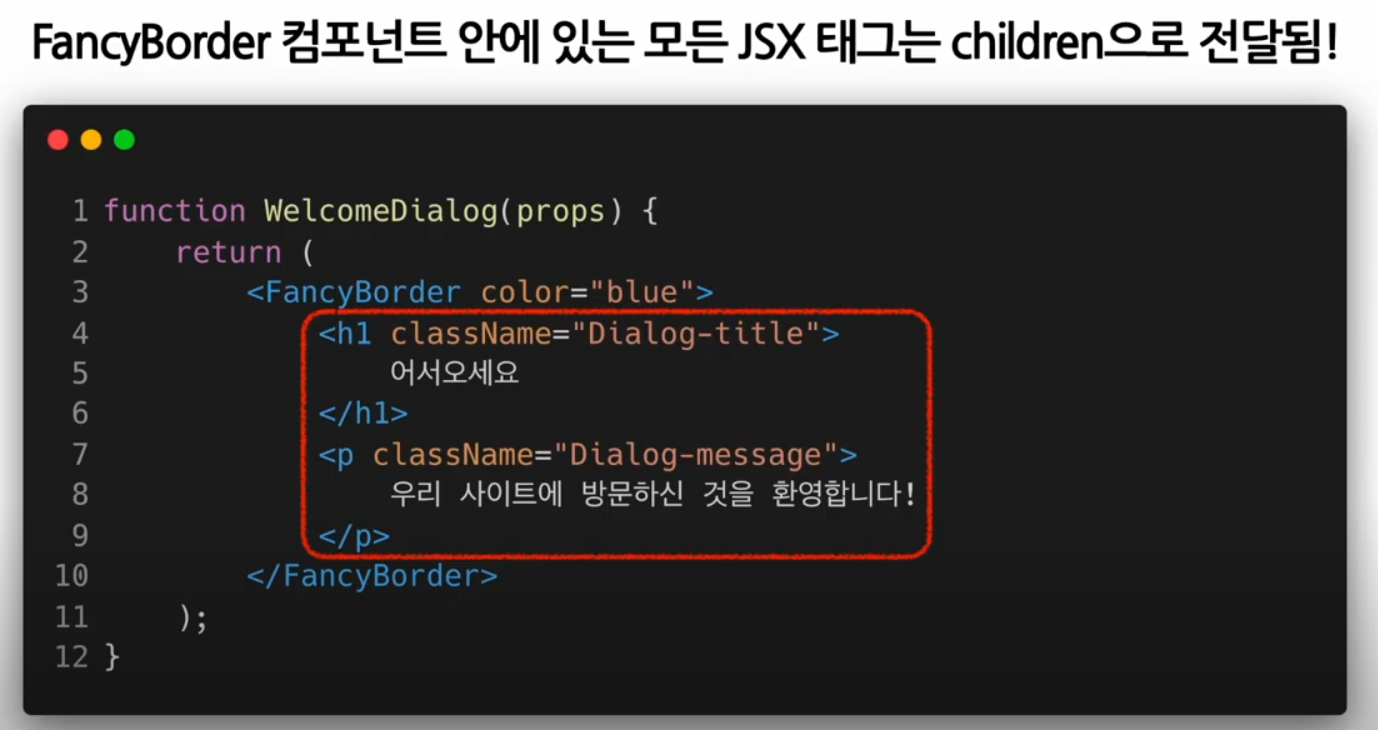
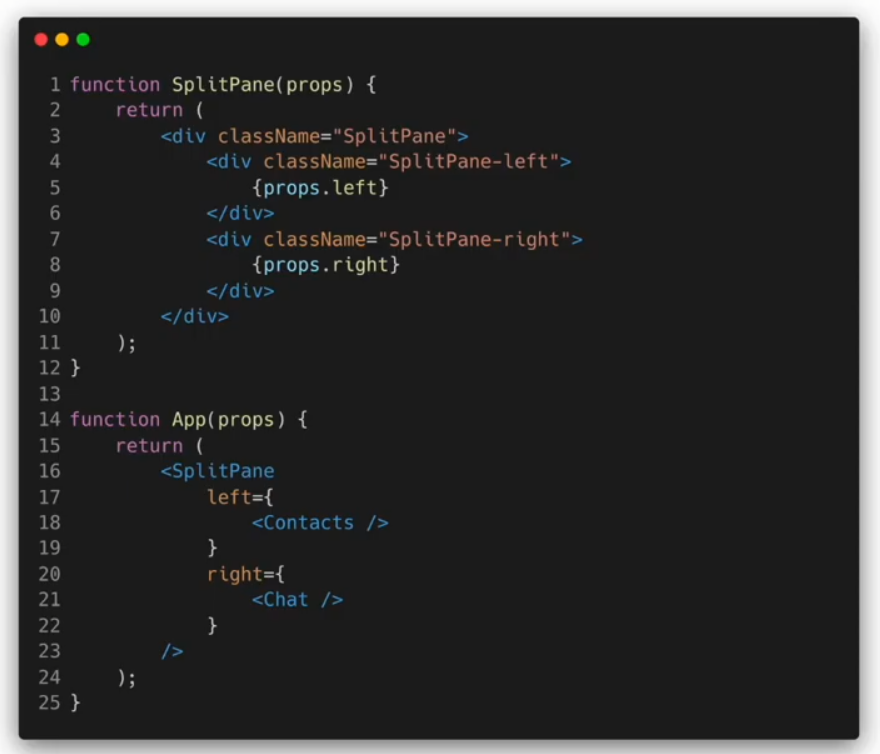
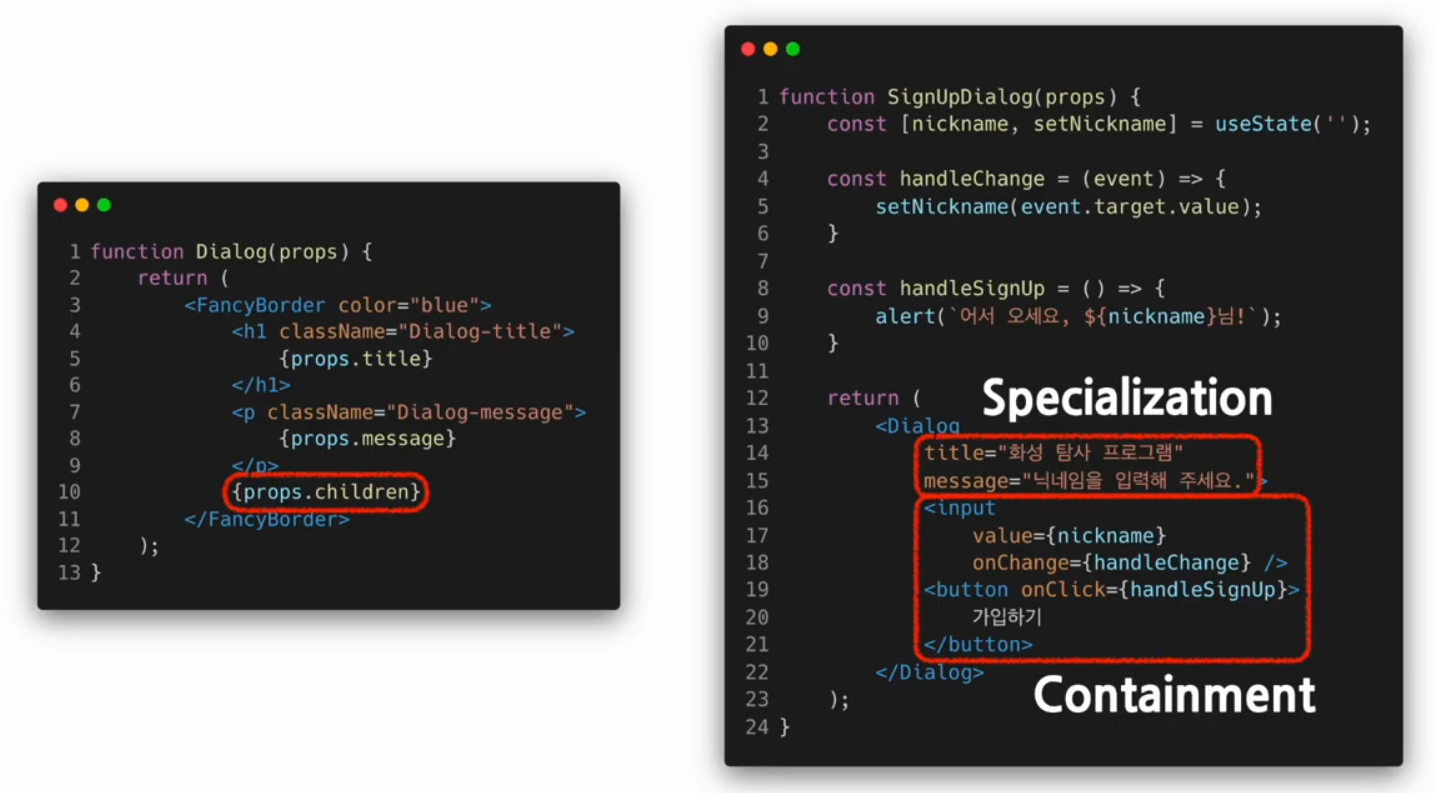
Containment

Specialization
범용적인 개념을 구별이 되게 구체화하는 것
기존의 객체지향 언어에서는 상속(inheritance)을 사용하여 specialization을 구현하지만 리액트에서는 합성(Composition)을 사용하여 specialization을 구현한다
Inheritance
다른 컴포넌트로부터 상속을 받아서 새로운 컴포넌트를 만드는 것
Card 컴포넌트 만들기
Card.jsx
function Card(props) {
const { title, backgroundColor, children } = props;
return (
<div
style={{
margin: 8,
padding: 8,
borderRadius: 8,
boxShadow: "0px 0px 4px grey",
backgroundColor: backgroundColor || "white",
}}
>
{title && <h1>{title}</h1>}
{children}
</div>
);
}
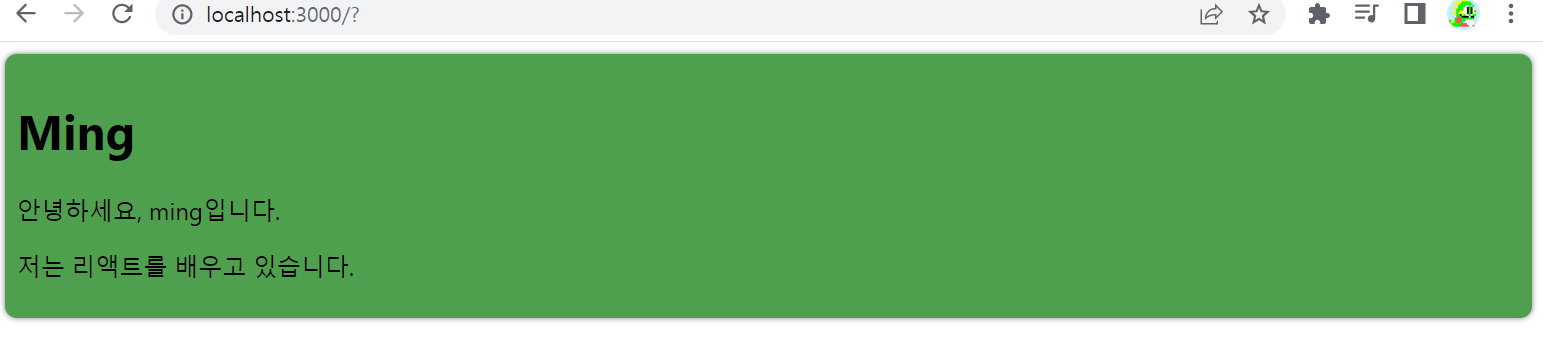
export default Card;ProfileCard.jsx
import Card from "./Card";

function ProfileCard(props) {
    return (
        <Card title="Ming" backgroundColor="#4ea04e">
            <p>안녕하세요, ming입니다.</p>
            <p>저는 리액트를 배우고 있습니다.</p>
        </Card>
    );
}

export default ProfileCard;
결과물
Context

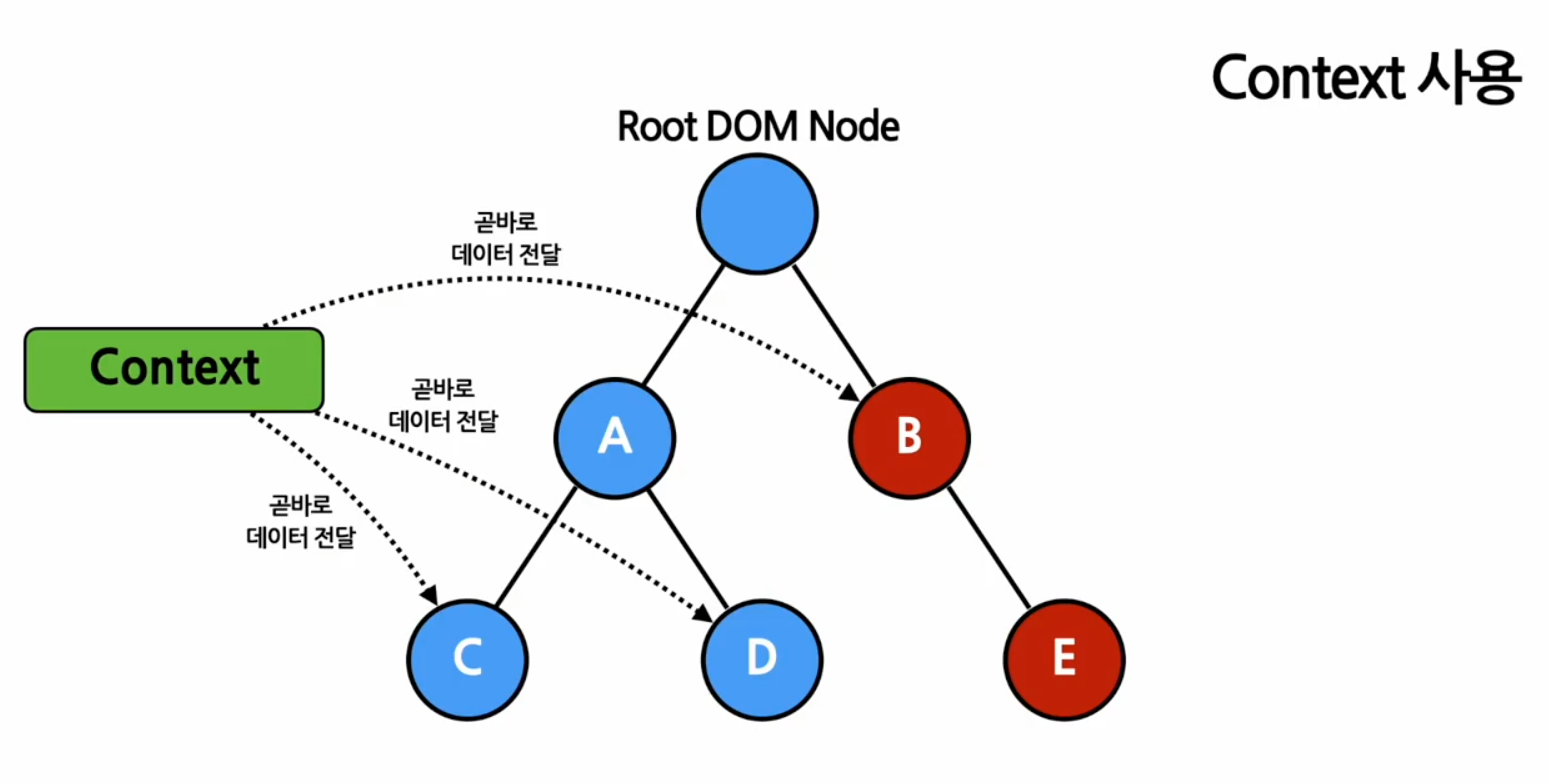
여러개의 컴포넌트들이 접근해야 하는 데이터를 사용해야 할때 context 사용
ex. 로그인 여부, 로그인 정보, UI 테마, 현재 언어 등
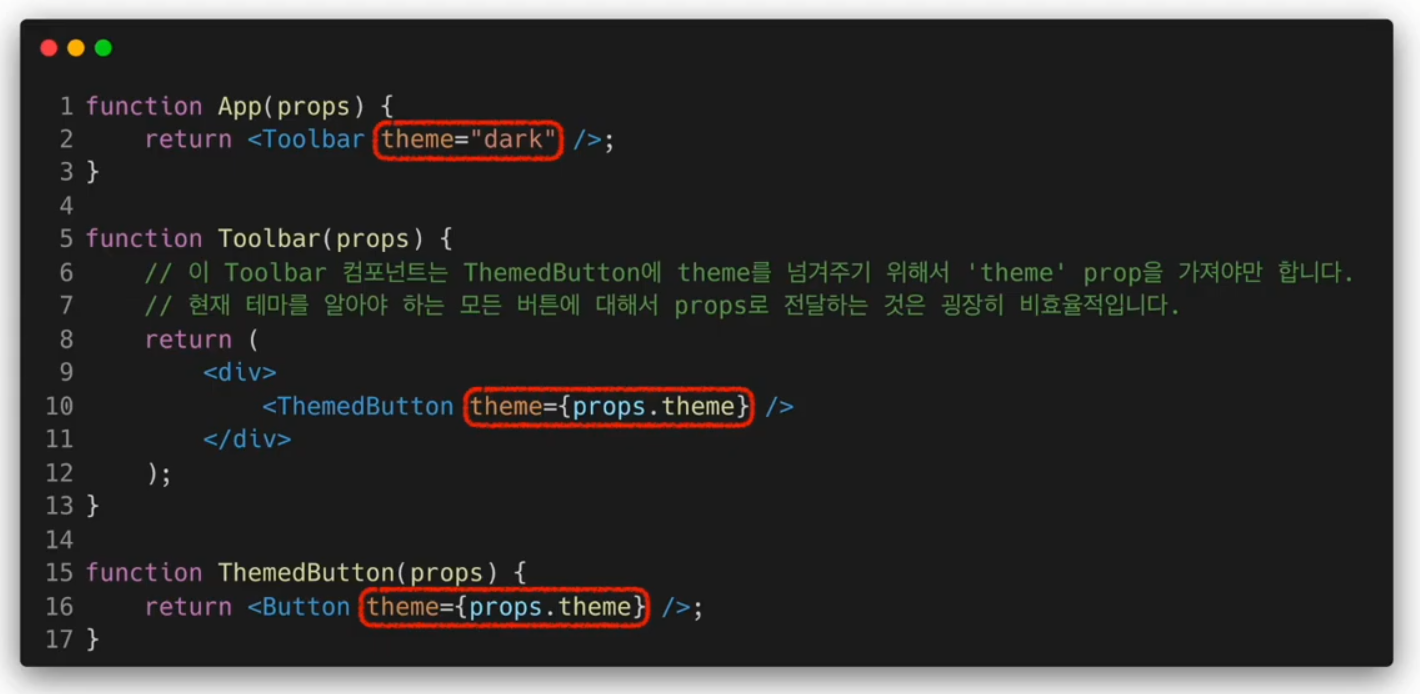
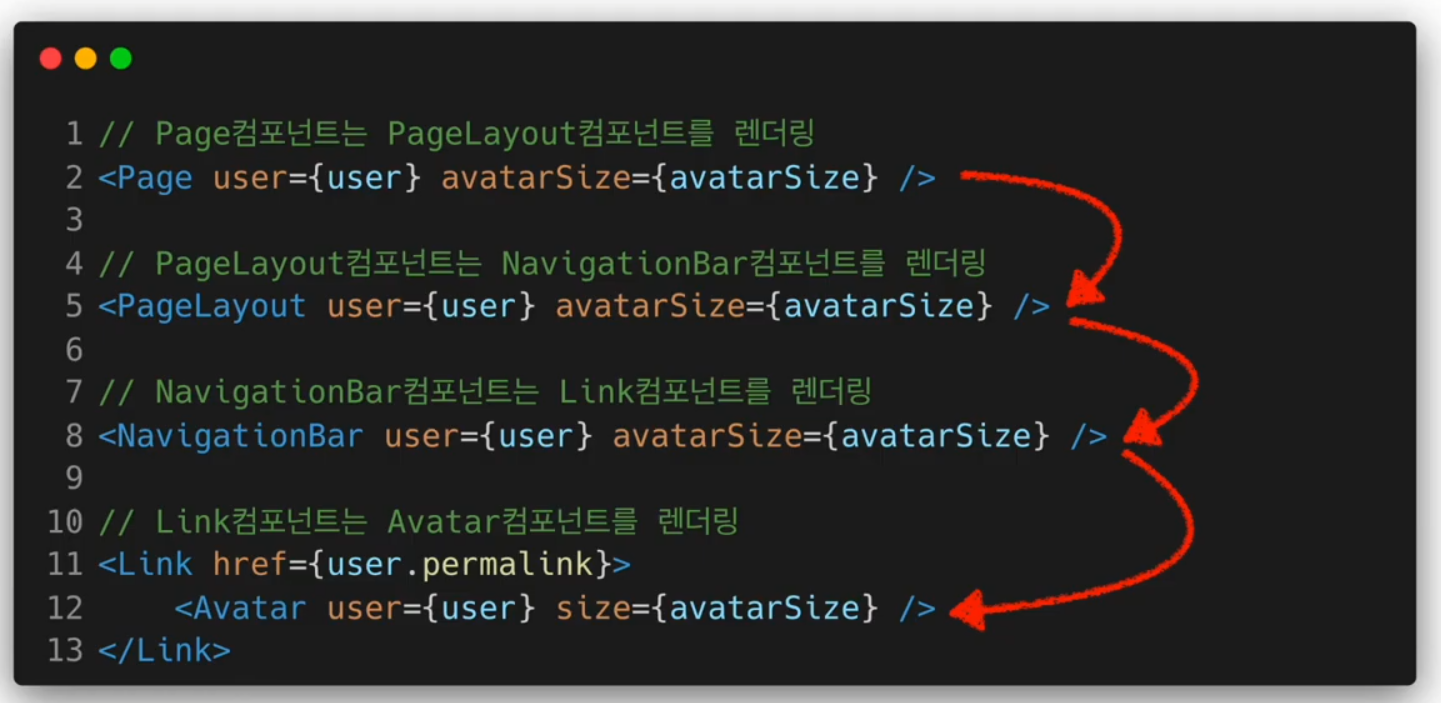
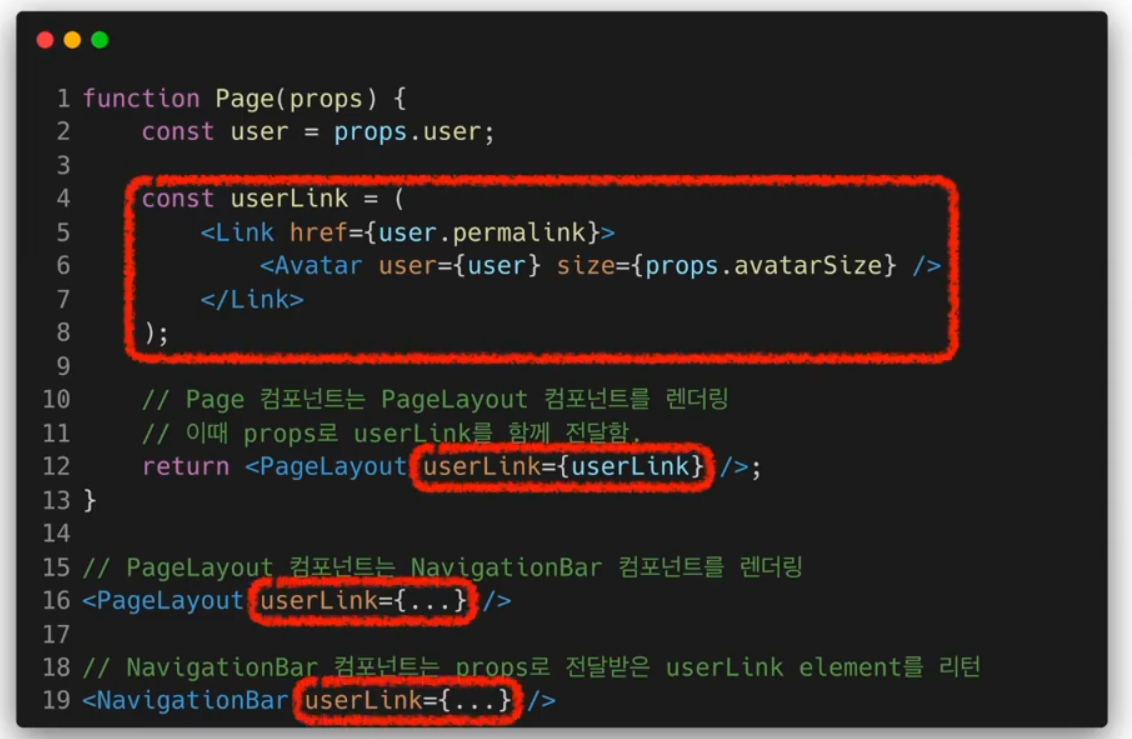
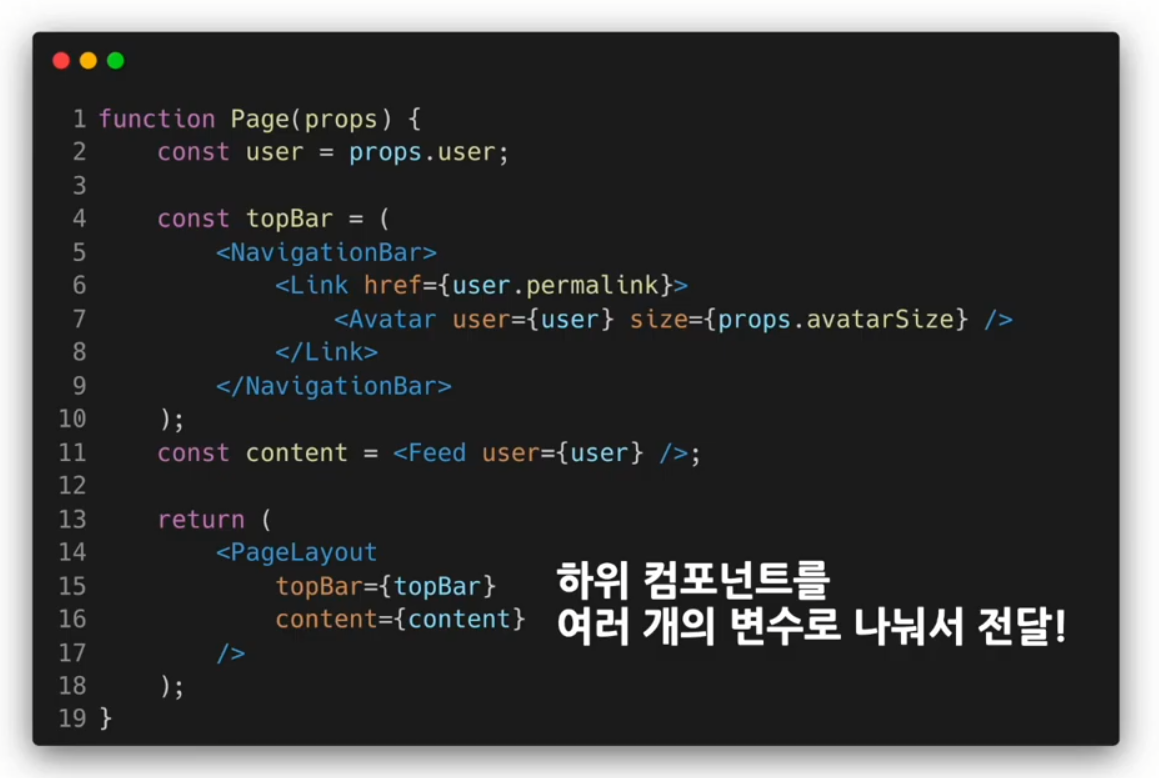
깊이가 깊어질수록 복잡해지고 반복적인 코드를 계속해서 작성해야 하기 때문에 비효율적이고 직관적이지 못하다
컴포넌트와 컨텍스트가 연동되면 재사용성이 떨어지기 때문에 기존의 props를 이용한 방식과 잘 구분하여 사용하여야 한다.
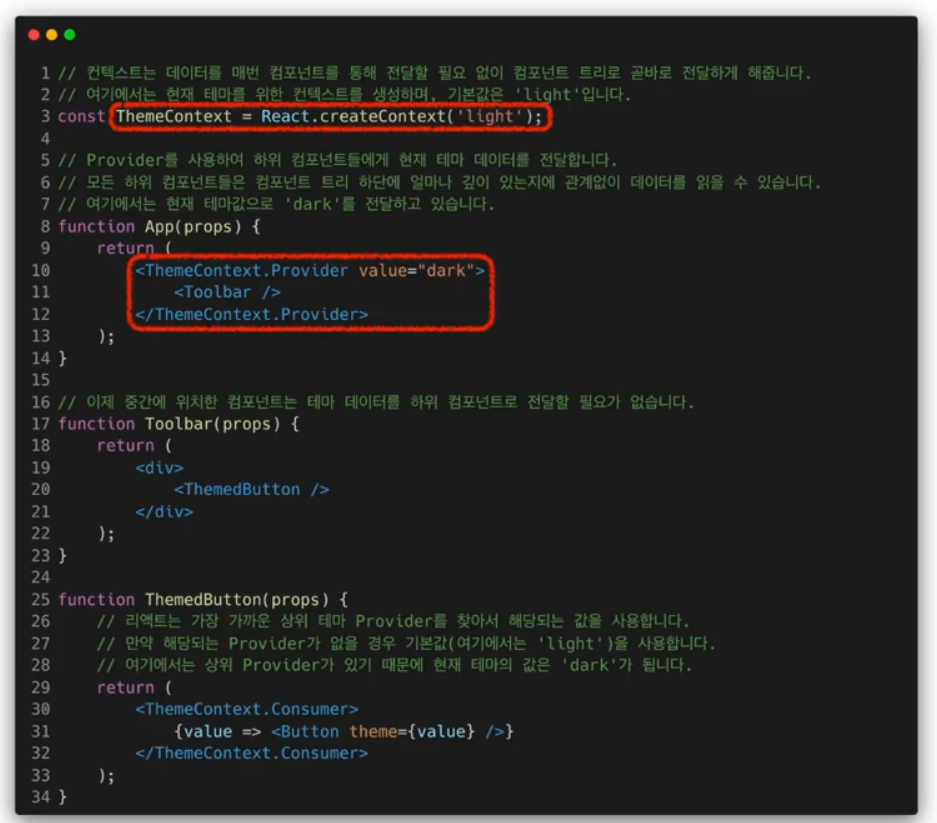
Context API
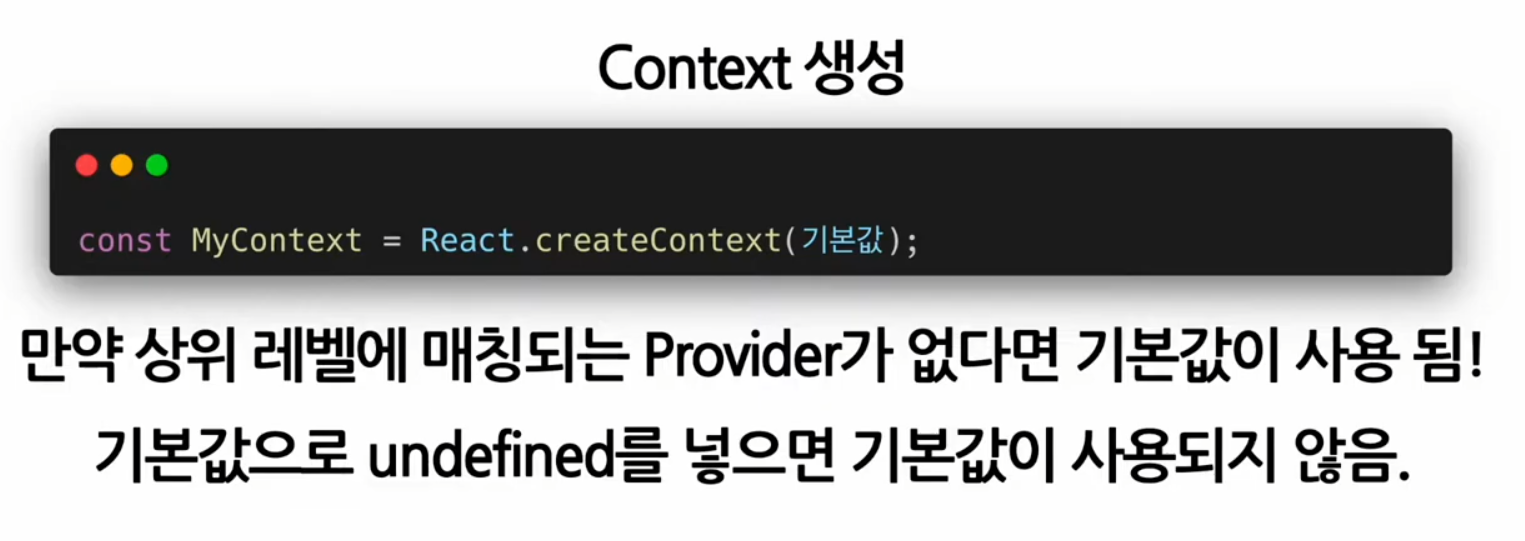
React.createContext()
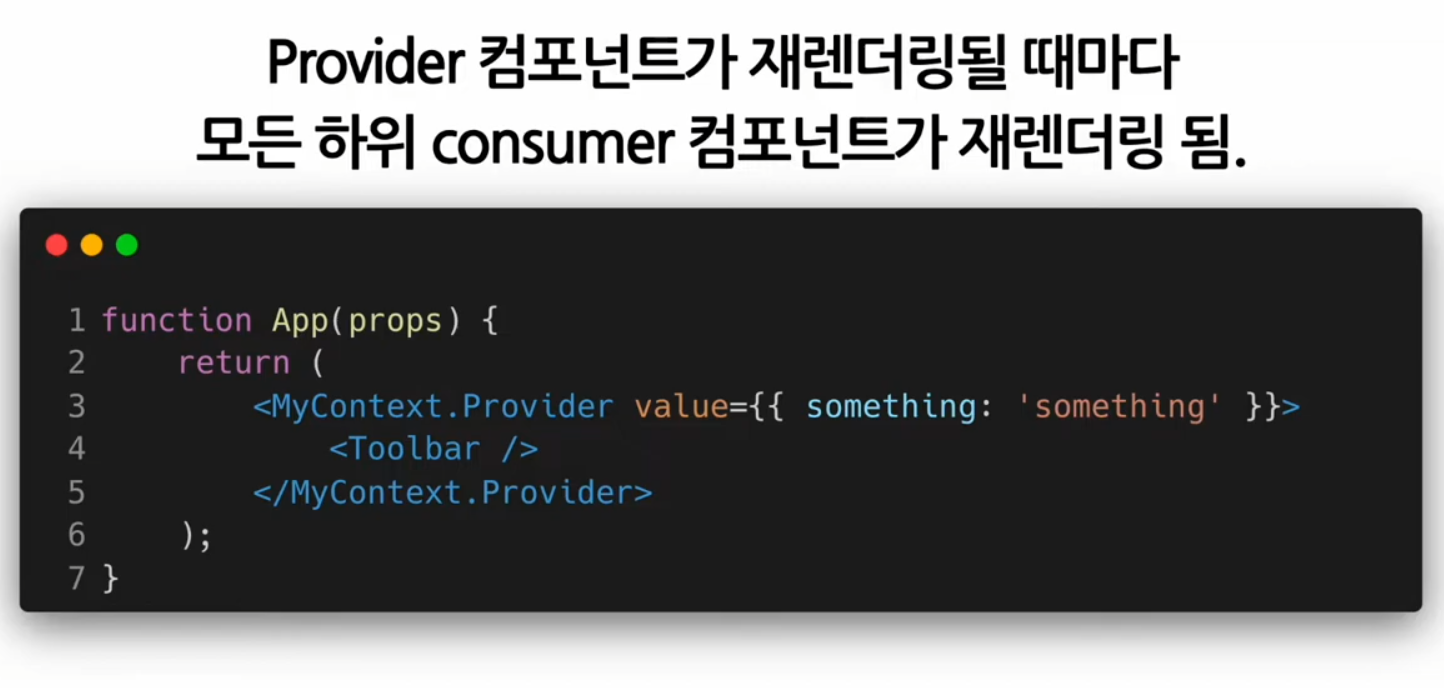
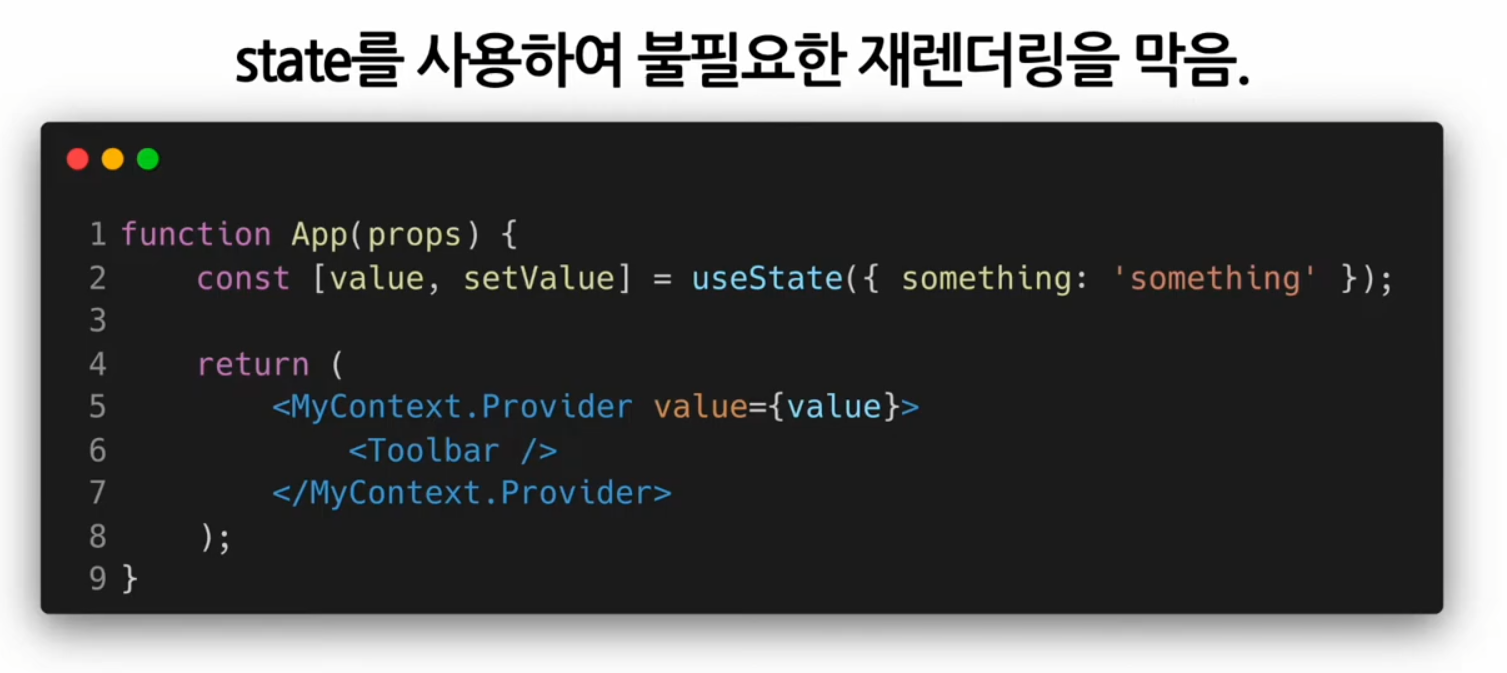
Context.Provider

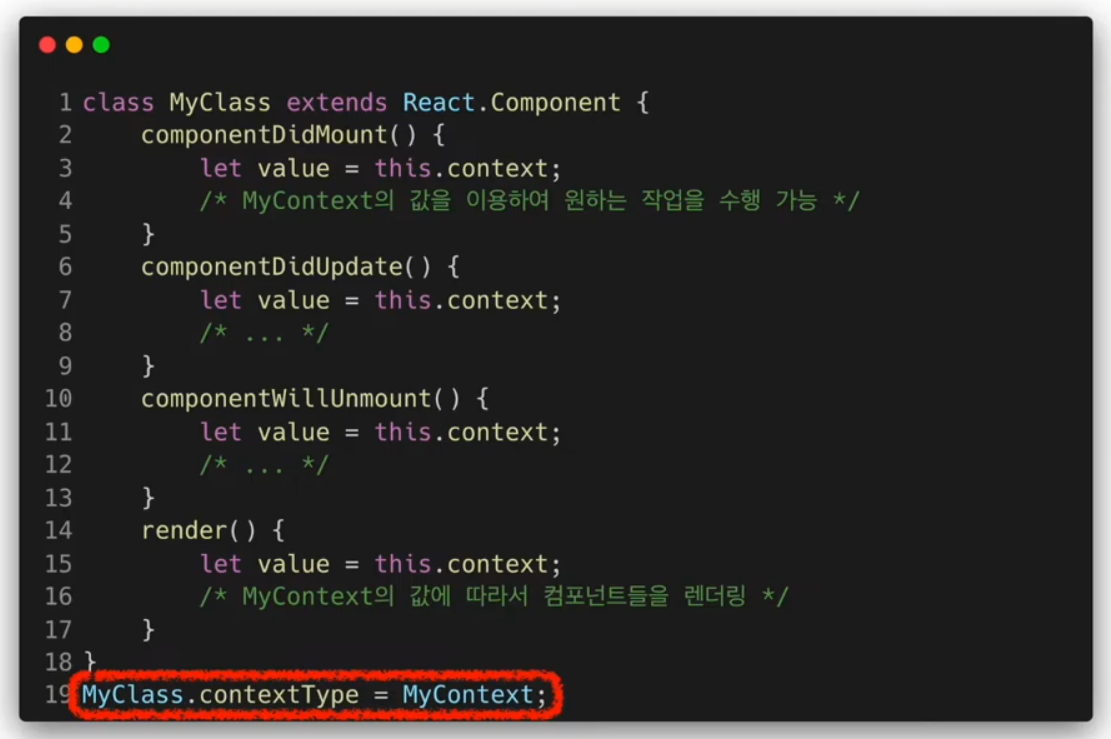
Class.contextType
현재는 거의 사용하지 않음 알아만 두기
Context.Consumer
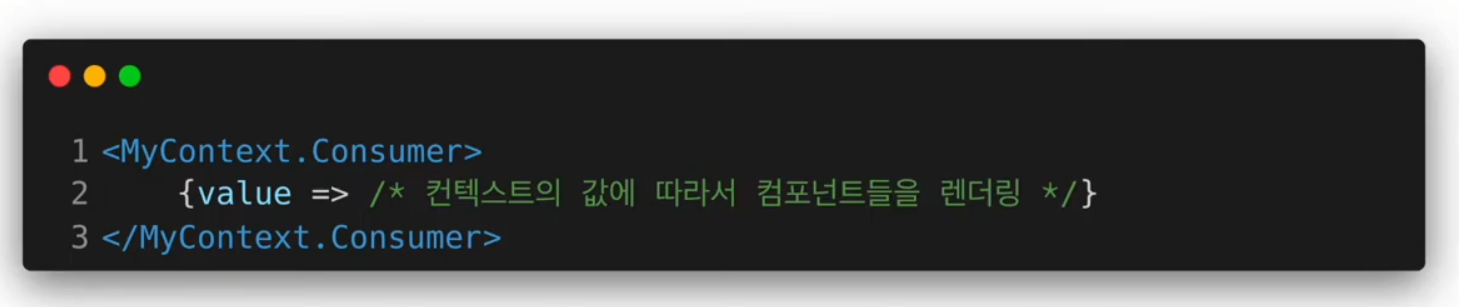
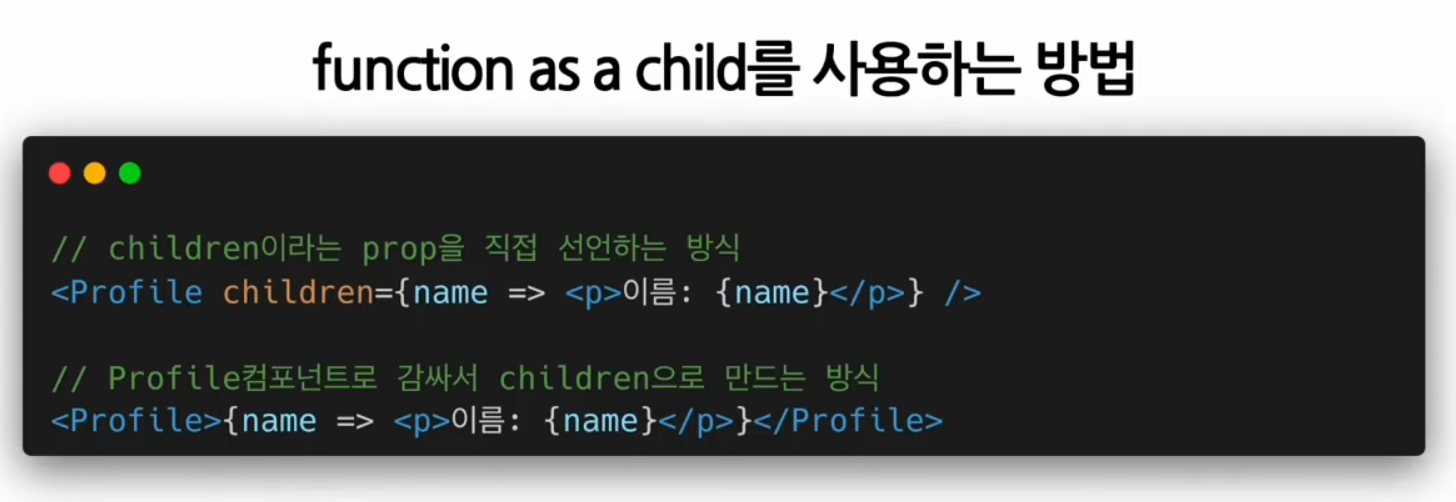
function as a child
Context.displayName

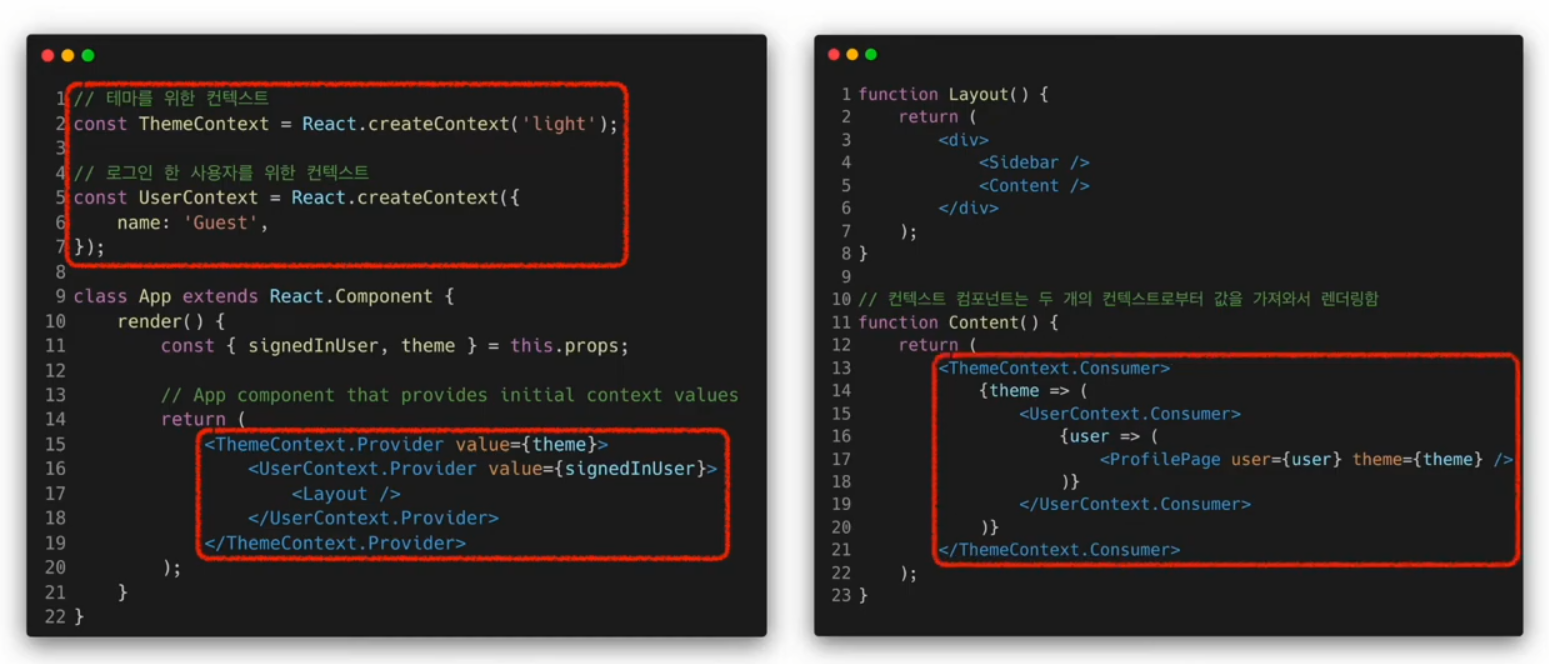
여러 개의 Context 사용하기
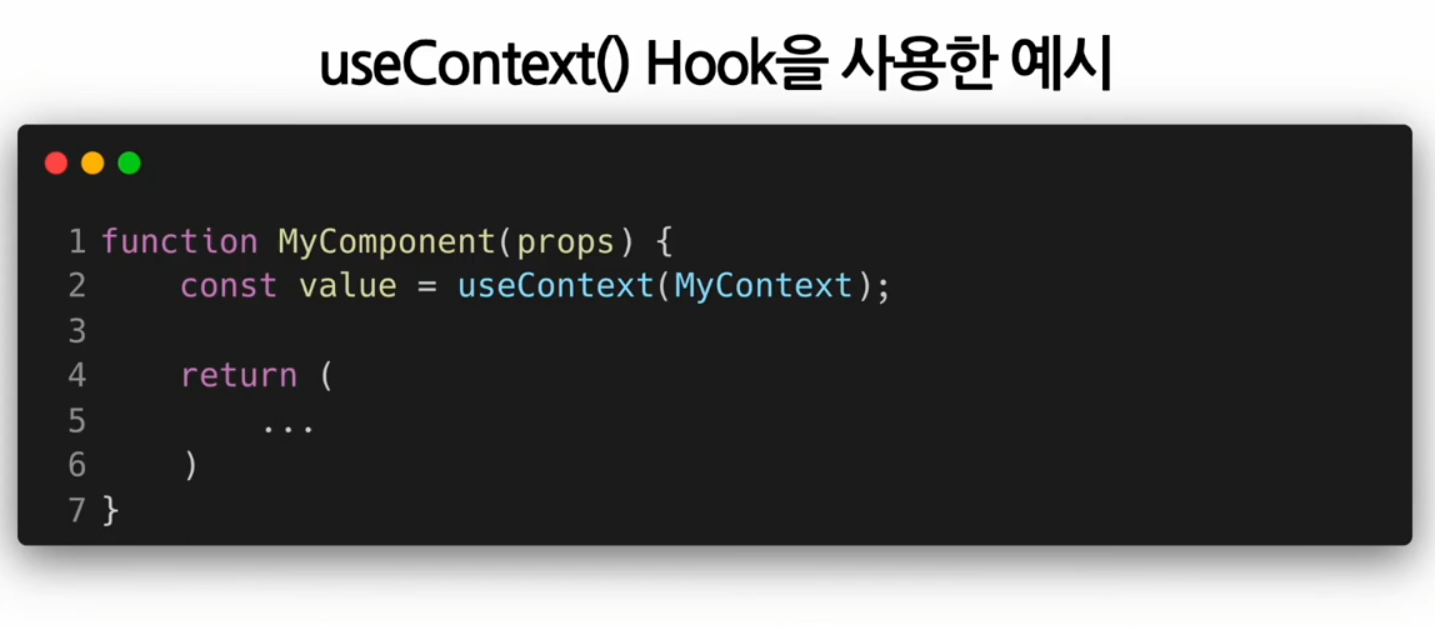
useContext()
Context를 사용하여 테마 변경 기능 만들기
ThemeContext
import React from "react";

const ThemeContext = React.createContext();
ThemeContext.displayName = "ThemeContext";

export default ThemeContext;
MainContent
import { useContext } from "react";
import ThemeContext from "./ThemeContext";

function MainContent(props) {
    const { theme, toggleTheme } = useContext(ThemeContext);

    return (
        <div
            style={{
                width: "100vw",
                height: "100vh",
                padding: "1.5rem",
                backgroundColor: theme === "light" ? "white" : "black",
                color: theme === "light" ? "black" : "white",
            }}
        >
            <p>안녕하세요, 테마 변경이 가능한 웹사이트입니다.</p>
            <button onClick={toggleTheme}>테마 변경</button>
        </div>
    );
}

export default MainContent;
DarkOrLight
import { useState, useCallback } from "react";
import ThemeContext from "./ThemeContext";
import MainContent from "./MainContent";

function DarkOrLight(props) {
    const [theme, setTheme] = useState("light");

    const toggleTheme = useCallback(() => {
        if (theme == "light") {
            setTheme("dark");
        } else if (theme == "dark") {
            setTheme("light");
        }
    }, [theme]);

    return (
        <ThemeContext.Provider value={{ theme, toggleTheme}}>
            <MainContent />
        </ThemeContext.Provider>
    )

}

export default DarkOrLight;
결과물
Styling

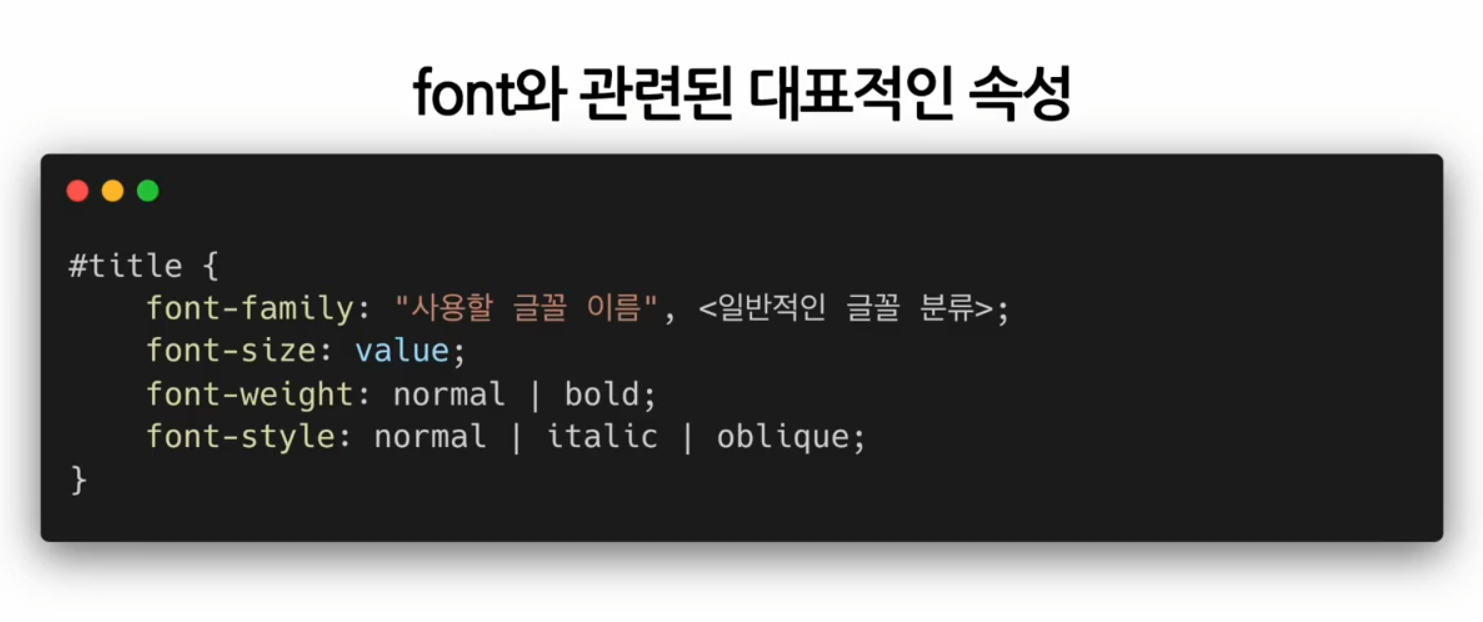
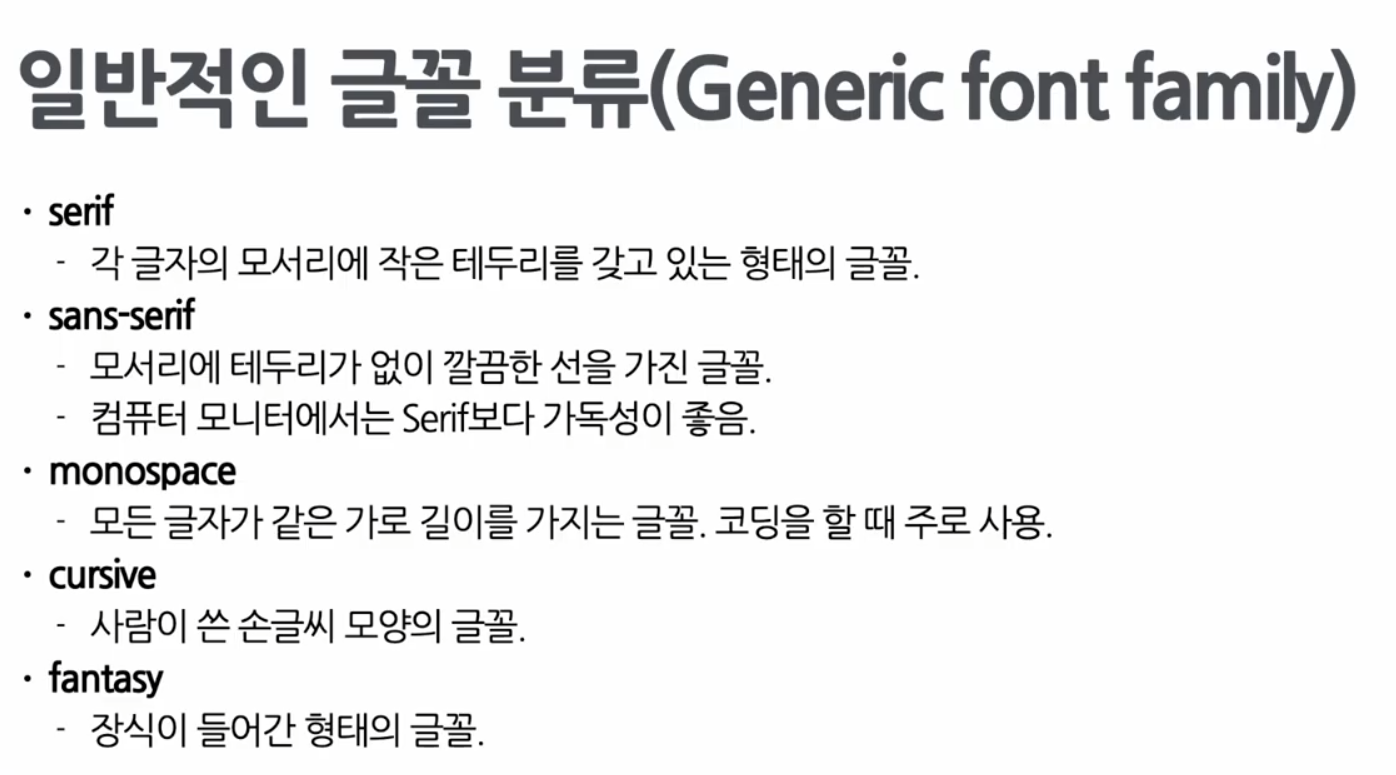
font
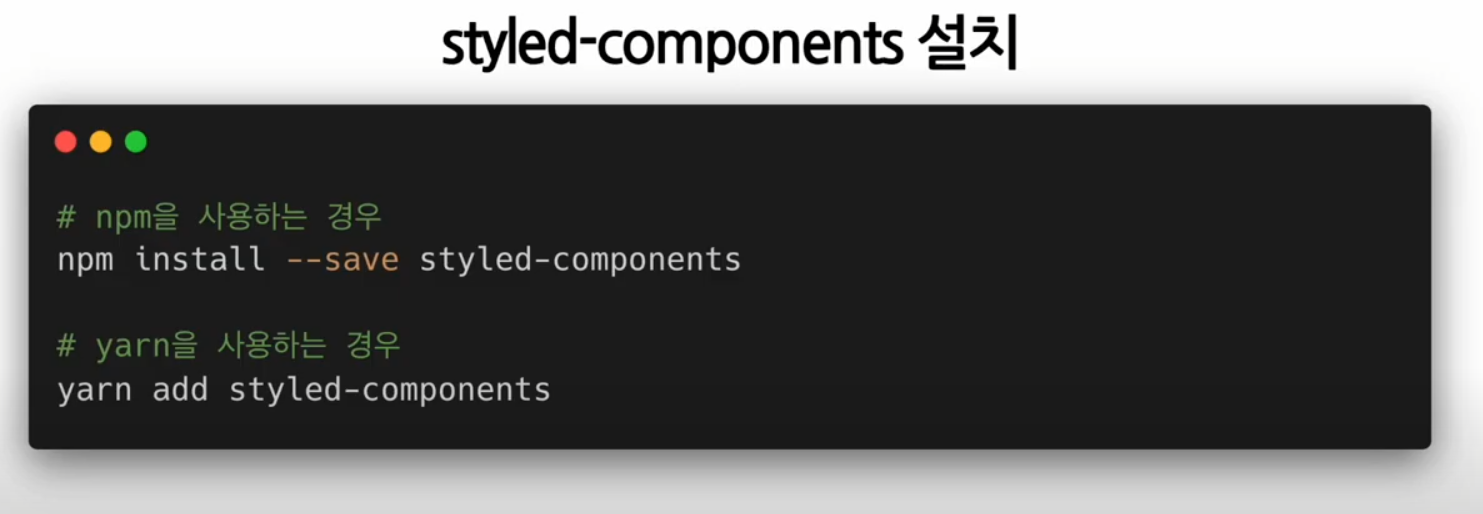
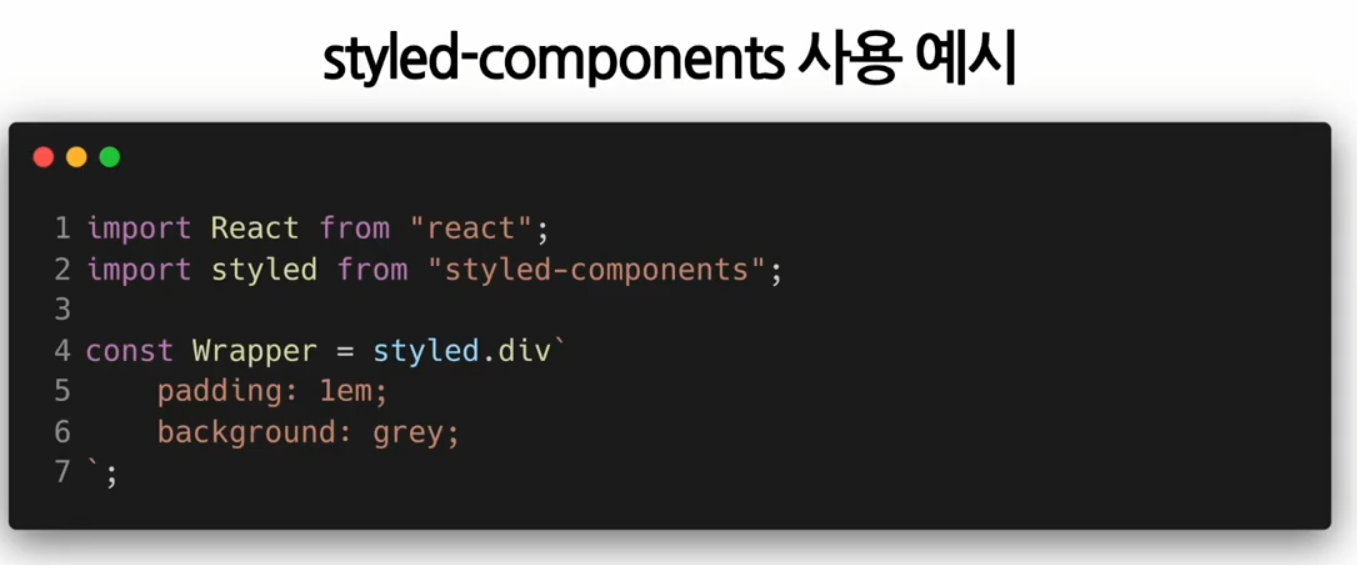
styled-components
import React from "react";
import styled from "styled-components";
const Wrapper = styled.div`
padding: 1em;
background: grey;
`;
const Title = styled.h1`
font-size: 1.5em;
color: white;
text-align: center;
`;
function MainPage(props) {
return (
<Wrapper>
<Title>
안녕, 리액트!
</Title>
</Wrapper>
)
}
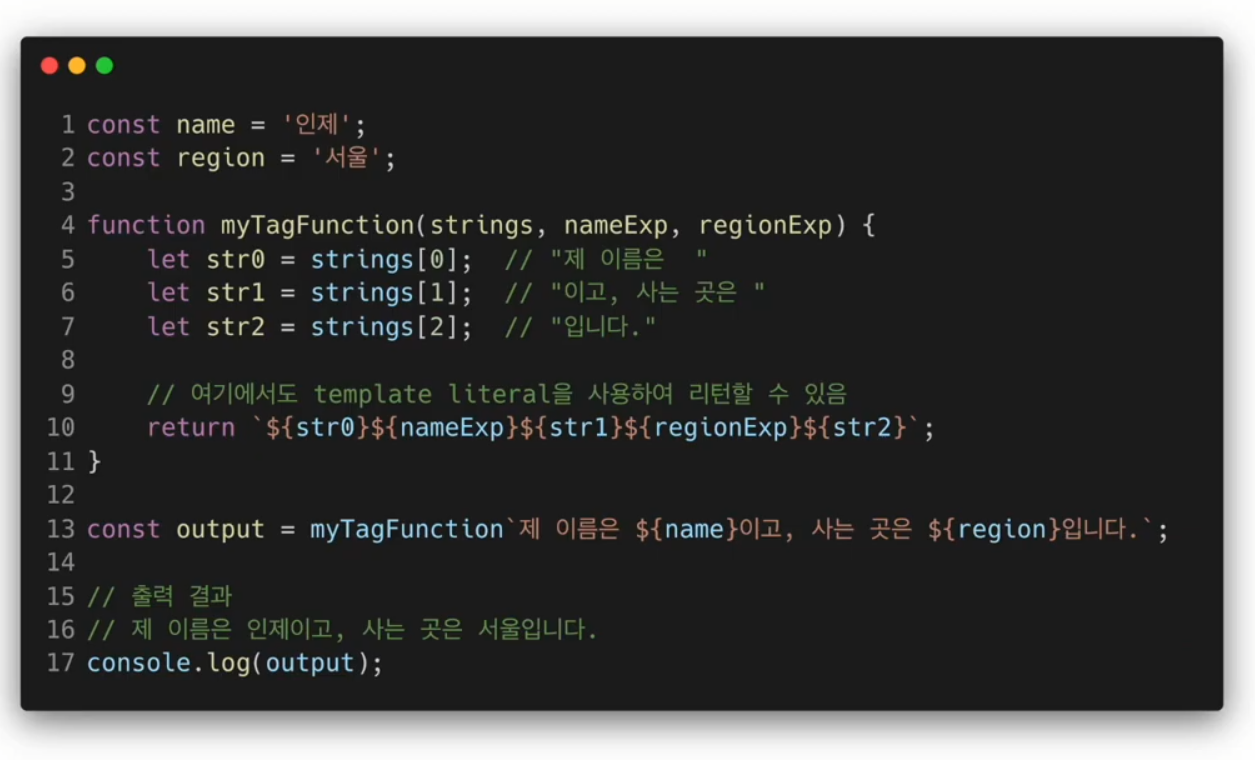
export default MainPage;tagged template literal
leteral = 소스코드의 고정된 값


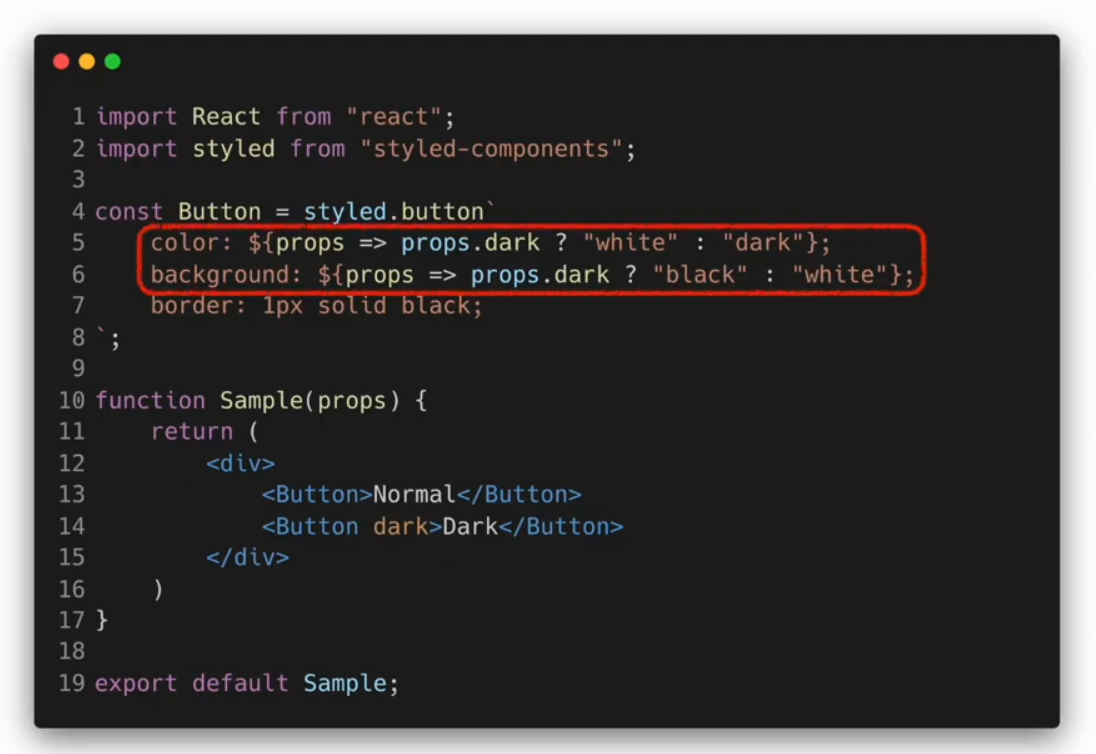
styled-components의 props 사용하기
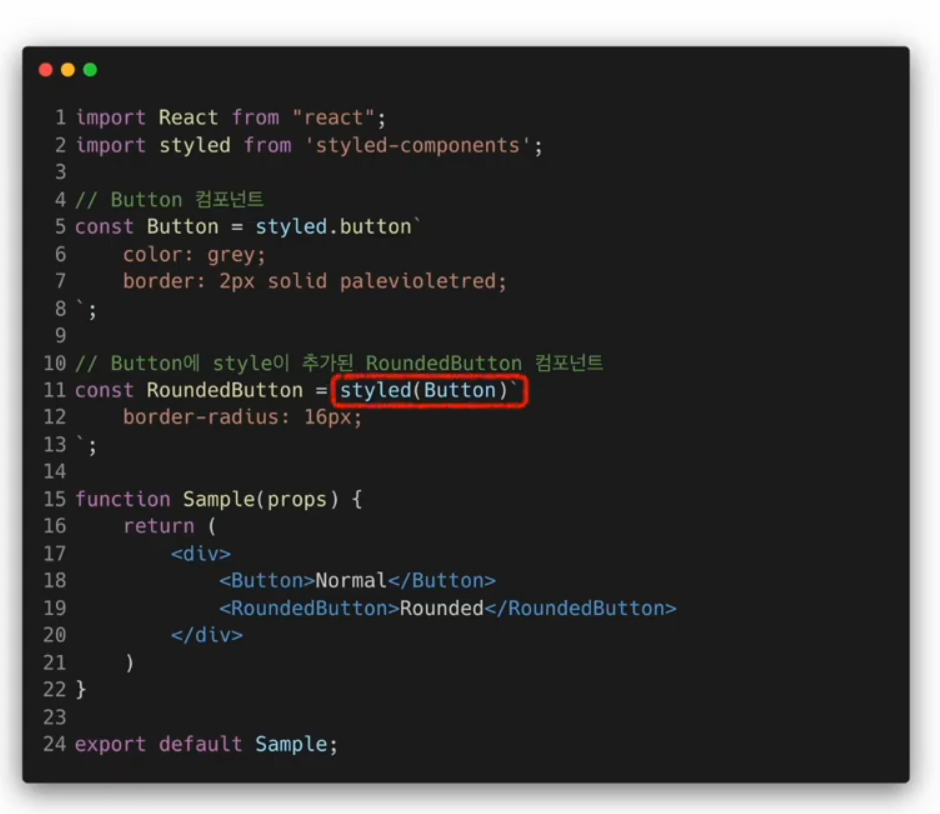
styled-components의 스타일 확장하기
styled-components를 사용하여 스타일링 해보기
Blocks.jsx
import styled from "styled-components";
const Wrapper = styled.div`
padding: 1rem;
display: flex;
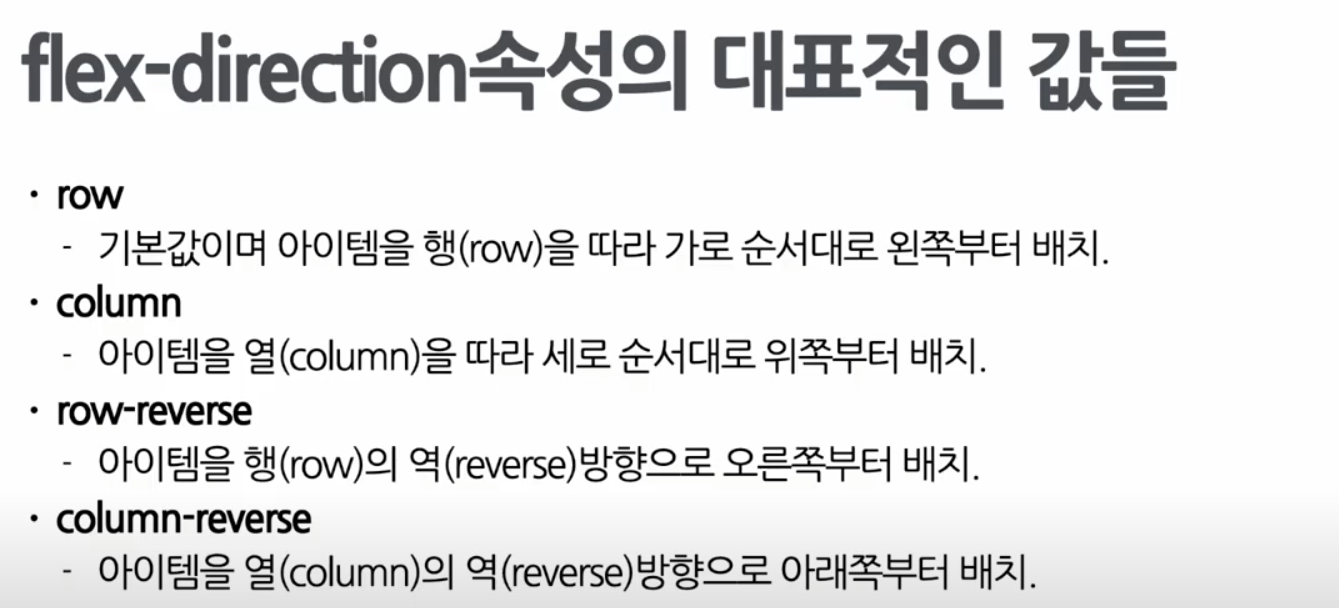
flext-direction: row;
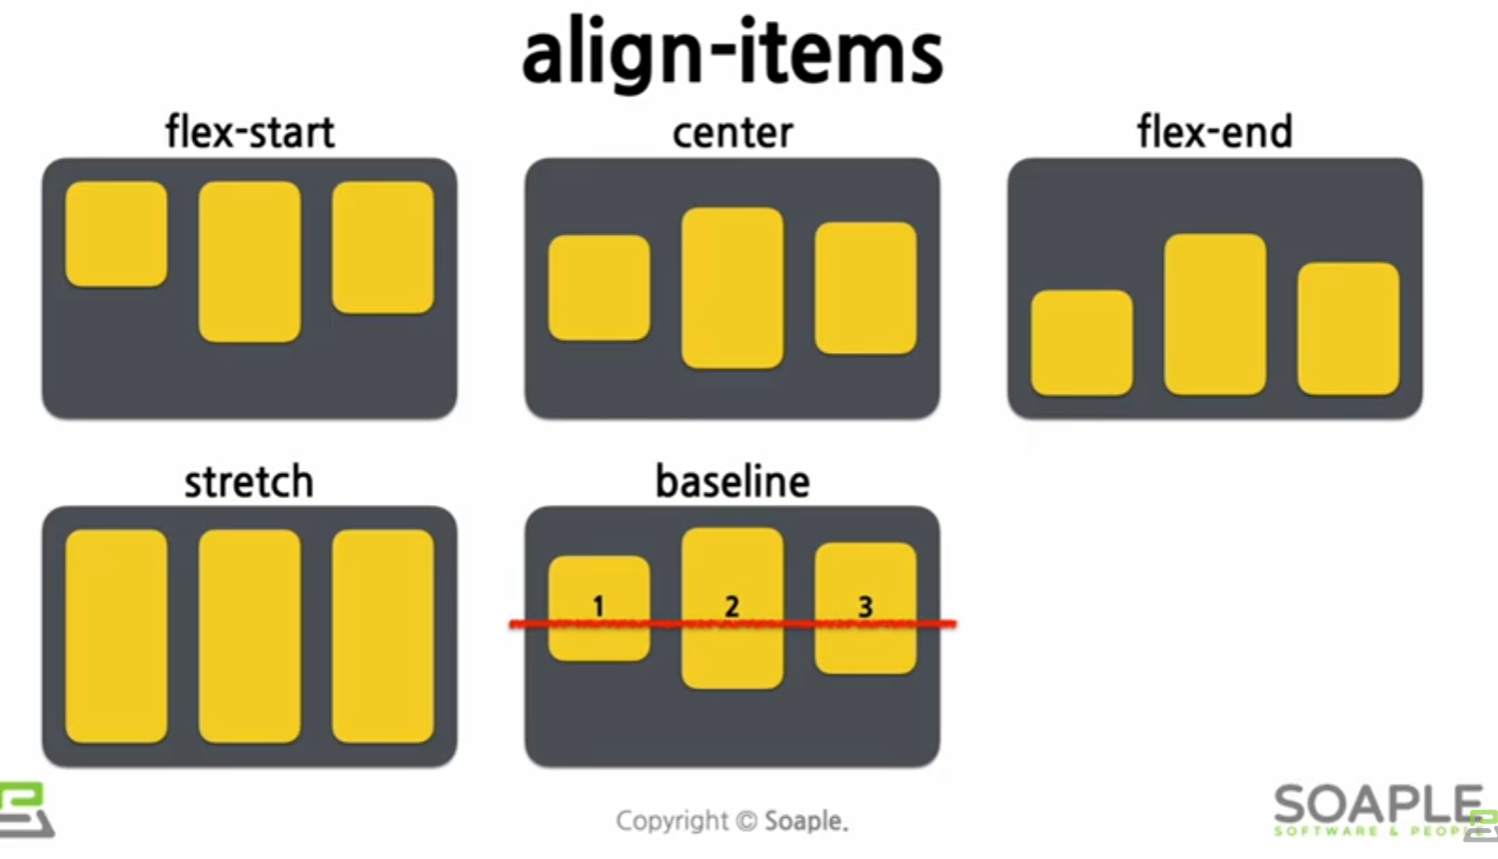
align-items: flex-start;
justify-content: flex-start;
background-color: lightgrey;
`;
const Block = styled.div`
padding: ${(props) => props.padding};
border: 1px solid black;
border-radius: 1rem;
background-color: ${(props) => props.backgroundColor};
color: white;
font-size: 2rem;
font-weight: bold;
text-align: center;
`;
const blockItems = [
{
label: "1",
padding: "1rem",
backgroundColor: "red",
},
{
label: "2",
padding: "3rem",
backgroundColor: "green",
},
{
label: "3",
padding: "2rem",
backgroundColor: "blue",
},
];
function Blocks(props) {
return (
<Wrapper>
{blockItems.map((blockItem) => {
return (
<Block
padding={blockItem.padding}
backgroundColor={blockItem.backgroundColor}
>
{blockItem.label}
</Block>
);
})}
</Wrapper>
);
}
export default Blocks;