
Props?
단어 뜻 그대로 컴퍼넌트의 속성값을 의미.
props는 부모 컴퍼넌트로부터 전달받은 데이터를 지니고 있는 객체.
props를 통해서 부모 컴퍼넌트로부터 자식 컴퍼넌트에게 State의 상태값, event handler를 넘겨줄 수 있다.
class형 컴퍼넌트에서 props 정의하기
//현재 Parent.js 임
import React from 'react';
import Child from '../pages/child/child';
class Parent extends React.Component {
  constructor() {
    super();
    this.state = {
      color: 'red'
    };
  }
  render() {
    return (
      <div>
        <h1>Parent Component</h1>
        <Child />
        </div>
      );
  }
}
export default state;
parent.js 는 부모 컴퍼넌트이다.
부모 컴퍼넌트 안에서<child />컴퍼넌트를import한 후,<h1>태그 아래에 위치해주었다.
부모의state에 있는 데이터를<child />컴퍼넌트에게props를 통해 넘겨보자.// 현재 Parent.js 임. import React from 'react'; import Child from '../pages/Child/Child' class Parent extends React.Component { constructor() { super(); this.state = { color: 'red'; }; } render() { return ( <div> <h1>Parent Component</h1> <Child titleColor={this.state.color} /> </div> ); } } export default State;
- 자식 컴퍼넌트의
props에titleColor속성을 만들어주었다.titleColor의 값으로this.state.color, 즉 부모 컴퍼넌트의state객체 중에color의 값을 전달했다.이러한 방식으로
props를 통해 부모 컴퍼넌트 내부의state값을 자식 컴퍼넌트에세 전달할 수 있다.
그렇다면
<Child />컴퍼넌트 내부에서 전달 받은 props 데이터를 어떻게 사용하나?
state와 마찬가지로 컴퍼넌트의 props 는 객체이다.
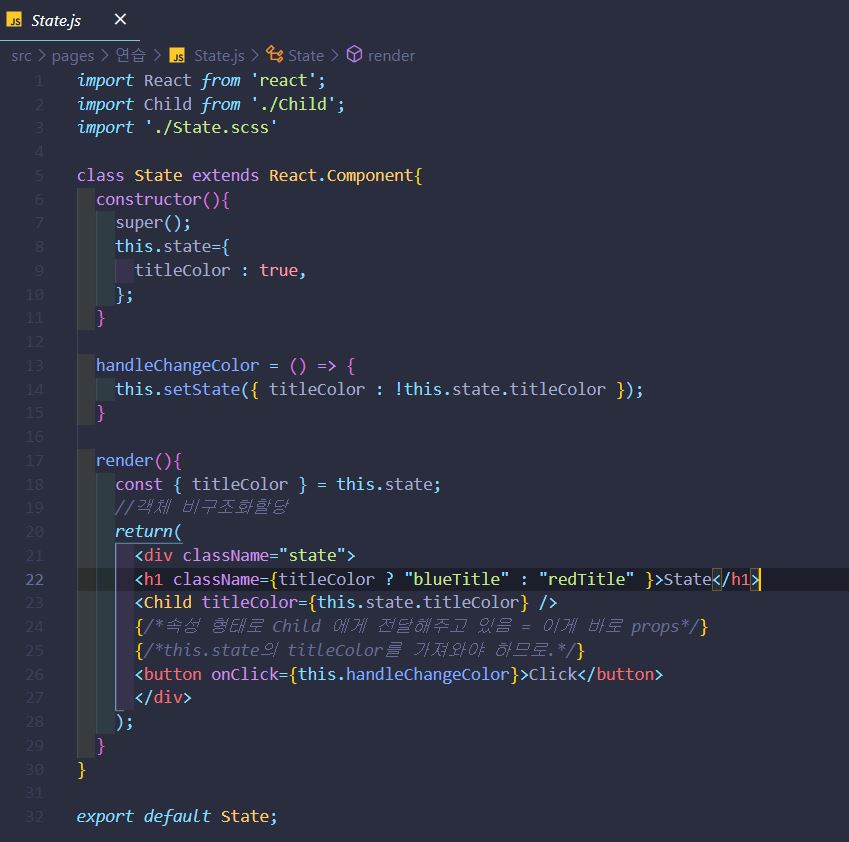
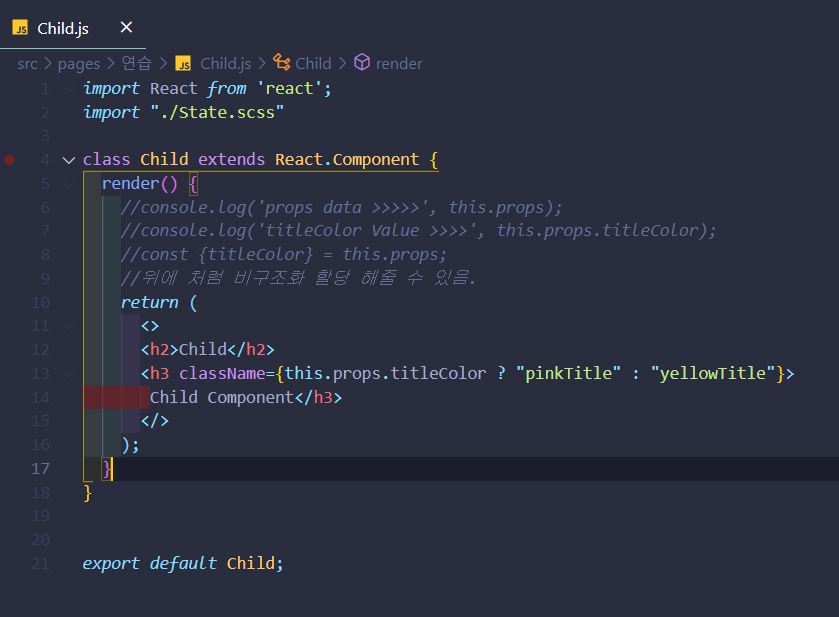
이번엔 child.js의 코드를 확인해보자.//현재 Child.js 임 import React from 'react'; class child extends React.Component { render() { //console.log(this.props); return ( <div> <h1 style={{color : this.props.titleColor}}> Child Component</h1> </div> ); } } export default State;
<Child />컴퍼넌트 내부에<h1>가 있다.
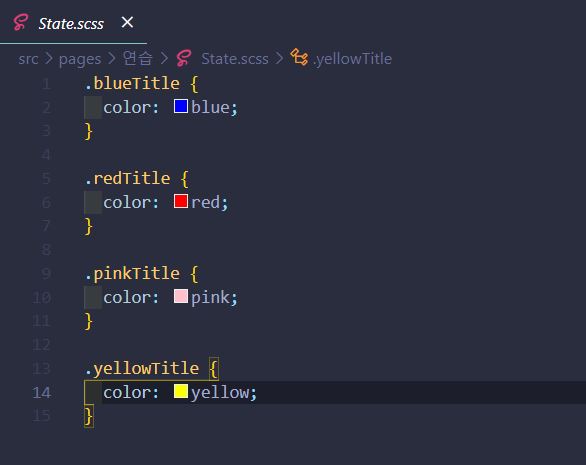
해당 태그의 글자 색상을 부모 컴퍼넌트의 state로 부터 전달 받은 데이터를 지정해줬음을 알 수 있다.render함수와return함수 사이에서this.props값을 콘솔로 확인할 수 있다.- 콘솔에서 보면, props 객체 안에 부모로부터 전달받은 데이터가 key-value 값의 형태로 담겨있음을 알 수 있다.
<h1 style={{color : this.props.titleColor}}>
  Child Component</h1>
//this : 해당 컴퍼넌트
//this.props : 해당 컴퍼넌트의 props 객체
//this.props.titleColor : props 객체의 특정 key 값,
                          //즉 'red'
컴퍼넌트 내부에서 부모 컴퍼넌트로부터 전달받은 props 데이터를 사용하기 위해서는 state 객체에 접근하는 것과 마찬가지로 props 객체의 특정 키 값인
this.props.titleColor로 작성하면 된다.
<Child/> 컴퍼넌트 안에 state의 속성값을 가져온 것을 볼 수 있다.
Child 컴퍼넌트에서 prop를 통하여 속성을 전달받은 것을 확인할 수 있다. 이게 바로 부모 컴퍼넌트로 부터 전달 받은 것. 그 데이터를 지닌 것이 props.
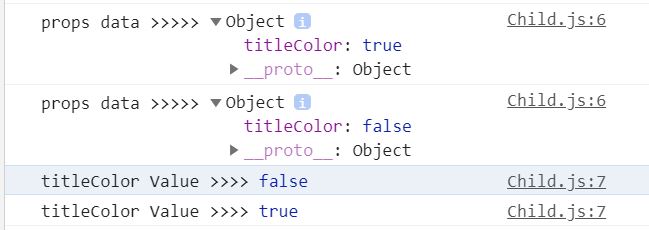
콘솔로 찍어서 확인해봤다. props 데이터는 객체임을 알 수 있고, props가 titleColor:true 를 가지고 왔음 또한 확인이 가능하다. true 와 false 가 연속으로 나온 것은 버튼을 클릭 할 경우 true / false 로 바뀔 때 색상을 바뀌게 했기 때문.
props 는 부모로 부터 데이터를 받아 전달하는 역할이므로 수정이 안된다.
props를 통한 event handler 전달
//Parent.js
import React from 'react';
import Child from '../Pages/Child/Child';
class Parent extends React.Copmponent {
  constructor() {
    super();
    this.state = {
      color: 'red'
    };
  }
  handleColor = () => {
    this.setState({
      color: 'blue'
    })
  }
  render() {
    return (
      <div>
        <h1>Parent Component</h1>
        <Child titleColor={this.state.color}
          changeColor={this.handleColor} />
        //handleColor 함수 자체를 넘겨주고 있음
        </div>
      );
  }
}
export default State;
props객체를 통해state데이터 뿐만 아니라 부모에서 정의한event handler함수도 넘겨줄 수 있다.props의changeColor값으로Parent함수에서 정의한handleColor함수 자체를 넘겨주고 있다.
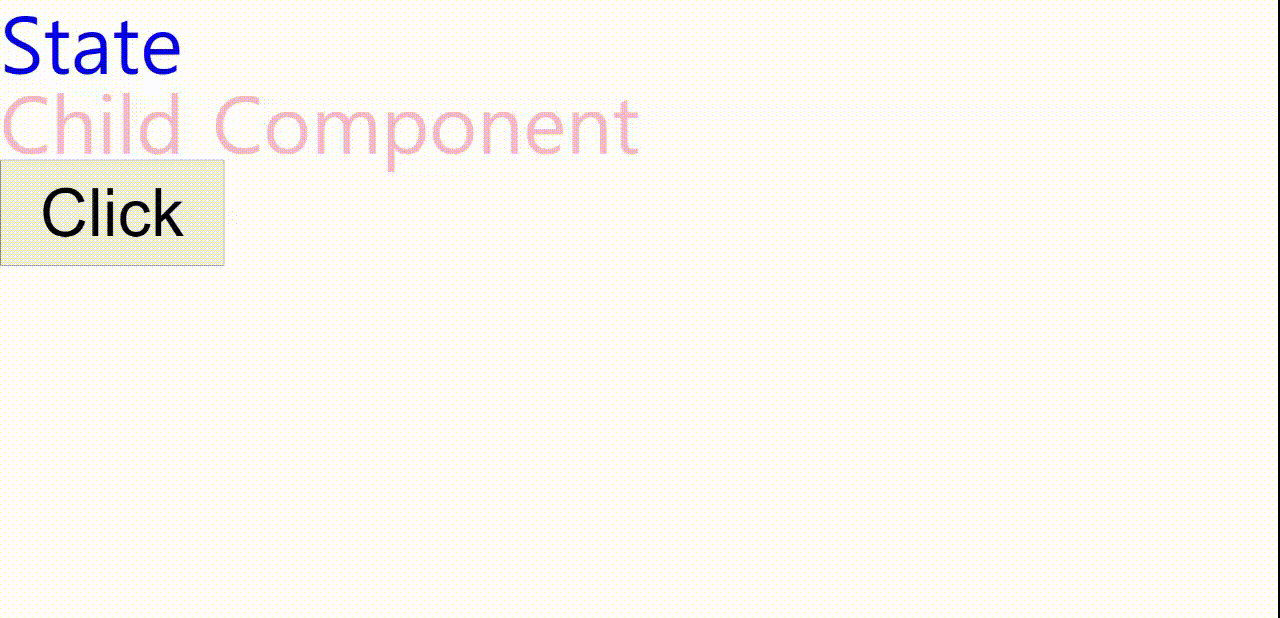
<Child />컴퍼넌트에서 어떻게 props로 전달받은 handleColor 함수를 활용하는지 보자.//Child.js import React from 'react'; class Child extends React.Component { render() { //console.log(this.props); return ( <div> <h1 style={{color : this.props.titleColor}}> Child Component</h1> <button onClick={this.props.changeColor}> Click</button> </div> ); } } export default State;
<Child />컴퍼넌트 내부에<button>태그가 있다.<button>요소에서onClick이벤트 발생 ->
이벤트 발생 시,this.props.changeColor실행 ->
props 객체의changeColor,
즉 부모 컴퍼넌트로 부터 받은handleColor함수 실행 -> 함수 실행 시setState함수 호출 ->
state의color값을 'blue' 로 변경 ->render함수 호출 ->
<Child />컴퍼넌트에 변경된 state 데이터(this.state.color) 전달
-> this.props.titleColor 를 글자 색상으로 지정하는<h1>타이틀 색상 변경.