
요약
- CSS
- calc
- position
- transition
- React
- webpack
CSS
calc
+나-등 사칙연산을 함수 안에 사용할 때는 기호 양옆에 공백을 넣어야 한다.
%를 px와 함께 연산할 수 있게 도와준다. 유용함
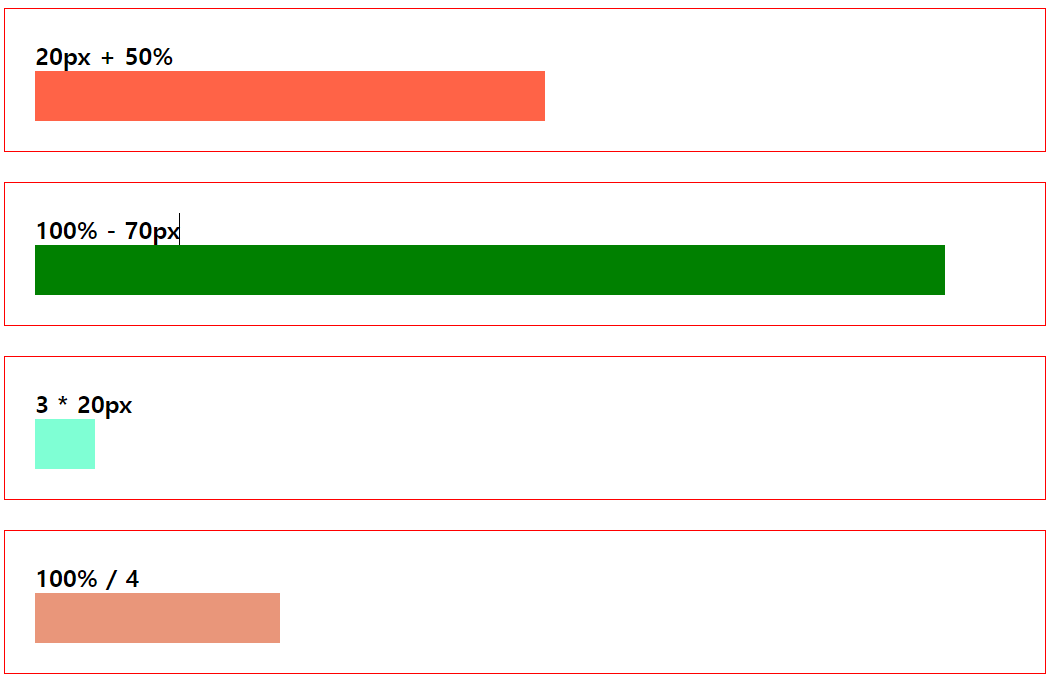
.item1{
	background-color: tomato;
	width: calc(20px + 50%);
	height: 50px;
}
.item2{
	background-color: green;
	width: calc(100% - 70px);
	height: 50px;
}
.item3{
	background-color: aquamarine;
	width:calc(3 * 20px);
	height: 50px;
}
.item4{
	background-color: darksalmon;
	width:calc(100% / 4);
	height: 50px;
}
위에서 정리한 flex와 calc를 활용해서 간단한 연습용 레이아웃을 만들었다.

flex로 기본적인 틀을 만든 다음에 calc를 사용해서 sidebar와 contents의 크기를 조절했다.
position
html요소가 뷰포트에 배치되는 방식을 결정한다.
position 배우기 전에 알아야 되는게 있는데
top, bottom, left, right를 알아야 한다. 해당 태그의 상위 태그 중 position:relative가 설정된 태그 기준으로 절대적인 위치를 지정할 수 있다.
- static(기본): top/bottom/left/right 적용할 수 없음
- relative: 위의것들 적용 가능
- absolute:
position: relative인 상위태그 기준으로 배치 - fixed: 뷰포트 절대값으로 고정됨. 스크롤 무시함
- sticky: 원래 위치에서 static처럼 보이지만 스크롤 내려가면 지정한 좌표에 고정됨
absolute
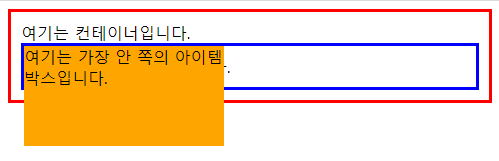
이건 absolute의 속성을 확인하기 위해서 만든 예제이다. container, wrapper, item이라는 div태그가 있을 때 item을 어떤 태그 기준으로 배치시킬지 정할 수 있다.
container와 wrapper position: relative를 줬고 item에 position: absolute를 줬다.
item기준 가장 가까이에 있는 상위태그인 wrapper 붙었다. 어떤 개념인지만 감을 잡았다.
.container{
	border: 3px solid red;
	padding:10px;
	position:relative;
}
.wrapper{
	border:3px solid blue;
	padding:10px;
	position:relative;
}
.item{
	background-color: orange;
	width: 200px;
	height: 100px;
	position: absolute;
	top:0;
	left:0;
}
z-index
position:static이면 적용되지 않음. 태그의 z축 위치를 결함. 워드로 치면 가장 앞에 배치, 가장 뒤에 배치 같은 느낌. position에서 기본값이 아닌 다른 값을 줘야 사용할 수 있다는거 기억하기.
기본 값은 auto이고 숫자로 된 값을 주게되면 항상 auto보다 위에 배치된다.
transition
AE의 베지어곡선과 비슷한 효과를 주는 옵션이다.
- transition-property: 어떤 요소에 효과를 줄 지 결정한다. 무수히 많은 속성값이 올 수 있다.
all도 있음 - transition-duration: 변화에 걸리는 시간을 결정한다.
- transition-timing-function: 어떤 속도로 변화할지 결정한다. 베지어곡선이랑 비슷함
- linear: 일정속도로 변화
- ease: 빠르게->늦게
- ease-in/out: 늦게->빠르게 / 빠르게->늦게 좀더 텐션 있음
- ease-in-out: 늦게->빠르게->늦게 변화
단축속성이 존재한다. 단축속성을 쓰면 여러 효과를 내가 원하는대로 지정할 수 있으므로 단축속성 순서 익히기
transition: property duration timing-function delay(생략가능)
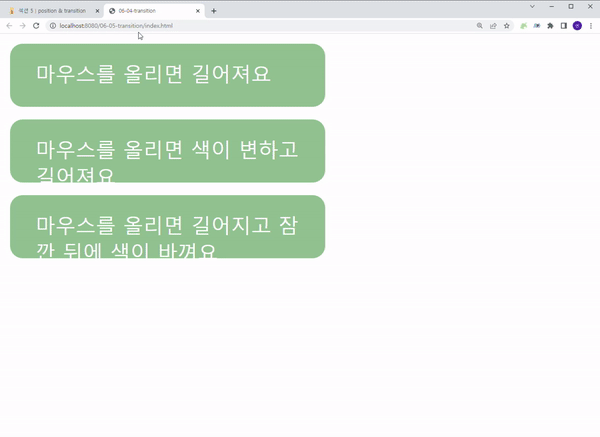
버튼 위에 마우스를 올렸을 때 트랜지션 단축속성을 이용해서 여러 효과를 적용해봤다.
<버튼 통합 css>
.box{
	background-color: darkseagreen;
	border-radius: 10px;
	color:white;
	width: 250px;
	height: 50px;
	padding: 13px 20px;
	margin-bottom:10px
}- 버튼 width 늘리기
.box1:hover{
	width: 350px;
	transition: width 0.4s ease-in-out;
}- 버튼 width 늘리면서 background-color 변경하기
.box2:hover{
	width: 350px;
	background-color: rgb(0, 139, 107);
	transition: all 0.4s ease-in-out;
}- 버튼 width 늘리고 잠시 뒤에 background-color 변경하기
.box3:hover{
	width:350px;
	background-color: rgb(0, 139, 107);
	transition: background-color 0.5s ease-in-out 0.5s, width 0.5s ease-in-out;
}
React
webpack
설정이 은근 복잡해서 노트랑 깃에 저장해놨다. 순서만 요약함
-
npm init
이름, 작성자, 권한 등 입력해야 하는데 이름과 작성자, 권한만 입력하면 된다. 이름과 작성자는 원하는 대로 입력하고 권한에는MIT입력 -
필요한 라이브러리 다운받기
npm i react react-dom
기본적인 react라이브러리는 개발자모드가 아니라 일반으로 install한다.
npm i -D webpack webpack-cli @babel/core @babel/preset-env @babel/preset-react babel-loader
- babel/env는 인터넷 환경 버전관리
- babel/react는 jsx를 읽는 기능이다.
-
필요한 파일 생성하기
webpack.config.js,client.js,index.html을 폴더 내에 생성한다.
가장 중요한 파트다. 생성한 파일에 환경 설정을 해야 한다. 필요한 라이브러리는 모두 다운받았기 때문에client.js와index.html은 원하는대로 설정하고webpack.config.js는 깃 참고해서 설정한다. -
package.json의 script부분에"dev": "webpack",을 입력한다.
이 스크립트 빼먹으면 터미널에서npm run dev했을 때 오류 난다. -
npm run dev로 웹팩을 실행시키고index.html파일을 연다.
설정 끝! 단계대로만 하면 금방 끝나는데 웹팩 환경설정이 좀 번거롭고 외워야할게 많다.