어느정도 CI/CD 구축이 끝났고 본격적인 개발의 첫 단추로 로그인 기능을 구현해보겠습니다.
Spring Security와 Redis Session을 이용한 로그인, 로그아웃, 회원가입 등을 개발해봅시다!
Spring Redis Session 설정
RedisConfig.java
@Configuration
@EnableRedisHttpSession
public class RedisConfig {

    @Value("${spring.redis.host}")
    private String host;

    @Value("${spring.redis.port}")
    private String port;

    @Bean
    public RedisConnectionFactory redisConnectionFactory() {
        RedisStandaloneConfiguration redisStandaloneConfiguration = new RedisStandaloneConfiguration();
        redisStandaloneConfiguration.setHostName(host);
        redisStandaloneConfiguration.setPort(Integer.parseInt(port));
        return new LettuceConnectionFactory(redisStandaloneConfiguration);
    }
}
@EnableRedisHttpSession 어노테이션을 통해 Redis를 세션저장소로 사용할 수 있도록 해줍니다.
maxInactiveIntervalInSeconds 속성을 통하여 세션 만료 기간을 설정할 수 있습니다. (default는 1800)
해당 설정 시 request를 받으면 session이 Redis에 저장되는 것을 확인할 수 있습니다.
Spring Security 설정
Spring MVC 혹은 프론트와의 API 통신에 대하여 인증/인가, 보안에 관련된 사항들을 편리하게 개발할 수 있게 만들어 주는 프레임워크인 Spring Security를 사용해봅시다!
Filter Chain 기반으로 동작하는 Spring Security인 만큼, 해당 부분을 먼저 살펴보겠습니다.
WebSecurityConfig
    @Bean
    public SecurityFilterChain filterChain(HttpSecurity http) throws Exception {
        http
            // Request
            .authorizeRequests()
            .requestMatchers(CorsUtils::isPreFlightRequest).permitAll()
            .antMatchers(
                "/users/login", "/users/register"
            ).permitAll()
            .anyRequest().hasAnyRole("USER")
            .and()
            // 사용하지 않는 필터
            .formLogin()
            .disable()
            .csrf()
            .disable()
            .headers()
            .disable()
            .httpBasic()
            .disable()
            .rememberMe()
            .disable()
            .logout()
            .disable()
            .sessionManagement()
            .sessionCreationPolicy(SessionCreationPolicy.STATELESS)
            .and()
            // 인증/인가 실패 Response
            .exceptionHandling()
            .authenticationEntryPoint(authenticationEntryPoint(objectMapper()))
            .accessDeniedHandler(accessDeniedHandler(objectMapper()))
            .and()
            // Redis Session
            .addFilterBefore(userAuthenticationFilter(),
                UsernamePasswordAuthenticationFilter.class)
            // CORS
            .cors().configurationSource(corsConfigurationSource());

        return http.build();
    }
우선 프론트가 분리된 환경이므로 Spring MVC에 관련된 필터들을 disable 해줍니다.
로그인 시 Session을 Redis에 저장하므로 세션을 통해 세션저장소에서 User의 권한을 가져오는 필터를 추가해야됩니다.
따라서 OncePerRequestFilter을 상속받는 UserAuthenticationFilter를 구현하여 Authentication과 관련한 첫 필터인 UsernamePasswordAuthenticationFilter 앞단에 추가합니다.
그 외에는 프론트에서 별도의 프록시 서버를 이용하지 않을 것이므로, CORS에 관련한 설정과 인가를 적용하지 않을 API, 인가를 적용할 API에 어떠한 Role이 있어야 하는지 설정하고, 필터에서 권한이 할당되지 않은 경우를 대비한 핸들러를 매핑합니다.
그럼 이제 세션을 통해 권한을 부여하는 UserAuthenticationFilter를 살펴보겠습니다.
UserAuthenticationFilter
public class UserAuthenticationFilter extends OncePerRequestFilter {


    @Override
    protected void doFilterInternal(HttpServletRequest request, HttpServletResponse response,
        FilterChain filterChain) throws ServletException, IOException {

        User user = (User) request.getSession().getAttribute(LOGIN_USER);

        if (!isNull(user)) {
            SecurityContextHolder.getContext().setAuthentication(user.makeAuthentication());
        }

        filterChain.doFilter(request, response);
    }
}
해당 필터에는 세션에서 User 객체를 꺼내옵니다.
만약 존재하지 않아 null이 반환되는 경우에는 권한을 부여하지 않고, 나머지 경우에는 커스텀한 UserAuthenticationToken을 시큐리티 컨텍스트에 넣어줍니다.
User
    public UserAuthenticationToken makeAuthentication() {
        List<GrantedAuthority> roles = new ArrayList<>();
        StringTokenizer st = new StringTokenizer(this.roles, ",");
        while (st.hasMoreTokens()) {
            roles.add(new SimpleGrantedAuthority(st.nextToken()));
        }

        return new UserAuthenticationToken(email, password, roles);
    }
사용자 도메인 객체에서는 자기 자신으로 권한을 만드는 메소드를 추가했습니다.
USER_ROLE 테이블을 따로 빼서 해당 사용자의 권한을 일대다로 매핑하는 ERD 설계도 고려해봤지만, 역정규화를 통해 ','로 권한을 구분지어 성능과 편의성을 챙기는게 좋다고 생각했습니다.
따라서 User에 role 필드를 추가했으며 권한 객체를 생성할 때 List로 분리하여 생성해줍니다.
CustomAuthenticationEntryPoint
@RequiredArgsConstructor
public class CustomAuthenticationEntryPoint implements AuthenticationEntryPoint {

    private final ObjectMapper objectMapper;

    @Override
    public void commence(HttpServletRequest request, HttpServletResponse response,
        AuthenticationException authException) throws IOException {
        response.setContentType("text/plain;charset=UTF-8");
        response.setStatus(HttpServletResponse.SC_UNAUTHORIZED);
        response.getWriter()
            .write(objectMapper.writeValueAsString(new ErrorResponse("로그인 인증 정보가 존재하지 않습니다.")));
        response.getWriter().flush();
        response.getWriter().close();
    }
}
CustomAccessDeniedHandler
@RequiredArgsConstructor
public class CustomAccessDeniedHandler implements AccessDeniedHandler {

    private final ObjectMapper objectMapper;

    @Override
    public void handle(HttpServletRequest request, HttpServletResponse response,
        AccessDeniedException accessDeniedException) throws IOException {
        response.setContentType("text/plain;charset=UTF-8");
        response.setStatus(HttpServletResponse.SC_FORBIDDEN);
        response.getWriter()
            .write(objectMapper.writeValueAsString(new ErrorResponse("API 호출에 필요한 권한이 없습니다.")));
        response.getWriter().flush();
        response.getWriter().close();
    }
}
필터 체인에서 인증이 없거나 해당 API에 대한 권한이 없는 경우를 핸들링할 CustomAuthenticationEntryPoint, CustomAccessDeniedHandler를 작성했습니다.
Spring Security에서 AuthenticationEntryPoint는 필터 체인 과정에서 Authentication을 얻지 못한 경우를, AccessDeniedHandler는 해당 API에 권한에 부합하지 않는 경우를 핸들링합니다.
WebSecurityConfig에서 Bean으로 등록하여 필터체인에 등록해줍니다.
회원가입
UserService.java
    // TODO: 이메일 인증 구현
    public String register(RegisterDto registerDto) {
        User newUser = User.createNewUser(passwordEncoder, registerDto);

        return userRepository.save(newUser.toEntity()).getNickname();
    }
User.java
    public static User createNewUser(PasswordEncoder passwordEncoder, RegisterDto registerDto) {
        String encryptedPassword = passwordEncoder.encode(registerDto.getPassword());

        return User.builder()
            .email(registerDto.getEmail())
            .password(encryptedPassword)
            .nickname(registerDto.getNickname())
            .roles(ROLE_USER)
            .build();
}UserService의 회원가입은 간단하게 작성했습니다.
Config에서 BCryptPasswordEncoder를 Bean으로 등록한 뒤 의존성을 주입 받아 사용합니다.
User 도메인의 정적 팩토리 메소드 패턴을 사용한 createNewUser()메소드에서 패스워드를 암호화하여 새로운 도메인 인스턴스를 생성합니다.
Entity로 변환 후 저장하고, 프론트에서 URL 파라미터로 쓰일 수 있는 닉네임을 반환합니다.
로그인
로그인은 다음과 같은 순서로 이루어집니다.
1. 프론트에서 email, password POST
2. email을 통해 Entity 가져오고 Domain 영역으로 변환
3. Domain 영역에서 비밀번호 검증
4. 비밀번호가 일치하면 Session에 User 객체 저장
민감한 데이터인 패스워드를 통신 과정에서 중간자 공격을 통해 빼앗길 수 있기 때문에, HTTPS 통신은 TODO에 넣어줍니다!
User 객체를 Redis Session으로 저장하기 위해선 직렬화가 필요하기 때문에 Serializable을 상속받아야 합니다.
User
@AllArgsConstructor
@Builder
public class User implements Serializable {
	// 생략
    public boolean isPasswordMatch(PasswordEncoder passwordEncoder, String password) {
        return passwordEncoder.matches(password, this.password);
    }
    // 생략
}
User 도메인에서 비밀번호 일치 여부 메소드를 구현하고 UserService에서 Session에 attribute를 설정합니다.
UserService
    @Transactional(readOnly = true)
    public String login(HttpSession session, LoginDto loginDto) {
        User user = userRepository.findByEmail(loginDto.getEmail())
            .orElseThrow(() -> new CustomException(ErrorCode.LOGIN_DENIED))
            .toDomain();

        if (!user.isPasswordMatch(passwordEncoder, loginDto.getPassword())) {
            throw new CustomException(ErrorCode.LOGIN_DENIED);
        }

        session.setAttribute(LOGIN_USER, user);

        return session.getId();
}HttpSession의 setAttribute로 현재 세션에 User 객체를 직렬화하여 넣어줍니다.
로그아웃
로그아웃은 세션을 제거하여 구현할 수 있지만, 세션은 인증 정보 외에도 활용할 수 있으므로 우선 attribute를 제거하여 구현하겠습니다.
UserService
    public void logout(HttpSession session) {
        session.removeAttribute(LOGIN_USER);
    }
테스트
Postman을 통하여 모든 과정이 잘 구현되었는지 확인해봅니다.

테스트를 위해 회원가입 요청을 보내고
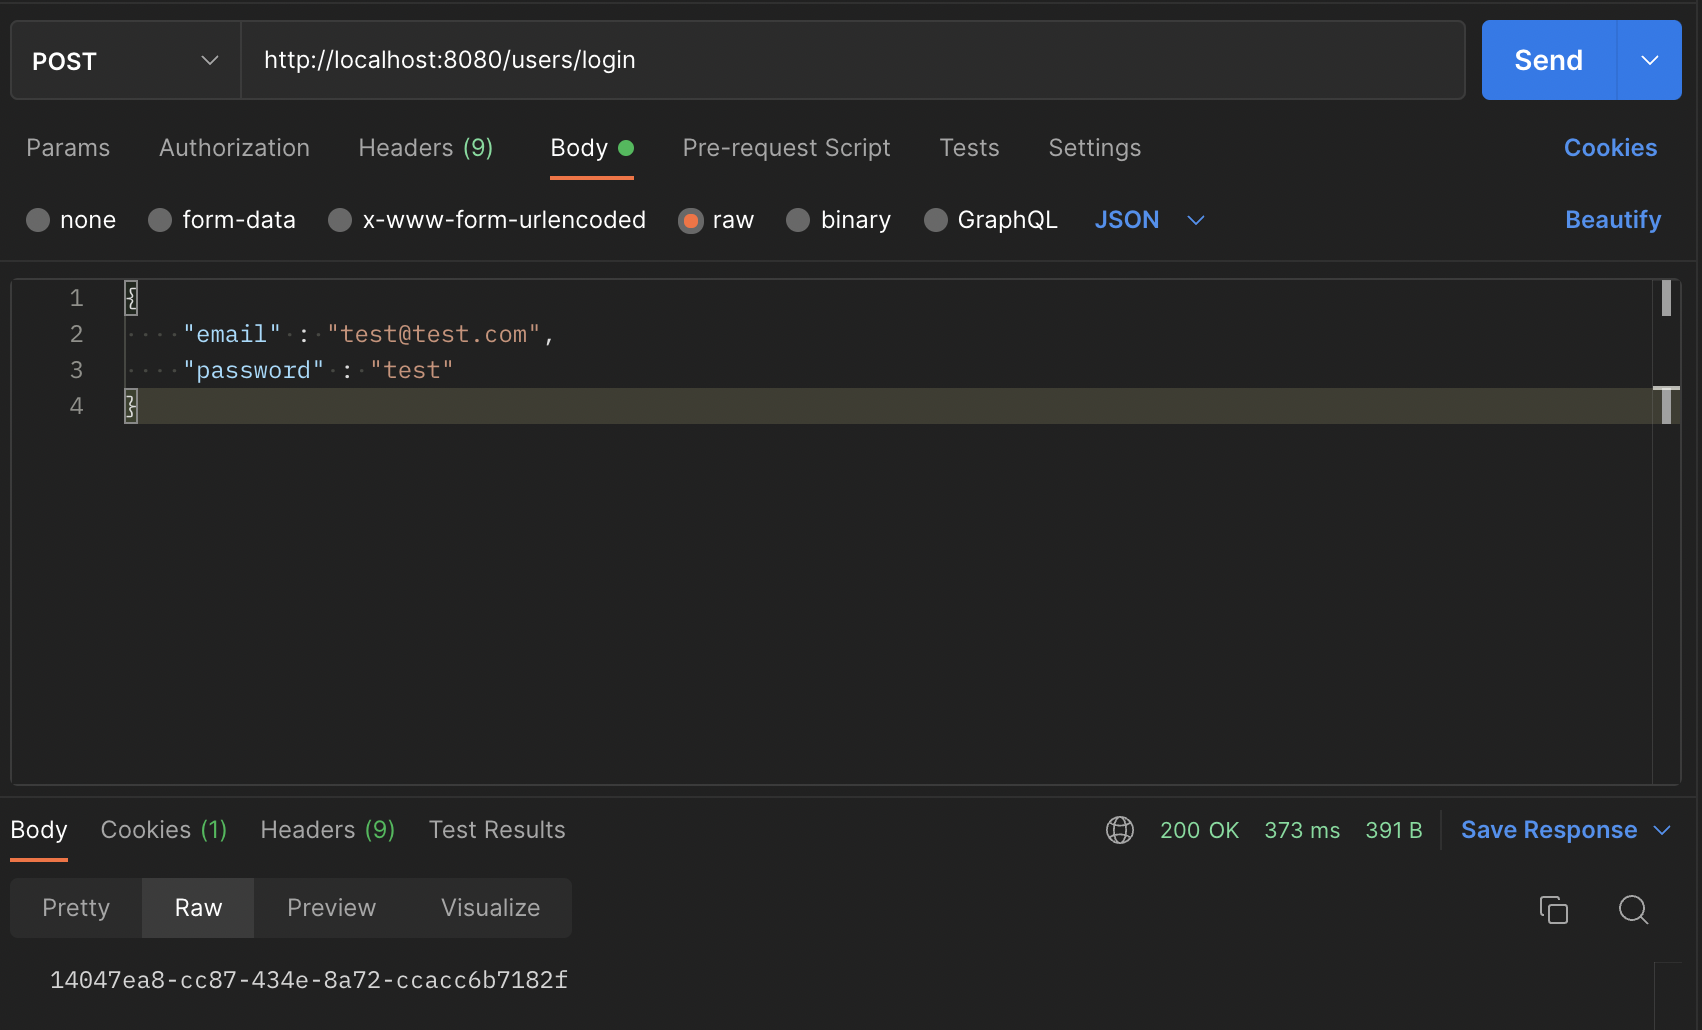
로그인을 통해 세션에 User 객체를 직렬화해서 넣어주면
UserController
@GetMapping("/test")
public ResponseEntity<String> test(HttpSession session) {
String result;
Object maybeUser = session.getAttribute(LOGIN_USER);
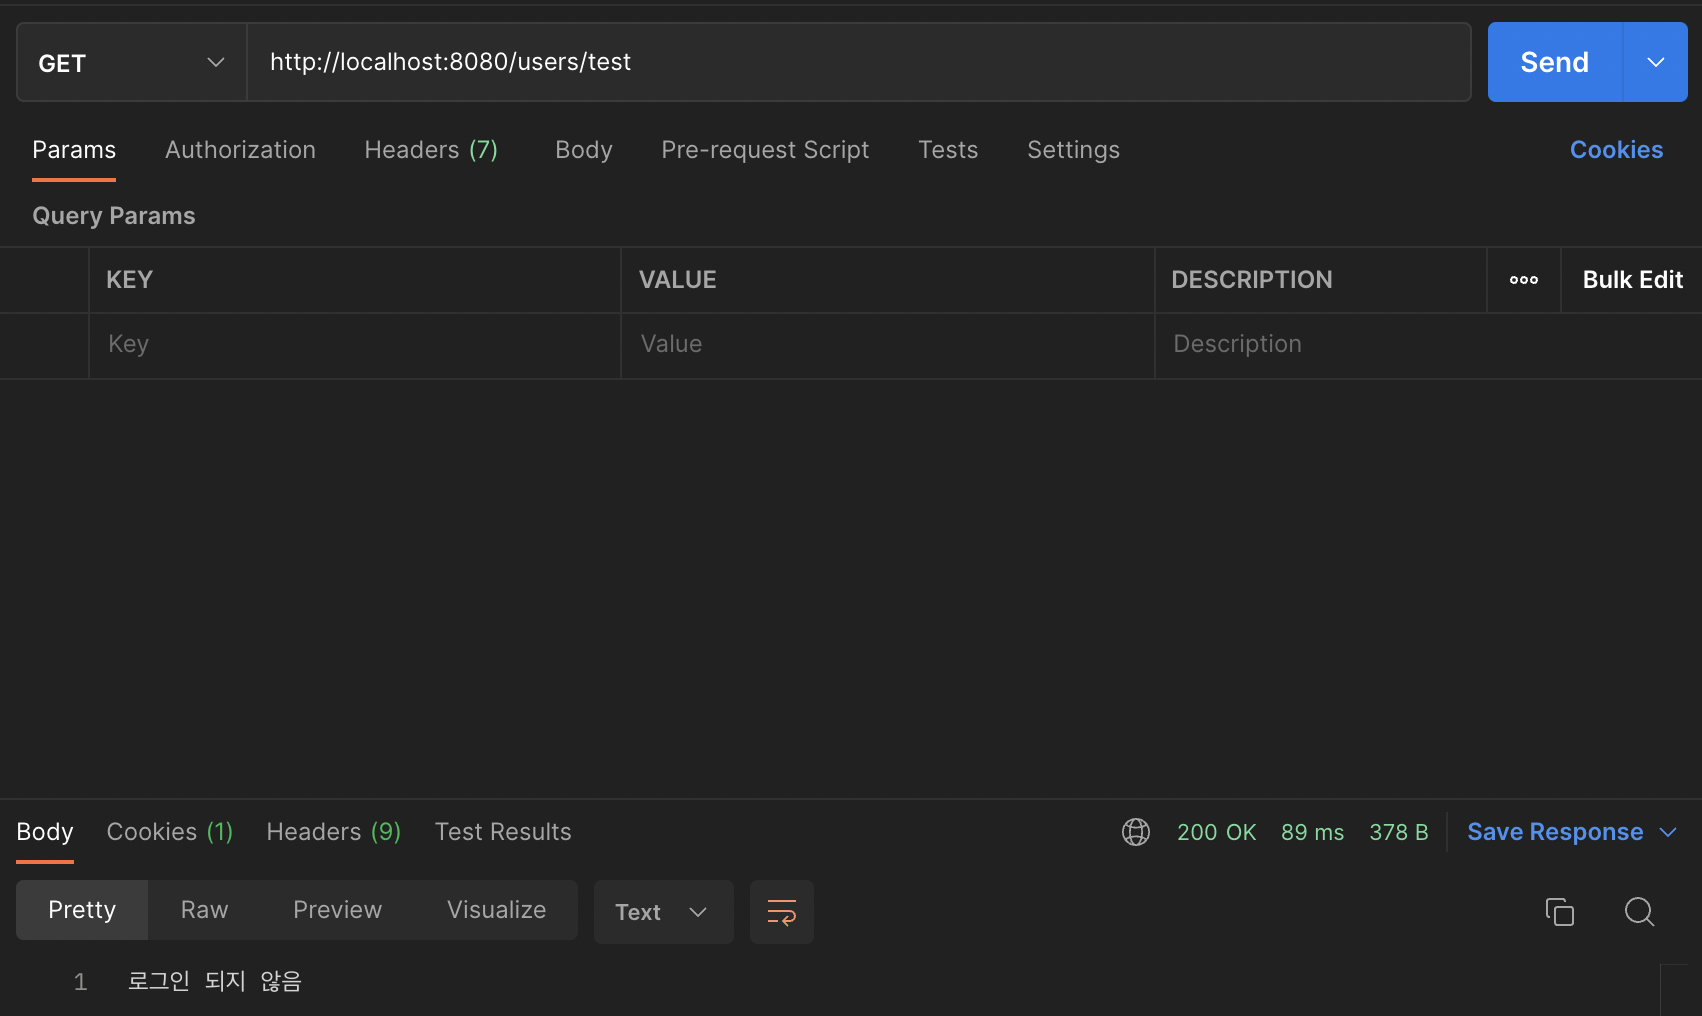
if (isNull(maybeUser)) {
result = "로그인 되지 않음";
} else {
result = ((User) maybeUser).toEntity().getEmail();
}
return ResponseEntity.ok(result);
}
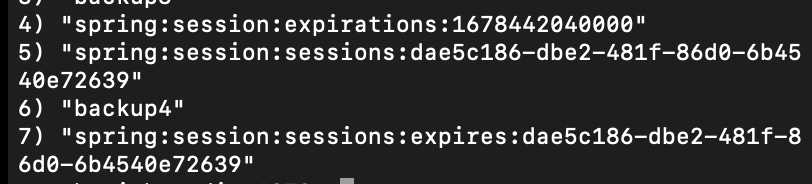
세션 저장소에 정상적으로 User 객체가 저장된 것을 확인할 수 있습니다.

UserController
    @PostMapping("/logout")
    public ResponseEntity<String> logout(HttpSession session, @AuthenticationPrincipal String principal) {
        log.info("로그아웃된 사용자 이메일 : {}", principal);
        session.invalidate();
        return ResponseEntity.ok().build();
    }
로그아웃은 인가가 필요한(ROLE_USER 권한) API이기 때문에 필터 체인 과정에서 Authentication이 잘 들어갔는지 컨트롤러에서 principal을 가져와 로그를 찍어주는 테스트를 진행합니다.

API 호출 시 커스텀한 필터가 잘 동작하는 것을 확인할 수 있습니다.
현재 세션에 대한 로그아웃 요청을 보내고 다시 세션 저장소를 확인하면...
로그아웃에 성공한 것을 확인할 수 있습니다.
필터 체인에 등록한 핸들러가 인증/인가가 없는 요청을 잘 핸들링하는지 확인해봅니다.

인증 정보가 없는 클라이언트의 API 호출의 경우 위와 같은 메시지를,

임시로 API의 접근 레벨을 ADMIN으로 올려 USER 권한의 사용자로 로그인하여 API 호출하면 위와 같은 메시지와 403을 확인할 수 있습니다.